
Ground Vehicles
T-34-85
III
Rank
AB
5.7
RB
5.7
SB
5.7
Battle rating

USSR
Research country
Medium tank
Main role
20,000

Research
135,000

Purchase
General information
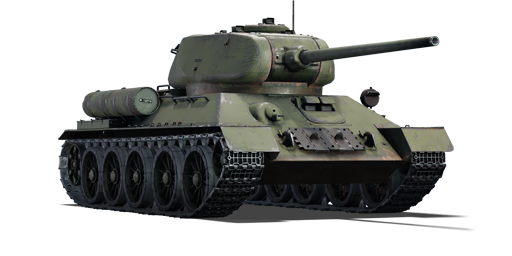
The T-34-85 is a Soviet medium tank. It was introduced during the Closed Beta Test for Ground Forces before Update 1.41. Though similar to the T-34-85 (D-5T), it has an improved gun and a full crew for combat efficiency.
The T-34-85 is an improvement over its predecessor, the T-34-85 (D-5T) with a better armament, a shorter reload time, APCR ammo, and an additional crew member. Aside from that, both tanks share the same technical specification.
The front hull armour is only 45 mm thick, even when sloped this is a pitiful amount of armour to fight with against the other vehicles at the same BR as every other tank gun can penetrate that armour. Thus if possible, do not prolong the exposure of the hull armour towards the enemy.
Camouflages
Survivability and armour
Armour
front / side / back
Hull
45 / 45 / 45 mm
Turret
90 / 75 / 52 mm
Visibility
100 %
Crew
5 persons
Mobility
Max speed
Forward
5561 km/h
Backward
89 km/h
Power-to-weight ratio
15.413.729.424.1 hp/t
Engine power
500442954775 hp
Weight
32.432.232.432.2 t
Optics
Gunner
Commander
Driver
Optics zoom
3.8x–4.0x
—
—
Armaments
85 mm ZIS-S-53 cannon
Ammunition
60 rounds
First-order
20 rounds
Reload
basic crew → aces
9.6 → 7.4 s
Vertical guidance
-5 / 22°
Turret Rotation Speed
basic crew → aces
Horizontal
17.514.932.923.8 → 2521.347.134 °/s
Vertical
2.82.29.86.3 → 43.2149 °/s
| Ammunition | Type | Armor penetration (mm) at a distance: | |||||
|---|---|---|---|---|---|---|---|
| 10 m | 100 m | 500 m | 1000 m | 1500 m | 2000 m | ||
| APHE | 148 | 143 | 126 | 106 | 90 | 77 | |
| HE | 19 | 18 | 17 | 16 | 15 | 14 | |
| APHEBC | 135 | 133 | 124 | 114 | 104 | 95 | |
| APCR | 195 | 187 | 154 | 122 | 96 | 76 | |
7.62 mm DT machine gun (coaxial)
Ammunition
1,890 rounds
Belt capacity
63 rounds
Reload
basic crew → aces
10.4 → 8 s
Fire rate
600 shots/min
| Belt | Belt filling | Armor penetration (mm) at a distance: | |||||
|---|---|---|---|---|---|---|---|
| 10 m | 100 m | 500 m | 1000 m | 1500 m | 2000 m | ||
| AP-I/API-T | 13 | 12 | 7 | 3 | 2 | 0 | |
Economy
Repair cost
Basic → Reference
AB
1,582 → 2,110
RB
1,878 → 2,505
SB
2,430 → 3,242
Crew training
39,000
Experts
135,000
Aces
550 
Research Aces
390,000
Reward multiplier
AB / RB / SB
90 / 140 / 160 %
154 %
Total cost of modifications
34,400
67,200
Talisman cost
1,300
Research order:
Mobility | |
|---|---|
Protection |
|---|
Firepower | |
|---|---|
Rating by players
You must play more than 3 battles for the last week and more than 10 battles in a vehicle to rate it.
Like:
158
Armor protection:
Not enough ratings
Survivability:
Not enough ratings
Mobility:
Not enough ratings
Armament:
Not enough ratings
Balance:
Not enough ratings
Features & Facts
This space is currently empty
Do you know any interesting vehicle features?
Loading...

No articles about this vehicle yet
Become the first author and get rewards!
Write a guide, tell about interesting historical facts, make a tutorial or simply an interesting post.
No more content