Difference between revisions of "M36 GMC (China)"
(→Pros and cons) (Tag: Visual edit) |
(→Ammunition) |
||
| (21 intermediate revisions by 9 users not shown) | |||
| Line 1: | Line 1: | ||
| − | {{Specs-Card|code=cn_m36}} | + | {{About |
| + | | about = tank destroyer '''{{PAGENAME}}''' | ||
| + | |usage = other versions | ||
| + | |link = M36 Jackson (Family) | ||
| + | }} | ||
| + | {{Specs-Card | ||
| + | |code=cn_m36 | ||
| + | |images={{Specs-Card-Image|GarageImage_{{PAGENAME}}.jpg}} | ||
| + | }} | ||
== Description == | == Description == | ||
<!-- ''In the description, the first part should be about the history of the creation and combat usage of the vehicle, as well as its key features. In the second part, tell the reader about the ground vehicle in the game. Insert a screenshot of the vehicle, so that if the novice player does not remember the vehicle by name, he will immediately understand what kind of vehicle the article is talking about.'' --> | <!-- ''In the description, the first part should be about the history of the creation and combat usage of the vehicle, as well as its key features. In the second part, tell the reader about the ground vehicle in the game. Insert a screenshot of the vehicle, so that if the novice player does not remember the vehicle by name, he will immediately understand what kind of vehicle the article is talking about.'' --> | ||
| − | |||
| − | |||
The '''{{Specs|name}}''' is a rank {{Specs|rank}} Chinese tank destroyer {{Battle-rating}}. It was introduced in [[Update 1.91 "Night Vision"]]. | The '''{{Specs|name}}''' is a rank {{Specs|rank}} Chinese tank destroyer {{Battle-rating}}. It was introduced in [[Update 1.91 "Night Vision"]]. | ||
| + | |||
| + | A version of the American [[M36 GMC]] in the Chinese tech tree, the vehicle shares identical characteristics. The only major differences is the Chinese M36 does not possess the M304 APCR shot round available to the American M36 GMC. | ||
== General info == | == General info == | ||
=== Survivability and armour === | === Survivability and armour === | ||
| + | {{Specs-Tank-Armour}} | ||
<!-- ''Describe armour protection. Note the most well protected and key weak areas. Appreciate the layout of modules as well as the number and location of crew members. Is the level of armour protection sufficient, is the placement of modules helpful for survival in combat? If necessary use a visual template to indicate the most secure and weak zones of the armour.'' --> | <!-- ''Describe armour protection. Note the most well protected and key weak areas. Appreciate the layout of modules as well as the number and location of crew members. Is the level of armour protection sufficient, is the placement of modules helpful for survival in combat? If necessary use a visual template to indicate the most secure and weak zones of the armour.'' --> | ||
'''Armour type:''' | '''Armour type:''' | ||
| Line 16: | Line 25: | ||
{| class="wikitable" | {| class="wikitable" | ||
| − | !Armour | + | ! Armour !! Front !! Sides !! Rear !! Roof |
| − | !Front | ||
| − | !Sides | ||
| − | !Rear | ||
| − | !Roof | ||
|- | |- | ||
| − | |Hull | + | | Hull || 38.1 mm (56°) ''Front glacis'' <br> 50.8-107.8 (9-63°) ''Transmission housing'' || 19.05 mm (37°) ''Top'' <br> 25.4 mm ''Bottom'' || 19.05 mm (42°) ''Top'' <br> 19.05 (1-45°) ''Bottom'' || 19.5 mm ''Front roof'' <br> 9.5 mm ''Engine deck'' |
| − | |38.1 mm (56°) | + | |- |
| − | 50.8-107.8 (9-63°) | + | | Turret || 31.75 mm (2-53°) ''Turret front'' <br> 76.2 mm (°) ''Gun mantlet'' || 31.75 mm (0-21°) || 25.4 mm (2-23°) |
| − | |19.05 mm (37°) | + | ! |
| − | 25.4 | ||
| − | |19.05 mm (42°) | ||
| − | 19.05 (1-45°) | ||
| − | |19.5 | ||
| − | 9.5 | ||
|- | |- | ||
| − | |||
| − | |||
| − | |||
| − | |||
| − | |||
| − | |||
|} | |} | ||
'''Notes:''' | '''Notes:''' | ||
| Line 46: | Line 40: | ||
=== Mobility === | === Mobility === | ||
| + | {{Specs-Tank-Mobility}} | ||
<!-- ''Write about the mobility of the ground vehicle. Estimate the specific power and manoeuvrability, as well as the maximum speed forwards and backwards.'' --> | <!-- ''Write about the mobility of the ground vehicle. Estimate the specific power and manoeuvrability, as well as the maximum speed forwards and backwards.'' --> | ||
{{tankMobility|abMinHp=710|rbMinHp=442}} | {{tankMobility|abMinHp=710|rbMinHp=442}} | ||
| + | |||
| + | === Modifications and economy === | ||
| + | {{Specs-Economy}} | ||
== Armaments == | == Armaments == | ||
| + | {{Specs-Tank-Armaments}} | ||
=== Main armament === | === Main armament === | ||
| + | {{Specs-Tank-Weapon|1}} | ||
<!-- ''Give the reader information about the characteristics of the main gun. Assess its effectiveness in a battle based on the reloading speed, ballistics and the power of shells. Do not forget about the flexibility of the fire, that is how quickly the cannon can be aimed at the target, open fire on it and aim at another enemy. Add a link to the main article on the gun: <code><nowiki>{{main|Name of the weapon}}</nowiki></code>. Describe in general terms the ammunition available for the main gun. Give advice on how to use them and how to fill the ammunition storage.'' --> | <!-- ''Give the reader information about the characteristics of the main gun. Assess its effectiveness in a battle based on the reloading speed, ballistics and the power of shells. Do not forget about the flexibility of the fire, that is how quickly the cannon can be aimed at the target, open fire on it and aim at another enemy. Add a link to the main article on the gun: <code><nowiki>{{main|Name of the weapon}}</nowiki></code>. Describe in general terms the ammunition available for the main gun. Give advice on how to use them and how to fill the ammunition storage.'' --> | ||
{{main|M3 (90 mm)}} | {{main|M3 (90 mm)}} | ||
| − | The | + | The 90 mm cannon on the M36 is great at its BR. The stock AP has good penetration but lacks damage, so it is recommended to quickly unlock the APCBC which is superior in every aspect. |
{| class="wikitable" style="text-align:center" width="100%" | {| class="wikitable" style="text-align:center" width="100%" | ||
| Line 74: | Line 74: | ||
==== Ammunition ==== | ==== Ammunition ==== | ||
| − | { | + | {{:M3 (90 mm)/Ammunition|M77 shot, M82 shot (T25), M71 shell, M313}} |
| − | |||
| − | |||
| − | |||
| − | |||
| − | |||
| − | |||
| − | |||
| − | |||
| − | | M77 shot | ||
| − | |||
| − | |||
| − | |||
| − | |||
| − | |||
| − | |||
| − | |||
| − | |||
| − | |||
| − | |||
| − | |||
| − | |||
| − | |||
| − | |||
| − | |||
| − | |||
| − | |||
| − | |||
| − | |||
| − | |||
| − | |||
| − | |||
| − | |||
| − | |||
| − | |||
| − | |||
| − | |||
| − | |||
| − | |||
| − | |||
| − | |||
| − | |||
| − | |||
| − | |||
| − | |||
| − | |||
| − | |||
| − | |||
| − | |||
| − | |||
| − | |||
==== [[Ammo racks]] ==== | ==== [[Ammo racks]] ==== | ||
| − | + | [[File:Ammoracks_M36_GMC.png|right|thumb|x250px|[[Ammo racks]] of the {{PAGENAME}}]] | |
{| class="wikitable" style="text-align:center" | {| class="wikitable" style="text-align:center" | ||
|- | |- | ||
| Line 139: | Line 89: | ||
! Visual<br>discrepancy | ! Visual<br>discrepancy | ||
|- | |- | ||
| − | | '''47''' || | + | | '''47''' || 39 ''(+8)'' || 30 ''(+17)'' || 21 ''(+26)'' || 12 ''(+35)'' || 7 ''(+40)'' || 1 ''(+46)'' || No |
|- | |- | ||
|} | |} | ||
| + | '''Notes''': | ||
| + | |||
| + | * Recommended load is 21 ''(+26)'' shells to remove most ammo from the hull. | ||
| + | * Racks 5 and 6 are ready racks and take priority in being filled as well as depleted. | ||
| + | * Full reload speed will be realized as long as ammo exists in either ready racks. If both ready racks are empty, a penalty to reload speed will occur. | ||
| + | * Simply not firing when the main gun is loaded will load ammo from racks 1 to 4 into 5 then 6, as long as there is ammo present in racks 1 to 4. Firing the main gun will interrupt the loading of the ready racks. | ||
=== Machine guns === | === Machine guns === | ||
| + | {{Specs-Tank-Weapon|2}} | ||
<!-- ''Offensive and anti-aircraft machine guns not only allow you to fight some aircraft but also are effective against lightly armoured vehicles. Evaluate machine guns and give recommendations on its use.'' --> | <!-- ''Offensive and anti-aircraft machine guns not only allow you to fight some aircraft but also are effective against lightly armoured vehicles. Evaluate machine guns and give recommendations on its use.'' --> | ||
{{main|M2HB (12.7 mm)}} | {{main|M2HB (12.7 mm)}} | ||
| Line 159: | Line 116: | ||
== Usage in battles == | == Usage in battles == | ||
<!-- ''Describe the tactics of playing in the vehicle, the features of using vehicles in the team and advice on tactics. Refrain from creating a "guide" - do not impose a single point of view but instead give the reader food for thought. Describe the most dangerous enemies and give recommendations on fighting them. If necessary, note the specifics of the game in different modes (AB, RB, SB).'' --> | <!-- ''Describe the tactics of playing in the vehicle, the features of using vehicles in the team and advice on tactics. Refrain from creating a "guide" - do not impose a single point of view but instead give the reader food for thought. Describe the most dangerous enemies and give recommendations on fighting them. If necessary, note the specifics of the game in different modes (AB, RB, SB).'' --> | ||
| − | + | Playstyle with the M36 should be about the same as the [[M10 GMC]]. The speed is slightly better and armour is still just as thin, but it has an improved turret traverse rate and a 90 mm gun, making it able to engage targets much easier. The playstyle is also similar to the M18, since they have the same concept - speed and manoeuvrability with a powerful armament. | |
The greatest advantages of the M36 are its speed and its armament. As such, the best course of action is to make use of the speed to get to good early game positions on the map. The 90 mm gun is powerful at its BR, and it can penetrate many tanks at its BR from the front. But, this is not the case for more heavily armoured targets such as those in the IS series or the Panther series, but it can reliably kill every tank at its BR from the side in 1 to 2 shots because of the high explosive filler in the APCBC round. In addition, most enemy tanks can reliably penetrate you from the front, as the M36 does not have thick armour. Your armour can only protect you when a shell hits it at an extreme angle, or against low penetration weapons, such as those one some anti-aircraft vehicles. All of these factors mean that the M36 should never engage enemy tanks from the front, unless they are preoccupied with a friendly vehicle or not looking in your direction, but the M36 should engage enemies from the side. As such, the M36's mobility should be used to get to positions that the enemy would not expect where it will be able to shoot the enemy in the side before they even realize you are there. The M36 can also use its mobility to flank effectively. If an enemy knows your location and has an operational gun, you should not push out into their line of fire, as they are likely to come of better than you. If an enemy is likely to be able to shoot you, do not chance it, as only one shot will often knock out or disable the M36. | The greatest advantages of the M36 are its speed and its armament. As such, the best course of action is to make use of the speed to get to good early game positions on the map. The 90 mm gun is powerful at its BR, and it can penetrate many tanks at its BR from the front. But, this is not the case for more heavily armoured targets such as those in the IS series or the Panther series, but it can reliably kill every tank at its BR from the side in 1 to 2 shots because of the high explosive filler in the APCBC round. In addition, most enemy tanks can reliably penetrate you from the front, as the M36 does not have thick armour. Your armour can only protect you when a shell hits it at an extreme angle, or against low penetration weapons, such as those one some anti-aircraft vehicles. All of these factors mean that the M36 should never engage enemy tanks from the front, unless they are preoccupied with a friendly vehicle or not looking in your direction, but the M36 should engage enemies from the side. As such, the M36's mobility should be used to get to positions that the enemy would not expect where it will be able to shoot the enemy in the side before they even realize you are there. The M36 can also use its mobility to flank effectively. If an enemy knows your location and has an operational gun, you should not push out into their line of fire, as they are likely to come of better than you. If an enemy is likely to be able to shoot you, do not chance it, as only one shot will often knock out or disable the M36. | ||
| Line 173: | Line 130: | ||
One thing to note: if there is an enemy plane in the vicinity, getting to cover is a priority as the turret is open topped, and a plane can kill all three turret crew in one pass with only low-calibre machine guns. | One thing to note: if there is an enemy plane in the vicinity, getting to cover is a priority as the turret is open topped, and a plane can kill all three turret crew in one pass with only low-calibre machine guns. | ||
| − | |||
| − | |||
| − | |||
| − | |||
| − | |||
| − | |||
| − | |||
| − | |||
| − | |||
| − | |||
| − | |||
| − | |||
| − | |||
| − | |||
| − | |||
| − | |||
| − | |||
| − | |||
| − | |||
| − | |||
| − | |||
| − | |||
| − | |||
| − | |||
| − | |||
| − | |||
| − | |||
| − | |||
| − | |||
| − | |||
| − | |||
| − | |||
| − | |||
| − | |||
| − | |||
| − | |||
| − | |||
=== Pros and cons === | === Pros and cons === | ||
| Line 216: | Line 136: | ||
'''Pros:''' | '''Pros:''' | ||
| − | * Easily achieves its top speed of 42 km/h regardless of the | + | * Easily achieves its top speed of 42 km/h regardless of the terrain, allowing it to get to most positions in good time |
| − | * Excellent firepower | + | * Excellent firepower; easily penetrates and knocks out most opponents like the [[Tiger H1]], Pz.IV 70 and the [[M4 Sherman (Family)|Shermans]], combined with its 5x scope magnification it is a deadly sniper |
* 10° gun depression provides great terrain adaptation. | * 10° gun depression provides great terrain adaptation. | ||
* Around 16°/sec of turret rotation is adequate to respond to surprise attacks | * Around 16°/sec of turret rotation is adequate to respond to surprise attacks | ||
| Line 224: | Line 144: | ||
'''Cons:''' | '''Cons:''' | ||
| − | * Only 5 km/h of reverse speed can get the player killed sometimes | + | * Only 5 km/h of reverse speed can get the player killed sometimes |
| − | * Weak armour overall | + | * Weak armour overall, can die from artillery strikes or small bombs |
* Open topped, vulnerable to aircraft attacks | * Open topped, vulnerable to aircraft attacks | ||
| − | * Quite big and tall for a tank destroyer | + | * Quite big and tall for a tank destroyer- harder to hide |
| − | * Does not have access to the better APCR | + | * Does not have access to the better APCR like the American one |
| − | |||
== History == | == History == | ||
| − | ''Describe the history of the creation and combat usage of the vehicle in more detail than in the introduction. If the historical reference turns out to be too long, take it to a separate article, taking a link to the article about the vehicle and adding a block "/History" (example: <nowiki>https://wiki.warthunder.com/(Vehicle-name)/History</nowiki>) and add a link to it here using the <code>main</code> template. Be sure to reference text and sources by using <code><nowiki><ref></ref></nowiki></code>, as well as adding them at the end of the article with <code><nowiki><references /></nowiki></code>. This section may also include the vehicle's dev blog entry (if applicable) and the in-game encyclopedia description (under <code><nowiki>=== In-game description ===</nowiki></code>, also if applicable).'' | + | <!-- ''Describe the history of the creation and combat usage of the vehicle in more detail than in the introduction. If the historical reference turns out to be too long, take it to a separate article, taking a link to the article about the vehicle and adding a block "/History" (example: <nowiki>https://wiki.warthunder.com/(Vehicle-name)/History</nowiki>) and add a link to it here using the <code>main</code> template. Be sure to reference text and sources by using <code><nowiki><ref></ref></nowiki></code>, as well as adding them at the end of the article with <code><nowiki><references /></nowiki></code>. This section may also include the vehicle's dev blog entry (if applicable) and the in-game encyclopedia description (under <code><nowiki>=== In-game description ===</nowiki></code>, also if applicable).'' --> |
| + | {{main|M36_GMC#History|l1=History of the M36 GMC}} | ||
| + | |||
| + | === ROCA Service === | ||
| + | Under known documentations, the PLA nor ROCA received the M36 GMC <small>(but PLA did captured one during the Korean War as PVA [People's Voluntary Army] in 1951, now displayed in Beijing)</small>, however the ROCA have received the [[M36B2_(France)|M36B2]] variant from France. | ||
| + | |||
| + | As part of the retreat from Vietnam due to the total loss of French Indo-China, 8 of the M36B2 of the French Army were returned to USA and then handed to ROCA in 1955 to the '''3rd Armored Artillery Company, 600th Field Artillery Group''' of '''Kinmen Defense Command''' as a part of the emergency military aid against the ongoing artillery war between ROCA and PLA at costal Xiamen/Kinmen. They were positioned into fortified position with a slope for better trajectory against PLA targets on the other side of the Xiamen Bay. A memoir from a ROCA veteran claimed that one of these M36B2 took down a PLA broadcast station while records from ROCA have recorded losses of two M36B2 during the war.<ref>https://a2928796.pixnet.net/blog/post/289486502-%E9%87%91%E9%96%80%E7%9A%84m36</ref> The remaining of these M36s were likely decommissioned in 2000 as some photo suggests that two of them were still in commission as late as 2001. | ||
| + | |||
| + | All the remaining 6 tanks are currently in Taichung (at Chenggongling Training Facility), Hsinchu (in ROCA Armor Training Command at Hukou Township; a theme park at Xinfeng Township respectively), Kaohsiung (ROCMC School at Zuoying) and 3 on Kinmen (2 are still in their combat fortifications while the remaining known one is at the Rushan Fort [乳山故壘] tank walkway<ref>https://blog.xuite.net/b0917581040191/twblog/176510695</ref>) | ||
== Media == | == Media == | ||
| − | ''Excellent additions to the article would be video guides, screenshots from the game, and photos.'' | + | <!-- ''Excellent additions to the article would be video guides, screenshots from the game, and photos.'' --> |
| + | |||
| + | ;Skins | ||
| + | * [https://live.warthunder.com/feed/camouflages/?vehicle=cn_m36 Skins and camouflages for the {{PAGENAME}} from live.warthunder.com.] | ||
== See also == | == See also == | ||
| − | ''Links to the articles on the War Thunder Wiki that you think will be useful for the reader, for example:'' | + | <!-- ''Links to the articles on the War Thunder Wiki that you think will be useful for the reader, for example:'' |
| + | * ''reference to the series of the vehicles;'' | ||
| + | * ''links to approximate analogues of other nations and research trees.'' --> | ||
| − | * | + | ;Vehicles equipped with the same chassis |
| − | * | + | * [[M36 Jackson (Family)]], except the M36B1 |
| + | * [[M10 (Family)]] | ||
== External links == | == External links == | ||
| − | ''Paste links to sources and external resources, such as:'' | + | <!--''Paste links to sources and external resources, such as:'' |
| + | * ''topic on the official game forum;'' | ||
| + | * ''other literature.''--> | ||
| − | + | ===References=== | |
| − | + | ;Citations: | |
| − | + | <references/> | |
| + | {{TankManufacturer Ordnance Department}} | ||
{{China tank destroyers}} | {{China tank destroyers}} | ||
Revision as of 18:57, 24 January 2023
| This page is about the tank destroyer M36 GMC (China). For other versions, see M36 Jackson (Family). |
.jpg)
Contents
Description
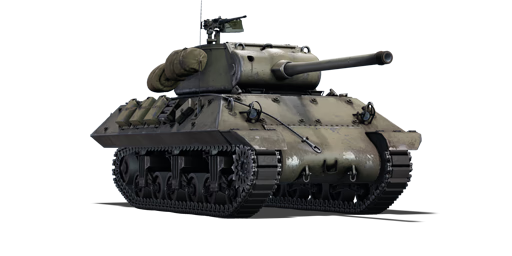
The ␗90-mm Gun Motor Carriage M36 is a rank IV Chinese tank destroyer with a battle rating of 5.3 (AB/RB/SB). It was introduced in Update 1.91 "Night Vision".
A version of the American M36 GMC in the Chinese tech tree, the vehicle shares identical characteristics. The only major differences is the Chinese M36 does not possess the M304 APCR shot round available to the American M36 GMC.
General info
Survivability and armour
Armour type:
- Rolled homogeneous armour
- Cast homogeneous armour (Gun mantlet, Transmission area)
| Armour | Front | Sides | Rear | Roof |
|---|---|---|---|---|
| Hull | 38.1 mm (56°) Front glacis 50.8-107.8 (9-63°) Transmission housing |
19.05 mm (37°) Top 25.4 mm Bottom |
19.05 mm (42°) Top 19.05 (1-45°) Bottom |
19.5 mm Front roof 9.5 mm Engine deck |
| Turret | 31.75 mm (2-53°) Turret front 76.2 mm (°) Gun mantlet |
31.75 mm (0-21°) | 25.4 mm (2-23°) |
Notes:
- Tracks are 30 mm thick, bogies are 10 mm thick while the wheels are 20 mm thick.
- Small slivers of 5 mm armour hang off the top side hull armour, giving minuscule protections at those areas.
- Track blocks on the side hull armour allows an extra 30 mm of armour at their locations.
Mobility
| Game Mode | Max Speed (km/h) | Weight (tons) | Engine power (horsepower) | Power-to-weight ratio (hp/ton) | |||
|---|---|---|---|---|---|---|---|
| Forward | Reverse | Stock | Upgraded | Stock | Upgraded | ||
| Arcade | 46 | 6 | 28.1 | 710 | 954 | 25.27 | 33.95 |
| Realistic | 42 | 6 | 442 | 500 | 15.73 | 17.79 | |
Modifications and economy
| Mobility | Protection | Firepower | ||||||||||||||||||||
|---|---|---|---|---|---|---|---|---|---|---|---|---|---|---|---|---|---|---|---|---|---|---|
|
|
|
Armaments
Main armament
The 90 mm cannon on the M36 is great at its BR. The stock AP has good penetration but lacks damage, so it is recommended to quickly unlock the APCBC which is superior in every aspect.
| 90 mm M3 | Turret rotation speed (°/s) | Reloading rate (seconds) | |||||||||||
|---|---|---|---|---|---|---|---|---|---|---|---|---|---|
| Mode | Capacity | Vertical | Horizontal | Stabilizer | Stock | Upgraded | Full | Expert | Aced | Stock | Full | Expert | Aced |
| Arcade | 47 | -10°/+20° | ±180° | N/A | 21.10 | 29.25 | 35.52 | 39.28 | 41.79 | 9.70 | 8.63 | 7.95 | 7.50 |
| Realistic | 14.28 | 16.80 | 20.40 | 22.56 | 24.00 | ||||||||
Ammunition
| Penetration statistics | |||||||
|---|---|---|---|---|---|---|---|
| Ammunition | Type of warhead |
Penetration @ 0° Angle of Attack (mm) | |||||
| 10 m | 100 m | 500 m | 1,000 m | 1,500 m | 2,000 m | ||
| M77 shot | AP | 162 | 160 | 148 | 135 | 123 | 113 |
| M82 shot | APCBC | 185 | 182 | 169 | 155 | 142 | 130 |
| M71 shell | HE | 20 | 20 | 18 | 17 | 16 | 16 |
| Shell details | ||||||||||||
|---|---|---|---|---|---|---|---|---|---|---|---|---|
| Ammunition | Type of warhead |
Velocity (m/s) |
Projectile mass (kg) |
Fuse delay (m) |
Fuse sensitivity (mm) |
Explosive mass (TNT equivalent) (g) |
Ricochet | |||||
| 0% | 50% | 100% | ||||||||||
| M77 shot | AP | 822 | 10.61 | - | - | - | 47° | 60° | 65° | |||
| M82 shot | APCBC | 853 | 10.91 | 1.2 | 14 | 137.2 | 48° | 63° | 71° | |||
| M71 shell | HE | 823 | 10.55 | 0.2 | 0.1 | 1,210 | 79° | 80° | 81° | |||
| Smoke shell characteristics | ||||||
|---|---|---|---|---|---|---|
| Ammunition | Velocity (m/s) |
Projectile mass (kg) |
Screen radius (m) |
Screen deploy time (s) |
Screen hold time (s) |
Explosive mass (TNT equivalent) (g) |
| M313 | 821 | 10.7 | 9 | 5 | 20 | 50 |
Ammo racks

| Full ammo |
1st rack empty |
2nd rack empty |
3rd rack empty |
4th rack empty |
5th rack empty |
6th rack empty |
Visual discrepancy |
|---|---|---|---|---|---|---|---|
| 47 | 39 (+8) | 30 (+17) | 21 (+26) | 12 (+35) | 7 (+40) | 1 (+46) | No |
Notes:
- Recommended load is 21 (+26) shells to remove most ammo from the hull.
- Racks 5 and 6 are ready racks and take priority in being filled as well as depleted.
- Full reload speed will be realized as long as ammo exists in either ready racks. If both ready racks are empty, a penalty to reload speed will occur.
- Simply not firing when the main gun is loaded will load ammo from racks 1 to 4 into 5 then 6, as long as there is ammo present in racks 1 to 4. Firing the main gun will interrupt the loading of the ready racks.
Machine guns
| 12.7 mm M2HB | ||||
|---|---|---|---|---|
| Mount | Capacity (Belt) | Fire rate | Vertical | Horizontal |
| Pintle | 1,000 (200) | 576 | -10°/+70° | ±60° |
Usage in battles
Playstyle with the M36 should be about the same as the M10 GMC. The speed is slightly better and armour is still just as thin, but it has an improved turret traverse rate and a 90 mm gun, making it able to engage targets much easier. The playstyle is also similar to the M18, since they have the same concept - speed and manoeuvrability with a powerful armament.
The greatest advantages of the M36 are its speed and its armament. As such, the best course of action is to make use of the speed to get to good early game positions on the map. The 90 mm gun is powerful at its BR, and it can penetrate many tanks at its BR from the front. But, this is not the case for more heavily armoured targets such as those in the IS series or the Panther series, but it can reliably kill every tank at its BR from the side in 1 to 2 shots because of the high explosive filler in the APCBC round. In addition, most enemy tanks can reliably penetrate you from the front, as the M36 does not have thick armour. Your armour can only protect you when a shell hits it at an extreme angle, or against low penetration weapons, such as those one some anti-aircraft vehicles. All of these factors mean that the M36 should never engage enemy tanks from the front, unless they are preoccupied with a friendly vehicle or not looking in your direction, but the M36 should engage enemies from the side. As such, the M36's mobility should be used to get to positions that the enemy would not expect where it will be able to shoot the enemy in the side before they even realize you are there. The M36 can also use its mobility to flank effectively. If an enemy knows your location and has an operational gun, you should not push out into their line of fire, as they are likely to come of better than you. If an enemy is likely to be able to shoot you, do not chance it, as only one shot will often knock out or disable the M36.
In a downtier, there are not a lot of heavily armoured tanks that the M36 can't penetrate, so the player can also choose to not flank, but to sit at a position and be a sniper. It's best to find a spot that:
- Overlooks a key street / passageway where enemies will likely to pass / go to
- Has hard cover or hill to hull-down
- Has bushes to hide in
- Is not too close to the frontline
This way when any enemy comes in sight, the M36 can easily finish it off, therefore "locking down" this key passageway, preventing the enemies to push and attack which gains a significant advantage to your team.
One thing to note: if there is an enemy plane in the vicinity, getting to cover is a priority as the turret is open topped, and a plane can kill all three turret crew in one pass with only low-calibre machine guns.
Pros and cons
Pros:
- Easily achieves its top speed of 42 km/h regardless of the terrain, allowing it to get to most positions in good time
- Excellent firepower; easily penetrates and knocks out most opponents like the Tiger H1, Pz.IV 70 and the Shermans, combined with its 5x scope magnification it is a deadly sniper
- 10° gun depression provides great terrain adaptation.
- Around 16°/sec of turret rotation is adequate to respond to surprise attacks
- Powerful roof mounted M2 MG can deal with light vehicles and incoming planes
Cons:
- Only 5 km/h of reverse speed can get the player killed sometimes
- Weak armour overall, can die from artillery strikes or small bombs
- Open topped, vulnerable to aircraft attacks
- Quite big and tall for a tank destroyer- harder to hide
- Does not have access to the better APCR like the American one
History
ROCA Service
Under known documentations, the PLA nor ROCA received the M36 GMC (but PLA did captured one during the Korean War as PVA [People's Voluntary Army] in 1951, now displayed in Beijing), however the ROCA have received the M36B2 variant from France.
As part of the retreat from Vietnam due to the total loss of French Indo-China, 8 of the M36B2 of the French Army were returned to USA and then handed to ROCA in 1955 to the 3rd Armored Artillery Company, 600th Field Artillery Group of Kinmen Defense Command as a part of the emergency military aid against the ongoing artillery war between ROCA and PLA at costal Xiamen/Kinmen. They were positioned into fortified position with a slope for better trajectory against PLA targets on the other side of the Xiamen Bay. A memoir from a ROCA veteran claimed that one of these M36B2 took down a PLA broadcast station while records from ROCA have recorded losses of two M36B2 during the war.[1] The remaining of these M36s were likely decommissioned in 2000 as some photo suggests that two of them were still in commission as late as 2001.
All the remaining 6 tanks are currently in Taichung (at Chenggongling Training Facility), Hsinchu (in ROCA Armor Training Command at Hukou Township; a theme park at Xinfeng Township respectively), Kaohsiung (ROCMC School at Zuoying) and 3 on Kinmen (2 are still in their combat fortifications while the remaining known one is at the Rushan Fort [乳山故壘] tank walkway[2])
Media
- Skins
See also
- Vehicles equipped with the same chassis
- M36 Jackson (Family), except the M36B1
- M10 (Family)
External links
References
- Citations
| China tank destroyers | |
|---|---|
| PLA | |
| Gun vehicles | PLZ83 · PTZ89 |
| Missile vehicles | AFT09 |
| ROC | |
| Missile vehicles | CM25 |
| USA | |
| Gun vehicles | ␗M8 HMC · LVT(A)(4) (ZiS-2) · ␗M10 GMC · ␗M36 GMC |
| Missile vehicles | ␗M113A1 (TOW) |
| USSR | |
| Gun vehicles | ␗SU-76M · ␗ISU-152 · ␗ISU-122 · ␗SU-100 |
