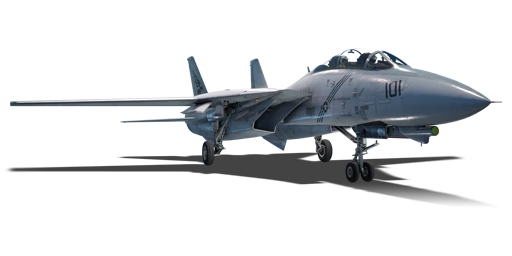
F-14B
| This page is about the American jet fighter F-14B. For the other version, see F-14A Early. |

Contents
Description
The F-14B Tomcat is a rank VIII American jet fighter with a battle rating of 12.0 (AB/RB/SB). It was introduced in Update "La Royale". The F-14B is a direct upgrade to the previous F-14A, introducing many improvements such as stronger engines, more potent missiles and a massively increased countermeasure capacity, while retaining the F-14A's excellent manoeuvrability and radar.
General info
Flight performance
Describe how the aircraft behaves in the air. Speed, manoeuvrability, acceleration and allowable loads - these are the most important characteristics of the vehicle.
| Characteristics | Max speed (km/h at 10,668 m) |
Max altitude (metres) |
Turn time (seconds) |
Rate of climb (metres/second) |
Take-off run (metres) | |||
|---|---|---|---|---|---|---|---|---|
| AB | RB | AB | RB | AB | RB | |||
| Stock | 2,191 | 2,181 | 16764 | 24.4 | 24.5 | 195.5 | 188.7 | 750 |
| Upgraded | 2,238 | 2,215 | 23.6 | 24.0 | 256.6 | 224.8 | ||
Details
| Features | |||||
|---|---|---|---|---|---|
| Combat flaps | Take-off flaps | Landing flaps | Air brakes | Arrestor gear | Drogue chute |
| ✓ | ✓ | ✓ | ✓ | ✓ | X |
| Limits | Wings (km/h) | Gear (km/h) | Flaps (km/h) | Max Static G | |||
|---|---|---|---|---|---|---|---|
| Combat | Take-off | Landing | + | - | |||
| Min sweep | 1,359 | 518 | 1,200 | 873 | 416 | ~10 | ~5 |
| Max sweep | 1,555 | ~11 | ~5 | ||||
| Optimal velocities (km/h) | |||
|---|---|---|---|
| Ailerons | Rudder | Elevators | Radiator |
| < 1,200 | < 850 | < 1,800 | N/A |
Engine performance
| Engine | Aircraft mass | ||||||||
|---|---|---|---|---|---|---|---|---|---|
| Engine name | Number | Basic mass | Wing loading (full fuel) | ||||||
| General Electric F110-GE-400 | 2 | 19,663 kg | 514 kg/m2 | ||||||
| Engine characteristics | Mass with fuel (no weapons load) | Max Gross Weight | |||||||
| Weight (each) | Type | 16m fuel | 20m fuel | 30m fuel | 45m fuel | 53m fuel | |||
| 1,897 kg | Afterburning low-bypass turbofan | 21,868 kg | 22,399 kg | 23,766 kg | 25,818 kg | 27,013 kg | 33,593 kg | ||
| Maximum engine thrust @ 0 m (RB/SB) | Thrust to weight ratio @ 0 m (WEP) | ||||||||
| Condition | 100% | WEP | 16m fuel | 20m fuel | 30m fuel | 45m fuel | 53m fuel | MGW | |
| Stationary | 6,200 kgf | 10,230 kgf | 0.93 | 0.91 | 0.86 | 0.79 | 0.76 | 0.61 | |
| Optimal | 6,428 kgf (1,200 km/h) |
13,610 kgf (1,200 km/h) |
1.24 | 1.22 | 1.15 | 1.05 | 1.00 | 0.81 | |
Survivability and armour
Examine the survivability of the aircraft. Note how vulnerable the structure is and how secure the pilot is, whether the fuel tanks are armoured, etc. Describe the armour, if there is any, and also mention the vulnerability of other critical aircraft systems.
Modifications and economy
| Flight performance | Survivability | Weaponry | ||||||||||||||||||||||||||||||||
|---|---|---|---|---|---|---|---|---|---|---|---|---|---|---|---|---|---|---|---|---|---|---|---|---|---|---|---|---|---|---|---|---|---|---|
|
|
|
Armaments
| Ballistic Computer | ||||
|---|---|---|---|---|
| CCIP (Guns) | CCIP (Rockets) | CCIP (Bombs) | CCRP (Bombs) | Lead indicator |
| |
|
|
|
|
Offensive armament
The F-14B is armed with:
- A choice between two presets:
- 1 x 20 mm M61A1 cannon, cheek-mounted (676 rpg)
- 1 x 20 mm M61A1 cannon + 60 x countermeasures
Suspended armament
The F-14B can be outfitted with the following ordnance presets:
Custom loadout options
| 1 | 2 | 3 | 4 | 5 | 6 |  | |
|---|---|---|---|---|---|---|---|
| 500 lb LDGP Mk 82 bombs | 8¶ | 6 | |||||
| 500 lb Mk 82 AIR bombs | 8¶ | 6 | |||||
| 1,000 lb LDGP Mk 83 bombs | 2¶ | 2 | |||||
| 1,000 lb Mk 83 AIR bombs | 2¶ | 2 | |||||
| 2,000 lb LDGP Mk 84 bombs | 2¶ | 2 | |||||
| 2,000 lb LDGP Mk 84 Air bombs | 2¶ | 2 | |||||
| 957 kg GBU-10 Paveway II bombs | 2†‡¶ | ||||||
| 277 kg GBU-12 Paveway II bombs | 2† | † | |||||
| 1,092 lb GBU-16 Paveway II bombs | 2† | 2† | |||||
| 2,000 lb GBU-24 Paveway III bombs | 1†‡¶ | 1† | |||||
| Zuni Mk32 Mod 0 ATAP rockets | 8 | 8 | |||||
| AIM-7M Sparrow missiles | 1 | 2 | 1‡, 2¶ | 1 | |||
| AIM-9L Sidewinder missiles | 1* | 1* | 1* | 1* | |||
| AIM-54A Phoenix missiles | 1 | 2¶ | 2 | 1 | |||
| AIM-54C Phoenix missiles | 1 | 2¶ | 2 | 1 | |||
| Countermeasures | 160* | 160* | 160* | 160* | |||
| LANTIRN targeting pod | 1† | ||||||
| * AIM-9L missiles can be equipped with countermeasures on the same hardpoint †LANTIRN targeting pod must be equipped when carrying guided bombs ‡Single AIM-7M missile on hardpoint 4 cannot be equipped with GBU-10 or GBU-24 bombs on hardpoint 3 ¶ Dual AIM-7M missiles on hardpoint 4 cannot be equipped with marked options on hardpoint 3 | |||||||
| Default weapon presets | |
|---|---|
| |
Usage in battles
Describe the tactics of playing in the aircraft, the features of using aircraft in a team and advice on tactics. Refrain from creating a "guide" - do not impose a single point of view, but instead, give the reader food for thought. Examine the most dangerous enemies and give recommendations on fighting them. If necessary, note the specifics of the game in different modes (AB, RB, SB).
Air Realistic Battles
Dogfighting
The F-14 may have been built as a large, missile carrying interceptor, but do not be fooled; the F-14B is also a supremely capable dogfighter which, if flown correctly, can out-maneuver nearly every fighter in the game. However, this is much easier said than done. The plane itself will not do all the work; proper tactics, energy management, and utilization of the F-14's flaps and variable sweep wings are required to get this fighter to perform in a dogfight.
Flaps
Usage of the F-14B's flaps is critical in dogfights. With the flaps completely up, the F-14B can attain higher speeds outside of dogfights, though at this flap state the plane will not be at its full maneuvering potential. Generally, during dogfights, it is preferable to set the flaps to "combat", as this significantly boosts both F-14B's instantaneous and sustained turn rates. Energy retention at this flap state, while lowered, is still sufficient, and the combination of turn and energy retention will make this flap state ideal for two-circle rate fights. The combat flaps can be extended at very high speeds, and thus pilots should not be worried about them falling off. In some cases, the flaps can be brought back up to increase energy retention and gain back energy. Setting the flaps to "takeoff" will further increase manoeuvrability at the expense of additional energy retention. The "landing" flaps gives the F-14B it's fastest turn rate and tightest turning circle, but at the expense of greatly diminished energy retention. These flaps should be used at lower speeds, ideally in one-circle fights or if you are behind the enemy. It should be noted that in the "landing" configuration, the flaps have a much lower speed tolerance than the other configurations. Go above 400 km/h with these flaps down, and you risk breaking them off, so be careful.
If it wasn't clear already, it is important to keep these flaps on, as if you do lose your flaps, you will greatly damage your dogfighting capability, not to mention the loss of dogfighting position that comes from the force of the flaps breaking off. If you've lost your flaps but sense you will eventually have to dogfight the enemy, it is best to go back to your airfield to get them repaired. If you end up locked in a dogfight without flaps, your best bet would be to keep your speed up and attempt a two-circle rate fight. Without it's flaps, the F-14B's AOA (angle of attack) is not sufficient for one circle fights, so in most cases, do not attempt them.
The Two-Circle (Rate Fight)
The F-14B's main advantage in a dogfight is its excellent energy retention and sustained turn rate. These can be used to great extent in a two-circle rate fight, which will be the preferred type of fight for the F-14B. A two-circle rate fight is a type of dogfight where the two fighters attempt to get on each other's tails. In this kind of dogfight, instead of turning as hard as you can, you instead must keep a certain speed. All fighter jets lose speed in turns, and generally, they turn worse at lower speeds. A fighter jet's optimal rate speed is the speed at which they can sustain the highest turn rate (or, the sustained turn rate). While you could pull harder to turn faster, you would be sacrificing speed to do this, and if you cannot take the shot, you will get slow and lose your turning capability, eventually lagging behind the now better turning enemy fighter. All fighter jets have different flight capabilities, and in a rate fight, the fighter with the better sustained turn rate will have the advantage. The beginning of the fight will have the two fighters' paths form two circles, hence the name. The fighter with the superior sustained turn rate (which we'll call the friendly fighter) will attempt to maneuver onto the other enemy fighter's tail. While this is happening, they must carefully manage their energy, taking great care in ensuring they do not go too much faster or slower than their optimal rate speed. During this inital turn, the enemy fighter may turn harder and initially get a shot on the friendly fighter, who must dodge. As the two fighters turn, the enemy fighter with the inferior sustained turn rate will lose speed faster, forcing them to fly downwards to use gravity to gain more speed and thus more turn, and the friendly fighter will follow. Eventually, the fight will lower to the ground, where there won't be any more altitude for the enemy fighter to gain speed. With the enemy fighter now slow, the friendly fighter, still fast and better turning, will begin to get behind the other fighter (the enemy fighter is being "out-rated" here). Once they are approaching the enemy's tail, the enemy fighter may attempt to get the friendly fighter to overshoot by turning hard; to counteract this, the friendly fighter can pull hard, drop the flaps further, and/or airbrake to stay on the enemy's tail. At this point, the friendly fighter will be firmly planted on the tail of the enemy and has an opportunity to shoot them down.
Some jets will prefer the two-circle, while others will prefer other tactics. Again, the F-14B is one that favors this two-circle type of fight; in fact, theoretically, the F-14B has a superior sustained turn rate to just about every single aircraft in the game, with one notable exception. In the F-14B, the optimal rate speed can be achieved around 800-830km/h with full afterburner, the wings at 0% sweep and combat flaps down. To do this, you can tap your elevator key, or use the mouse. It is fine if it gets below that speed but be sure to regain it eventually. Try not to go below 700km/h, as by that point, the turn rate will start to noticeably suffer. Above 830km/h, you will want to lose it by turning harder. Sweep the wings back a little (to around 20-30%), as this will help you lose speed and allow you to turn harder without breaking the wings off (at 0% wing sweep, you risk ripping the wing off at these higher speeds). When entering a dogfight with the F-14B, it is preferrable to be at a higher speed (>900km/h). This way, when you merge with an enemy fighter, you can sweep the wings back to around 45% and deploy combat flaps to boost your initial turn rate, thus initially gaining position before reaching your optimal rate speed.
The One-Circle
The other type of dogfight is the one-circle fight. This one is much simpler than the two circle. It involves both fighters turning as hard as they can into each other. Losing speed is preferrable, as it allows a fighter to get behind an enemy. While the F-14B is not as much of a one-circle fighter as it is a two-circle fighter, it still performs very well in the one-circle. In these types of fights, engage the F-14B's landing flaps to improve its instantaneous turn rate.
Aircraft Worth Noting
While you could be an expert in your own aircraft, in order to prevail, you still need to know the strengths and weaknesses of the opposing aircraft you will be facing. While the F-14B itself is a highly capable dogfighter, so are many of the common enemies that it will face.
- F-16A (All): The F-14B is nearly unmatched in a rate fight. Unfortunately, the most common fighter at top tier, the supremely capable F-16A, is the only aircraft that has a superior sustained turn rate. Even in the one-circle, the F-16A seems to have a slight advantage. Therefore, if possible, it is best to avoid dogfights with F-16As. Keep in mind that the F-16A being a superior aircraft has nothing to do with its pilot's skill; in a dogfight, if you recognize that an enemy F-16A is pulling too hard and getting too slow, keeping your optimal rate speed will allow you to emerge victorious in a two-circle rate fight. \
- F-16C, F-16D Barak II: Despite having a more powerful engine, these upgraded F-16s are heavier than the previous A variants, and can actually be beaten by the F-14B in a rate fight. Keep in mind that they are still superior in the one-circle fight.
- MiG-29A: The MiG-29A is superior to the F-14B in the one-circle, having a better AOA and tigher turn radius. However, as of the new update, the MiG-29's energy retention was nerfed. Thus, as long as you can keep the MiG-29A in a two-circle fight, the F-14B will be able to easily prevail.
- MiG-29SMT: The MiG-29SMT is a heavier MiG-29A, so it can be out-rated even easier than the MiG-29A. However, keep in mind that the SMT has extremely dangerous R-73s paired with a HMD, so be sure to start pre-flaring if you notice you may be about to be launched on.
Pros and cons
Pros:
- Ability to equip additional countermeasure pods grants a massive amount of countermeasures
- Access to upgraded AIM-7M SARH missiles and AIM-54C ARH missiles
- All-aspect AIM-9L Sidewinder missiles are a significant upgrade from the previous rear-aspect AIM-9H
- High velocity and extremely fast firing M61 rotary cannon
- Large air-to-air missile capacity of eight
- Substantial improvement to thrust and climb rate from the previous F-14A
- Same powerful radar as the previous F-14A
- Strong air-to-ground load out with Paveway laser-guided bombs and the LANTIRN thermal laser targeting pod
- Great instantaneous turn rate and excellent sustained turn rate
- Excellent energy retention
- Built-in camera targeting system automatically zooms in to radar locked aircraft and is useful for identification in simulator mode
- Built-in camera works with the EEGS, allowing you to use the function by applying the target point on the enemy
Cons:
- Large airframe makes for a large target
- Two very hot engines make it harder to flare off IR-guided missiles
- M61 rotary cannon has a rather small ammunition pool of 676
- The AIM-54C still only has 17G maximum overload and is thus rather easy to kinetically defeat
History
F-14B Upgrade Program
During the mid-1980s, the United States Navy (USN) made a momentous decision to enhance the F-14 airframe by introducing a remarkable new variant of the aircraft. Originally designated as the F-14A+, this exceptional aircraft would eventually earn the prestigious moniker of the F-14B. The USN's comprehensive modernization program aimed to bring the F-14 airframe up to date with the latest technological advancements. One of the key aspects of this program was the incorporation of numerous electronic upgrades. The F-14B underwent a significant avionics overhaul, introducing advanced systems that improved the aircraft's capabilities in various areas. These upgrades included enhanced RWR systems, improved target detection and tracking capabilities (introduction of the Television Camera System) and upgraded communication systems to ensure seamless integration with other elements of the modern battlefield. In addition to these upgrades, the F-14B also received a major boost in terms of its powerplant. The outdated engines of the original F-14A model were replaced with the more advanced F110-GE-400 engines. These engines provided increased thrust and improved fuel efficiency, resulting in enhanced performance and greater operational flexibility for the aircraft. The F-110 engines also offered improved reliability and reduced maintenance requirements, which were crucial factors in ensuring the overall effectiveness and availability of the F-14B.
Devblog
As part of the further upgrade of the Grumman F-14A carrier-based fighters, the aircraft were equipped with new General Electric F110-GE-400 turbojet engines with an afterburner, which significantly increased thrust, while reducing specific fuel consumption. The aircraft also received updated electronic equipment, as well as, unlike early production versions, the TISEO (Target Identification System, Electro Optical) optical target identification system. Initially, the updated Tomcats received the designation F-14A +.
This configuration was applied both to newly manufactured fighters, as well as to those already in service as an upgrade pack. In 1992, the designation was changed to F-14B in order to unify it with other military equipment in service. Subsequently, the F-14B were further upgraded in 1998 under the SLEP program. These jet fighters were in service with the US Navy aviation until 2006.
Media
- Skins
- Images


- Videos
See also
- Related development
External links
| Grumman Aircraft Engineering Corporation | |
|---|---|
| Fighters | |
| F3F | F3F-2 · Galer's F3F-2 |
| F4F Wildcat | F4F-3 · F4F-4 |
| XF5F Skyrocket | XF5F · XP-50 |
| F6F Hellcat | F6F-5 · F6F-5N |
| F7F Tigercat | F7F-1 · F7F-3 |
| F8F Bearcat | F8F-1 · F8F-1B |
| Jet Fighters | |
| F9F Panther/Cougar | F9F-2 · F9F-5 · F9F-8 |
| F-11 Tiger | F11F-1 |
| F-14 Tomcat | F-14A Early · F-14B |
| Jet Strike Aircraft | |
| A-6 Intruder | A-6E TRAM |
| Bombers | TBF-1C |
| Export | ▄Martlet Mk IV · ▄F6F-5 · ▄F6F-5N · ▄F8F-1B · ▄Avenger Mk II · ▄Hellcat Mk II |
| USA jet aircraft | |
|---|---|
| Fighters | |
| F-4 | F-4C Phantom II · F-4E Phantom II · F-4J Phantom II · F-4S Phantom II |
| F-5 | F-5A · F-5C · F-5E · F-20A |
| F-8 | F8U-2 · F-8E |
| F-80 | F-80A-5 · F-80C-10 |
| F-84 | F-84B-26 · F-84F · F-84G-21-RE |
| F-86 | F-86A-5 · F-86F-25 · F-86F-2 · F-86F-35 |
| F-89 | F-89B · F-89D |
| F-100 | F-100D |
| F-104 | F-104A · F-104C |
| F-14 | F-14A Early · F-14B |
| F-15 | F-15A |
| F-16 | F-16A · F-16A ADF · F-16C |
| F9F | F9F-2 · F9F-5 · F9F-8 |
| Other | P-59A · F2H-2 · F3D-1 · F3H-2 · F4D-1 · F11F-1 |
| Strike Aircraft | |
| FJ-4 | FJ-4B · FJ-4B VMF-232 |
| A-4 | A-4B · A-4E Early |
| A-6 | A-6E TRAM |
| A-7 | A-7D · A-7E · A-7K |
| AV-8 | AV-8A · AV-8C |
| A-10 | A-10A · A-10A Late |
| B-57 | B-57A · B-57B |
| F-105 | F-105D |
| F-111 | F-111A |
