Difference between revisions of "Boomerang Mk I (Great Britain)"
Inceptor57 (talk | contribs) m (→Pros and cons) |
(→Survivability and armour) (Tag: Visual edit) |
||
| (28 intermediate revisions by 11 users not shown) | |||
| Line 1: | Line 1: | ||
| + | {{Specs-Card|code=boomerang_mki}} | ||
{{About | {{About | ||
| − | | about = premium British fighter '''{{ | + | | about = premium British fighter '''{{Specs|name}}''' |
| − | | usage = | + | | usage = other version |
| − | | link = Boomerang Mk II (Great Britain) | + | | link = Boomerang Mk II (Great Britain) |
| − | |||
| − | |||
| − | |||
| − | |||
}} | }} | ||
== Description == | == Description == | ||
| − | <!-- ''In the description, the first part | + | <!--''In the description, the first part needs to be about the history of and the creation and combat usage of the aircraft, as well as its key features. In the second part, tell the reader about the aircraft in the game. Insert a screenshot of the vehicle. If the novice player does not remember the vehicle by name, he will immediately understand what kind of vehicle it is talking about.''--> |
| − | The '''{{Specs|name}}''' is a | + | [[File:GarageImage_Boomerang_Mk_I_Great_Britain.jpg|420px|thumb|left|]] |
| + | {{break}} | ||
| + | The '''{{Specs|name}}''' is a rank {{Specs|rank}} premium British fighter {{Battle-rating}}. This fighter aircraft has been in the game since the start of the Open Beta Test prior to Update 1.29. It costs 1,150 Golden Eagles. This variant of the Boomerang represents a version which was designed and manufactured in Australia. | ||
== General info == | == General info == | ||
| − | === Flight | + | === Flight Performance === |
| − | + | <!--''Describe how the aircraft behaves in the air. Maximum speed, manoeuvrability, speed and allowable loads - these are the most important characteristics of the vehicle.''--> | |
| − | <!-- ''Describe how the aircraft behaves in the air. | + | {| class="wikitable" style="text-align:center" |
| − | + | |- | |
| − | {| class="wikitable" style="text-align:center" | + | ! colspan="8" | Characteristics |
| − | ! | + | |- |
| + | ! colspan="8" | ''Stock'' | ||
| + | |- | ||
! colspan="2" | Max Speed<br>(km/h at 5,100 m) | ! colspan="2" | Max Speed<br>(km/h at 5,100 m) | ||
| − | ! rowspan="2" | Max altitude<br>( | + | ! rowspan="2" | Max altitude<br>(meters) |
! colspan="2" | Turn time<br>(seconds) | ! colspan="2" | Turn time<br>(seconds) | ||
| − | ! colspan="2" | Rate of climb<br>( | + | ! colspan="2" | Rate of climb<br>(meters/second) |
| − | ! rowspan="2" | Take-off run<br>( | + | ! rowspan="2" |Take-off run<br>(meters) |
| + | |- | ||
| + | ! AB | ||
| + | ! RB | ||
| + | ! AB | ||
| + | ! RB | ||
| + | ! AB | ||
| + | ! RB | ||
| + | |- | ||
| + | |469||459|| {{Specs|ceiling}} ||23.5||23.8||12.0||12.0||273 | ||
| + | |- | ||
| + | ! colspan="8" | ''Upgraded'' | ||
|- | |- | ||
| − | ! | + | ! colspan="2" | Max Speed<br>(km/h at 5,100 m) |
| + | ! rowspan="2" |Max altitude (meters) | ||
| + | ! colspan="2" | Turn time (seconds) | ||
| + | ! colspan="2" | Rate of climb<br>(meters/second) | ||
| + | ! rowspan="2" |Take-off run (meters) | ||
|- | |- | ||
| − | ! | + | ! AB |
| − | + | ! RB | |
| + | ! AB | ||
| + | ! RB | ||
| + | ! AB | ||
| + | ! RB | ||
|- | |- | ||
| − | + | | ? || ? || {{Specs|ceiling}} || ??.? || ??.? || ??.? || ??.? ||273 | |
| − | | | ||
|- | |- | ||
|} | |} | ||
| − | ==== Details ==== | + | ====Details==== |
| − | {| class="wikitable" style="text-align:center | + | {| class="wikitable" style="text-align:center" |
|- | |- | ||
! colspan="5" | Features | ! colspan="5" | Features | ||
|- | |- | ||
| − | ! Combat | + | ! Combat flap |
| + | ! Take-off flap | ||
| + | ! Landing flap | ||
| + | ! Air brakes | ||
| + | ! Arrestor gear | ||
|- | |- | ||
| ✓ || ✓ || ✓ || X || X <!-- ✓ --> | | ✓ || ✓ || ✓ || X || X <!-- ✓ --> | ||
| Line 47: | Line 70: | ||
|} | |} | ||
| − | {| class="wikitable" style="text-align:center | + | {| class="wikitable" style="text-align:center" |
|- | |- | ||
| − | ! colspan=" | + | ! colspan="5" | Limits |
|- | |- | ||
| − | ! rowspan="2" | | + | ! rowspan="2" | Wing-break speed<br>(km/h) |
| − | ! rowspan="2" | Gear (km/h) | + | ! rowspan="2" | Gear limit<br>(km/h) |
| − | ! | + | ! rowspan="2" | Combat flap<br> (km/h) |
! colspan="2" | Max Static G | ! colspan="2" | Max Static G | ||
|- | |- | ||
| − | + | ! + | |
| + | ! - | ||
|- | |- | ||
| − | | {{Specs| | + | | {{Specs|разрушение|конструкции}} || {{Specs|разрушение|шасси}} ||520|| ~20 || ~20 |
|- | |- | ||
|} | |} | ||
| Line 64: | Line 88: | ||
{| class="wikitable" style="text-align:center" | {| class="wikitable" style="text-align:center" | ||
|- | |- | ||
| − | ! colspan="4" | Optimal velocities | + | ! colspan="4" | Optimal velocities |
|- | |- | ||
| − | ! Ailerons | + | ! Ailerons<br>(km/h) |
| + | ! Rudder<br>(km/h) | ||
| + | ! Elevators<br>(km/h) | ||
| + | ! Radiator<br>(km/h) | ||
|- | |- | ||
| − | | < | + | | < 365 || < 300 || < 420 || > 215 |
|- | |- | ||
|} | |} | ||
| Line 82: | Line 109: | ||
! WEP Engine power | ! WEP Engine power | ||
|- | |- | ||
| − | | 1,990 m || 1,100 hp || 1,188 hp | + | | 1,990 m || 1,100 hp || 1,188 hp |
| + | |- | ||
| + | <!--! colspan="3" | Setting 2 | ||
| + | |- | ||
| + | ! Optimal altitude | ||
| + | ! 100% Engine power | ||
| + | ! WEP Engine power | ||
| + | |- | ||
| + | | ?,??? m || ?,??? hp || ?,??? hp | ||
| + | |- | ||
| + | ! colspan="3" | Setting 3 | ||
| + | |- | ||
| + | ! Optimal altitude | ||
| + | ! 100% Engine power | ||
| + | ! WEP Engine power | ||
|- | |- | ||
| + | | ?,??? m || ?,??? hp || ?,??? hp | ||
| + | |- --> | ||
|} | |} | ||
=== Survivability and armour === | === Survivability and armour === | ||
| − | + | Lights up like a tinderbox, japanese planes are less likely to catch on fire in comparison to this vehicle<!--''Examine the survivability of the aircraft. Note how vulnerable the structure is and how secure the pilot is, whether the fuel tanks are armoured. Describe the armour, if there is any, also mention the vulnerability of other critical aircraft systems.''--> | |
| − | <!-- ''Examine the survivability of the aircraft. Note how vulnerable the structure is and how secure the pilot is, whether the fuel tanks are armoured | ||
| − | |||
| − | |||
* 38 mm Bulletproof glass in front of the pilot. | * 38 mm Bulletproof glass in front of the pilot. | ||
* 12.7 mm Steel plate behind the pilot, with 3 mm steel plate flaps around it. | * 12.7 mm Steel plate behind the pilot, with 3 mm steel plate flaps around it. | ||
| − | * | + | * Critical components located at the front of aircraft (fuel, pilot, engine, controls) |
| − | + | * More fuel tanks located in wings near the fuselage | |
| − | |||
| − | |||
| − | * | ||
| − | |||
| − | |||
| − | |||
| − | |||
== Armaments == | == Armaments == | ||
| − | |||
=== Offensive armament === | === Offensive armament === | ||
| − | + | <!--''Describe the offensive armament of the aircraft, if any. Describe how effective the cannons and machine guns are in a battle, and also what belts or drums are better to use. If there is no offensive weaponry, delete this subsection.''--> | |
| − | <!-- ''Describe the offensive armament of the aircraft, if any. Describe how effective the cannons and machine guns are in a battle, and also what belts or drums are better to use. If there is no offensive weaponry, delete this subsection.'' --> | + | {{main|Hispano Mk.II (20 mm)|Browning .303 (7.7 mm)}} |
| − | {{main|Hispano Mk.II (20 mm)|Browning (7.7 mm)}} | ||
The '''''{{PAGENAME}}''''' is armed with: | The '''''{{PAGENAME}}''''' is armed with: | ||
| − | * 2 x 20 mm Hispano Mk.II | + | * 2 x 20 mm Hispano Mk.II cannon, wing-mounted (60 rpg = 120 total) |
| − | * 4 x 7.7 mm Browning machine | + | * 4 x 7.7 mm Browning machine gun, wing-mounted (1,000 rpg = 4,000 total) |
== Usage in battles == | == Usage in battles == | ||
| − | + | ''Describe the tactics of playing in an aircraft, the features of using vehicles in a team and advice on tactics. Refrain from creating a "guide" - do not impose a single point of view, but give the reader food for thought. Examine the most dangerous enemies and give recommendations on fighting them. If necessary, note the specifics of the game in different modes (AB, RB, SB).'' | |
| − | |||
| − | |||
| − | |||
| − | |||
| − | |||
| − | |||
| − | === Manual Engine Control === | + | ===Manual Engine Control=== |
{| class="wikitable" style="text-align:center" | {| class="wikitable" style="text-align:center" | ||
|- | |- | ||
! colspan="7" | MEC elements | ! colspan="7" | MEC elements | ||
|- | |- | ||
| − | ! rowspan="2" | Mixer | + | ! rowspan="2" |Mixer |
| − | ! rowspan="2" | Pitch | + | ! rowspan="2" |Pitch |
| − | ! colspan="3" | Radiator | + | ! colspan="3" |Radiator |
| − | ! rowspan="2" | Supercharger | + | ! rowspan="2" |Supercharger |
| − | ! rowspan="2" | Turbocharger | + | ! rowspan="2" |Turbocharger |
|- | |- | ||
| − | ! Oil | + | ! Oil |
| + | ! Water | ||
| + | ! Type | ||
|- | |- | ||
| − | | Controllable || Controllable | + | | Controllable || rowspan="2" | Controllable || rowspan="2" | Not controllable || rowspan="2" | Controllable || rowspan="2" | Combined || rowspan="2" | Controllable || rowspan="2" | Not controllable |
| + | |- | ||
| + | |} | ||
| + | |||
| + | ===Modules=== | ||
| + | {| class="wikitable" | ||
| + | ! colspan="1" | Tier | ||
| + | ! colspan="2" | Flight performance | ||
| + | ! colspan="1" | Survivability | ||
| + | ! colspan="2" | Weaponry | ||
| + | |- | ||
| + | | I | ||
| + | | Fuselage Repair | ||
| + | | Radiator | ||
| + | | | ||
| + | | | ||
| + | |- | ||
| + | | II | ||
| + | | | ||
| + | | Compressor | ||
| + | | Airframe | ||
| + | | | ||
| + | |- | ||
| + | | III | ||
| + | | Wings Repair | ||
| + | | Engine | ||
| + | | | ||
| + | | | ||
| + | |- | ||
| + | | IV | ||
| + | | | ||
| + | | Engine Injection | ||
| + | | Cover | ||
| + | | | ||
|- | |- | ||
|} | |} | ||
=== Pros and cons === | === Pros and cons === | ||
| − | <!-- '' | + | <!--''Summarize and briefly evaluate the vehicle in terms of its characteristics and combat effectiveness. Mark its pros and cons in the bulleted list. Try not to use more than 6 points for each of the characteristics. Avoid using categorical definitions such as "bad", "good" and the like - they have a substitution in the form of softer "inadequate", "effective".''--> |
'''Pros:''' | '''Pros:''' | ||
| − | * Tight turn | + | * Tight turn speed and Roll ability at low altitude |
| − | * A large amount of secondary machine gun ammunition (4,000 | + | * A large amount of secondary machine gun ammunition (4,000 Rounds) |
* Large choice of ammo belts for both the cannons and machine guns | * Large choice of ammo belts for both the cannons and machine guns | ||
| − | |||
'''Cons:''' | '''Cons:''' | ||
| − | * Poor performance at higher | + | * Poor performance at higher altitude |
| − | + | * Cannons only have 60 rounds in each gun | |
| − | + | * Low Speed for a Fighter Aircraft (even for Rank II) | |
| − | + | * Occasionally poor matchmaking | |
| − | * Cannons only have 60 rounds in each gun ( | ||
| − | * | ||
== History == | == History == | ||
| − | + | ''Describe the history of the creation and combat usage of the aircraft in more detail than in the introduction. If the historical reference turns out to be too long, take it to a separate article, taking a link to the article about the vehicle and adding a block "/History" (example: <nowiki>https://wiki.warthunder.com/(Vehicle-name)/History</nowiki>) and add a link to it here using the <code>main</code> template. Be sure to reference text and sources by using <code><nowiki><ref></ref></nowiki></code>, as well as adding them at the end of the article with <code><nowiki><references /></nowiki></code>. This section may also include the vehicle's dev blog entry (if applicable) and the in-game encyclopedia description (under <code><nowiki>=== In-game description ===</nowiki></code>, also if applicable).'' | |
| − | |||
| − | |||
| − | |||
| − | |||
| − | |||
| − | In | + | === In-game description === |
| − | |||
| − | |||
| − | |||
| − | |||
The CAC Boomerang was an Australian single-seat, single-engine fighter of mixed wood and aluminium construction. | The CAC Boomerang was an Australian single-seat, single-engine fighter of mixed wood and aluminium construction. | ||
The Japanese attack on Pearl Harbour on December 7, 1941 and subsequent events in the Pacific theatre of operations showed how unready Australia was for war. The country had fewer than two hundred military aircraft, most of them obsolete. At that time, the Commonwealth Aircraft Corporation (CAC) only produced a trainer, the CAC Wirraway (a licensed version of the American NA-33). The License Agreement provided for modifications, so, in order to have fighter aircraft as soon as possible, the CAC decided to use the trainer as a basis for a new fighter. | The Japanese attack on Pearl Harbour on December 7, 1941 and subsequent events in the Pacific theatre of operations showed how unready Australia was for war. The country had fewer than two hundred military aircraft, most of them obsolete. At that time, the Commonwealth Aircraft Corporation (CAC) only produced a trainer, the CAC Wirraway (a licensed version of the American NA-33). The License Agreement provided for modifications, so, in order to have fighter aircraft as soon as possible, the CAC decided to use the trainer as a basis for a new fighter. | ||
| − | The CA-12 (later called the Boomerang Mk.I) was created, the first domestically produced fighter to ever roll off Australian assembly lines. The CA-12 borrowed the | + | The CA-12 (later called the Boomerang Mk.I) was created, the first domestically produced fighter to ever roll off Australian assembly lines. The CA-12 borrowed the Wirraway’s landing gear, tail, and wing design and was powered by a liscene built American Pratt and Whitney Twin Wasp engine, rated at 1200 hp. The aircraft was armed with two 20mm Hispano cannon and four 0.303 inch Browning machine guns and could carry four 9kg smoke bombs to mark targets, one 227kg bomb, or a 265 litre external fuel tank. |
| − | The CA-12 had high durability, good armament, and excellent handling characteristics at low level, although this performance deteriorated at height and the | + | The CA-12 had high durability, good armament, and excellent handling characteristics at low level, although this performance deteriorated at height and the fighter’s top speed was not at all competitive. |
Mass production began in July 1942 and 105 Boomerang Mk I fighters were produced. | Mass production began in July 1942 and 105 Boomerang Mk I fighters were produced. | ||
| − | |||
== Media == | == Media == | ||
| − | + | ''An excellent addition to the article will be video guides, as well as screenshots from the game and photos.'' | |
| − | |||
| − | |||
| − | |||
| − | |||
| − | |||
| − | |||
| − | |||
== See also == | == See also == | ||
| Line 202: | Line 242: | ||
== External links == | == External links == | ||
| − | + | ''Paste links to sources and external resources, such as:'' | |
| + | |||
* ''topic on the official game forum;'' | * ''topic on the official game forum;'' | ||
| − | * ''other literature.'' | + | * ''encyclopedia page on aircraft;'' |
| − | + | * ''other literature.'' | |
| − | |||
{{AirManufacturer Commonwealth}} | {{AirManufacturer Commonwealth}} | ||
{{Britain fighters}} | {{Britain fighters}} | ||
| − | |||
Revision as of 01:11, 2 February 2020
Contents
| This page is about the premium British fighter ▄Boomerang Mk I. For other version, see Boomerang Mk II (Great Britain). |
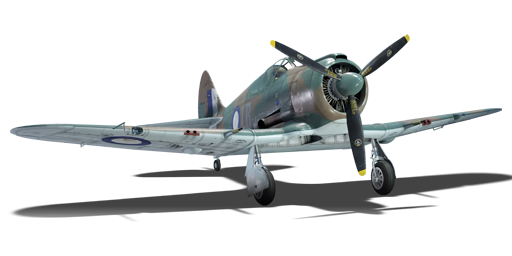
Description
.jpg)
The ▄Boomerang Mk I is a rank II premium British fighter
with a battle rating of 3.3 (AB), 3.0 (RB), and 2.7 (SB). This fighter aircraft has been in the game since the start of the Open Beta Test prior to Update 1.29. It costs 1,150 Golden Eagles. This variant of the Boomerang represents a version which was designed and manufactured in Australia.
General info
Flight Performance
| Characteristics | |||||||
|---|---|---|---|---|---|---|---|
| Stock | |||||||
| Max Speed (km/h at 5,100 m) |
Max altitude (meters) |
Turn time (seconds) |
Rate of climb (meters/second) |
Take-off run (meters) | |||
| AB | RB | AB | RB | AB | RB | ||
| 469 | 459 | 10356 | 23.5 | 23.8 | 12.0 | 12.0 | 273 |
| Upgraded | |||||||
| Max Speed (km/h at 5,100 m) |
Max altitude (meters) | Turn time (seconds) | Rate of climb (meters/second) |
Take-off run (meters) | |||
| AB | RB | AB | RB | AB | RB | ||
| ? | ? | 10356 | ??.? | ??.? | ??.? | ??.? | 273 |
Details
| Features | ||||
|---|---|---|---|---|
| Combat flap | Take-off flap | Landing flap | Air brakes | Arrestor gear |
| ✓ | ✓ | ✓ | X | X |
| Limits | ||||
|---|---|---|---|---|
| Wing-break speed (km/h) |
Gear limit (km/h) |
Combat flap (km/h) |
Max Static G | |
| + | - | |||
| 660 | 320 | 520 | ~20 | ~20 |
| Optimal velocities | |||
|---|---|---|---|
| Ailerons (km/h) |
Rudder (km/h) |
Elevators (km/h) |
Radiator (km/h) |
| < 365 | < 300 | < 420 | > 215 |
| Compressor (RB/SB) | ||
|---|---|---|
| Setting 1 | ||
| Optimal altitude | 100% Engine power | WEP Engine power |
| 1,990 m | 1,100 hp | 1,188 hp |
Survivability and armour
Lights up like a tinderbox, japanese planes are less likely to catch on fire in comparison to this vehicle
- 38 mm Bulletproof glass in front of the pilot.
- 12.7 mm Steel plate behind the pilot, with 3 mm steel plate flaps around it.
- Critical components located at the front of aircraft (fuel, pilot, engine, controls)
- More fuel tanks located in wings near the fuselage
Armaments
Offensive armament
The Boomerang Mk I (Great Britain) is armed with:
- 2 x 20 mm Hispano Mk.II cannon, wing-mounted (60 rpg = 120 total)
- 4 x 7.7 mm Browning machine gun, wing-mounted (1,000 rpg = 4,000 total)
Usage in battles
Describe the tactics of playing in an aircraft, the features of using vehicles in a team and advice on tactics. Refrain from creating a "guide" - do not impose a single point of view, but give the reader food for thought. Examine the most dangerous enemies and give recommendations on fighting them. If necessary, note the specifics of the game in different modes (AB, RB, SB).
Manual Engine Control
| MEC elements | ||||||
|---|---|---|---|---|---|---|
| Mixer | Pitch | Radiator | Supercharger | Turbocharger | ||
| Oil | Water | Type | ||||
| Controllable | Controllable | Not controllable | Controllable | Combined | Controllable | Not controllable |
Modules
| Tier | Flight performance | Survivability | Weaponry | ||
|---|---|---|---|---|---|
| I | Fuselage Repair | Radiator | |||
| II | Compressor | Airframe | |||
| III | Wings Repair | Engine | |||
| IV | Engine Injection | Cover | |||
Pros and cons
Pros:
- Tight turn speed and Roll ability at low altitude
- A large amount of secondary machine gun ammunition (4,000 Rounds)
- Large choice of ammo belts for both the cannons and machine guns
Cons:
- Poor performance at higher altitude
- Cannons only have 60 rounds in each gun
- Low Speed for a Fighter Aircraft (even for Rank II)
- Occasionally poor matchmaking
History
Describe the history of the creation and combat usage of the aircraft in more detail than in the introduction. If the historical reference turns out to be too long, take it to a separate article, taking a link to the article about the vehicle and adding a block "/History" (example: https://wiki.warthunder.com/(Vehicle-name)/History) and add a link to it here using the main template. Be sure to reference text and sources by using <ref></ref>, as well as adding them at the end of the article with <references />. This section may also include the vehicle's dev blog entry (if applicable) and the in-game encyclopedia description (under === In-game description ===, also if applicable).
In-game description
The CAC Boomerang was an Australian single-seat, single-engine fighter of mixed wood and aluminium construction.
The Japanese attack on Pearl Harbour on December 7, 1941 and subsequent events in the Pacific theatre of operations showed how unready Australia was for war. The country had fewer than two hundred military aircraft, most of them obsolete. At that time, the Commonwealth Aircraft Corporation (CAC) only produced a trainer, the CAC Wirraway (a licensed version of the American NA-33). The License Agreement provided for modifications, so, in order to have fighter aircraft as soon as possible, the CAC decided to use the trainer as a basis for a new fighter.
The CA-12 (later called the Boomerang Mk.I) was created, the first domestically produced fighter to ever roll off Australian assembly lines. The CA-12 borrowed the Wirraway’s landing gear, tail, and wing design and was powered by a liscene built American Pratt and Whitney Twin Wasp engine, rated at 1200 hp. The aircraft was armed with two 20mm Hispano cannon and four 0.303 inch Browning machine guns and could carry four 9kg smoke bombs to mark targets, one 227kg bomb, or a 265 litre external fuel tank.
The CA-12 had high durability, good armament, and excellent handling characteristics at low level, although this performance deteriorated at height and the fighter’s top speed was not at all competitive.
Mass production began in July 1942 and 105 Boomerang Mk I fighters were produced.
Media
An excellent addition to the article will be video guides, as well as screenshots from the game and photos.
See also
Links to the articles on the War Thunder Wiki that you think will be useful for the reader, for example:
- reference to the series of the aircraft;
- links to approximate analogues of other nations and research trees.
External links
Paste links to sources and external resources, such as:
- topic on the official game forum;
- encyclopedia page on aircraft;
- other literature.
| Commonwealth Aircraft Corporation (CAC) | |
|---|---|
| Attackers | ▄Wirraway |
| Fighters | ▄Boomerang Mk I · ▄Boomerang Mk II |
