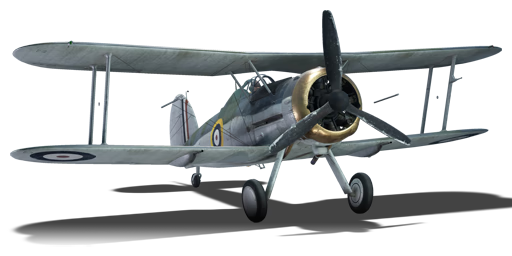
Gladiator Mk II

From War Thunder Wiki
Jump to: navigation, search
Rank IV USSR | Premium | Golden Eagles
Tu-1 Pack
This page is about the British fighter Gladiator Mk II. For other versions, see Gladiator (Family).
Gladiator Mk II
gladiator_mk2.png
GarageImage Gladiator Mk II.jpg
ArtImage Gladiator Mk II.png
Gladiator Mk II
AB RB SB
1.7 1.3 1.3
Class:
Research:2 900 Specs-Card-Exp.png
Purchase:700 Specs-Card-Lion.png
Show in game

Description

The Gladiator Mk II is a rank I British fighter with a battle rating of 1.7 (AB) and 1.3 (RB/SB). It has been in the game since the start of the Open Beta Test prior to Update 1.27.

The Gladiator Mk II is one of the first British tech tree fighters that can be researched (the other two being the Hurricane Mk I/L and the Sea Gladiator Mk I), and once researched leads into the famous Spitfire fighter line.

At rank I with a battle rating of 1.7 (AB) and 1.3 (RB/SB), this plane will typically be one of the first fighters a new player will research. However, the Gladiator, like its sea-based cousin, may be difficult to seek success in, especially in Realistic Battles mode. Within Realistic Battles, when up-tiering comes into play, it will have to deal with not only biplane adversaries such as the CR.42, F3F and the very manoeuvrable Ki-10, but also more advanced fighters such as the P-40E, Bf 109s, I-16s, and Ki-43s. All these plane types have several varying advantages against the Gladiator, which can make early grinding a bit unbearable for some players.

There are a couple of issues with the Gladiator, all of which can make it an easy target at times:

  • Its power plant configuration, which includes a three-blade fixed-pitch propeller, can make the Gladiator a slug in acceleration and climb. In-flight testing the Gladiator can usually only sustain at most around 3,000 ft/min (roughly 15 m/s) in a climb at around 180 - 200 km/h (111 - 124 mph) indicated airspeed, and its top speed isn't great either (at sea level it can only manage around 335 km/h, and testing has yielded 396 km/h at 4,000 m altitude).
  • The Gladiator manoeuvres well. However, it bleeds a lot of speed in sharp turns, and while its turn radius is good enough to shake off reserve planes, the loss of speed can make the plane a slower and henceforth a more vulnerable target to any other enemy planes in the area. Using flaps does help a bit with decreasing the amount of speed lost in a turn, but it is not beneficial enough to allow for minimal loss of speed. Like most early British fighters, it does not fare well in high-speed dives.

The Gladiator has four 7.7 mm (.303) Browning machine guns with a total of 2,000 rounds on hand. As with most other 7.7 mm guns the default rounds for the Browning's can be a bit weak in stopping power, but when equipped with tracer belts the four guns on this plane can be a deadly force to be reckoned with, as they can trigger fires and do a considerable amount of damage as a result.

General info

Flight performance

Max speed
at 4 420 m414 km/h
Turn time15 s
Max altitude10 211 m
EngineBristol Mercury VIIIA/AS
TypeRadial
Cooling systemAir
Take-off weight2 t

The Gladiator Mk II behaves very well in the sky, it got a decent acceleration to compared single set of wings fighters, but for a Biplane it got a excellent acceleration. manoeuvrability like many other Biplanes of War Thunder it's an excellent turnfighter and avoid bursts with, making it a plane to avoid trying to engage with at close combat. For a biplane it got an excellent speed to get close to the other biplanes but can also keep up with other fighter types can have problem with the acceleration to keep up with certain fighters. Its most important characteristics is being able to turn and keep up with other biplanes, being able to handle up to 11G and -5G make it a good plane to make tight turns without having to be concerned about the G force overload.

Characteristics Max Speed
(km/h at 4,420 m)
Max altitude
(metres)
Turn time
(seconds)
Rate of climb
(metres/second)
Take-off run
(metres)
AB RB AB RB AB RB
Stock 399 386 10211 16.7 17.7 13.0 13.0 232
Upgraded 431 414 15.3 16.0 18.8 15.7

Details

Features
Combat flaps Take-off flaps Landing flaps Air brakes Arrestor gear
X X X
Limits
Wings (km/h) Gear (km/h) Flaps (km/h) Max Static G
Combat Take-off Landing + -
560 560 N/A 469 320 ~11 ~5
Optimal velocities (km/h)
Ailerons Rudder Elevators Radiator
< 240 < 180 < 330 > 190
Compressor (RB/SB)
Setting 1
Optimal altitude 100% Engine power WEP Engine power
4,100 m 810 hp 850 hp

Survivability and armour

Crew1 person
Speed of destruction
Structural560 km/h
Gear560 km/h

The Gladiator Mk II does not have any particular armour on the plane itself, making the pilot exposed to being hit by bullet can be fatal and instantly knocked unconscious. The survivability of the aircraft over all is decent when in its own BR and not facing any cannons other than most 7,62mm and 7,92mm Machine guns. But it's still best to avoid being hit as much as possible in the Gladiator Mk II since it does not have much armour its survivability can be questioned at the damage it can take before going down.

Modifications and economy

Repair costBasic → Reference
AB117 → 146 Sl icon.png
RB161 → 201 Sl icon.png
SB113 → 141 Sl icon.png
Total cost of modifications2 960 Rp icon.png
885 Sl icon.png
Talisman cost190 Ge icon.png
Crew training200 Sl icon.png
Experts1 000 Sl icon.png
Aces20 Ge icon.png
Research Aces96 000 Rp icon.png
Reward for battleAB / RB / SB
10 / 20 / 60 % Sl icon.png
100 / 100 / 100 % Rp icon.png
Modifications
Flight performance Survivability Weaponry
Mods aerodinamic fuse.png
Fuselage repair
Research:
200 Rp icon.png
Cost:
60 Sl icon.png
40 Ge icon.png
Mods radiator.png
Radiator
Research:
200 Rp icon.png
Cost:
60 Sl icon.png
40 Ge icon.png
Mods compressor.png
Compressor
Research:
220 Rp icon.png
Cost:
65 Sl icon.png
45 Ge icon.png
Mods aerodinamic wing.png
Wings repair
Research:
370 Rp icon.png
Cost:
110 Sl icon.png
70 Ge icon.png
Mods new engine.png
Engine
Research:
370 Rp icon.png
Cost:
110 Sl icon.png
70 Ge icon.png
Mods metanol.png
Engine injection
Research:
480 Rp icon.png
Cost:
145 Sl icon.png
95 Ge icon.png
Mods armor frame.png
Airframe
Research:
220 Rp icon.png
Cost:
65 Sl icon.png
45 Ge icon.png
Mods armor cover.png
Cover
Research:
480 Rp icon.png
Cost:
145 Sl icon.png
95 Ge icon.png
Mods ammo.png
bmg303_belt_pack
Research:
200 Rp icon.png
Cost:
60 Sl icon.png
40 Ge icon.png
Mod arrow 0.png
Mods weapon.png
bmg303_new_gun
Research:
220 Rp icon.png
Cost:
65 Sl icon.png
45 Ge icon.png

Armaments

Offensive armament

Ammunition2 000 rounds
Fire rate1 000 shots/min

The Gladiator Mk II is armed with:

  • 2 x 7.7 mm Browning .303 machine guns, nose-mounted (600 rpg = 1,200 total)
  • 2 x 7.7 mm Browning .303 machine guns, wing-mounted (400 rpg = 800 total)

Usage in battles

Simulator:

The Gladiator is a lovely plane to learn with in Sim. It can be used in turnfighting and bomber interception. Like in AB and RB, it is excellent in turning tightly and continuously, and it has lovely low-speed handling and low stall speeds, making it a great starter plane for Sim. Also it has a decent reflector sight for an early biplane, unlike other early planes with those awful telescope-like sight, which is an advantage in all engagements. However it does have its drawbacks: the rather big nose blocks the visibility a lot, offering very poor over-the-nose visibility which is a disadvantage in a turn fight, because when leading a shot the enemy will always get obstructed by the engine, making the player guess the shot. Also its upper wings and various frames and strings between the wings will get in the way when you look aside.

Note: it is recommended to set the convergence within 300 m, with vertical convergence on, because the majority of turnfights happen at that range or closer.

Before engaging a fight, it is better to have an altitude advantage first. When approaching the fight try to figure out which is your teammate and which is the enemy, to avoid going for a second pass, as the energy retention of the Gladiator is rather slow. Also pick your target carefully. For easier aiming, you want to go for those unmanoeuvrable twin engine aircraft like Ju 88 or Ki-45, or bombers if there are any. Given the bad forward visibility of the Gladiator, these are the best options as they are quite slow and sluggish, and are a bigger target to hit. However getting hits on them doesn't mean good damage, so you must be patient. When dealing with fighters, it is way harder to aim. The elevator control of the Gladiator is quite sensitive, giving it good manoeuvrability, but at the same time, bad handling. The Gladiator will respond in a very fast turn upon moving your stick/mouse by a little bit, which makes tracking nimble planes quite hard. But once you get used to it, try to lure every enemy into a turnfight, as that is where the Gladiator shines. Quite a bit of bullets are required to effectively damage the enemy so you must be patient. If you find an enemy at your six, utilise your great turning ability and simply do tight turns, most monoplanes won't be able to cut inside your turn and they might disengage. However with biplanes you will need some defensive manoeuvres like barrel rolls.

If you are not very experienced in Sim, you can also go for even bigger targets (bombers) for easier aiming. However you want to be more careful when hunting bombers, since with the Sim control (whether it be mouse joystick or a real stick) the plane will manoeuvre much more gently, making itself a great target for the bomber's gunners. DO NOT follow behind a bomber's six unless you are sure that its tail gunners are unconscious. Chasing behind a bomber makes yourself stationary for the tail gunners, and you will be showered with bullets. Your big radial engine will usually get damaged. Instead, before attacking, get an altitude advantage over the bomber by flying around 2 km above it. The bomber should only fill up about 1/6 of your gunsight. The best position for an attack is at the bomber's high six so you can adjust the lead much easier. Dive at the bomber, but not directly at it, try to predict where you two will crash by imagining yourself as a missile, that's where you should aim at (deflection shooting). To maximise the damage it is better to aim for their wings and engines, as the fuselage usually soaks up quite some bullets. Only fire when the bomber passes in front of your guns. This short window might seem inadequate to do anything, but with a accurate burst on the engine the 4 MG can at least damage it. With an engine damaged most bombers cannot go far.

Enemies worth noting:

Ki-27, N1K1, He 51, I-15, etc. - Those commonly seen planes are equally good at turnfights and will be a hard target to down since they are very small and agile. To deal with them you need to practice leading and deflection shots, plus manoeuvres like barrel rolls and scissors. They still need plenty of bullets to get damaged, so these kind of targets are the hardest to kill and requires great skills from the player. Specific notes to the I-15: do not try to out-turn it. Use the Gladiator's speed advantage over it.

Do 17 Z-2 - This early twin engine plane always shows up as an AI controlled recon aircraft that you have to down, which is a good news as AI won't manoeuvre aggressively. However this plane is extremely durable for the Gladiator's weak MGs. When it shows up as an AI, deflection shots are not recommended as the small shooting windows really does nothing. Instead, try disabling its 2 gunners first, then just sit behind it and burst on its wings and engines. When attacking the gunners try to not get your engine damaged by pulling evasive manoeuvres as soon as the bullets come close, since the Do 17 might outrun the Gladiator in a level flight if your engine is damaged.

He 100, Bf 109 E, He 112 - These early monoplanes might not be able to out-turn the Gladiator, but they can easily outrun it as the Gladiator is rather slow. These fighters will usually BnZ you, so you must constantly look above and behind you. If they are diving on you, use your roll rate and dodge under their negative G areas. Most players will try to follow up, if not immediately losing track of you. Several dodges might make them impatient and give up BnZ, and if they really start to turnfight with you, they are already dead.

Manual Engine Control

MEC elements
Mixer Pitch Radiator Supercharger Turbocharger
Oil Water Type
Controllable Not controllable
Not auto controlled
Not controllable
Not auto controlled
Not controllable
Not auto controlled
Separate Not controllable
1 gear
Not controllable

Pros and cons

Pros:

  • Armament is equal to or better than other fighters in its battle rating range
  • Good manoeuvrability in a turn
  • Tracer belts, like all other planes fitted with Browning machine guns, can be deadly
  • Has flaps, unlike most other biplane fighters

Cons:

  • Sluggish in acceleration and top speed (fixed-pitch propeller can exacerbate this problem)
  • Performance deficiencies can make it an easy target for experienced or more difficult adversaries
  • Not the best climber
  • Bleeds speed in turns, even when using flaps

History

One of the greatest claims to fame of the Gloster Gladiator was the Siege of Malta, which was, at the time, controlled by Great Britain. Because of the high value of Malta (it is only about 400 miles south of Italy, and on the map, it is an island in the middle of the Mediterranean), the IAF (Italian Air Force) using mainly SM.79 Sparviero bombers began bombing Malta into submission starting June 11, 1940. Due to the remote location of Malta and the fact that the British forces had to cover the Suez Canal, there were very few fighters available to defend against the IAF - so few that, as legend has it, there were only 3 Gloster Gladiators available: Faith, Hope, and Charity. In reality, there were at least 6 Gladiators, and after the first few weeks of the Siege, 4 Hurricanes en route to North Africa were pressed into service. Amazingly, against 40 - 50 bombers in the initial raids, the resistance was fierce enough to force the Italians to send a fighter escort of MC.200 Saetta fighters. By the end of 1940, Malta was nowhere near defeated, and quite, on the contrary, the RAF claimed an impressive 45 kills. However, the antiquated Gladiators were retired, being replaced by more effective Hurricane IIAs and Spitfires.


Archive of the in-game description

The Gloster Gladiator was a single engine, single seat fighter which entered service in 1937 as the Royal Air Force's last biplane fighter. Often overshadowed by more modern monoplanes, it still remained arguably the greatest biplane fighter of all time.

Biplane design was already considered outdated by the time production of the Gladiator started, but it was feared that Britain might not have time to develop more modern monoplanes in sufficient quantities before full scale war began.

Building on the success of the earlier Gauntlet fighter, the Gladiator was developed to replace the aging Bristol Bulldog. Featuring an enclosed cockpit, new wings and a more streamlined fixed undercarriage, the armament was also increased to four 0.303 inch machine guns. Initially, 231 Gladiator Mk Is were delivered to the RAF.

The Mk II model had the more reliable Bristol Mercury VIIIA / AS engine with an output of 830 horsepower in place of the Mk I's Mercury IX; this was also fitted with an electrical starter motor, automatic mixture control, Vokes air filter and a metal three bladed propeller to replace the earlier wooden two bladed variant. 38 Gladiator Mk IIs were also fitted with arrestor hooks to serve in the Fleet Air Arm as Sea Gladiators until 60 fully navalised variants were also delivered, the latter being fitted with catapult points and a dinghy stowage.

A total of 746 Gladiator aircraft were produced, and served with distinction in the opening phases of the war, notably during the Norwegian Campaign and in the defence of Malta. Pilots who achieved success in the Gladiator included the RAF's top scorer, Squadron Leader 'Pat' Pattle, who scored 15 ½ confirmed kills in Gladiators, and Royal Navy Commander Charles Keighly-Peach, who trained several of his Swordfish pilots in fighter tactics to operate from HMS Eagle in the Mediterranean.


Media

Skins
Videos

See also

Links to the articles on the War Thunder Wiki that you think will be useful for the reader, for example:

  • reference to the series of the aircraft;
  • links to approximate analogues of other nations and research trees.

External links


Gloster Aircraft Company, Limited
Fighters  Gladiator Mk II · Sea Gladiator Mk I · Gladiator Mk IIS · Tuck's Gladiator Mk II
Jet Fighters  Meteor F Mk 3 · Sea Meteor F Mk 3 · Meteor F Mk 4 G.41F · Meteor F Mk 4 G.41G · Meteor F Mk 8 G.41K · Meteor F Mk.8 Reaper
  Javelin F.(A.W.) Mk.9
Export  J8A · Iacobi's J8A · ␗Gladiator Mk I · Gladiator Mk IIF
  Meteor NF.13 · Meteor F.8

Britain fighters
Fury  Fury Mk I · Fury Mk II
Nimrod  Nimrod Mk I · Nimrod Mk II
Gladiator  Gladiator Mk II · Tuck's Gladiator Mk II · Gladiator Mk IIF · Gladiator Mk IIS
Sea Gladiator  Sea Gladiator Mk I
Hurricane  Hurricane Mk I/L · Hurricane Mk.I/L FAA M · Hurricane Mk IIB/Trop
Sea Hurricane  Sea Hurricane Mk IB · Sea Hurricane Mk IC
Martin-Baker  MB.5
Spitfire (early-Merlin)  Spitfire Mk Ia · Spitfire Mk IIa · Spitfire Mk.IIa Venture I · Spitfire Mk IIb · Spitfire Mk Vb/trop · Spitfire Mk Vb · Spitfire Mk Vc/trop · Spitfire Mk Vc
Spitfire (late-Merlin)  Spitfire F Mk IX · Spitfire LF Mk IX · Spitfire F Mk IXc · Plagis' Spitfire LF Mk IXc · Spitfire F Mk XVI
Spitfire (Griffon)  Spitfire F Mk XIVc · Spitfire F Mk XIVe · Prendergast's Spitfire FR Mk XIVe · Spitfire F Mk XVIIIe · Spitfire F Mk 22 · Spitfire F Mk 24
Seafire  Seafire LF Mk.III · Seafire F Mk XVII · Seafire FR 47
Typhoon  Typhoon Mk Ia · Typhoon Mk Ib · Typhoon Mk Ib/L
Tempest  Tempest Mk II · Tempest Mk V
Sea Fury  Sea Fury FB 11
Twin-engine fighters  Hornet Mk.I · Hornet Mk.III · Whirlwind Mk I · Whirlwind P.9
  Foreign:
Australia  ▄Boomerang Mk I · ▄Boomerang Mk II
France  ▄D.520 · ▄D.521
USA  ▄Martlet Mk IV · ▄Corsair F Mk II · ▄Hellcat Mk II · ▄Thunderbolt Mk.1 · ▄Mustang Mk IA