Thunderbolt Mk.1 (Great Britain)

From War Thunder Wiki
Jump to: navigation, search
Rank VI USA | Premium | Golden Eagles
A-10A Thunderbolt (Early)
This page is about the premium British fighter Thunderbolt Mk.1 (Great Britain). For other versions, see P-47 (Family).
▄Thunderbolt Mk.1
thunderbolt_mk1.png
GarageImage Thunderbolt Mk.1 (Great Britain).jpg
▄Thunderbolt Mk.1
AB RB SB
3.7 3.7 3.7
Purchase:1 600 Specs-Card-Eagle.png
Show in game

Description

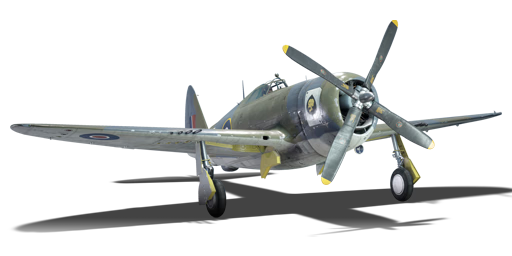
The ▄Thunderbolt Mk.1 is a premium rank III British fighter with a battle rating of 3.7 (AB/RB/SB). It was introduced in Update "Raining Fire".

The Thunderbolt Mk.1 is the British designation for a P-47D with a razorback cockpit design. Compared to the American version, the Thunderbolt Mk.1 comes with a slightly weaker engine, and so the maximum speed and rate of climb is not as fast as the American tech tree version.

General info

Flight performance

Max speed
at 7 924 m676 km/h
Turn time25 s
Max altitude12 200 m
EnginePratt & Whitney R-2800-59
TypeRadial
Cooling systemAir
Take-off weight10 t

In Arcade Battles, the P-47 can be pushed to its limits. Climb rate, turn rate, and responsiveness are all dramatically increased. Still, tactics used in RB also apply very well in Arcade- this fighter is great for practising Boom & Zoom in Arcade due to the impressive climb rate in this mode. However, the skill will not be built nearly as well in this mode, as rolling scissors and "skidding" manoeuvres will not really be needed.

Overall, the P-47 is a very pleasurable plane to fly for a quick jaunt in arcade battles.

Characteristics Max Speed
(km/h at 7,925 m)
Max altitude
(metres)
Turn time
(seconds)
Rate of climb
(metres/second)
Take-off run
(metres)
AB RB AB RB AB RB
Stock 650 632 12200 26.2 27.2 8.0 8.0 600
Upgraded 705 676 23.9 25.0 16.1 11.5

Details

Features
Combat flaps Take-off flaps Landing flaps Air brakes Arrestor gear
X X
Limits
Wings (km/h) Gear (km/h) Flaps (km/h) Max Static G
Combat Take-off Landing + -
0 450 498 469 320 ~13 ~5
Optimal velocities (km/h)
Ailerons Rudder Elevators Radiator
< 402 < 420 < 470 > 335

Survivability and armour

Crew1 person
Speed of destruction
Structural0 km/h
Gear450 km/h
  • 9.5 mm steel behind oil cooling system
  • 9.5 mm steel under bulletproof glass
  • 38 mm bulletproof glass in front of the pilot
  • Self-sealing fuel tanks (1 under the pilot, 1 in front of the pilot)

Modifications and economy

Repair cost
AB695 Sl icon.png
RB4 396 Sl icon.png
SB2 332 Sl icon.png
Crew training10 000 Sl icon.png
Experts165 000 Sl icon.png
Aces590 Ge icon.png
Research Aces710 000 Rp icon.png
Reward for battleAB / RB / SB
Talisman.png 2 × 70 / 220 / 350 % Sl icon.png
Talisman.png 2 × 148 / 148 / 148 % Rp icon.png
Modifications
Flight performance Survivability Weaponry
Mods aerodinamic fuse.png
Fuselage repair
Mods radiator.png
Radiator
Mods armor frame.png
Airframe
Mods compressor.png
Compressor
Mods aerodinamic wing.png
Wings repair
Mods new engine.png
Engine
Mods armor cover.png
Cover
Mods metanol.png
Engine injection
Mods g suit.png
G-suit
Mods ammo.png
bmg50_belt_pack
Mod arrow 1.png
Mods pilon rocket.png
Rocket Launcher M10
Mods pilon bomb.png
FSBC mk.5
Mod arrow 0.png
Mods weapon.png
bmg50_new_gun
Mods pilon bomb.png
FMBC mk.1
Mod arrow 0.png
Mods pilon bomb.png
FLBC mk.1

Armaments

Offensive armament

Main article: M2 Browning (12.7 mm)

The Thunderbolt Mk.1 (Great Britain) is armed with:

  • 8 x 12.7 mm M2 Browning machine guns, wing-mounted (425 rpg = 3,400 total)

Suspended armament

The Thunderbolt Mk.1 (Great Britain) can be outfitted with the following ordnance:

1 2 3 4 5
Hardpoints P-47D-22-RE.png
250 lb AN-M57 bombs 1 1 1
500 lb AN-M64A1 bombs 1 1 1
1,000 lb AN-M65A1 bombs 1 1
M8 rockets 3 3
Maximum permissible loadout weight: 1,340 kg
Maximum permissible weight imbalance: 520 kg
Default weapon presets
  • Without load
  • 6 x M8 rockets
  • 3 x 250 lb AN-M57 bombs (750 lb total)
  • 3 x 500 lb AN-M64A1 bombs (1,500 lb total)
  • 2 x 1,000 lb AN-M65A1 bombs (2,000 lb total)

Usage in battles

Simulator/EC

In Simulator/Enduring Confrontation, bulkier planes that suffer in AB & RB shine and that, of course, includes the P-47. Sitting at BR 3.7, the lowest BR for rank 3 EC, it can respawn infinitely which makes it a great learning platform for new EC players. In Sim, the P-47 has great control handling, fast speed, and a wide range of additional armaments of bombs and rockets, plus the original 8 x .50 cal, meaning it is an excellent multi-role aircraft. However, compared to the later Jugs with the all-clear bubble canopy, the razorback P-47 has worse visibility. The front has quite some frames around the gunsight, but they are thin which is good news. The sides are overall unaffected. The rearview, however, is greatly obstructed by the razorback, preventing the pilot from seeing what's on the tail which can be fatal sometimes.

The P-47 can perform base-bombing, ground-pounding, bomber intercepting and traditional BnZ fighting. Sim is different from realistic, so discard the habit of bringing the least fuel. Bring at least 30 minutes of fuel, although it decreases the plane's performance a bit, it prevents constant refuelling which saves time for patrolling and fighting.

For base bombing, choose the maximum setup of 1 x 500 lbs and 2 x 1,000 lbs to maximise the damage. The fastest way to get to a base is to remain at tree-top level upon taking off. This way there is no need to climb so the P-47 can pick up quite some speed like that, even with the full bombload. It is also harder to be seen since the P-47's dark colour will blend in with the ground for some maps. When approaching the base, check its position with the minimap to ensure it's the right target. When the base fills up the gunsight, pull up to around 500 m and then dive at the base at a rather shallow angle. When the gunsight slices past the furthest edge of the base, release all the bombs, bank to the direction of the nearest friendly airfield, descend back to tree-top level and fly back. If you are lucky, you might even catch some enemy bombers that just took off from a nearby airfield. They will be some nice RP for you. Overall, base bombing is the safest way to get rewards but not the most efficient.

For ground-pounding, you can choose to take the full bombload if you want. Use the bombs to take out pillboxes and tanks. The aiming method for bombs is pretty similar to base bombing, but there are differences for the 500 lb and 1,000 lb, as their drop are different and you want to adapt the aim to be more precise because now the targets are much smaller. Dive at a shallow angle to approach the target, try to get as close as possible but avoid crashing into the ground. When the gunsight slices through and just above the target, drop the 1,000 lbs. When the target is at the centre of the gunsight and fills up around 1/3 of it, release the 500 lb. The 8 MGs are perfect for destroying trucks, AA guns and artilleries as they have plenty of ammo. However, constantly watch your surrounding, especially your high 6 o'clock for any incoming enemies.

You want to be more careful when hunting bombers, since with the Sim control (whether it be mouse joystick or a real stick) the plane will manoeuvre much more gently, making itself a great target for the bomber's gunners. Do not follow behind a bomber's 6 o'clock unless you are sure that its tail gunners are unconscious. Chasing behind a bomber makes yourself pretty much stationary for the tail gunners, and you will be showered with bullets. The big radial engine of the P-47 will usually get damaged. Instead, before launching an attack, get an altitude advantage over the bomber by flying around 2 km above it. The bomber should only fill up about 1/6 of your gunsight. The best position for an attack is at the bomber's high 6 so you can adjust the lead much easier. Dive at the bomber, but not directly at it, try to predict where you two will crash by imagining yourself as a missile, that's where you should aim at (deflection shooting). To maximise the damage it is better to aim for their wings and engines, as the fuselage usually soaks up quite some bullets. Only fire when the bomber passes in front of your guns. This short window might seems inadequate to do anything, but the 8 MG on the P-47 are actually quite destructive, as sometimes it only takes one bullet to set the target aflame.

As for dogfighting, because almost all aerial battles in Sim occurs at below 3,000 m, the P-47 can easily climb to this altitude and gather up lots of speed before engaging a battle. The tactic is similar to the RB one above. If, unfortunately, you find yourself being chased at your 6 and you don't know how to do any defensive manoeuvres, do a large, smooth turn towards the nearest friendly airfield to avoid bleeding too much speed. Then shallow-dive towards your airfield. The P-47 can quite easily outrun opponents like the A6M or Bf 109 E but struggles to outrun Bf 109 F/G, Fw 190 A or other P-47. Another way of disengaging is to do a sudden split-S to dodge under the chaser. Average Sim players will now try and see where you went, if not immediately losing track of you. You can then run for your airfield or shallow climb for another attack.

Enemies worth noting:

  • Me 264 - This giant is one of the few bombers who get air spawns in Sim, so it usually flies higher than you think. On top of this, the Me 264 is armed with large calibre MG and cannons all over it, therefore tailing a 264 is basically suicide unless all of their gunners are knocked out. You can treat the 264 almost like a B-29 or B-17 as they are very similar in both design and defensive capabilities. It is best to head-on the 264 if you can as you can easily knock out the pilots due to its glazed nose while also taking minimal damage. However, the bomber lacks a ventral turret on its belly, making it easy to deal damage from below, but be wary of the downwards facing rear 20 mm cannon near the tail. The safest way to attack is from a higher altitude, dive at an oblique angle and focus fire on the wings and nose. Never engage if you have no altitude advantage.
  • Bf 110, Ki-45, A-26 - As mentioned before, those twin-engine aircraft are a big threat since their lack of manoeuvrability comparing to single-engine fighters are minimised in Sim. They are usually armed with heavy guns & cannons in the nose, so an accurate burst will tear any plane apart, including the P-47. The P-47 manoeuvres rather sluggishly and you might get out-turned from even those heavy fighters, so engage them with either altitude or speed advantage to avoid being targeted. If they are not manoeuvring aggressively, aim for their wings or engines. If the fight is intense and you cannot smooth the aim, just burst anywhere as long as you hit them, the 12.7 mm bullets will damage their flight models quite a bit.
  • Yak-2 KABB - Do not think that the Thunderbolt can confidently out manoeuvre this plane just because it is twin-engined. The Yak-2 has an amazing turn rate for a heavy fighter, thus the Thunderbolt must avoid turning with it, if not dogfighting with it in general. It bears a pair of ShVAK cannons that can easily damage your vital parts like engine or cooling systems. It has green camouflage, greatly resembling a Me 410 but with an H-tail like a Bf 110's.
  • ZSD63 (tank RB) - Though it is hard to identify specific SPAA vehicles on the ground (especially when they are shooting tracers at you), if a ZSD63 is identified, avoid it at all costs and do not attempt head-ons with it, ever. It can easily snap a wing off by casually putting a short burst in the Thunderbolt's flight path. Don't even get close to it unless it is occupied with another friendly or if the Thunderbolt is equipped with a bomb that it can use. Some identifying features of the ZSD63 is its rather boxy and tall hull with a geometric turret sitting at the back, slightly similar to a Wirbelwind's. The firing manner is also distinctive: the sound and green tracers are very rapid, much like a buzz saw, but then it will remain silent for half a minute reloading. Note that an experienced ZSD player will hold its fire or shoot in short salvoes with long halts between, making it look like that it's reloading. The armour-piercing belt is recommended since their high penetration can tear through the ZSD's armour with ease and knock out its crews.

Manual Engine Control

MEC elements
Mixer Pitch Radiator Supercharger Turbocharger
Oil Water Type
Controllable Controllable
Auto control available
Controllable
Not auto controlled
Controllable
Not auto controlled
Separate Controllable
1 gear
Auto controlled

Pros and cons

Pros:

  • Great at diving and Boom & Zoom, thanks to its responsiveness at high speed
  • Great multirole aircraft, can carry various bombs and rockets, acting as an interceptor or ground-attack aircraft
  • Impressive speed, great engine performance above 6,000 m
  • Very rugged construction can keep the plane flying despite damages
  • Impressive firepower of 8 x 12.7 mm M2 Browning machine guns with also impressive ammunition pool
  • Can easily escape enemies with its high speed for its rank
  • One of the few fighters that can carry both bombs and rockets at the same time, making it excellent for ground attack
  • By using opposite rudder and aileron controls, for example, left rudder and right aileron, the Thunderbolt can "skid" quickly in the direction of the rudder - very useful to dodge shots

Cons:

  • Terrible turning time at low altitude/low speed
  • Mediocre climb performance (side climbing recommended)
  • Larger than average fighters
  • Poor overall performance when mounting payloads
  • After attacking ground targets, the P-47 lacks the altitude to Boom & Zoom enemy fighters
  • Big engine easily hit during a head-on attack
  • In Simulator, the view is more obstructed especially towards the rear due to more framing, comparing to the later bubble canopy variants

History

A wartime photograph of a "razorback" RAF Thunderbolt Mk. I in British service.

The United Kingdom became the second-largest user of the P-47 Thunderbolt, which had already become an icon of the Allied air forces. During the course of the Second World War, the country eventually acquires a total of 830 Thunderbolts Mk. I and Mk. II aircraft, based on the American P-47D. These aircraft served in the Eastern theatre between 1944 and 1946, gaining a reputation for being a highly durable bomber escort and ground-attack fighter[1].

Design and procurement

The P-47 Thunderbolt, designed and developed by Alexander Kartveli, had gained a reputation for being a highly durable bomber-escort and ground-attack aircraft during its service with the USAF. As a result, the United Kingdom decided to lease 830 P-47D aircraft for service. These aircraft were of the Razorback (P-47D-22-RE)[2] variant, as well as of the Bubble-Canopy (P-47D-25/-30-RE)[2] variant. The Razorback Thunderbolts would be known as the Thunderbolt Mk. I, while the Bubble-Canopied Thunderbolts were known as the Thunderbolt Mk. II. A total of 240 Thunderbolt Mk. Is were delivered, followed by 590 Thunderbolt Mk. IIs[3].

Service life

The Thunderbolt Mk I started entering service with the RAF in 1944, far later than it's American counterparts. Though initially disliked by RAF pilots due to its massive size (almost three times as heavy as the Spitfire Mk. IX), the aircraft soon became popular with pilots due to its ruggedness. The P-47 was appropriately nicknamed 'Jug', due to it's similar appearance to a milk jug[4].

As the British Thunderbolt was unneeded in the European theatre, the aircraft was diverted to fight over the skies of East Asia. The Thunderbolt's ruggedness, long-range and impressive low-altitude performance made it an ideal replacement for the RAF Hurricanes that were stationed in Burma at the time[1]. The aircraft soon gained a reputation for being a highly effective ground-attacker, wreaking havoc against Japanese convoys. The aircraft also served as a high-altitude bomber escort, accompanying RAF B-24 Liberators on their bombing runs[1].

Following the end of the war, most RAF Thunderbolt squadrons retired their old aircraft and converted to the newer, faster Hawker Tempest. However, some units were sent to Batavia (present-day Jakarta) in an attempt to reintroduce Dutch colonial rule[1]. These aircraft were used extensively in ground-attack roles, dropping bombs against the Indonesian guerillas. The last RAF P-47 Squadron retired their 'Jugs' in 1946[2], ending the P-47's service life with the Royal Air Force.

Media

Skins
Images

See also

Links to the articles on the War Thunder Wiki that you think will be useful for the reader, for example:

  • reference to the series of the aircraft;
  • links to approximate analogues of other nations and research trees.

External links

References

Citations
  1. 1.0 1.1 1.2 1.3 RAF Museum (2018)
  2. 2.0 2.1 2.2 RAF Commands (2017)
  3. J, Rickard (2007)
  4. National Interest (2019)
Bibliography


Republic Aviation Corporation
Fighters  P-43A-1
  P-47D-22-RE · P-47D-25 · P-47D-28 · P-47M-1-RE · ⋠P-47M-1-RE · P-47N-15
Jet Aircraft  F-84B-26 · F-84F · F-84G-21-RE
  F-105D
Export  J9 Early*
  ␗P-43A-1
  ▄Thunderbolt Mk.1 · ▄P-47D-22-RE · ␗P-47D-23-RA · ▂P-47D-27 · ␗P-47D-30 · ▄P-47D-30 · ␗F-47N-25-RE
  ◄F-84F · ▄F-84F (Italy) · ▄F-84F (France) · F-84F IAF · F-84F
  ␗F-84G-21-RE · ▄F-84G-21-RE · ▄F-84G-26-RE · ␗F-84G-31-RE
Captured  ▀P-47D-16-RE · ▀P-47D
  *The company was named "Seversky Aircraft Company" before being renamed in 1939

Britain fighters
Fury  Fury Mk I · Fury Mk II
Nimrod  Nimrod Mk I · Nimrod Mk II
Gladiator  Gladiator Mk II · Tuck's Gladiator Mk II · Gladiator Mk IIF · Gladiator Mk IIS
Sea Gladiator  Sea Gladiator Mk I
Hurricane  Hurricane Mk I/L · Hurricane Mk.I/L FAA M · Hurricane Mk IIB/Trop
Sea Hurricane  Sea Hurricane Mk IB · Sea Hurricane Mk IC
Martin-Baker  MB.5
Spitfire (early-Merlin)  Spitfire Mk Ia · Spitfire Mk IIa · Spitfire Mk.IIa Venture I · Spitfire Mk IIb · Spitfire Mk Vb/trop · Spitfire Mk Vb · Spitfire Mk Vc/trop · Spitfire Mk Vc
Spitfire (late-Merlin)  Spitfire F Mk IX · Spitfire LF Mk IX · Spitfire F Mk IXc · Plagis' Spitfire LF Mk IXc · Spitfire F Mk XVI
Spitfire (Griffon)  Spitfire F Mk XIVc · Spitfire F Mk XIVe · Prendergast's Spitfire FR Mk XIVe · Spitfire F Mk XVIIIe · Spitfire F Mk 22 · Spitfire F Mk 24
Seafire  Seafire LF Mk.III · Seafire F Mk XVII · Seafire FR 47
Typhoon  Typhoon Mk Ia · Typhoon Mk Ib · Typhoon Mk Ib/L
Tempest  Tempest Mk II · Tempest Mk V
Sea Fury  Sea Fury FB 11
Twin-engine fighters  Hornet Mk.I · Hornet Mk.III · Whirlwind Mk I · Whirlwind P.9
  Foreign:
Australia  ▄Boomerang Mk I · ▄Boomerang Mk II
France  ▄D.520 · ▄D.521
USA  ▄Martlet Mk IV · ▄Corsair F Mk II · ▄Hellcat Mk II · ▄Thunderbolt Mk.1 · ▄Mustang Mk IA

Britain premium aircraft
Fighters  Tuck's Gladiator Mk II · ▄Boomerang Mk I · ▄Boomerang Mk II · ▄D.520
  ▄Martlet Mk IV · ▄Corsair F Mk II · ▄Hellcat Mk II · ▄Thunderbolt Mk.1 · ▄Mustang Mk IA
  Hurricane Mk.I/L FAA M · Spitfire Mk.IIa Venture I · Spitfire F Mk IXc · Plagis' Spitfire LF Mk IXc · Spitfire F Mk XIVc · Prendergast's Spitfire FR Mk XIVe
  Typhoon Mk Ib · MB.5
Twin-engine fighters  Hornet Mk.I · Whirlwind P.9
Jet fighters  Attacker FB.2 · Hunter FGA.9 · Lightning F.53 · Meteor F Mk.8 Reaper · Sea Vixen F.A.W. Mk.2 · F-4J(UK) Phantom II · ▄MiG-21 Bison
Strike aircraft  ▄Wirraway · Beaufighter Mk I (40-mm) · Wyvern S4
  Harrier GR.1 · Strikemaster Mk.88
Bombers  ▄Avenger Mk II · ▄Boston Mk I · ▄Catalina Mk IIIa · ▄DB-7 · ▄Havoc Mk I · ▄Hudson Mk V · Swordfish Mk II