Difference between revisions of "AGS"
(→Pros and cons) |
m (→See also) (Tag: Visual edit) |
||
| (17 intermediate revisions by 9 users not shown) | |||
| Line 7: | Line 7: | ||
== Description == | == Description == | ||
<!-- ''In the description, the first part should be about the history of the creation and combat usage of the vehicle, as well as its key features. In the second part, tell the reader about the ground vehicle in the game. Insert a screenshot of the vehicle, so that if the novice player does not remember the vehicle by name, he will immediately understand what kind of vehicle the article is talking about.'' --> | <!-- ''In the description, the first part should be about the history of the creation and combat usage of the vehicle, as well as its key features. In the second part, tell the reader about the ground vehicle in the game. Insert a screenshot of the vehicle, so that if the novice player does not remember the vehicle by name, he will immediately understand what kind of vehicle the article is talking about.'' --> | ||
| − | The | + | The '''{{Specs|name}}''' is a gift rank {{Specs|rank}} American light tank {{Battle-rating}}. It was introduced during [[Update "Winged Lions"]] as a reward for the [[wt:en/news/7469-event-operation-w-i-n-t-e-r-en|2021 Operation W.I.N.T.E.R.]] event. |
| − | |||
| − | |||
== General info == | == General info == | ||
| Line 15: | Line 13: | ||
{{Specs-Tank-Armour}} | {{Specs-Tank-Armour}} | ||
<!-- ''Describe armour protection. Note the most well protected and key weak areas. Appreciate the layout of modules as well as the number and location of crew members. Is the level of armour protection sufficient, is the placement of modules helpful for survival in combat? If necessary use a visual template to indicate the most secure and weak zones of the armour.'' --> | <!-- ''Describe armour protection. Note the most well protected and key weak areas. Appreciate the layout of modules as well as the number and location of crew members. Is the level of armour protection sufficient, is the placement of modules helpful for survival in combat? If necessary use a visual template to indicate the most secure and weak zones of the armour.'' --> | ||
| − | + | ''Describe armour protection. Note the most well protected and key weak areas. Appreciate the layout of modules as well as the number and location of crew members. Is the level of armour protection sufficient, is the placement of modules helpful for survival in combat? If necessary use a visual template to indicate the most secure and weak zones of the armour.'' | |
| − | '''Armour type:''' | + | '''Armour type:''' <!-- The types of armour present on the vehicle and their general locations --> |
| − | + | <!-- Example: * Rolled homogeneous armour (Front, Side, Rear, Hull roof) | |
| − | * | + | * Cast homogeneous armour (Turret, Transmission area) --> |
{| class="wikitable" | {| class="wikitable" | ||
| Line 25: | Line 23: | ||
! Armour !! Front (Slope angle) !! Sides !! Rear !! Roof | ! Armour !! Front (Slope angle) !! Sides !! Rear !! Roof | ||
|- | |- | ||
| − | | Hull || | + | | Hull || ___ mm || ___ mm ''Top'' <br> ___ mm ''Bottom'' || ___ mm || ___ - ___ mm |
| + | |- | ||
| + | | Turret || ___ - ___ mm ''Turret front'' <br> ___ mm ''Gun mantlet'' || ___ - ___ mm || ___ - ___ mm || ___ - ___ mm | ||
|- | |- | ||
| − | | | + | | Cupola || ___ mm || ___ mm || ___ mm || ___ mm |
|- | |- | ||
|} | |} | ||
| Line 52: | Line 52: | ||
{| class="wikitable" style="text-align:center" width="100%" | {| class="wikitable" style="text-align:center" width="100%" | ||
|- | |- | ||
| − | ! colspan="5" | [[M68A1 (105 mm)|105 mm M68A1]] || colspan="5" | Turret rotation speed (°/s) || Reloading rate (seconds) | + | ! colspan="5" | [[M68A1 (105 mm)|105 mm M68A1]] || colspan="5" | Turret rotation speed (°/s) || colspan="4" | Reloading rate (seconds) |
|- | |- | ||
! Mode !! Capacity !! Vertical !! Horizontal !! Stabilizer | ! Mode !! Capacity !! Vertical !! Horizontal !! Stabilizer | ||
! Stock !! Upgraded !! Full !! Expert !! Aced | ! Stock !! Upgraded !! Full !! Expert !! Aced | ||
| − | ! | + | ! Stock !! Full !! Expert !! Aced |
|- | |- | ||
! ''Arcade'' | ! ''Arcade'' | ||
| − | | rowspan="2" | 30 || rowspan="2" | -10°/+16° || rowspan="2" | ±180° || rowspan="2" | Two-plane || 38.1 || 52.7 || 64.0 || 70.8 || 75.3 || rowspan="2" | 5.00 | + | | rowspan="2" | 30 || rowspan="2" | -10°/+16° || rowspan="2" | ±180° || rowspan="2" | Two-plane || 38.1 || 52.7 || 64.0 || 70.8 || 75.3 || rowspan="2" | 5.00 || rowspan="2" | 5.00 || rowspan="2" | 5.00 || rowspan="2" | 5.00 |
|- | |- | ||
! ''Realistic'' | ! ''Realistic'' | ||
| Line 67: | Line 67: | ||
==== Ammunition ==== | ==== Ammunition ==== | ||
| − | {{:M68A1 (105 mm)/Ammunition|M456A2, M416, M393A2, M774, | + | {{:M68A1 (105 mm)/Ammunition|M456A2, M416, M393A2, M774, M735}} |
==== [[Ammo racks]] ==== | ==== [[Ammo racks]] ==== | ||
| Line 114: | Line 114: | ||
! Mount !! Capacity (Belt) !! Fire rate !! Vertical !! Horizontal | ! Mount !! Capacity (Belt) !! Fire rate !! Vertical !! Horizontal | ||
|- | |- | ||
| − | | Coaxial || 3,000 (200) || 941 || | + | | Coaxial || 3,000 (200) || 941 || N/A || N/A |
|- | |- | ||
|} | |} | ||
| Line 121: | Line 121: | ||
<!-- ''Describe the tactics of playing in the vehicle, the features of using vehicles in the team and advice on tactics. Refrain from creating a "guide" - do not impose a single point of view but instead give the reader food for thought. Describe the most dangerous enemies and give recommendations on fighting them. If necessary, note the specifics of the game in different modes (AB, RB, SB).'' --> | <!-- ''Describe the tactics of playing in the vehicle, the features of using vehicles in the team and advice on tactics. Refrain from creating a "guide" - do not impose a single point of view but instead give the reader food for thought. Describe the most dangerous enemies and give recommendations on fighting them. If necessary, note the specifics of the game in different modes (AB, RB, SB).'' --> | ||
| − | + | Use the AGS's excellent mobility to get to key points or flank the enemy and try to get into hull-down areas, when attacking enemies keep in mind that you don't have that much armour and your low crew count will get you easily knocked out by a single shot. If you prefer flanking, hit the enemy with a side shot and move around them; if they have a pintle-mounted MG or autocannon, use side scraping so you don't get penetrated. If you get spotted, you have smoke grenades at your disposal: use them and pull back to allied tanks. When you run out of ammo, the only option you have is to resupply at a captured point; but if all the points are taken by the enemy then you are out of luck. | |
| − | |||
| − | Use the AGS's excellent mobility to get to key points or flank the enemy and try to get into hull-down areas, when attacking enemies keep in mind that you don't have that much armour and your low crew count will get you easily knocked out by a single shot. | ||
| − | |||
| − | |||
=== Pros and cons === | === Pros and cons === | ||
| Line 134: | Line 130: | ||
* Unmanned turret grants a better survivability when hull-down | * Unmanned turret grants a better survivability when hull-down | ||
* Effective mobility | * Effective mobility | ||
| − | * Good gun depression | + | * Good gun |
| + | * Decent gun depression | ||
* Laser rangefinder | * Laser rangefinder | ||
* 5 second reload is faster than most competing tanks | * 5 second reload is faster than most competing tanks | ||
| − | |||
| − | |||
'''Cons:''' | '''Cons:''' | ||
* Little to no armour, with frontal weak spots | * Little to no armour, with frontal weak spots | ||
| − | |||
* Low-calibre machine guns are of little use | * Low-calibre machine guns are of little use | ||
| + | * Limited gun elevation | ||
* Its 1st generation thermal sights are vastly inferior to those of other encountered vehicles, such as the [[T-72AV (TURMS-T)]] | * Its 1st generation thermal sights are vastly inferior to those of other encountered vehicles, such as the [[T-72AV (TURMS-T)]] | ||
| + | * Low zoom optics make some long-range engagements difficult, if not impossible | ||
* Ammo rack is placed far into the back of the vehicle, being hit while on the move can prove accidentally fatal | * Ammo rack is placed far into the back of the vehicle, being hit while on the move can prove accidentally fatal | ||
* Gun only reloads from ready rack, if the ready rack is empty gun cannot reload until a shell is loaded into the ready rack, thus making extended engagements difficult | * Gun only reloads from ready rack, if the ready rack is empty gun cannot reload until a shell is loaded into the ready rack, thus making extended engagements difficult | ||
| Line 151: | Line 147: | ||
== History == | == History == | ||
<!-- ''Describe the history of the creation and combat usage of the vehicle in more detail than in the introduction. If the historical reference turns out to be too long, take it to a separate article, taking a link to the article about the vehicle and adding a block "/History" (example: <nowiki>https://wiki.warthunder.com/(Vehicle-name)/History</nowiki>) and add a link to it here using the <code>main</code> template. Be sure to reference text and sources by using <code><nowiki><ref></ref></nowiki></code>, as well as adding them at the end of the article with <code><nowiki><references /></nowiki></code>. This section may also include the vehicle's dev blog entry (if applicable) and the in-game encyclopedia description (under <code><nowiki>=== In-game description ===</nowiki></code>, also if applicable).'' --> | <!-- ''Describe the history of the creation and combat usage of the vehicle in more detail than in the introduction. If the historical reference turns out to be too long, take it to a separate article, taking a link to the article about the vehicle and adding a block "/History" (example: <nowiki>https://wiki.warthunder.com/(Vehicle-name)/History</nowiki>) and add a link to it here using the <code>main</code> template. Be sure to reference text and sources by using <code><nowiki><ref></ref></nowiki></code>, as well as adding them at the end of the article with <code><nowiki><references /></nowiki></code>. This section may also include the vehicle's dev blog entry (if applicable) and the in-game encyclopedia description (under <code><nowiki>=== In-game description ===</nowiki></code>, also if applicable).'' --> | ||
| − | + | ''Describe the history of the creation and combat usage of the vehicle in more detail than in the introduction. If the historical reference turns out to be too long, take it to a separate article, taking a link to the article about the vehicle and adding a block "/History" (example: <nowiki>https://wiki.warthunder.com/(Vehicle-name)/History</nowiki>) and add a link to it here using the <code>main</code> template. Be sure to reference text and sources by using <code><nowiki><ref></ref></nowiki></code>, as well as adding them at the end of the article with <code><nowiki><references /></nowiki></code>. This section may also include the vehicle's dev blog entry (if applicable) and the in-game encyclopedia description (under <code><nowiki>=== In-game description ===</nowiki></code>, also if applicable).'' | |
== Media == | == Media == | ||
| Line 159: | Line 155: | ||
* [https://live.warthunder.com/feed/camouflages/?vehicle=us_ags_teledyne Skins and camouflages for the {{PAGENAME}} from live.warthunder.com.] | * [https://live.warthunder.com/feed/camouflages/?vehicle=us_ags_teledyne Skins and camouflages for the {{PAGENAME}} from live.warthunder.com.] | ||
| − | |||
| − | |||
| − | |||
== See also == | == See also == | ||
| Line 171: | Line 164: | ||
* [[M1128]] | * [[M1128]] | ||
| − | * | + | * M1128 WolfPacl |
== External links == | == External links == | ||
Revision as of 12:00, 13 February 2023


Contents
Description
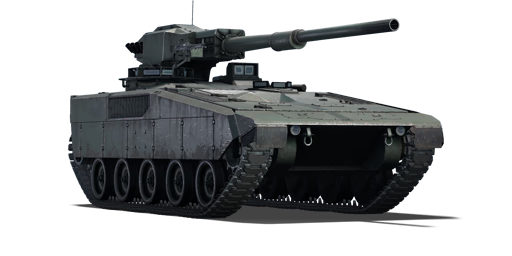
The TCM AGS is a gift rank VII American light tank with a battle rating of 11.0 (AB/RB/SB). It was introduced during Update "Winged Lions" as a reward for the 2021 Operation W.I.N.T.E.R. event.
General info
Survivability and armour
Describe armour protection. Note the most well protected and key weak areas. Appreciate the layout of modules as well as the number and location of crew members. Is the level of armour protection sufficient, is the placement of modules helpful for survival in combat? If necessary use a visual template to indicate the most secure and weak zones of the armour.
Armour type:
| Armour | Front (Slope angle) | Sides | Rear | Roof |
|---|---|---|---|---|
| Hull | ___ mm | ___ mm Top ___ mm Bottom |
___ mm | ___ - ___ mm |
| Turret | ___ - ___ mm Turret front ___ mm Gun mantlet |
___ - ___ mm | ___ - ___ mm | ___ - ___ mm |
| Cupola | ___ mm | ___ mm | ___ mm | ___ mm |
Notes:
Mobility
| Game Mode | Max Speed (km/h) | Weight (tons) | Engine power (horsepower) | Power-to-weight ratio (hp/ton) | |||
|---|---|---|---|---|---|---|---|
| Forward | Reverse | Stock | Upgraded | Stock | Upgraded | ||
| Arcade | 81 | 17 | 19.1 | 930 | 1,145 | 48.69 | 59.95 |
| Realistic | 73 | 16 | 531 | 600 | 27.8 | 31.41 | |
Modifications and economy
| Mobility | Protection | Firepower | ||||||||||||||||||||||||||||
|---|---|---|---|---|---|---|---|---|---|---|---|---|---|---|---|---|---|---|---|---|---|---|---|---|---|---|---|---|---|---|
|
|
|
Armaments
Main armament
| 105 mm M68A1 | Turret rotation speed (°/s) | Reloading rate (seconds) | |||||||||||
|---|---|---|---|---|---|---|---|---|---|---|---|---|---|
| Mode | Capacity | Vertical | Horizontal | Stabilizer | Stock | Upgraded | Full | Expert | Aced | Stock | Full | Expert | Aced |
| Arcade | 30 | -10°/+16° | ±180° | Two-plane | 38.1 | 52.7 | 64.0 | 70.8 | 75.3 | 5.00 | 5.00 | 5.00 | 5.00 |
| Realistic | 23.8 | 28.0 | 34.0 | 37.6 | 40.0 | ||||||||
Ammunition
| Penetration statistics | |||||||
|---|---|---|---|---|---|---|---|
| Ammunition | Type of warhead |
Penetration @ 0° Angle of Attack (mm) | |||||
| 10 m | 100 m | 500 m | 1,000 m | 1,500 m | 2,000 m | ||
| M456A2 | HEATFS | 400 | 400 | 400 | 400 | 400 | 400 |
| M393A2 | HESH | 127 | 127 | 127 | 127 | 127 | 127 |
| M774 | APFSDS | 372 | 370 | 365 | 358 | 351 | 343 |
| M735 | APFSDS | 292 | 291 | 284 | 275 | 266 | 257 |
| Shell details | ||||||||||||
|---|---|---|---|---|---|---|---|---|---|---|---|---|
| Ammunition | Type of warhead |
Velocity (m/s) |
Projectile mass (kg) |
Fuse delay (m) |
Fuse sensitivity (mm) |
Explosive mass (TNT equivalent) (kg) |
Ricochet | |||||
| 0% | 50% | 100% | ||||||||||
| M456A2 | HEATFS | 1,174 | 10.5 | 0.05 | 0.1 | 1.27 | 65° | 72° | 77° | |||
| M393A2 | HESH | 732 | 11.2 | 0.1 | 4 | 4.31 | 73° | 77° | 80° | |||
| M774 | APFSDS | 1,509 | 3.4 | - | - | - | 78° | 80° | 81° | |||
| M735 | APFSDS | 1,501 | 3.72 | - | - | - | 78° | 80° | 81° | |||
| Smoke shell characteristics | ||||||
|---|---|---|---|---|---|---|
| Ammunition | Velocity (m/s) |
Projectile mass (kg) |
Screen radius (m) |
Screen deploy time (s) |
Screen hold time (s) |
Explosive mass (TNT equivalent) (g) |
| M416 | 732 | 11.6 | 16 | 5 | 25 | 50 |
Ammo racks

| Full ammo |
1st rack empty |
2nd rack empty |
Visual discrepancy |
|---|---|---|---|
| 30 | 9 (+21) | 1 (+29) | No |
Notes:
- Shells are modeled individually and disappear after having been shot or loaded.
- Rack 2 (autoloader magazine) is a first stage ammo rack. It totals 8 shells.
- This rack gets filled first when loading up the tank and is also emptied first.
- As the AGS is equipped with an autoloader, manual reloading of the gun is not possible.
- Once the autoloader magazine has been depleted, you can't shoot until the loader has restocked the autoloader with at least one shell.
- The restocking time is longer than the normal reload time of the gun. Take this into account when playing.
- Simply not firing when the gun is loaded will move ammo from rack 1 into rack 2. Firing will interrupt the restocking of the ready rack.
- The depletion order at full capacity is: 2 - 1.
Machine guns
| 7.62 mm M60D | ||||
|---|---|---|---|---|
| Mount | Capacity (Belt) | Fire rate | Vertical | Horizontal |
| Pintle | 1,000 (100) | 651 | -10°/+20° | -6°/+180° |
| 7.62 mm M240 | ||||
|---|---|---|---|---|
| Mount | Capacity (Belt) | Fire rate | Vertical | Horizontal |
| Coaxial | 3,000 (200) | 941 | N/A | N/A |
Usage in battles
Use the AGS's excellent mobility to get to key points or flank the enemy and try to get into hull-down areas, when attacking enemies keep in mind that you don't have that much armour and your low crew count will get you easily knocked out by a single shot. If you prefer flanking, hit the enemy with a side shot and move around them; if they have a pintle-mounted MG or autocannon, use side scraping so you don't get penetrated. If you get spotted, you have smoke grenades at your disposal: use them and pull back to allied tanks. When you run out of ammo, the only option you have is to resupply at a captured point; but if all the points are taken by the enemy then you are out of luck.
Pros and cons
Pros:
- Unmanned turret grants a better survivability when hull-down
- Effective mobility
- Good gun
- Decent gun depression
- Laser rangefinder
- 5 second reload is faster than most competing tanks
Cons:
- Little to no armour, with frontal weak spots
- Low-calibre machine guns are of little use
- Limited gun elevation
- Its 1st generation thermal sights are vastly inferior to those of other encountered vehicles, such as the T-72AV (TURMS-T)
- Low zoom optics make some long-range engagements difficult, if not impossible
- Ammo rack is placed far into the back of the vehicle, being hit while on the move can prove accidentally fatal
- Gun only reloads from ready rack, if the ready rack is empty gun cannot reload until a shell is loaded into the ready rack, thus making extended engagements difficult
History
Describe the history of the creation and combat usage of the vehicle in more detail than in the introduction. If the historical reference turns out to be too long, take it to a separate article, taking a link to the article about the vehicle and adding a block "/History" (example: https://wiki.warthunder.com/(Vehicle-name)/History) and add a link to it here using the main template. Be sure to reference text and sources by using <ref></ref>, as well as adding them at the end of the article with <references />. This section may also include the vehicle's dev blog entry (if applicable) and the in-game encyclopedia description (under === In-game description ===, also if applicable).
Media
- Skins
See also
- Other vehicles with unmanned turret
- M1128
- M1128 WolfPacl
External links
| USA light tanks | |
|---|---|
| LVT | LVT(A)(1) · ○LVT(A)(1) · LVT(A)(4) |
| M2 | M2A2 · M2A4 · M2A4 (1st Arm.Div.) |
| M3/M5 Stuart | M3 Stuart · M3A1 Stuart · M3A1 (USMC) · M5A1 · M5A1 TD · ▃Stuart VI (5th CAD) |
| M22 Locust | M22 |
| M24 Chaffee | M24 · M24 (TL) |
| M18 Hellcat | M18 GMC · M18 "Black Cat" · Super Hellcat |
| M41 Walker Bulldog | M41A1 |
| M551 Sheridan | M551 · M551(76) |
| M3 Bradley | M3 Bradley · M3A3 Bradley |
| Wheeled | M8 LAC · T18E2 · M1128 · M1128 Wolfpack |
| Other | M8A1 GMC · T92 · T114 · HSTV-L · CCVL · XM8 · XM800T · AGS |
