Difference between revisions of "QF 3.7 Ram"
(→See also) (Tag: Visual edit) |
(Added a few pros and cons) (Tag: Visual edit) |
||
| (25 intermediate revisions by 10 users not shown) | |||
| Line 1: | Line 1: | ||
{{Specs-Card | {{Specs-Card | ||
|code=uk_ram_90mm_aa | |code=uk_ram_90mm_aa | ||
| − | |||
|market=QF 3.7 Ram (Britain) | |market=QF 3.7 Ram (Britain) | ||
}} | }} | ||
| Line 7: | Line 6: | ||
== Description == | == Description == | ||
<!--In the description, the first part should be about the history of the creation and combat usage of the vehicle, as well as its key features. In the second part, tell the reader about the ground vehicle in the game. Insert a screenshot of the vehicle, so that if the novice player does not remember the vehicle by name, he will immediately understand what kind of vehicle the article is talking about.--> | <!--In the description, the first part should be about the history of the creation and combat usage of the vehicle, as well as its key features. In the second part, tell the reader about the ground vehicle in the game. Insert a screenshot of the vehicle, so that if the novice player does not remember the vehicle by name, he will immediately understand what kind of vehicle the article is talking about.--> | ||
| − | The '''{{Specs|name}}''' '''({{Specs|pseudonym}})''' is a | + | [[File:GarageImage_{{PAGENAME}}.jpg|420px|thumb|left]] |
| − | + | {{Break}} | |
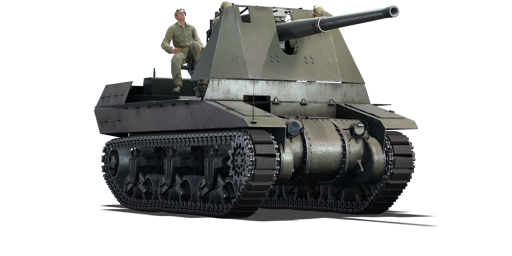
| − | + | The '''{{Specs|name}}''' '''({{Specs|pseudonym}})''' is a gift rank {{Specs|rank}} British tank destroyer {{Battle-rating}}. It was introduced during [[Update 1.95 "Northern Wind"]] in the [[wt:en/news/6521-special-operation-f-r-o-s-t-en|Operation F.R.O.S.T.]] event. It features a heavily modified Ram chassis with a powerful 94 mm AA cannon, playing as a British counterpart of the German [[VFW]] and the two can often face each other in the battlefield. | |
== General info == | == General info == | ||
=== Survivability and armour === | === Survivability and armour === | ||
| − | + | <!--Describe armour protection. Note the most well protected and key weak areas. Appreciate the layout of modules as well as the number and location of crew members. Is the level of armour protection sufficient, is the placement of modules helpful for survival in combat? | |
| − | <!-- | + | |
| − | The {{PAGENAME}} possesses light armour in the upper area of the turret (19.5 mm thickness), that might only cover your crew for small | + | If necessary use a visual template to indicate the most secure and weak zones of the armour.--> |
| + | |||
| + | ;Armour | ||
| + | |||
| + | The {{PAGENAME}} consists of light armour composed of Rolled Homogeneous Armour (RHA) and structural steel. | ||
| + | |||
| + | [[File:ARMOR RAM.jpg|thumb|left|300px|Frontal armour of the Ram SPG, since '''''Starfighters''''' update, the 10mm armour is now 19.5mm.]] | ||
| + | The {{PAGENAME}} possesses light armour in the upper area of the turret (19.5 ''mm'' thickness), that might only cover your crew for small caliber machine guns. | ||
| − | Lying hidden in the back of the turret, | + | Lying hidden in the back of the turret, its heavy 94 mm cannon is protected by ''20 mm'' of structural steel located lower the cannon gun. Inside it the vertical aim drive is located. If a shot goes through and detonates inside this boxy structure, it will cause damage to your crew and the vertical aiming drive. This is the most common damage the {{PAGENAME}} will get, as the enemy often shoots at the area below the 94 mm cannon. |
| − | The thicker part of the armour is located in the cannon structure, visible in the centre of the turret (60 mm thickness). But due to the structural steel armour type, its armour remains insignificant for the heavy shells it can face, making cannon breech damage | + | The thicker part of the armour is located in the cannon structure, visible in the centre of the turret (''60 mm'' thickness). But due to the structural steel armour type, its armour remains insignificant for the heavy shells it can face, making cannon breech damage a routine situation as shells with explosive filler detonate within the structure |
| − | More armour is located in the lower central area of the transmission. There, the transmission mounting | + | More armour is located in the lower central area of the transmission. There, the transmission mounting provides '''50.8 mm''' of armour thickness, thick enough that it is possible to stop awkwardly angled shots or HE shots, but won't save you from a frontal encounter. Damages through here also will damage the transmission module. |
| − | [[File:Side view RAM ARMOR.jpg|thumb|Cannon structure | + | [[File:Side view RAM ARMOR.jpg|thumb|Cannon structure armuor]] |
Due to the {{PAGENAME}}'s provided armour, any cannon shell sent its way can completely cripple your ability to retaliate. However, the {{PAGENAME}}'s crew helps provide a factor in the vehicle's survivability on the battlefield. | Due to the {{PAGENAME}}'s provided armour, any cannon shell sent its way can completely cripple your ability to retaliate. However, the {{PAGENAME}}'s crew helps provide a factor in the vehicle's survivability on the battlefield. | ||
| − | + | ; The crew | |
| − | |||
| − | ;The crew | ||
| − | The {{PAGENAME}} is managed by a 6 man crew. | + | The {{PAGENAME}} is managed by a 6 man crew. |
* 1 Gunner | * 1 Gunner | ||
* 1 Loader | * 1 Loader | ||
* 2 Machine gunners | * 2 Machine gunners | ||
| − | * 1 Commander | + | * 1 Commander |
* 1 Driver | * 1 Driver | ||
| − | The driver and a machine gunner remain in the safest spot within the vehicle chassis. The gunner it well placed but often gets knocked out. High crew skills are a must to ensure | + | The driver and a machine gunner remain in the safest spot within the vehicle chassis. The gunner it well placed but often gets knocked out. High crew skills are a must to ensure higher chance of resisting explosive effects or shrapnel, while performing gun reloads and field repairs even faster to fight back against the opponents. |
| − | + | The best way to utilize the armour to protect the crew is to aim the gun from the front, as it provides cover to both loaders in the back. However, avoid getting hit once as the proximity of the crew members, modules, and ammo racks within each other on the {{PAGENAME}} means a single hit has a chance of crippling the vehicle's performance enough for follow-up shots to finish the {{PAGENAME}} off. | |
| − | |||
| − | |||
| − | |||
| − | { | ||
| − | |||
| − | |||
| − | |||
| − | |||
| − | |||
| − | |||
| − | |||
| − | |||
| − | |||
| − | |||
| − | |||
| − | |||
| − | |||
| − | |||
| − | |||
| − | |||
=== Mobility === | === Mobility === | ||
| − | |||
<!-- ''Write about the mobility of the ground vehicle. Estimate the specific power and manoeuvrability, as well as the maximum speed forwards and backwards.'' --> | <!-- ''Write about the mobility of the ground vehicle. Estimate the specific power and manoeuvrability, as well as the maximum speed forwards and backwards.'' --> | ||
{{tankMobility|abMinHp= 568|rbMinHp= 354}} | {{tankMobility|abMinHp= 568|rbMinHp= 354}} | ||
| − | Mobility is decent for a | + | Mobility is decent for a SPG with such a gun, thanks to its light armour. 43 km/h in AB, 40 km/h in RB/SB. |
| − | The {{PAGENAME}} is able to reach its maximum speed of 40 km/h (RB) in off | + | The {{PAGENAME}} is able to reach its maximum speed of 40 km/h (RB) in off road terrain quite easily. Not enough to do a flanking manoeuvre, but enough to get a good sniping location or position early in the match. |
| − | + | Its reverse speed is quite poor, 5.7 km/h in AB and 5.2 km/h in RB/SB. However, this is enough for retreating from a sniping position effectively. | |
| − | + | Close quarters should be avoided as it would just make the {{PAGENAME}} quickly spotted and flanked by enemy forces. | |
| − | {{ | ||
== Armaments == | == Armaments == | ||
| − | |||
=== Main armament === | === Main armament === | ||
| − | + | <!--Give the reader information about the characteristics of the main gun. Assess its effectiveness in a battle based on the reloading speed, ballistics and the power of shells. Do not forget about the flexibility of the fire, that is how quickly the cannon can be aimed at the target, open fire on it and aim at another enemy. Add a link to the main article on the gun: <code><nowiki>{{main|Name of the weapon}}</nowiki></code>. Describe in general terms the ammunition available for the main gun. Advise about how to use them and how to fill the ammunition storage.--> | |
| − | <!-- | ||
{{main|OQF Mk.II (94 mm)}} | {{main|OQF Mk.II (94 mm)}} | ||
| − | {| class="wikitable" style="text-align:center" width="100%" | + | The 94 mm cannon provides very lethal penetration for all the enemy it faces. It's different from any other cannon in the British tree until battle rating 5.0, as this cannon holds a lower muzzle velocity than your usual 17pdr. Therefore some practice should be made to familiarize with the new cannon ballistics. |
| + | |||
| + | ===== Ammunition ===== | ||
| + | |||
| + | {| class="wikitable sortable" style="text-align:center" width="100%" | ||
| + | ! colspan="8" | Penetration statistics | ||
|- | |- | ||
| − | ! | + | ! rowspan="2" data-sort-type="text" | Ammunition |
| + | ! rowspan="2" class="unsortable" | Type of <br /> warhead | ||
| + | ! colspan="6" | '''Penetration''' '''''in mm''''' '''@ 0° Angle of Attack''' | ||
|- | |- | ||
| − | ! | + | ! 10m |
| − | ! | + | ! 100m |
| − | ! | + | ! 500m |
| + | ! 1000m | ||
| + | ! 1500m | ||
| + | ! 2000m | ||
|- | |- | ||
| − | + | | Shot Mk.1 || APCBC || 204 || 202 || 192 || 180 || 169 || 159 | |
| − | | | ||
|- | |- | ||
| − | + | | Shell Mk.1 || HE || 13 || 13 || 13 || 13 || 13 || 13 | |
| − | | | ||
|- | |- | ||
|} | |} | ||
| − | + | ===== [[Ammo racks|Ammo racks]] ===== | |
| − | + | <!--[[File:Ammoracks_{{PAGENAME}}.png|right|thumbnail|x250px|Ammo racks of the {{PAGENAME}}.]]--> | |
| − | + | {| class="wikitable sortable" style="text-align:center" | |
| − | |||
| − | |||
| − | |||
| − | |||
| − | |||
| − | |||
| − | ==== [[Ammo racks]] ==== | ||
| − | [[File:Ammoracks_{{PAGENAME}}.png|right| | ||
| − | |||
| − | {| class="wikitable" style="text-align:center" | ||
|- | |- | ||
| − | ! Full<br>ammo | + | ! class="wikitable unsortable" |Full<br />ammo |
| − | ! 1st<br>rack empty | + | ! class="wikitable unsortable" |1st<br />rack empty |
| − | ! 2nd<br>rack empty | + | ! class="wikitable unsortable" |2nd<br />rack empty |
| − | ! 3rd<br>rack empty | + | ! class="wikitable unsortable" |3rd<br />rack empty |
| − | ! 4th<br>rack empty | + | ! class="wikitable unsortable" |4th<br />rack empty |
| − | ! Visual<br>discrepancy | + | ! class="wikitable unsortable" |Visual<br /> discrepancy |
|- | |- | ||
| − | | '''44''' || 34 ''(+10)'' || 23 ''(+21)'' || 12 ''(+32)'' || 1 ''(+43)'' || No | + | | '''44''' || 34 ''(+10)'' || 23 ''(+21)'' || 12 ''(+32)'' || 1 ''(+43)'' || style="text-align:left" | No |
|- | |- | ||
|} | |} | ||
| − | + | Left side ammo racks only : 23 shells | |
| − | |||
| − | |||
| − | |||
== Usage in battles == | == Usage in battles == | ||
<!--Describe the tactics of playing in the vehicle, the features of using vehicles in the team and advice on tactics. Refrain from creating a "guide" - do not impose a single point of view but instead give the reader food for thought. Describe the most dangerous enemies and give recommendations on fighting them. If necessary, note the specifics of the game in different modes (AB, RB, SB).--> | <!--Describe the tactics of playing in the vehicle, the features of using vehicles in the team and advice on tactics. Refrain from creating a "guide" - do not impose a single point of view but instead give the reader food for thought. Describe the most dangerous enemies and give recommendations on fighting them. If necessary, note the specifics of the game in different modes (AB, RB, SB).--> | ||
| − | In Realistic/Simulator battles, | + | In Realistic/Simulator battles, the best approach is the sniping role. Quickly find an appropriate spot at the beginning of the match. The vehicle is tall and the gun depression is only of -5° so keep that in mind when positioning. Covering the allies flanks, long roads, taking down enemy snipers, or keeping the enemy from capturing a point shall be your duty. |
| − | A good tactic is to wait enemies expose their sides | + | A good tactic is to wait enemies expose their sides. Tiger and Panther tanks don't have the armour to resist the 94 mm cannon, and so one shot will usually be enough. The 44 shells it can carry is sufficient for prolonged sniper duties. The same can be said of Soviet vehicles, as their frontal armour tends to ricochet rounds, so it's recommended to aim at the sides as well. As enemies pass by, wait for the right moment to shoot, but make sure to correctly range the targets and lead the gun to successfully land the first shot. |
| − | + | This tactic can be more successful with camouflage on the frontal armour. Concealing the {{PAGENAME}} in the woods as well as hiding the exposed loaders in the back from easy picking. | |
| − | + | Shooting the enemies frontal armour is possible, but the risk of shots bouncing off is still high, despite the gun's penetration capabilities. This will also expose the {{PAGENAME}}'s position, which will lead enemies to pour down machine gun fire, artillery, and aerial strikes to suppress and eliminate the {{PAGENAME}}. | |
| − | === | + | === Modules === |
| − | + | {| class="wikitable" | |
| − | + | ! Tier | |
| − | + | ! colspan="2" | Mobility | |
| − | + | ! Protection | |
| − | + | ! Firepower | |
| − | + | |- | |
| − | + | | I | |
| − | + | | Tracks | |
| + | | | ||
| + | | Parts | ||
| + | | Horizontal Drive | ||
| + | |- | ||
| + | | II | ||
| + | | Suspension | ||
| + | | Brake System | ||
| + | | FPE | ||
| + | | Adjustment of Fire | ||
| + | |- | ||
| + | | III | ||
| + | | Filters | ||
| + | | | ||
| + | | Crew Replenishment | ||
| + | | Elevation Mechanism | ||
| + | |- | ||
| + | | IV | ||
| + | | Transmission | ||
| + | | Engine | ||
| + | | | ||
| + | | | ||
| + | |- | ||
| + | ! colspan="5" |This is a premium vehicle: all modifications are unlocked on purchase | ||
| + | |- | ||
| + | |} | ||
=== Pros and cons === | === Pros and cons === | ||
| − | <!-- | + | <!--Summarise and briefly evaluate the vehicle in terms of its characteristics and combat effectiveness. Mark its pros and cons in a bulleted list. Try not to use more than 6 points for each of the characteristics. Avoid using categorical definitions such as "bad", "good" and the like - use substitutions with softer forms such as "inadequate" and "effective".--> |
'''Pros:''' | '''Pros:''' | ||
| − | * Powerful 94 mm gun capable of | + | * Powerful 94 mm gun capable of penetrating most enemy it faces from the front |
| − | * | + | * Due to the large size of the gun it can reliably one shot other vehicles due to its immense spalling capabiltiies, even sometimes from the side, unlike most brittish tanks |
| − | + | * Decent survivability due to 6 crew members, The 2 members inside the tank being the most cover | |
| − | * Decent survivability due to 6 crew members, | + | * Due to the large size it shells may sometimes pass right trough without causing too much damage, APHE shells wont even trigger their fuze |
| − | * | + | * Good mobility and fast gun traverse for its powerful gun, allows some aggressive-defensive playstyle in close quarters |
| − | * Good mobility and fast | + | * Not a common vehicle. You might confuse the more inexperienced players to the point they may not know where to shoot |
| − | * Not a common vehicle | + | * Amazing reload speed, even more when crew is trained or aced |
| − | * Amazing reload speed, even more | + | * Elevation of +80° |
| − | * Good top speed | + | * Good top speed |
'''Cons:''' | '''Cons:''' | ||
| − | * Has no timed | + | * Gun traverse limited to 90° on each side |
| − | * Weak armour and exposed crew | + | * Has no timed fuze shells for aircraft, unlike its german counterparts (They are pretty useless anyways) |
| − | * Longer reload compared to its German counterpart, the | + | * Weak armour and exposed crew, SPAA and strafing aircraft can quickly shred it apart and is only partially protected against light machine guns, even from the front |
| − | * Poor gun depression of -5° | + | * Longer reload compared to its German counterpart, the '''VFW''' |
| − | * Lower muzzle velocity than the usual 17pdr, learning and quick correction is needed | + | * Poor gun depression of -5° |
| − | * Ammo racks | + | * Lower muzzle velocity than the usual 17pdr, learning and quick correction is needed. |
| + | * Ammo racks are stored at the very side of the tracks, experienced players will know to shoot at it, even High Explosive shells can set them off | ||
* Artillery can often knock out several crew members at once, even from a distance | * Artillery can often knock out several crew members at once, even from a distance | ||
| − | * Has hull break, like most open | + | * Has hull break, like most open top vehicles |
== History == | == History == | ||
<!--Describe the history of the creation and combat usage of the vehicle in more detail than in the introduction. If the historical reference turns out to be too long, take it to a separate article, taking a link to the article about the vehicle and adding a block "/History" (example: <nowiki>https://wiki.warthunder.com/(Vehicle-name)/History</nowiki>) and add a link to it here using the <code>main</code> template. Be sure to reference text and sources by using <code><nowiki><ref></ref></nowiki></code>, as well as adding them at the end of the article with <code><nowiki><references /></nowiki></code>. This section may also include the vehicle's dev blog entry (if applicable) and the in-game encyclopedia description (under <code><nowiki>=== In-game description ===</nowiki></code>, also if applicable).--> | <!--Describe the history of the creation and combat usage of the vehicle in more detail than in the introduction. If the historical reference turns out to be too long, take it to a separate article, taking a link to the article about the vehicle and adding a block "/History" (example: <nowiki>https://wiki.warthunder.com/(Vehicle-name)/History</nowiki>) and add a link to it here using the <code>main</code> template. Be sure to reference text and sources by using <code><nowiki><ref></ref></nowiki></code>, as well as adding them at the end of the article with <code><nowiki><references /></nowiki></code>. This section may also include the vehicle's dev blog entry (if applicable) and the in-game encyclopedia description (under <code><nowiki>=== In-game description ===</nowiki></code>, also if applicable).--> | ||
| − | |||
| − | |||
| − | + | In 1941, General Frederick 'Frank' Worthington, founder of the Canadian Armoured Corps, proposed that a 3.7 inch anti-aircraft gun be mounted on a Ram chassis to act as a mobile anti-tank gun. The OQF MK II was the primary British heavy AA guns during World War II. The Canadians used this gun for experimenting, mounting it on the Ram chassis. Few examples were made and one was sent to Great Britain for trials, but no further development came of it. | |
| − | |||
| − | |||
== Media == | == Media == | ||
| − | + | ''Excellent additions to the article would be video guides, screenshots from the game, and photos.'' | |
| − | |||
| − | |||
| − | |||
| − | |||
== See also == | == See also == | ||
| − | + | ''Links to the articles on the War Thunder Wiki that you think will be useful for the reader, for example:'' | |
| − | |||
| − | |||
| − | |||
| − | |||
| − | * | + | * ''reference to the series of the vehicles;'' |
| − | * | + | * ''links to approximate analogues of other nations and research trees.'' |
| − | |||
| − | |||
| − | |||
== External links == | == External links == | ||
| − | + | ''Paste links to sources and external resources, such as:'' | |
| − | |||
| − | |||
| − | * | + | * ''topic on the official game forum;'' |
| − | * | + | * ''encyclopedia page on the tank;'' |
| − | * | + | * ''other literature.'' |
{{Britain tank destroyers}} | {{Britain tank destroyers}} | ||
{{Britain premium ground vehicles}} | {{Britain premium ground vehicles}} | ||
{{Winter Event}} | {{Winter Event}} | ||
Revision as of 19:51, 27 August 2020
Contents
Description

The OQF 3.7-inch AA on Ram Mounting (QF 3.7 Ram) is a gift rank III British tank destroyer
with a battle rating of 5.3 (AB/RB/SB). It was introduced during Update 1.95 "Northern Wind" in the Operation F.R.O.S.T. event. It features a heavily modified Ram chassis with a powerful 94 mm AA cannon, playing as a British counterpart of the German VFW and the two can often face each other in the battlefield.
General info
Survivability and armour
- Armour
The QF 3.7 Ram consists of light armour composed of Rolled Homogeneous Armour (RHA) and structural steel.
The QF 3.7 Ram possesses light armour in the upper area of the turret (19.5 mm thickness), that might only cover your crew for small caliber machine guns.
Lying hidden in the back of the turret, its heavy 94 mm cannon is protected by 20 mm of structural steel located lower the cannon gun. Inside it the vertical aim drive is located. If a shot goes through and detonates inside this boxy structure, it will cause damage to your crew and the vertical aiming drive. This is the most common damage the QF 3.7 Ram will get, as the enemy often shoots at the area below the 94 mm cannon.
The thicker part of the armour is located in the cannon structure, visible in the centre of the turret (60 mm thickness). But due to the structural steel armour type, its armour remains insignificant for the heavy shells it can face, making cannon breech damage a routine situation as shells with explosive filler detonate within the structure
More armour is located in the lower central area of the transmission. There, the transmission mounting provides 50.8 mm of armour thickness, thick enough that it is possible to stop awkwardly angled shots or HE shots, but won't save you from a frontal encounter. Damages through here also will damage the transmission module.
.jpg)
Due to the QF 3.7 Ram's provided armour, any cannon shell sent its way can completely cripple your ability to retaliate. However, the QF 3.7 Ram's crew helps provide a factor in the vehicle's survivability on the battlefield.
- The crew
The QF 3.7 Ram is managed by a 6 man crew.
- 1 Gunner
- 1 Loader
- 2 Machine gunners
- 1 Commander
- 1 Driver
The driver and a machine gunner remain in the safest spot within the vehicle chassis. The gunner it well placed but often gets knocked out. High crew skills are a must to ensure higher chance of resisting explosive effects or shrapnel, while performing gun reloads and field repairs even faster to fight back against the opponents.
The best way to utilize the armour to protect the crew is to aim the gun from the front, as it provides cover to both loaders in the back. However, avoid getting hit once as the proximity of the crew members, modules, and ammo racks within each other on the QF 3.7 Ram means a single hit has a chance of crippling the vehicle's performance enough for follow-up shots to finish the QF 3.7 Ram off.
Mobility
| Game Mode | Max Speed (km/h) | Weight (tons) | Engine power (horsepower) | Power-to-weight ratio (hp/ton) | |||
|---|---|---|---|---|---|---|---|
| Forward | Reverse | Stock | Upgraded | Stock | Upgraded | ||
| Arcade | 44 | 6 | 29 | 568 | 763 | 19.59 | 26.31 |
| Realistic | 40 | 6 | 354 | 400 | 12.21 | 13.79 | |
Mobility is decent for a SPG with such a gun, thanks to its light armour. 43 km/h in AB, 40 km/h in RB/SB.
The QF 3.7 Ram is able to reach its maximum speed of 40 km/h (RB) in off road terrain quite easily. Not enough to do a flanking manoeuvre, but enough to get a good sniping location or position early in the match.
Its reverse speed is quite poor, 5.7 km/h in AB and 5.2 km/h in RB/SB. However, this is enough for retreating from a sniping position effectively.
Close quarters should be avoided as it would just make the QF 3.7 Ram quickly spotted and flanked by enemy forces.
Armaments
Main armament
The 94 mm cannon provides very lethal penetration for all the enemy it faces. It's different from any other cannon in the British tree until battle rating 5.0, as this cannon holds a lower muzzle velocity than your usual 17pdr. Therefore some practice should be made to familiarize with the new cannon ballistics.
Ammunition
| Penetration statistics | |||||||
|---|---|---|---|---|---|---|---|
| Ammunition | Type of warhead |
Penetration in mm @ 0° Angle of Attack | |||||
| 10m | 100m | 500m | 1000m | 1500m | 2000m | ||
| Shot Mk.1 | APCBC | 204 | 202 | 192 | 180 | 169 | 159 |
| Shell Mk.1 | HE | 13 | 13 | 13 | 13 | 13 | 13 |
Ammo racks
| Full ammo |
1st rack empty |
2nd rack empty |
3rd rack empty |
4th rack empty |
Visual discrepancy |
|---|---|---|---|---|---|
| 44 | 34 (+10) | 23 (+21) | 12 (+32) | 1 (+43) | No |
Left side ammo racks only : 23 shells
Usage in battles
In Realistic/Simulator battles, the best approach is the sniping role. Quickly find an appropriate spot at the beginning of the match. The vehicle is tall and the gun depression is only of -5° so keep that in mind when positioning. Covering the allies flanks, long roads, taking down enemy snipers, or keeping the enemy from capturing a point shall be your duty.
A good tactic is to wait enemies expose their sides. Tiger and Panther tanks don't have the armour to resist the 94 mm cannon, and so one shot will usually be enough. The 44 shells it can carry is sufficient for prolonged sniper duties. The same can be said of Soviet vehicles, as their frontal armour tends to ricochet rounds, so it's recommended to aim at the sides as well. As enemies pass by, wait for the right moment to shoot, but make sure to correctly range the targets and lead the gun to successfully land the first shot.
This tactic can be more successful with camouflage on the frontal armour. Concealing the QF 3.7 Ram in the woods as well as hiding the exposed loaders in the back from easy picking.
Shooting the enemies frontal armour is possible, but the risk of shots bouncing off is still high, despite the gun's penetration capabilities. This will also expose the QF 3.7 Ram's position, which will lead enemies to pour down machine gun fire, artillery, and aerial strikes to suppress and eliminate the QF 3.7 Ram.
Modules
| Tier | Mobility | Protection | Firepower | |
|---|---|---|---|---|
| I | Tracks | Parts | Horizontal Drive | |
| II | Suspension | Brake System | FPE | Adjustment of Fire |
| III | Filters | Crew Replenishment | Elevation Mechanism | |
| IV | Transmission | Engine | ||
| This is a premium vehicle: all modifications are unlocked on purchase | ||||
Pros and cons
Pros:
- Powerful 94 mm gun capable of penetrating most enemy it faces from the front
- Due to the large size of the gun it can reliably one shot other vehicles due to its immense spalling capabiltiies, even sometimes from the side, unlike most brittish tanks
- Decent survivability due to 6 crew members, The 2 members inside the tank being the most cover
- Due to the large size it shells may sometimes pass right trough without causing too much damage, APHE shells wont even trigger their fuze
- Good mobility and fast gun traverse for its powerful gun, allows some aggressive-defensive playstyle in close quarters
- Not a common vehicle. You might confuse the more inexperienced players to the point they may not know where to shoot
- Amazing reload speed, even more when crew is trained or aced
- Elevation of +80°
- Good top speed
Cons:
- Gun traverse limited to 90° on each side
- Has no timed fuze shells for aircraft, unlike its german counterparts (They are pretty useless anyways)
- Weak armour and exposed crew, SPAA and strafing aircraft can quickly shred it apart and is only partially protected against light machine guns, even from the front
- Longer reload compared to its German counterpart, the VFW
- Poor gun depression of -5°
- Lower muzzle velocity than the usual 17pdr, learning and quick correction is needed.
- Ammo racks are stored at the very side of the tracks, experienced players will know to shoot at it, even High Explosive shells can set them off
- Artillery can often knock out several crew members at once, even from a distance
- Has hull break, like most open top vehicles
History
In 1941, General Frederick 'Frank' Worthington, founder of the Canadian Armoured Corps, proposed that a 3.7 inch anti-aircraft gun be mounted on a Ram chassis to act as a mobile anti-tank gun. The OQF MK II was the primary British heavy AA guns during World War II. The Canadians used this gun for experimenting, mounting it on the Ram chassis. Few examples were made and one was sent to Great Britain for trials, but no further development came of it.
Media
Excellent additions to the article would be video guides, screenshots from the game, and photos.
See also
Links to the articles on the War Thunder Wiki that you think will be useful for the reader, for example:
- reference to the series of the vehicles;
- links to approximate analogues of other nations and research trees.
External links
Paste links to sources and external resources, such as:
- topic on the official game forum;
- encyclopedia page on the tank;
- other literature.
| Britain tank destroyers | |
|---|---|
| Infantry tank derivatives | Archer · Gun Carrier (3-in) |
| Light tank derivatives | Alecto I |
| M10 Achilles | Achilles · Achilles (65 Rg.) |
| Centurion derivatives | FV4005 · Conway |
| ATGM | Swingfire · Striker |
| Other | Tortoise · ▄M109A1 |
| Canada | QF 3.7 Ram · ADATS (M113) |
| South Africa | G6 · ZT3A2 |
| Britain premium ground vehicles | |
|---|---|
| Light tanks | A13 Mk I (3rd R.T.R.) · A13 Mk II 1939 · AEC Mk II · Crusader "The Saint" · Rooikat 105 |
| Medium tanks | A.C.I · Grant I · Cromwell V (RP-3) · Sherman IC "Trzyniec" · A.C.IV · Comet I "Iron Duke IV" |
| Centurion Mk.2 · ▄Strv 81 (RB 52) · Centurion Mk.5 AVRE · Centurion Mk.5/1 · ▄Sho't Kal Dalet · Centurion Action X | |
| Vijayanta · Khalid · Challenger DS · Challenger 2 OES | |
| Heavy tanks | Independent · Matilda Hedgehog · Excelsior · TOG II · Churchill Crocodile · Black Prince |
| Tank destroyers | Alecto I · Achilles (65 Rg.) · QF 3.7 Ram |
