FV4005

From War Thunder Wiki
Jump to: navigation, search
Rank VI | Premium | Golden Eagles
Chinese A-5C Pack
uk_fv4005.png
GarageImage FV4005.jpg
ArtImage FV4005.png
FV4005
AB RB SB
6.3 6.3 6.7
Research:46 000 Specs-Card-Exp.png
Purchase:155 000 Specs-Card-Lion.png
Show in game

Description

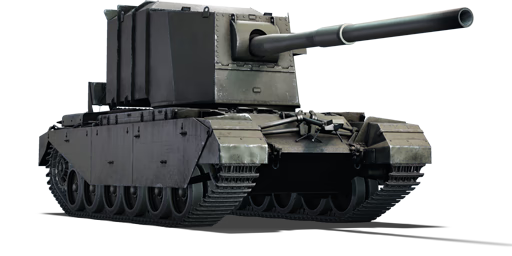
Following the debut of the IS-3 in 1945 and amidst fears that the Soviet Union would continue developing increasingly heavy tanks, a requirement was drawn up in 1950 for a tank with a gun capable of defeating a 152 mm armour plate sloped at 60° from up to 2 km. However, it was quickly realised that even the most powerful Allied guns of the time, namely the 120 mm cannon of the Conqueror and the American 155 mm mounted to tanks such as the T30, were not able to perform such a feat. Instead, a new 183 mm cannon was developed, firing HESH shells to allow both anti-armour and anti-fortification use. It was originally planned to mount the new gun on the same "Universal tank" hull as the Conqueror. However, this would take significant development, so it was decided to initially provide a stop-gap measure by utilising the hull of the Centurion, becoming the FV4005. The first prototype ("Stage I") mounted the gun in an open turret, featuring a concentric gun recoil system, mechanised loading assistance, and a recoil spade mounted on the rear of the chassis to allow the vehicle to dig in when firing. Following from this, "Stage II" featured a light but fully enclosed turret, doing away with the loading assist by providing space for an extra loader, as well as replacing the concentric recoil system with a new hydropneumatic version. However, the IS-3 and its developments did not materialise in as great numbers as was feared, and the project was officially cancelled in 1957.

Introduced in Update 1.67 "Assault", the FV4005 Stage II is truly the epitome of a "glass cannon". With the largest-calibre conventional tank gun in the game at 183 mm, even glancing hits from its powerful HESH shells tend to result in significant damage to a target. Despite their size, the shells have decent muzzle velocity, making them relatively easy to range and aim. However, the size of the shell can also pose a challenge, being likely to glance off extraneous components such as the barrel, leading to minimal internal damage; coupled with the particularly long reload, extreme care is required when taking a shot. Traverse is also limited to ±45°, due to the strong recoil. While the gun is extremely effective, the same cannot be said for its mount. The Centurion chassis struggles under the weight of the gun, resulting in rather mediocre mobility, while the turret, only lightly armoured to compensate, can be defeated by even .50 cal rounds. The survivability is both helped and hindered by the tank's spacious nature: while it is a large, highly visible target, a single shot often is not enough to take out the dispersed crew (unless it detonates the large ammunition lining the turret's sides), allowing the vehicle to retreat and reposition.

General info

Survivability and armour

Armourfront / side / back
Hull76 / 51 / 38
Turret14 / 14 / 14
Crew5 people
Visibility273 %

The FV4005 Stage II has essentially negligible armour, due to the gigantic turret providing only 14 mm of protection from any given angle. Due to this and the vehicle's crew being largely based in the turret, the FV4005 is extremely vulnerable to even .50 calibre machine guns, and any large calibre explosives can and will inflict overpressure damage on them, which is always fatal.

The only redeeming traits in regards to survivability are that the crew may survive some side-on attacks due to the sheer size of the gun breech, and that the sheer number of crew members in the turret means that the vehicle will remain alive. Regardless, an FV4005 player should not count on surviving anything bar the lightest of machine gun fire.

Armour type:

  • Rolled homogeneous armour
  • Cast homogeneous armour (Gun mantlet)
Armour Front Sides Rear Roof
Hull 76.2 mm (61°) Front glacis
76.2 mm (44°) Lower glacis
50.8 (12°) + 6 mm 38 mm (6°) Top
38 mm (13°) Bottom
38 mm
29 mm Engine deck
Turret 14 mm (10°) Turret front
14 mm (12-61°) Gun mantlet
14 mm (0-8°) 14 mm (1°) 14 mm

Notes:

  • Tracks and suspension wheels are both 20 mm thick.
  • Spaced armour plates are placed on the side of the Centurion chassis, giving an additional 6 mm of side armour.
  • The rear has a steel rack providing an additional 15 mm of protection.

Crew:

  • Commander
  • Gunner
  • Loader x2
  • Driver

Total: 5 crew members

Mobility

Speedforward / back
AB31 / 11 km/h
RB and SB28 / 10 km/h
Number of gears5 forward
2 back
Weight59.5 t
Engine power
AB1 240 hp
RB and SB650 hp
Power-to-weight ratio
AB20.8 hp/t
RB and SB10.9 hp/t
Game Mode Max Speed (km/h) Weight (tons) Engine power (horsepower) Power-to-weight ratio (hp/ton)
Forward Reverse Stock Upgraded Stock Upgraded
Arcade 31 11 59.5 923 1,240 15.51 20.84
Realistic 28 10 575 650 9.66 10.92

The FV4005 doesn't represent anything special in terms of mobility; the vehicle utilises a Centurion hull and retains most of the same characteristics, including the somewhat sub-par reverse speed. Hull traverse times are reasonable, but not exceptional, and maximum forwards speed is a limited 28 km/h in RB/SB.

Due to the vehicle's limited mobility, players should play conservatively, avoiding flanking routes and any areas where there is no immediate escape route available. The Tracks upgrade is particularly valuable on the FV4005, as due to its limited turret traverse distance the improved hull traverse will on occasion be a saving grace.

Modifications and economy

Repair costBasic → Reference
AB2 557 → 3 163 Sl icon.png
RB2 909 → 3 598 Sl icon.png
SB4 250 → 5 257 Sl icon.png
Total cost of modifications40 700 Rp icon.png
79 000 Sl icon.png
Talisman cost1 400 Ge icon.png
Crew training45 000 Sl icon.png
Experts155 000 Sl icon.png
Aces630 Ge icon.png
Research Aces440 000 Rp icon.png
Reward for battleAB / RB / SB
100 / 160 / 200 % Sl icon.png
160 / 160 / 160 % Rp icon.png
Modifications
Mobility Protection Firepower
Mods new tank traks.png
Tracks
Research:
2 700 Rp icon.png
Cost:
5 200 Sl icon.png
130 Ge icon.png
Mods new tank suspension.png
Suspension
Research:
2 300 Rp icon.png
Cost:
4 400 Sl icon.png
110 Ge icon.png
Mods new tank break.png
Brake System
Research:
2 300 Rp icon.png
Cost:
4 400 Sl icon.png
110 Ge icon.png
Mods new tank filter.png
Filters
Research:
3 400 Rp icon.png
Cost:
6 600 Sl icon.png
165 Ge icon.png
Mods new tank transmission.png
Transmission
Research:
6 600 Rp icon.png
Cost:
13 000 Sl icon.png
320 Ge icon.png
Mods new tank engine.png
Engine
Research:
6 600 Rp icon.png
Cost:
13 000 Sl icon.png
320 Ge icon.png
Mods tank tool kit.png
Improved Parts
Research:
2 700 Rp icon.png
Cost:
5 200 Sl icon.png
130 Ge icon.png
Mods extinguisher.png
Improved FPE
Research:
2 300 Rp icon.png
Cost:
4 400 Sl icon.png
110 Ge icon.png
Mods tank reinforcement uk.png
Crew Replenishment
Research:
3 400 Rp icon.png
Cost:
6 600 Sl icon.png
165 Ge icon.png
Mods new tank horizontal aiming.png
Horizontal Drive
Research:
2 700 Rp icon.png
Cost:
5 200 Sl icon.png
130 Ge icon.png
Mods tank cannon.png
Adjustment of Fire
Research:
2 300 Rp icon.png
Cost:
4 400 Sl icon.png
110 Ge icon.png
Mods new tank vertical aiming.png
Elevation Mechanism
Research:
3 400 Rp icon.png
Cost:
6 600 Sl icon.png
165 Ge icon.png

Armaments

Main armament

Ammunition12 rounds
Reloadbasic crew → aces
38.9 → 29.9 s
Vertical guidance-7° / 15°
Horizontal guidance-45° / 45°
Main article: QF L4A1 (183 mm)

The FV4005 Stage II sports one of the largest cannons available in War Thunder Ground Forces, the 183 mm QF L4A1, with the second longest single-shell base reload time of any vehicle, at 38.9 seconds. The L4A1 is restricted to the use of HESH only, due to the weapon originally being envisaged as an anti-emplacement howitzer.

HESH has slower fuse than HE and HEAT and won't detonate on most foliage, but it cannot penetrate more than one layer of armour, so it can be blocked by side skirts and, sometimes, even by chassis or machine guns. Despite problems with penetration of the countermeasures, HESH can be used to great effect against almost any possible target, provided shots are placed well - ideally on angled side armour, while ensuring the armour isn't angled enough to bounce and isn't protected by an additional layer.

HESH could also be placed straight on top of the target crew compartment, as long as it is strong enough to break through the armour (generally, angled frontal armour is only built with kinetic shells and HE in mind) and isn't blocked by internal modules. In the case of the L1 shell, which the FV4005 uses, even the frontal hull armour of the Maus is not enough to sustain a direct hit.

Despite the size and weight of the L1 round, it has reasonable ballistics at 716 m/s velocity. Due to a colossal explosive power, even if the shell misses it will sometimes destroy tanks with overpressure damage and create holes in the ground. Maximum penetration and effective range of the explosion effect are difficult to measure.

183 mm QF L4A1 Turret rotation speed (°/s) Reloading rate (seconds)
Mode Capacity Vertical Horizontal Stabilizer Stock Upgraded Full Expert Aced Stock Full Expert Aced
Arcade 12 -7°/+15° ±45° N/A 15.85 21.94 26.64 29.46 31.34 38.87 34.38 31.69 29.90
Realistic 10.71 12.60 15.30 16.92 18.00

Ammunition

Penetration statistics
Ammunition Type of
warhead
Penetration @ 0° Angle of Attack (mm)
10 m 100 m 500 m 1,000 m 1,500 m 2,000 m
Shell L1 HESH 228 228 228 228 228 228
Shell details
Ammunition Type of
warhead
Velocity
(m/s)
Projectile
mass (kg)
Fuse delay
(m)
Fuse sensitivity
(mm)
Explosive mass
(TNT equivalent) (kg)
Ricochet
0% 50% 100%
Shell L1 HESH 716 72.57 0.1 4 21.76 73° 77° 80°

HESH round performance improves, within reason, when targets are angled. This is due to the squash head the rounds are tipped by - on larger angles the head will squash further and result in more internal damage. However, the improvements with angling are limited once the rounds reach their ricochet angles - past 73° of angling the rounds have a chance to bounce. As such it's best to limit rounds to less than 70° where possible.

Ammo racks

Full
ammo
Ammo
type
1st
rack empty
2nd
rack empty
3rd
rack empty
4th
rack empty
5th
rack empty
6th
rack empty
Visual
discrepancy
12 Projectiles
Propellants
(+5)
11 (+1)
(+11)
(+3)
N/A
(+5)
N/A
(+7)
N/A
(+9)
N/A
(+11)
No
Ammo racks of the FV4005

Notes:

  • The FV4005 has extremely limited ammunition, with a maximum of 12 rounds. Despite this, it's no mean feat to run out of ammo due to the extended reload time.
  • Projectiles and propellant bags are modeled individually and disappear as soon as they're loaded/fired.
  • Projectiles racks empty from back to front.

Machine guns

Ammunition3 750 rounds
Belt capacity250 rounds
Reloadbasic crew → aces
10.4 → 8.0 s
Fire rate500 shots/min
Main article: L3A1 (7.62 mm)

The FV4005's coaxial machine gun is of limited value; it should be used to clear small obstacles or if possible crew members in open-top vehicles. It can be used as a ranging machine gun while keeping in mind that the main weapon's ballistics do not follow the machine gun's trajectory exactly as the MG has a slightly higher round velocity.

7.62 mm L3A1
Mount Capacity (Belt) Fire rate Vertical Horizontal
Coaxial 3,750 (250) 500 N/A N/A

Usage in battles

The main in-game use of this tank is the elimination of hull-down tanks (similar to T30), super-armoured heavy tanks in general (similar to IS-7), well-armoured SPG's (similar to Ho-Ri) and the likes of them. Meanwhile, you still can help your team by hiding around and eliminating reckless rushers in 1 hit, when they aren't looking.

Your main goal in between your hunts is to survive and stay hidden, as you only have enough armour to stop 7.62 mm machine guns, and your reloading time is exceptionally long, especially if you lose either of the loaders. Contrary to popular belief, if you aim poorly with FV4005 it does not knock anything out of existence with a single shot anyway. You should first get out of your cover (or wait for the enemy to get into your firing lines), then take aim at the enemy, and only then fire. HESH shell will do the rest for you if your aim and weak spot suggestion was correct.

Weak spots depend on the mode you play in. As an example, for most Soviet tanks, the frontal weak spot is the left side of the hull (for you - right side). It's also possible to target the back of their turrets in Realistic battle. However, if you fire at back of the turret of IS-2 in arcade mode, it may still survive with just 1 crew member (driver with very high "vitality" level), go into "last stand" mode, turn its turret and fire back at you. As such, try to aim at places, from which spalling can definitely hit every last crew member.

Likewise, in Arcade mode, it's not enough to just eliminate crew in your turret, and your driver is hidden in the decently armoured hull. However, if your FV4005 is attacked by explosives from 105+ mm gun, it will likely be overpressurized and destroyed. If the gun breech is hit and damaged, there is also a chance that the shell inside will also be destroyed, and you won't be able to avenge yourself even if you manage to repair before a follow up shot.

When firing at an enemy tank from its front, the shell can hit its barrel and only destroy the barrel and other external components, potentially only doing minimal damage. This is a relatively common occurrence as the sheer size of the shell and the volumetric modelling in combination make the shrapnel and explosive force get absorbed by the external modules. To avoid this, aim for turret cheeks or a disabling shot on their upper plate which will kill the driver (and on German tanks, destroy the transmission) and stop them from advancing, especially in urban maps.

The FV4005 will likely encounter a lot of German tanks. These include the Tiger II (P) and the Tiger II (H) most prominently. There are a few shots that are to be used. If you can see the rear or sides of the turret, shoot the tapered rear end to hit the primary ammunition storage, which will cook off. If the side of the turret is visible but the ammunition is not (i.e. if the Tiger is only partially peeking from cover), shoot the side of the turret, which will most likely kill the turret crew. From the front, the turret cheeks are the most viable shot, usually destroying the Tiger II in Ground Realistic Battles.

Do not take shots at the side of the hull on most vehicles, unless it is a significantly unarmoured or small target, as the tracks and/or sideskirts will absorb the shell's damage. Cupola shots are a hit-and-miss, as on some tanks, volumetric will cause the shell to detonate on an external module as opposed to plain armour, negating most, if not all internal damage.

HESH shells have a slow fuse, which does not react to literally every obstacle it hits, unlike with the HEAT or HE, sometimes allowing FV4005 to fire through some foliage, flimsy fences and the likes. While it does not look very useful at first, it can be especially beneficial in Arcade mode or in some specific sniper setup, as AB players are often extremely uncomfortable with firing without aim assist confirmation, which is easily prevented by obstacles such as a weak metal fence built around a capture point, while you can learn the gun ballistics and train yourself to fire by using distance indicators and tank profile (use "select" hotkey, which is by default set to mouse wheel, to see hostile tank overall size and position) instead, to surprise them and thus avoid return fire.

Going into sniper duels without preparations, like rangefinding and adjusting the gun beforehand, with this tank is ill-advised, as any sniper tank needs significantly less time to aim at you, due to the fact that your turret cannot turn freely, your enormous profile, and faster flying ammunition types. They also can destroy you in 1 hit as well, by hitting your ammo, or even by causing the turret to explode without engaging it directly, particularly noticeable with ATGM tanks like Type 60 ATM.

Pros and cons

Pros:

  • Armed with the gigantic 183 mm cannon
  • 183 mm HESH will cause the spalling of enemy armour that is 228 mm thick or less. Devastating to even the most heavily armoured tanks
  • Large gun breech can potentially protect some of the turret crew from incoming fire and shrapnel.
  • The co-axial machine gun has a very similar trajectory to the 183 mm gun, making it ideal for ranging.
  • Has the hull of a Centurion, it will block or deflect shots and explosions which missed the turret with modest efficiency
  • L1 shell can damage the ground, but the tank reloads so slowly, that there has to be multiple of FV4005, or the match has to be stalled for quite long for them to do any strategically significant damage
  • Being on the hull of a Centurion, it has a usable reverse gear, something Cromwell-based tanks like the Charioteer or Challenger do not have the luxury of.

Cons:

  • Huge turret with only 14 mm of armour all around. Can be shredded by .50 cal machine guns and auto cannons, vulnerable even to HEAT overpressure damage if hit
  • Lots of ammo lining the entire turret which can be detonated with little effort
  • 4 of the 5 crew members are in turret. An APHE penetration or overpressure will likely knock out the tank
  • HESH is inherently unreliable, a hit to a wrong spot on certain enemy tank chassis or armour may do no damage at all despite shell's potential, while a close miss might annihilate enemy tank regardless
  • Carries only 12 shells
  • Due to the thin turret armour and sheer size of the tank, is a prime target for AA guns and all aircraft at the BR
  • Turret cannot traverse a full 360 degrees, you'll need to traverse the entire tank left or right to engage enemies on your flanks or rear
  • Incredibly long reload time, a knocked out or injured loader can easily push the reload time over 1 minute

History

Work started on a 180 mm self-propelled gun in 1950 by Nuffield Mechanizations & Aero. Designated the FV215B, the plan was to mount the gun onto the Conqueror hull.[1] It was intended for the three trial vehicles to be built from the span of 1951-1955. The project was cancelled in early 1957 with no prototypes produced.[2]

During the development phase of the FV215B, another project was done on the Centurion.[2] Labeled the FV4005, it was an attempt to mount the 180 mm on the Centurion hull. The design phase is distinctive in two parts, Stage I and II. Stage I had the gun mounted on an open-topped hull. The gun had a concentric recoil system and an auto-loader. Stage II had the gun encased in a lightly armoured, splinter-proof turret with a conventional recoil system and manual loading.[3][4]

In December 1952, the 180 mm gun was increased into a 183 mm gun mounting. Though a single prototype was made for testing, the project never passed basic feasibility. In August 1957, the project was abandoned as well.[3][4] The lone prototype is currently at the Bovington Tank Museum, under restoration.

Media

Skins
Videos

See also

  • Conway - A vehicle built under a similar principle of a large gun on a Centurion chassis.

External links

References

Citations
  1. Ware 2012a, p. 79
  2. 2.0 2.1 Ware 2012a, p. 80
  3. 3.0 3.1 Ware 2012a, p. 78
  4. 4.0 4.1 Ware 2012b, p. 109
Bibliography
  • Ware Pat. Images of War: British Tanks: 1945 to the Present Day Great Britain: Pen & Sword Military, 2012a
  • Ware Pat. Images of War Special: The Centurion Tank Great Britain: Pen & Sword Military, 2012b


Department of Tank Design
Medium Tanks 
Sherman Firefly  Sherman Firefly · Sherman IC "Trzyniec"
MBTs 
Centurion  Centurion Mk 1 · Centurion Mk.2 · Centurion Mk 3 · Centurion Action X · Centurion Mk.5 AVRE · Centurion Mk 10
Challenger*  Challenger Mk.2 · Challenger Mk.3 · Challenger DS
Tank Destroyers 
Achilles  Achilles · Achilles (65 Rg.)
Centurion-based  Conway · FV4005
Export 
Sherman Firefly  Sherman Ic · ▄Sherman Vc
Centurion  Centurion Mk.5/1 · Strv 81 · Strv 81 (RB 52) · ▄Strv 81 (RB 52) · Strv 101 · Strv 104** · Strv 105** · Sho't
See also  US Ordnance Department · Israeli Ordnance Corps · Vickers-Armstrongs Limited
  *By successor, the Military Vehicles and Engineering Establishment
  **Swedish modernizations incorporating innovations from the Israeli Sho't Kals.

Britain tank destroyers
Infantry tank derivatives  Archer · Gun Carrier (3-in)
Light tank derivatives  Alecto I
M10 Achilles  Achilles · Achilles (65 Rg.)
Centurion derivatives  FV4005 · Conway
ATGM  Swingfire · Striker
Other  Tortoise · ▄M109A1
Canada  QF 3.7 Ram · ADATS (M113)
South Africa  G6 · ZT3A2