|
|
| Line 1: |
Line 1: |
| − | {{DISPLAYTITLE:CDK Mission Editor: Variables}} | + | {{Specs-Card|code=ki_43_2}} |
| | + | {{About |
| | + | |about=aircraft '''{{PAGENAME}}''' |
| | + | |usage=other uses |
| | + | |link=Ki-43 (Family) |
| | + | }} |
| | | | |
| − | __TOC__
| + | == Description == |
| | + | <!--In the description, the first part should be about the history of and the creation and combat usage of the aircraft, as well as its key features. In the second part, tell the reader about the aircraft in the game. Insert a screenshot of the vehicle, so that if the novice player does not remember the vehicle by name, he will immediately understand what kind of vehicle the article is talking about.--> |
| | | | |
| − | Variables in mission editor are used to store information like text, numbers or booleans used for creating true or false statements, they can be used to optimize code of your mission and also to create things that are normally impossible without using them.
| + | [[File:GarageImage_{{PAGENAME}}.jpg|420px|thumb|left]] |
| − | If you create a string variable named '''t1_unit_01''' you will be able to see it in '''target''' or '''object''' tab which you can find in actions similar to '''unitSetProperties''' where you can select AI or player units, it's name will be displayed as '''@t1_unit_01''', it will be displayed similarly in other actions too.
| + | {{break}} |
| − | As mentioned before, they can also be used to optimize missions, but only when you need a really high amount of triggers that do perform similar functions, in case of small mission you won't even notice a difference and usually you will need more triggers than when just using simple actions without variables, so this article will explain how to use them and show a good use of them.
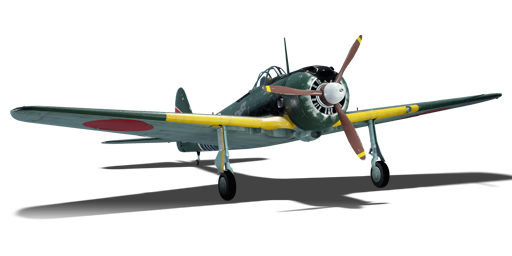
| + | The '''{{Specs|name}}''' is a rank {{Specs|rank}} Japanese fighter {{Battle-rating}}. This fighter was introduced into the game sometime prior to Update 1.27. |
| | | | |
| − | You can find some basic information about [https://wiki.warthunder.com/Triggers#List_of_all_Actions actions] and [https://wiki.warthunder.com/Triggers#List_of_all_Conditions conditions] with variables [https://wiki.warthunder.com/Triggers here], all their names start with '''var'''.
| + | == General info == |
| | + | === Flight Performance === |
| | + | ''Describe how the aircraft behaves in the air. Speed, manoeuvrability, acceleration and allowable loads - these are the most important characteristics of the vehicle.'' |
| | | | |
| | + | {| class="wikitable" style="text-align:center" |
| | + | |- |
| | + | ! colspan="8" | Characteristics |
| | + | |- |
| | + | ! colspan="8" | ''Stock'' |
| | + | |- |
| | + | ! colspan="2" | Max Speed<br>(km/h at 6,000 m) |
| | + | ! rowspan="2" | Max altitude<br>(meters) |
| | + | ! colspan="2" | Turn time<br>(seconds) |
| | + | ! colspan="2" | Rate of climb<br>(meters/second) |
| | + | ! rowspan="2" |Take-off run<br>(meters) |
| | + | |- |
| | + | ! AB |
| | + | ! RB |
| | + | ! AB |
| | + | ! RB |
| | + | ! AB |
| | + | ! RB |
| | + | |- |
| | + | | 539 || 523 || {{Specs|ceiling}} || 15.7 || 16.3 || 11.9 || 11.9 || 190 |
| | + | |- |
| | + | ! colspan="8" | ''Upgraded'' |
| | + | |- |
| | + | ! colspan="2" | Max Speed<br>(km/h at 6,000 m) |
| | + | ! rowspan="2" |Max altitude (meters) |
| | + | ! colspan="2" | Turn time (seconds) |
| | + | ! colspan="2" | Rate of climb<br>(meters/second) |
| | + | ! rowspan="2" |Take-off run (meters) |
| | + | |- |
| | + | ! AB |
| | + | ! RB |
| | + | ! AB |
| | + | ! RB |
| | + | ! AB |
| | + | ! RB |
| | + | |- |
| | + | | 580 || 558 || {{Specs|ceiling}} || 14.7 || 15.0 || 19.6 || 15.3 || 190 |
| | + | |- |
| | + | |} |
| | | | |
| − | '''Important notes:'''
| + | ====Details==== |
| | + | {| class="wikitable" style="text-align:center" |
| | + | |- |
| | + | ! colspan="5" | Features |
| | + | |- |
| | + | ! Combat flap |
| | + | ! Take-off flap |
| | + | ! Landing flap |
| | + | ! Air brakes |
| | + | ! Arrestor gear |
| | + | |- |
| | + | | X || X || X || X || X <!-- ✓ --> |
| | + | |- |
| | + | |} |
| | | | |
| − | :* You can't store more than one information in the same variable
| + | {| class="wikitable" style="text-align:center" |
| − | :* All of these instructions from this article are valid for both singleplayer and multiplayer missions
| + | |- |
| − | | + | ! colspan="5" | Limits |
| − | = Basics = | + | |- |
| − | ''Note: Before reading this make sure that you know basics about creating triggers and other things related to them (events, actions, conditions), if not then check the links above''
| + | ! rowspan="2" | Wing-break speed<br>(km/h) |
| − | | + | ! rowspan="2" | Gear limit<br>(km/h) |
| − | == How to create a variable == | + | ! rowspan="2" | Combat flap<br> (km/h) |
| − | [[File:Variables window.jpg|thumb|250x250px|Variables window]]
| + | ! colspan="2" | Max Static G |
| − | ''Note: You will need a working singleplayer mission before you start''
| + | |- |
| − | | + | ! + |
| − | :1. Choose on the side toolbar '''Variables''', you can find it under '''Triggers''' tab
| + | ! - |
| − | :: Now you should be able to see a window with multiple tabs that can be pressed, '''Add''' for adding new variables, '''Edit''' for editing, '''Del''' for deleting and '''Up''' and '''Down''' to move them.
| + | |- |
| − | :2. Press '''Add''' to add a new variable
| + | | {{Specs|разрушение|конструкции}} || {{Specs|разрушение|шасси}} || 523 || ~?? || ~? |
| − | :: After pressing it a new window should appear, you can select a name for it under '''Variable name:''' and select its type under '''Variable type:''', there are 10 of them, but for now I'll only explain how to use string (text), integer (number without a fractional component), real (number with a fractional component) and bool (used for creating true or false statements)
| + | |- |
| − | :3. Set the variable name to '''t1_unit_string_01''' and it's type to '''string'''
| + | |} |
| − | :: Now you should have created a new string variable, the next thing to do is set its value and assign it to something
| |
| − | :4. Select created variable
| |
| − | :: After selecting there should appear a new field where you can set its value
| |
| − | :5. Set the variable value to '''t1_unit_01'''
| |
| − | :: Now you need a new action where you can assign this variable
| |
| − | :6. Go to the '''Triggers / Missions Obj. Navigat''' tab, find an '''unitSetProperties''' action and create it
| |
| − | :7. Press '''object''' and select '''@t1_unit_string_01''', then scroll down and enable '''cannotShoot''' option
| |
| − | :: It should assign a variable to this action and give it a simple property, now we need a unit which will use it
| |
| − | :8. Create a new '''armada unit''' and call it '''t1_unit_01''' and make it a player unit
| |
| − | :: If everything went without any issues then your unit shouldn't be able to fire and that will mean that you properly assigned a variable to unitSetProperties action
| |
| | | | |
| − | == Ways of storing information in variables ==
| + | {| class="wikitable" style="text-align:center" |
| − | | |
| − | :* Editing variable value manually
| |
| − | :: Go to the window with '''Variables''', simply select one of them and just set it's value
| |
| − | :: Sometimes it's a good idea to assign some important actions and conditions to variables and then just edit them by changing variable value in the .blk file
| |
| − | :* Using '''varSet''' (Int/Real/Bool/String) actions
| |
| − | :: Create a varSet action, in '''var''' tab select that variable which you want to edit, then set it's '''value''', you can also import this '''value''' from other variable using '''input_var''' option
| |
| − | ::{| class="wikitable" style="width: 90%;"
| |
| − | |+
| |
| − | ! style="width: 20%;" |Action
| |
| − | ! style="width: 70%;" |Description
| |
| | |- | | |- |
| − | | varSetBool
| + | ! colspan="4" | Optimal velocities |
| − | |<div class="mw-collapsible mw-collapsed" style="width:100%">Sets a bool value<div class="mw-collapsible-content">
| |
| − | '''Notes:'''
| |
| − | | |
| − | * Using this action will remove (overwrite) everything from selected '''var''' variable
| |
| − | | |
| − | '''Fields:'''
| |
| − | | |
| − | * var: Select a bool variable to which you want to input a value
| |
| − | * value: Select the type of value (checked - True, unchecked - False)
| |
| − | * input_var: Select if you want to input the value from other variables
| |
| − | * fromDescriptor: unknown
| |
| − | </div></div>
| |
| | |- | | |- |
| − | | varSetInt
| + | ! Ailerons<br>(km/h) |
| − | |<div class="mw-collapsible mw-collapsed" style="width:100%">Sets an integer value<div class="mw-collapsible-content">
| + | ! Rudder<br>(km/h) |
| − | '''Notes:'''
| + | ! Elevators<br>(km/h) |
| − | | + | ! Radiator<br>(km/h) |
| − | * Using this action will remove (overwrite) everything from selected '''var''' variable
| |
| − | | |
| − | '''Fields:'''
| |
| − | | |
| − | * var: Select an integer variable to which you want to input a value
| |
| − | * value: Set the number
| |
| − | * source_var: Select if you want to input values from ongoing battle (overwrites current '''value''')
| |
| − | * input_var: Select if you want to input the value from other variables
| |
| − | * fromDescriptor: unknown
| |
| − | </div></div> | |
| | |- | | |- |
| − | | varSetReal | + | | < ??? || < ??? || < ??? || > ??? |
| − | |<div class="mw-collapsible mw-collapsed" style="width:100%">Sets a real value<div class="mw-collapsible-content"> | |
| − | '''Notes:'''
| |
| − | | |
| − | * Using this action will remove (overwrite) everything from selected '''var''' variable
| |
| − | | |
| − | '''Fields:'''
| |
| − | | |
| − | * var: Select a real variable to which you want to input a value
| |
| − | * value: Set the number
| |
| − | * input_var: Select if you want to input the value from other variables
| |
| − | * fromDescriptor: unknown
| |
| − | </div></div>
| |
| | |- | | |- |
| − | | varSetString | + | |} |
| − | |<div class="mw-collapsible mw-collapsed" style="width:100%">Sets a string value<div class="mw-collapsible-content">
| |
| − | '''Notes:'''
| |
| | | | |
| − | * Using this action will remove (overwrite) everything from selected '''var''' variable
| + | {| class="wikitable" style="text-align:center" |
| − | | |
| − | '''Fields:'''
| |
| − | | |
| − | * var: Select a string variable to which you want to input a value
| |
| − | * value: Set the text
| |
| − | * input_var: Select if you want to input the value from other variables
| |
| − | * fromDescriptor: unknown
| |
| − | </div></div>
| |
| | |- | | |- |
| − | |}
| + | ! colspan="3" | Compressor (RB/SB) |
| − | :* Using '''varAddString''' action
| |
| − | :: This way you can add a text to existing string variable by adding a '''value''' in the field with same name or a number and setting it selected amount of shown '''digits''' (for example if you add a '''3''' number and set '''digits''' to '''2''' then it will be shown as '''03'''), you can also input all these values from other variables
| |
| − | ::{| class="wikitable" style="width: 90%;"
| |
| − | |+
| |
| − | ! style="width: 20%;" |Action | |
| − | ! style="width: 70%;" |Description
| |
| | |- | | |- |
| − | | varSetString
| + | ! colspan="3" | Setting 1 |
| − | |<div class="mw-collapsible mw-collapsed" style="width:100%">Sets a string value<div class="mw-collapsible-content">
| |
| − | '''Notes:'''
| |
| − | | |
| − | * Using this action will remove (overwrite) everything from selected '''var''' variable
| |
| − | | |
| − | '''Fields:'''
| |
| − | | |
| − | * var: Select a string variable to which you want to input a value
| |
| − | * value: Set the text
| |
| − | * input_var: Select if you want to input the value from other variables
| |
| − | * fromDescriptor: unknown
| |
| − | </div></div>
| |
| | |- | | |- |
| − | |}
| + | ! Optimal altitude |
| − | :* Using '''varModify''' action
| + | ! 100% Engine power |
| − | :: To do operations on selected number
| + | ! WEP Engine power |
| − | ::{| class="wikitable" style="width: 90%;"
| |
| − | |+
| |
| − | ! style="width: 20%;" |Action | |
| − | ! style="width: 70%;" |Description | |
| | |- | | |- |
| − | | varModify | + | | ?,??? m || ??? hp || ?,??? hp |
| − | |<div class="mw-collapsible mw-collapsed" style="width:100%">Modifies existing real or integer variable<div class="mw-collapsible-content"> | |
| − | '''Fields:'''
| |
| − | | |
| − | * var: Select which variable you want to modify
| |
| − | * operator: Select what type of operation you want to do (inv - Inverse, mul - Multiplication, add - Addition, subAB - (var - value), subBA - (value - var), divAB - (var / value), divBA - (value / var), modAB, modBA - get the remainder from a division)
| |
| − | * value: Select the value
| |
| − | * use_variable: If checked, will use the value from other integer or real variable
| |
| − | * var_value: Select a string or real variable
| |
| − | </div></div>
| |
| | |- | | |- |
| − | |}
| + | <!--! colspan="3" | Setting 2 |
| − | :* using '''varSetRandomInt''' action
| |
| − | :: To just let the game choose a random number from selected range
| |
| − | ::{| class="wikitable" style="width: 90%;"
| |
| − | |+
| |
| − | ! style="width: 20%;" |Action | |
| − | ! style="width: 70%;" |Description | |
| | |- | | |- |
| − | | varSetRandomInt
| + | ! Optimal altitude |
| − | |<div class="mw-collapsible mw-collapsed" style="width:100%">Sets a random integer value<div class="mw-collapsible-content">
| + | ! 100% Engine power |
| − | '''Notes:'''
| + | ! WEP Engine power |
| − | | |
| − | * Using this action will remove (overwrite) everything from selected '''var''' variable
| |
| − | | |
| − | '''Fields:'''
| |
| − | | |
| − | * var: Select an integer variable to which you want to input a value
| |
| − | * from: Sets the first value
| |
| − | * var_from: Sets the first value using an integer variable
| |
| − | * to_not_including: Sets the second value (it won't be included in getting the final number)
| |
| − | * var_to_not_including: Sets the second value using an integer variable (it won't be included in getting the final number)
| |
| − | </div></div>
| |
| | |- | | |- |
| − | |} | + | | ?,??? m || ?,??? hp || ?,??? hp |
| − | :* using '''varGetIntFromString''' or '''varGetStringValue'''
| |
| − | ::{| class="wikitable" style="width: 90%;"
| |
| − | |+ | |
| − | ! style="width: 20%;" |Action
| |
| − | ! style="width: 70%;" |Description
| |
| | |- | | |- |
| − | | varGetIntFromString
| + | ! colspan="3" | Setting 3 |
| − | |<div class="mw-collapsible mw-collapsed" style="width:100%">Imports an integer value from the selected string variable to a selected integer variable<div class="mw-collapsible-content">
| |
| − | '''Fields:'''
| |
| − | | |
| − | * value: Select from which string variable you want to import an integer value
| |
| − | * var: Select to which integer variable you want to export an integer value
| |
| − | </div></div>
| |
| | |- | | |- |
| − | | varGetStringValue
| + | ! Optimal altitude |
| − | |<div class="mw-collapsible mw-collapsed" style="width:100%">Imports all text from the selected string value<div class="mw-collapsible-content">
| + | ! 100% Engine power |
| − | '''Fields:'''
| + | ! WEP Engine power |
| − | | |
| − | * var: Select to which string variable you want to import a string value
| |
| − | * from_var_name: Select from which string variable you want to import a string value (remember to not put '''@''' before string variable name)
| |
| − | </div></div>
| |
| | |- | | |- |
| | + | | ?,??? m || ?,??? hp || ?,??? hp |
| | + | |- --> |
| | |} | | |} |
| − | :: Example of how you can set it:
| |
| | | | |
| − | ::: '''Current variables:'''
| + | === Survivability and armour === |
| − | ::: var = t1_unit_string | type = string | value = t1_unit_12
| + | ''Examine the survivability of the aircraft. Note how vulnerable the structure is and how secure the pilot is, whether the fuel tanks are armoured, etc. Describe the armour, if there is any, and also mention the vulnerability of other critical aircraft systems.'' |
| − | ::: var = t1_unit_int | type = integer | value = 12
| |
| | | | |
| − | :: Now I want it to set the string to the name of a unit that has a higher number (by 1)
| + | == Armaments == |
| | + | === Offensive armament === |
| | + | ''Describe the offensive armament of the aircraft, if any. Describe how effective the cannons and machine guns are in a battle, and also what belts or drums are better to use. If there is no offensive weaponry, delete this subsection.'' |
| | | | |
| − | ::: '''Actions:'''
| + | === Suspended armament === |
| − | ::: unitSetVar (var = "t1_unit_string" value = "") - to clear value of selected string variable
| + | ''Describe the aircraft's suspended armament: additional cannons under the wings, bombs, rockets and torpedoes. This section is especially important for bombers and attackers. If there is no suspended weaponry remove this subsection.'' |
| − | ::: unitSetVar (var = "t1_unit_string" value = "t1_unit") - sets the value to that with which starts name of AI units
| |
| − | ::: varModify (var = "t1_unit_int" operator = "add" value = "1") - adds 1 to existing number
| |
| − | ::: unitAddString (var = "t1_unit_string" input_var = "t1_unit_int" digits = "2") - adds the number of the next unit | |
| | | | |
| − | :: After that this variable should be shown as '''t1_unit_13'''
| + | == Usage in battles == |
| | + | ''Describe the tactics of playing in an aircraft, the features of using vehicles in a team and advice on tactics. Refrain from creating a "guide" - do not impose a single point of view, but instead, give the reader food for thought. Examine the most dangerous enemies and give recommendations on fighting them. If necessary, note the specifics of the game in different modes (AB, RB, SB).'' |
| | | | |
| − | = Examples of use = | + | ===Manual Engine Control=== |
| | + | {| class="wikitable" style="text-align:center" |
| | + | |- |
| | + | ! colspan="7" | MEC elements |
| | + | |- |
| | + | ! rowspan="2" |Mixer |
| | + | ! rowspan="2" |Pitch |
| | + | ! colspan="3" |Radiator |
| | + | ! rowspan="2" |Supercharger |
| | + | ! rowspan="2" |Turbocharger |
| | + | |- |
| | + | ! Oil |
| | + | ! Water |
| | + | ! Type |
| | + | |- |
| | + | | Controllable || rowspan="2" | Not controllable || rowspan="2" | Not controllable || rowspan="2" | Not controllable || rowspan="2" | Separate || rowspan="2" | Not controllable || rowspan="2" | Not controllable |
| | + | |- |
| | + | |} |
| | | | |
| − | == Creating a set of triggers that checks multiple areas for units == | + | ===Modules=== |
| − | | + | {| class="wikitable" |
| − | This set of triggers is meant to check if there are units in a selected area, then if there's at least one unit from the '''A''' or '''B''' team in it the mission should mark this area on the minimap with a colour depending on which team is at this moment in that area.
| + | ! colspan="1" | Tier |
| − | If there are both teams in the same area then it should give it white neutral marking on the minimap.
| + | ! colspan="2" | Flight performance |
| − | The mission should have 36 of those areas and they should be placed next to each other.
| + | ! colspan="1" | Survivability |
| − | | + | ! colspan="2" | Weaponry |
| − | Here's a screenshot showing how it should look:
| + | |- |
| − | [[File:Minimap for Variables article.jpg|left|thumb|232x232px]]
| + | | I |
| − | {{break}}
| + | | Fuselage Repair |
| − | To make everything behave as intended, you need 8 triggers, one that checks all areas at the start of mission, one that checks all areas later when the first one is disabled, three for checking if there are any units in them and from what team they are, another three triggers to mark all areas and obviously variables, in this case 42 of them.
| + | | Radiator |
| − | | + | | |
| − | ===Adding variables===
| + | | |
| − | | + | |- |
| − | The first step to get things done is to add variables that you will need for your mission
| + | | II |
| − | :* '''b_area_string'''
| + | | |
| − | :: String variable, it will store area's name and be used to check current area
| + | | Compressor |
| − | :* '''b_area_int'''
| + | | Airframe |
| − | :: integer variable, it will store the number of current area and that number will be added by using '''varAddString''' action to '''b_area_string''' and '''b_area_string_check''' variables
| + | | |
| − | :* '''b_area_amount_int'''
| + | |- |
| − | :: integer variable, it will store current amount of areas, in this case '''36''', you need to set it manually there
| + | | III |
| − | :* '''b_area_string_check'''
| + | | Wings Repair |
| − | :: string variable, it will be used to store current state of the area (1 - there are units from the A team in the area, 2 - there are units from the B team in the area, 3 - neutral)
| + | | Engine |
| − | :* '''b_area_01_int - b_area_36_int'''
| + | | |
| − | :: integer variables, there will be 36 of them and they will store informations about all created areas
| + | | |
| − | :* '''switch_area_string'''
| + | |- |
| − | :: string variable, it will store the name of '''first_time_check_all_areas''' and then '''switch_area''' variables, set it to '''first_time_check_all_areas'''
| + | | IV |
| − | :* '''check_if_no_one_in_area'''
| + | | |
| − | :: string variable, set it to check_if_no_one_in_area (to point it at the trigger with the same name)
| + | | Engine Injection |
| − | :* '''check_if_t1_in_area'''
| + | | Cover |
| − | :: string variable, set it to check_if_t1_in_area (to point it at the trigger with the same name)
| + | | |
| − | :* '''check_if_t2_in_area'''
| + | |- |
| − | :: string variable, set it to check_if_t2_in_area (to point it at the trigger with the same name)
| + | |} |
| − | :* '''when_t1'''
| |
| − | :: string variable, set it to when_t1 (to point it at the trigger with the same name)
| |
| − | :* '''when_t2'''
| |
| − | :: string variable, set it to when_t2 (to point it at the trigger with the same name)
| |
| − | :* '''when_both'''
| |
| − | :: string variable, set it to when_both (to point it at the trigger with the same name)
| |
| − | | |
| − | ===Adding areas===
| |
| − | | |
| − | The second step is to add areas
| |
| − | :* Create 36 box areas that are placed next to each other
| |
| − | :: It should create one big 6x6 box, so it should have 6 columns and 6 rows
| |
| − | :: Don't forget to set their size to 2000x2000 meters
| |
| − | :: They can't overlap with each other because if that happens it can break the mission, there should be at least 5 meters of free space between areas
| |
| − | :* Rename all areas to b_area_01, b_area_02, b_area_03 etc.
| |
| − | :: Remember that they can't be named in random order, it is the best to name them from the left to the right or in reverse order
| |
| − | | |
| − | Here's a screenshot showing how it should look:
| |
| − | [[File:Areas from the Mission Editor.jpg|left|thumb|300x300px]]
| |
| − | {{break}}
| |
| − | ===Creating triggers that checks all areas at the start of mission===
| |
| − | | |
| − | First trigger will responsible for creating a name of areas which will be later checked in other triggers for the number assigned to every area (1, 2 or 3)
| |
| − | Basically it work like that, '''first_time_check_all_areas''' sets the value of '''b_area_string''' (for example '''b_area_01''' - name of the area that is going to be checked, it will be needed for showing icons) and '''b_area_string_check''' (for example '''b_area_01_int''' - name of the variable (it's stored value, 1, 2 or 3) that is going to be checked) that is going to be checked, then activates '''when_t1''', '''when_t2''' and '''when_both''' triggers that will shown an icon on the minimap with corresponding color
| |
| − | | |
| − | ''Important note: Order of creating triggers matters, if you set them wrongly then the mission will not work''
| |
| − | | |
| − | :'''Trigger name''' = "first_time_check_all_areas"
| |
| − | :'''Events'''
| |
| − | ::* Periodic Event = 0.01
| |
| − | ::: Set it to 0.01 so it will be able switch between areas as fast as it is possible
| |
| − | :'''Conditions'''
| |
| − | ::* varCompareInt (var_value = b_area_int, value = 0, var_value_other = b_area_amount_int, comparison_func = equal)
| |
| − | ::: This condition will keep changing the number of '''b_area_int''' variable (at the start of mission it is set to 0) until it reaches 36
| |
| − | :'''Actions'''
| |
| − | ::: This part will start working once the trigger will reach the '''36''' number
| |
| − | ::* unitSetInt (value = 0, var="b_area_int")
| |
| − | ::: Resets the value of '''b_area_int''' integer variable, so the '''switch_area''' (which will be activated next) will be able to start changing areas from the start (b_area_01)
| |
| − | ::* unitSetString (value = "switch_area", var = "switch_area_string")
| |
| − | ::: Changes the value of
| |
| − | ::* triggerEnable (target = "@switch_area_string")
| |
| − | ::: Enables '''switch_area''' trigger which will work for the rest of time until the mission ends
| |
| − | ::* triggerDisable (target = "first_time_check_all_areas")
| |
| − | ::: Disables this trigger
| |
| − | :'''Else'''
| |
| − | ::* varModify (operator = "add", value = 1, var = "b_area_int")
| |
| − | ::: It will add 1 every time this trigger is activated (as long as it meets the condition, so the '''b_area_int''' variable has lower number than 37)
| |
| − | ::* varSetString (value = "b_area_", var = "b_area_string", var ="b_area_string_check")
| |
| − | ::: It will set '''b_area_string''' and '''b_area_string_check''' variable values to '''b_area_'''
| |
| − | ::* varAddString (value = "", input_var = "b_area_int", digits = 2, var = "b_area_string", var = "b_area_string_check")
| |
| − | ::: It will add a number after '''b_area_''' which was set in previous action so '''b_area_string''' value and area name will be the same (in this case '''b_area_01''')
| |
| − | ::* varAddString (value = "_int", digits = 0, var = "b_area_string_check")
| |
| − | ::: It will add a text after the full name of area ('''b_area_01''') so it will allow other triggers set or check the number (0 - doesn't change the icon, 1 - change the icon color to A team, 2 change the icon colo r to B team, 3 - change the icon color to neutral white) assigned to '''b_area_01_int''', '''b_area_02_int''', '''b_area_03_int''' etc. variables
| |
| − | ::* triggerEnable (target = "@when_t1", target = "@when_t2", target = "when_both")
| |
| − | ::: It will enable all triggers that are needed to add an icon on the minimap
| |
| − | | |
| − | Three similar triggers which the main function will be to add an icon on the minimap
| |
| − | | |
| − | :'''Trigger name''' = "when_t1" - it will check the number assigned to '''b_area_xx_int''' (xx = number) variables, 1 - set the icon color to A team
| |
| − | :'''Trigger name''' = "when_t2" - it will check the number assigned to '''b_area_xx_int''' (xx = number) variables, 2 - set the icon color to B team
| |
| − | :'''Trigger name''' = "when_both" - it will check the number assigned to '''b_area_xx_int''' (xx = number) variables, 3 - set the icon color to neutral team (white)
| |
| − | | |
| − | This one is for '''when_t1'''
| |
| − | Every time only one of these triggers will be used and the rest of them will abort should they not meet the condition
| |
| − | | |
| − | :'''Events'''
| |
| − | ::* Periodic Event = 0.01
| |
| − | ::: Just like before, to make it work as fast as it is possible
| |
| − | :'''Conditions'''
| |
| − | ::* varCompareInt (var_value = "@b_area_string_check", value = 1 comparison func = "equal")
| |
| − | ::: It will compare the number of value stored in '''b_area_xx_int''' variable with '''1'''
| |
| − | :'''Actions'''
| |
| − | ::*missionShowMapIcon (show = true, team = "both", iconName = "ui/gameuiskin#capturezone_big_ring", areaName = "@b_area_string" colorCode = "team A", scale = 0.20)
| |
| − | ::*triggerEnable (target = "@switch_area_string")
| |
| − | ::: If the number of '''b_area_xx_int''' variable is set to 1 then it will show an icon with A team color, then enable '''switch_area''' trigger (it's name is stored in '''switch_area_string''' string) which will switch the area name to check to the next one (b_area_01 -> b_area_02, b_area_02 -> b_area_03 etc.)
| |
| − | :'''Else'''
| |
| − | ::*missionShowMapIcon (show = false, team = "both")
| |
| − | ::*triggerDisable (target = "@when_t1")
| |
| − | ::: If the number of '''b_area_xx_int''' variable is NOT set to 1 then it won't show the icon and just disable this trigger
| |
| | | | |
| | + | === Pros and cons === |
| | + | <!--Summarise and briefly evaluate the vehicle in terms of its characteristics and combat effectiveness. Mark its pros and cons in the bulleted list. Try not to use more than 6 points for each of the characteristics. Avoid using categorical definitions such as "bad", "good" and the like - use substitutions with softer forms such as "inadequate" and "effective".--> |
| | | | |
| − | Now you will need to copy this trigger to make it work for every colour (blue, red and white)
| + | '''Pros:''' |
| | | | |
| − | ::* Copy this trigger two times and set the name of copies to '''when_t2''' and '''when_both''', then change their '''value'''s in '''varCompareInt''' to '''2''' for '''when_t2''' and '''3''' for '''when_both'''.
| + | * Extremely good roll rate |
| − | ::* Change the color of icon in '''missionShowMapIcon''' (under '''actions''') to '''Team B''' for '''when_t2''' and '''White''' for '''when_both'''.
| + | * Excellent stock performance |
| − | ::* Change the '''target''' in '''triggerDisable''' action, switch it to '''@when_t2''' for '''when_t2''' and '''@when_both''' for '''when_both'''.
| + | * Wins turn battles and can easily outrun opponents it typically faces |
| | + | * Can equip bombs up to 100 kg to help aid weight and energy retention |
| | + | * Fires can be easily extinguished |
| | | | |
| − | Now go back to the window with '''Variables''' and set values of all '''b_area_xx_int''' (xx = number) variables to 1, 2 or 3.
| + | '''Cons:''' |
| − | If you did everything properly then the mission should show blue, red or white icons on the minimap.
| |
| | | | |
| − | ===Creating triggers that give a number to ''b_area_xx_int'' variables and keep checking them until the mission ends===
| + | * Very light, retains no energy |
| | + | * Weak armour |
| | + | * Very limited ammo pool |
| | | | |
| − | This trigger works like '''first_time_check_all_areas''', the only big difference is the part under '''Actions''', this time it is used to reset trigger state when '''b_area_int''' it reaches 36, other difference is a trigger that is enabled at the end of '''Actions''' and '''Else''', it is set to '''check_if_no_one_in_area''' now.
| + | == History == |
| | + | ''Describe the history of the creation and combat usage of the aircraft in more detail than in the introduction. If the historical reference turns out to be too long, take it to a separate article, taking a link to the article about the vehicle and adding a block "/ History" (example: <nowiki>https://wiki.warthunder.com/(Vehicle-name)/History</nowiki>) and add a link to it here using the <code>main</code> template. Be sure to reference text and sources by using <code><nowiki><ref></nowiki></code>, as well as adding them at the end of the article. This section may also include the vehicle's dev blog entry (if applicable) and the in-game encyclopedia description (under <code><nowiki>=== In-game description ===</nowiki></code>, also if applicable).'' |
| | | | |
| − | :'''Trigger name''' = "switch_area"
| + | === In-game description === |
| − | :'''Events'''
| + | The single-seater Japanese Nakajima Ki-43 Hayabusa (Peregrine Falcon) fighter was designed to replace the Ki-27 in the Japanese Imperial Army’s Air Force. |
| − | ::* Periodic Event = 0.01
| |
| − | ::: Set it to 0.01 so it will be able switch between areas as fast as it is possible
| |
| − | :'''Conditions'''
| |
| − | ::* varCompareInt (var_value = b_area_int, value = 0, var_value_other = b_area_amount_int, comparison_func = equal)
| |
| − | ::: This condition will keep changing the number of '''b_area_int''' variable (at the start of mission it is set to 0) until it reaches 36
| |
| − | :'''Actions'''
| |
| − | ::* varSetInt (value = 0, var = "b_area_int")
| |
| − | ::: Resets the '''b_area_int''' variable value to '''0'''
| |
| − | ::* varSetString (value = "b_area_", var = "b_area_string", var ="b_area_string_check")
| |
| − | ::* varAddString (value = "", input_var = "b_area_int", digits = 2, var = "b_area_string", var = "b_area_string_check")
| |
| − | ::* varAddString (value = "_int", digits = 0, var = "b_area_string_check")
| |
| − | ::* triggerEnable (target = "@check_if_no_one_in_area")
| |
| − | ::: Activates a trigger which changes the value of '''b_area_xx_int''' variable
| |
| − | :'''Else'''
| |
| − | ::* varModify (operator = "add", value = 1, var = "b_area_int")
| |
| − | ::* varSetString (value = "b_area_", var = "b_area_string", var ="b_area_string_check")
| |
| − | ::* varAddString (value = "", input_var = "b_area_int", digits = 2, var = "b_area_string", var = "b_area_string_check")
| |
| − | ::* varAddString (value = "_int", digits = 0, var = "b_area_string_check")
| |
| − | ::* triggerEnable (target = "@check_if_no_one_in_area")
| |
| − | ::: Activates a trigger which changes the value of '''b_area_xx_int''' variable
| |
| | | | |
| − | The next set of triggers will change the number of ''b_area_xx_int'' variables, for that you need to create three similar triggers, which will check if there are any units in areas. | + | The Ki-27 design was so successful that, without resorting to the competition that usually occurred among aircraft manufacturers, the Air Force authorized Nakajima to create an improved model. The main requirement for the new fighter was a high top speed of at least 500 km/h but with the same maneuverability as the Ki-27. |
| | | | |
| − | :'''Trigger name''' = "check_if_no_one_in_area"
| + | The first three prototypes were prepared and tested in 1939, but their maneuverability was inadequate. Therefore 10 pre-production aircraft with different configurations were considered. Two of them used the new “butterfly” combat flaps, which largely decided the issue. With the flaps, the plane became much more maneuverable. |
| − | :'''Events'''
| |
| − | ::* Periodic Event = 0.01
| |
| − | :'''Conditions'''
| |
| − | ::* unitWhenInArea (math = "3D", object = "all_players_squad", target = "@b_area_string", object_type = "isAlive", check_objects = "any")
| |
| − | ::: Checks if there are any players in currently checked area
| |
| − | :'''Actions'''
| |
| − | ::* triggerEnable (target = "@check_if_t1_in_area"
| |
| − | ::: If there are any players then it will enable '''check_if_t1_in_area''' to check if there are any players from the A team
| |
| − | :'''Else'''
| |
| − | ::* triggerEnable (target = "@switch_area_string"
| |
| − | ::: If there are NOT any players present in the area then it will just enable ''''switch_area''' trigger to switch ''b_area_xx_int'' to the next area
| |
| | | | |
| | + | In autumn of 1942, the Ki-42-IIA entered production. The main differences between the Ki-42-IIA and previous models were its more powerful Ha-115 motor, its 1130 hp output, and its three-bladed propeller (the previous model had a two-bladed propeller). The wings were reinforced to hold 250-kg bombs, and the lighter machine guns were replaced with large-caliber ones. In addition, the wing fuel tanks were self-sealing, and pilot protection was enhanced with 13 mm of armor (previous models, to lighten the aircraft, did not include protection for the pilot or fuel tanks). |
| | | | |
| | + | All in all, 5919 Ki-43 fighters were produced, most of which were of the Ki-43-IIA design. |
| | | | |
| − | :'''Trigger name''' = "check_if_t1_in_area"
| + | == Media == |
| − | :'''Events'''
| + | ''Excellent additions to the article would be video guides, screenshots from the game, and photos.'' |
| − | ::* Periodic Event = 0.01
| |
| − | :'''Conditions'''
| |
| − | ::* unitWhenInArea (math = "3D", object = "all_players_squad", target = "@b_area_string", object_type = "isTeamA", check_objects = "any")
| |
| − | ::: Checks if there are any players from the A team in currently checked area
| |
| − | :'''Actions'''
| |
| − | ::* varSetInt (value = 0, var = "@b_area_string_check")
| |
| − | ::* varModify (operator = "add", value = 1, var = "@b_area_string_check")
| |
| − | ::: If there are any units from the A team then it will reset the value of ''b_area_xx_int'' variable and add 1 to it (1 = A team color)
| |
| − | ::* triggerEnable (target = "@switch_area_string"
| |
| − | ::: It will enable '''switch_area''' to switch ''b_area_xx_int'' to the next area
| |
| − | :'''Else'''
| |
| − | ::* triggerEnable (target = "@check_if_t2_in_area"
| |
| − | ::: If there are players in the area but they are not from the A team then it will enable another trigger which checks if for the B team
| |
| | | | |
| − | ''Note: If you wonder why there's the var set to '''@b_area_string_check''' and not '''b_area_string_check''' in '''varSetInt''' action.''
| + | == See also == |
| − | ''If you just set it to '''b_area_string_check''' then it would look for this value: '''b_area_string_check:t = b_area_01_int''''' | + | ''Links to the articles on the War Thunder Wiki that you think will be useful for the reader, for example:'' |
| − | ''If you set it to '''@b_area_string_check''' then it will look for this value: '''b_area_01_int:t = 0''' so it can check and set the number stored in currently checked area''
| |
| | | | |
| − | :'''Trigger name''' = "check_if_t2_in_area"
| + | * ''reference to the series of the aircraft;'' |
| − | :'''Events'''
| + | * ''links to approximate analogues of other nations and research trees.'' |
| − | ::* Periodic Event = 0.01
| |
| − | :'''Conditions'''
| |
| − | ::* unitWhenInArea (math = "3D", object = "all_players_squad", target = "@b_area_string", object_type = "isTeamB", check_objects = "any")
| |
| − | ::: Checks if there are any players from the B team in currently checked area
| |
| − | :'''Actions'''
| |
| − | ::* varModify (operator = "add", value = 2, var = "@b_area_string_check")
| |
| − | ::: If there are any units from the B team it will add 2 to it (2 = B team color) and if it already added 1 in the previous action then it will set it's color to white (3 - neutral color)
| |
| − | ::* triggerEnable (target = "@when_t1" target = "@when_t2" target = "@when_both")
| |
| − | ::: When it is done with checking players it will enable triggers which will show an icon with proper color on the minimap
| |
| − | :'''Else'''
| |
| − | ::* triggerEnable (target = "@when_t1" target = "@when_t2" target = "@when_both")
| |
| − | ::: When it is done with checking players it will enable triggers which will show an icon with proper color on the minimap
| |
| | | | |
| − | :After that, it will work exactly like in the previous part (3.).
| + | == External links == |
| − | :If you did everything properly, then now this entire set of triggers should work like it was explained in the description of this section.
| + | ''Paste links to sources and external resources, such as:'' |
| − | :You can increase the number of areas but you also need to increase the value of '''b_area_amount_int''' variable if you want to do that. | |
| | | | |
| − | :Link to the multiplayer mission that contains this set of triggers:
| + | * ''topic on the official game forum;'' |
| − | :[http://drive.google.com/uc?export=download&id=1OxB0E0TVt5mZtS3_mPmMLPBzsH2aVaxn test_gamemode_tanks.blk]
| + | * ''encyclopedia page on the aircraft;'' |
| − | :Remember that you need to remove '''https://''' part of this link to make it work in War Thunder.
| + | * ''other literature.'' |
| | | | |
| − | [[Category:War Thunder CDK]]
| + | {{Japan fighters}} |
| − | [[Category:Custom missions]]
| |