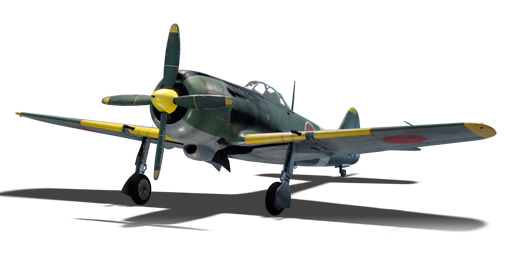
Ki-84 hei

From War Thunder Wiki
Jump to: navigation, search
Rank VI | Premium | Golden Eagles
Challenger DS Pack
This page is about the Japanese fighter Ki-84 hei. For other versions, see Ki-84 (Family).
Ki-84 hei
ki_84_hei.png
GarageImage Ki-84 hei.jpg
ArtImage Ki-84 hei.png
Ki-84 hei
AB RB SB
7.7 6.3 6.3
Class:
Research:63 000 Specs-Card-Exp.png
Purchase:200 000 Specs-Card-Lion.png
Show in game

Description

The Ki-84 hei Hayate is a rank IV Japanese fighter with a battle rating of 7.7 (AB) and 6.3 (RB/SB). It was introduced in Update 1.37.

General info

Flight performance

Max speed
at 6 000 m692 km/h
Turn time19 s
Max altitude13 000 m
EngineNakajima Homare 21
TypeRadial
Cooling systemAir
Take-off weight4 t

The Hei Hayate has identical flight performance to the preceding Ko and Otsu versions - same good turn rate, climb rate, and compression. As with the other two, use your excellent vertical energy retention and good manoeuvrability to your advantage. You can outturn all Allied aircraft except the Merlin Spitfires and the P-59 using combat flaps. You still retain the reasonable roll rate and abysmal rudder of the other Hayates.

Characteristics Max Speed
(km/h at 6,000 m)
Max altitude
(metres)
Turn time
(seconds)
Rate of climb
(metres/second)
Take-off run
(metres)
AB RB AB RB AB RB
Stock 669 650 13000 20.2 20.8 14.1 14.1 421
Upgraded 718 692 19.1 19.4 22.6 17.9

Details

Features
Combat flaps Take-off flaps Landing flaps Air brakes Arrestor gear
X X
Limits
Wings (km/h) Gear (km/h) Flaps (km/h) Max Static G
Combat Take-off Landing + -
837 270 470 431 280 ~13 ~10
Optimal velocities (km/h)
Ailerons Rudder Elevators Radiator
< 400 < 480 < 430 > 324

Survivability and armour

Crew1 person
Speed of destruction
Structural837 km/h
Gear270 km/h
  • 70 mm sloped (65°) bulletproof glass in the windshield
  • 13 mm steel plate behind the pilot seat

Modifications and economy

Repair costBasic → Reference
AB2 832 → 3 622 Sl icon.png
RB7 254 → 9 277 Sl icon.png
SB10 973 → 14 034 Sl icon.png
Total cost of modifications52 700 Rp icon.png
91 000 Sl icon.png
Talisman cost1 700 Ge icon.png
Crew training57 000 Sl icon.png
Experts200 000 Sl icon.png
Aces1 100 Ge icon.png
Research Aces520 000 Rp icon.png
Reward for battleAB / RB / SB
110 / 240 / 510 % Sl icon.png
172 / 172 / 172 % Rp icon.png
Modifications
Flight performance Survivability Weaponry
Mods aerodinamic fuse.png
Fuselage repair
Research:
2 600 Rp icon.png
Cost:
4 500 Sl icon.png
175 Ge icon.png
Mods radiator.png
Radiator
Research:
2 600 Rp icon.png
Cost:
4 500 Sl icon.png
175 Ge icon.png
Mods compressor.png
Compressor
Research:
3 000 Rp icon.png
Cost:
5 200 Sl icon.png
200 Ge icon.png
Mods aerodinamic wing.png
Wings repair
Research:
4 400 Rp icon.png
Cost:
7 600 Sl icon.png
290 Ge icon.png
Mods new engine.png
Engine
Research:
4 400 Rp icon.png
Cost:
7 600 Sl icon.png
290 Ge icon.png
Mods metanol.png
Engine injection
Research:
5 700 Rp icon.png
Cost:
9 800 Sl icon.png
380 Ge icon.png
Mods armor frame.png
Airframe
Research:
3 000 Rp icon.png
Cost:
5 200 Sl icon.png
200 Ge icon.png
Mods armor cover.png
Cover
Research:
5 700 Rp icon.png
Cost:
9 800 Sl icon.png
380 Ge icon.png
Mods ammo.png
ho5_belt_pack
Research:
2 600 Rp icon.png
Cost:
4 500 Sl icon.png
175 Ge icon.png
Mod arrow 0.png
Mods pilon bomb.png
9 in (mod23)
Research:
2 600 Rp icon.png
Cost:
4 500 Sl icon.png
175 Ge icon.png
Mod arrow 0.png
Mods weapon.png
ho5_new_gun
Research:
3 000 Rp icon.png
Cost:
5 200 Sl icon.png
200 Ge icon.png
Mods pilon bomb.png
12 in (mod27)
Research:
3 000 Rp icon.png
Cost:
5 200 Sl icon.png
200 Ge icon.png
Mods ammo.png
ho155_belt_pack
Research:
4 400 Rp icon.png
Cost:
7 600 Sl icon.png
290 Ge icon.png
Mod arrow 0.png
Mods weapon.png
ho155_new_gun
Research:
5 700 Rp icon.png
Cost:
9 800 Sl icon.png
380 Ge icon.png

Armaments

Offensive armament

Weapon 12 x 30 mm Ho-155 cannon
Ammunition120 rounds
Fire rate500 shots/min
Weapon 22 x 20 mm Ho-5 cannon
Ammunition300 rounds
Fire rate948 shots/min

The Ki-84 hei is armed with:

  • 2 x 30 mm Ho-155 cannons, wing-mounted (60 rpg = 120 total)
  • 2 x 20 mm Ho-5 cannons, nose-mounted (150 rpg = 300 total)

Suspended armament

List of setups (2)
Setup 12 x 50 kg Army Type 94 GPHE bomb
Setup 22 x 250 kg Army Type 92 GPHE bomb

The Ki-84 hei can be outfitted with the following ordnance:

  • Without load
  • 2 x 50 kg Army Type 94 GPHE bombs (100 kg total)
  • 2 x 250 kg Army Type 92 GPHE bombs (500 kg total)

Usage in battles

The Hei Hayate is the same great Hayate but with 2 x 30 mm cannons instead of 2 x 20 mm. Although this might not seem too important, one hit from a 30 mm high explosive shell will easily send your enemies to their doom. This solves the problem of the lacklustre 20 mm cannons. When up-tiered to jets, focus on taking out propeller-powered aircraft. Climb high, and gradually work your way down. Once all the props are down, look for furballs and/or ground-pounding jets. Swoop down on these people and destroy them. When jumped by a jet, there are a few things you can do such as pulling evasive manoeuvres and wearing the enemy's energy down. Call out for your jet teammates to help you out. When there is one more person running away, unless they are a bomber (which are typically easy to catch) or a prop fighter, will not be much for you to do. Just go to the airfield, repair, and "J"-out. Equip ground target rounds and bombs and try to wear down the tickets. Remember not to die. Survival is more important than ever in the Hei Hayate: your astounding repair cost means that you need to take down at least three air targets before breaking even.

Simulator Battles

  • In Simulator, the Ki-84 is overall a decent plane to fly. It enjoys lovely visibility towards the rear, sides, above, and over the nose, giving the pilot great situational awareness. It has nice handling, good climb rate, great speed and acceleration. Armament wise, the cannons have destructive damage and enough fire rate to put quite a few projectiles into the target in one pass. However the Ki-84's disadvantages are the poor rudder efficiency at high speeds, the rather slow roll rate, and the compass at the front-right of the gunsight that can obstruct your view. This aircraft can be used in BnZ fighting, turn fighting, intercepting (to some extent) and some ground pounding.
  • Before taking off, bring at least 30 minutes of fuel for longer patrol time. Set the convergence to around 250 m since your weapons have low velocity, therefore needing more precise aim at longer range. While your Ki-84 roars down the runway, you will notice that it shifts severely to the left, thus you must put rudder input to the right to taxi straight. As with other Ki series aircraft, only elevator trim is available, so when the stick is at its deadzone, the Ki-84 will roll and yaw to the left side. Therefore you always need to pull the stick a little to the right which can get a bit annoying. Usually, trim for around -1% when cruising around 470 km/h, around -5% when diving around 600 km/h, and when fighting at around 400 km/h no negative trim is needed. When carrying the 2 x 250 kg bombload, no negative trim is needed as well. Landing characteristics are forgiving: cut throttle to make sure you are not above 350 km/h before touchdown. Deploy combat then takeoff flaps to further decelerate in preparation for extending landing gears. Extend at around 260 km/h, control your descend rate throughout. Right before touchdown, deploy landing flaps. The gears are quite sturdy. You can break until the plane reaches full stop and not worry about propeller strike.
  • For dogfighting, it is always safer to enter with an altitude advantage. Most dogfights in Sim happen around or below 3,000 m so the Ki-84 can easily climb up to that altitude. Once at an advantageous height, boom & zoom the enemies. The Ki-84 can easily accelerate to more than 550 km/h in a dive which is decently fast but requires more precise manoeuvres to get the correct lead, since the faster you go the smaller the shooting window is. Important note: when fighting above 550 km/h, you want to be more precise in the roll and pitch axis, since at this speed the rudder locks up severely, preventing you from making aim adjustments which negatively impacts the lead. You must pretend that your rudder doesn't exist and fully rely on the ailerons and elevators to lead. A successful pass will usually cripple, if not destroying the enemy. Aside from BnZ, the Ki-84 is also excellent at turn fighting - with the appropriate opponent, of course. Except a few dedicated turnfighters, the Ki-84 can out-turn and get on most opponents' tail with combat / takeoff flaps deployed, and can sustain its turning ability throughout the fight. The Ki-84's stable handling allows you to pull some tight manoeuvres, so don't worry too much about flat spins. If you become a prey, try some defensive manoeuvres like barrel rolls or disengage by diving steeply towards a nearby friendly airfield. Note that the Ki-84's roll rate is very average so avoid manoeuvres like scissors.
  • When performing the "destroy enemy surveillance aircraft/attackers/bombers" task, it is crucial to constantly evade the turrets. If it is a bomber/attacker with decent defensive firepower or robust protection, then you might want to disengage after some attempts if you don't want to die. Pay special attention to any plane equipped with M2 Browning MG, they can critically damage the Ki-84 especially on the engine, fuel tanks, and pilot which can always lead to a later crash. Before attacking try to get an altitude advantage and perform deflection shots. To maximise the damage it is better to aim for their wings and engines, as the fuselage usually soaks up quite some bullets. Only fire when the bomber passes in front of your guns. This short window is enough to cripple or even destroy a twin-engine aircraft thanks to the upgraded 30 mm cannons, but it might require more passes to destroy robust targets such as B-29. However sometimes it only takes one bullet to set the target aflame. Do not follow behind a bomber's 6 unless you are sure that its tail gunners are unconscious. Chasing behind a bomber makes yourself pretty much stationary for the tail gunners, and you will be showered with bullets.
  • For ground pounding, the best loadout is the 2 x 250 kg bombs. With an extra 500 kg of weight attached outside, the Ki-84 handles much clumsier during take offs, especially on the roll axis. Longer distance is needed before lifting off. It is quite easy to drop bombs accurately with a Ki-84 because this aircraft is able to quickly accelerate above 550 km/h in a dive, the bombs will travel an almost straight line towards the target, therefore you can aim the gunsight directly at the target and expect the bombs to land very close. After bombs away, immediately pull up. The 4 Ho-5's perform well in killing trucks, AA guns and artilleries as they are quite accurate, but do not waste cannon shells on these targets unless you must. Constantly watch your surrounding, especially your high 6 for any incoming enemies.

Enemies worth noting:

  • Me 264 - The Me 264 is armed with large calibre MG and cannons all over it, therefore tailing a 264 is basically suicide unless all of their gunners are knocked out. You can treat the 264 almost like a B-29 or B-17 as they are very similar in both design and defensive capabilities. It is best to head-on the 264 if you can as you can easily knock out the pilots due to its glazed nose while also taking minimal damage. However the bomber lacks a ventral turret on its belly, making it easy to deal damage from below, but be wary of the downwards facing rear 20 mm cannon near the tail. The safest way to attack is from a higher altitude, dive at an oblique angle and focus fire on the wings and nose. Never engage if you have no altitude advantage. Looking somewhat similar to a B-17, an Me 264 has huge back-swept wings with 2 engines on each, and a H-tail which differentiates it from a B-17/B-29.
  • Yak-3 - This is a capable dogfighter or BnZ fighter that can be a huge threat. Although its firepower is not deadly, it can still critically damage a Ki-84. It is able to fly or dive at similar speeds, and can even engage a turn fight with a Ki-84 that is using takeoff flaps. The Yak-3 has a straight dorsal line housing an inline engine, a bubble canopy with a huge cooling intake sticking out the belly, and its symbolic, triangular wings.
  • A6M, Spitfire, etc. - If you see these turnfighters on your tail try outrunning them by diving at around -40 degrees. The Ki-84 still remains responsive handling at 600 km/h, but its speed retention is not the best, meaning it will start to lose speed quickly and the enemy might catch up. If you are near a friendly airfield, great. If not, then hope for the best and run towards the friendly side. A Spitfire also has an uncurved dorsal outline and large, elliptical wings. A Zero has a radial engine that's usually painted black, rounded wingtips and stabiliser tips followed by a pointy tail.
  • Ju 288 C - This is a very common bomber in air RB. Their tactics generally fall into two styles: shallow dive bombing and conventional climbing. For the ones that shallow dive towards a bomb base at the start of the match, think twice before engaging. The Ju 288 is very fast for a bomber, being able to reach >500 km/h in a shallow dive which makes it quite hard for an attacker to BnZ it, as it will be slow to catch up to it, giving it long enough time to shoot back. The Ki-84 locks up past 550 km/h, plus the small ammo capacity of its 30 mm cannons, it is best to leave it for heavy-punching teammates. As for the Ju 288 that climb, do not engage if you have no altitude advantage. It has numerous guns with great downward coverage, posing a big threat to the fragile Ki-84.

Manual Engine Control

MEC elements
Mixer Pitch Radiator Supercharger Turbocharger
Oil Water Type
Controllable Controllable
Not auto controlled
Controllable
Not auto controlled
Controllable
Not auto controlled
Separate Controllable
2 gears
Not controllable

Pros and cons

Pros:

  • Equipped with a very powerful array of weapons
  • Respectable speed for a prop plane
  • Decent high altitude performance
  • Effective top speed and energy retention allowing for the effective use of "boom and zoom" tactics
  • Capable turner: maintains a high degree of manoeuvrability at almost all speeds
  • Solid energy retention
  • High muzzle velocity from both cannons
  • 30 mm cannons are very effective against air targets
  • Engine cools down fairly quickly when overheated
  • Thanks to its lack of canopy frames, a clear all-round canopy view especially over the nose gives it a huge advantage in simulator.
  • Center of mass is behind main landing gears, allowing it to break continuously until it stops. Does not need to worry about propeller strike

Cons:

  • 30 mm cannons are mounted in the wings, resulting in significant convergence and makes them harder to aim
  • 30 mm cannons fire fairly slowly, which isn't ideal for dogfighting
  • Poor ballistics from the 20 mm cannons at this rank
  • Elevator locks up at high speeds preventing optimal usage of its great energy retention
  • Severe lock-up of the rudder above 500 km/h renders dive bombing or high speed boom and zoom less effective
  • Can and will face early jet fighters (e.g. He 162), which negate your speed advantage
  • Useless when the engine's shot
  • Airframe is highly susceptible to battle damage, especially of the incendiary type

History

The IJAAF approached Nakajima in 1942 to upgrade it's Ki 43 fighter. They realised the need for a more solidly armoured, faster, and heavier armed fighter. Addressing the common complaints with the Ki 43 which were low speed, lack of armour, and measly armament, the designers at Nakajima unleashed the Ki 84 - Japan's fastest propeller-driven fighter. Using the firm's own Homare, the Ki 84 was easily able to keep up and dogfight with the P-51 and P-47. The Hayate was produced in three modifications which happened to be the same aircraft with different armament options. These three are available to fly in-game.

Media

Skins
Videos

See also

Links to the articles on the War Thunder Wiki that you think will be useful for the reader, for example:

  • reference to the series of the aircraft;
  • links to approximate analogues of other nations and research trees.

External links


Nakajima Aircraft Company (中島飛行機株式会社 )
Fighters  Ki-27 otsu · Ki-27 otsu Tachiarai
  Ki-43-I · Ki-43-II · Ki-43-III otsu
  Ki-44-I · Ki-44-I 34 · Ki-44-II otsu · Ki-44-II hei
  Ki-84 ko · Ki-84 otsu · Ki-84 hei
  Ki-87
Hydroplanes  A6M2-N*
Interceptors  J1N1 · J5N1
Bombers  B5N2
  B6N1 Model 11 · B6N2 Model 12 · B6N2a Model 12Ko
  G5N1 · G8N1
  Ki-49-I · Ki-49-IIa · Ki-49-IIb · Ki-49-IIb/L
Recon  E8N2
Jet Fighters  Kikka
Captured  ␗Ki-27 otsu · ▃Ki-43-II · ␗Ki-43-III ko · ␗Ki-44-II hei · ␗Ki-84 ko
  *Refit of the Mitsubishi A6M2 mod. 11
See also  Fuji Heavy Industries (1957-2017)

Japan fighters
Navy 
Carrier-based fighter 
A5M  A5M4 · Hagiri's A5M4
A6M  A6M2 mod. 11 · A6M2 · A6M3 · A6M3 mod. 22 · A6M3 mod. 22Ko · A6M5 · A6M5 Ko · A6M5 otsu · A6M5 Hei · A6M6c
A7He  A7He1*
A7M  A7M1 (NK9H) · A7M2
Land-based Fighter 
J2M  J2M2 · J2M3 · J2M4 Kai · J2M5 · J2M5 (30 mm)
J6K  J6K1
J7W  J7W1
N1K-J  N1K1-Ja · N1K2-J · N1K2-Ja
Fighter seaplane 
N1K  N1K1
A6M-N  A6M2-N
Army 
Ki-10  Ki-10-I · Ki-10-I C · Ki-10-II · Ki-10-II C
Ki-27  Ki-27 otsu · Ki-27 otsu Tachiarai
Ki-43  Ki-43-I · Ki-43-II · Ki-43-III otsu
Ki-44  Ki-44-I · Ki-44-I 34 · Ki-44-II otsu · Ki-44-II hei
Ki-61  Ki-61-I ko · Ki-61-I otsu · Ki-61-I hei · Tada's Ki-61-I hei · Ki-61-I tei · Ki-61-II Otsu Kai
Ki-84  Ki-84 ko · Ki-84 otsu · Ki-84 hei
Ki-87  Ki-87
Ki-94  Ki-94-II
Ki-100  Ki-100 · Ki-100-II
Other countries  ▅F4U-1A · ▅P-51C-11-NT · ▅Bf 109 E-7 · ▅Fw 190 A-5
  *Imported designation of the He 112 (A6M was in development - A7M would take A7 designation after the cancelation of the A7He)