J2M5

From War Thunder Wiki
Jump to: navigation, search
Rank VI | Premium | Golden Eagles
Challenger DS Pack
This page is about the Japanese fighter J2M5. For other versions, see J2M (Family).
J2M5
j2m5.png
GarageImage J2M5.jpg
ArtImage J2M5.png
J2M5
AB RB SB
6.3 5.7 5.7
Class:
Research:31 000 Specs-Card-Exp.png
Purchase:200 000 Specs-Card-Lion.png
Show in game

Description

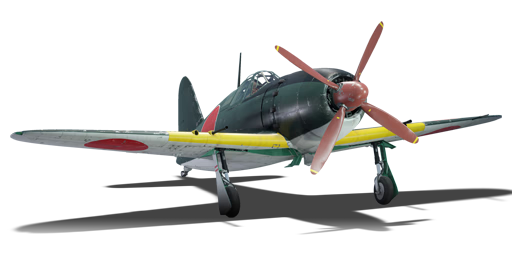
The J2M5 Model 33, designated as Raiden Mod.33 (雷電三三型), was a high-altitude variant of the Raiden series which was developed to increase the ceiling and effectiveness at high altitude. Equipped with the Mitsubishi MK4U-A "Kasei 26a" engine with a mechanically driven supercharger, giving increased high-altitude speed at the expense of range. Unlike the failed J2M4 Model 32, the Model 33 saw (limited) production and deployed to several air units.

It was introduced in Update 1.51 "Cold Steel". Similar to its preceding variant, the J2M4, the J2M5 boosts its performance over its earlier predecessors by boasting a 1,854 hp engine on top of equipping a turbocharger increasing its efficiency at high altitudes. With the engine shaft remaining relatively the same over the previous J2M2/3, the J2M5 enjoys the same weight distribution with a stronger engine. Still excelling at climbing, the J2M5 plays more similarly to the J2M2's performance-to-BR with the firepower of a J2M3.

Nicknames

General info

Flight performance

Max speed
at 6 580 m615 km/h
Turn time19 s
Max altitude11 500 m
EngineMitsubishi Kasei 26
TypeRadial
Cooling systemAir
Take-off weight4 t
Characteristics Max Speed
(km/h at 6,580 m)
Max altitude
(metres)
Turn time
(seconds)
Rate of climb
(metres/second)
Take-off run
(metres)
AB RB AB RB AB RB
Stock 590 571 11500 20.0 20.6 13.0 13.0 300
Upgraded 646 615 18.5 19.0 23.9 17.5

Details

Features
Combat flaps Take-off flaps Landing flaps Air brakes Arrestor gear
X X
Limits
Wings (km/h) Gear (km/h) Flaps (km/h) Max Static G
Combat Take-off Landing + -
0 350 488 454 280 ~12 ~9
Optimal velocities (km/h)
Ailerons Rudder Elevators Radiator
< 390 < 400 < 420 > 324
Compressor (RB/SB)
Setting 1
Optimal altitude 100% Engine power WEP Engine power
2,800 m 1,510 hp 1,812 hp
Setting 2
Optimal altitude 100% Engine power WEP Engine power
6,800 m 1,450 hp 1,740 hp
Setting 3
Optimal altitude 100% Engine power WEP Engine power
7,200 m 1,400 hp 1,680 hp

Survivability and armour

Crew1 person
Speed of destruction
Structural0 km/h
Gear350 km/h
  • 70 mm Bulletproof glass - Armoured windscreen
  • 8 mm Steel - Armour plate in pilot's headrest

Modifications and economy

Repair costBasic → Reference
AB2 987 → 3 802 Sl icon.png
RB6 812 → 8 671 Sl icon.png
SB9 949 → 12 665 Sl icon.png
Total cost of modifications52 800 Rp icon.png
90 900 Sl icon.png
Talisman cost1 700 Ge icon.png
Crew training57 000 Sl icon.png
Experts200 000 Sl icon.png
Aces1 100 Ge icon.png
Research Aces520 000 Rp icon.png
Reward for battleAB / RB / SB
100 / 230 / 480 % Sl icon.png
172 / 172 / 172 % Rp icon.png
Modifications
Flight performance Survivability Weaponry
Mods aerodinamic fuse.png
Fuselage repair
Research:
3 500 Rp icon.png
Cost:
6 000 Sl icon.png
200 Ge icon.png
Mods radiator.png
Radiator
Research:
3 500 Rp icon.png
Cost:
6 000 Sl icon.png
200 Ge icon.png
Mods compressor.png
Compressor
Research:
4 000 Rp icon.png
Cost:
6 900 Sl icon.png
230 Ge icon.png
Mods aerodinamic wing.png
Wings repair
Research:
4 400 Rp icon.png
Cost:
7 600 Sl icon.png
250 Ge icon.png
Mods new engine.png
Engine
Research:
4 400 Rp icon.png
Cost:
7 600 Sl icon.png
250 Ge icon.png
Mods metanol.png
Engine injection
Research:
5 700 Rp icon.png
Cost:
9 800 Sl icon.png
330 Ge icon.png
Mods armor frame.png
Airframe
Research:
4 000 Rp icon.png
Cost:
6 900 Sl icon.png
230 Ge icon.png
Mods armor cover.png
Cover
Research:
5 700 Rp icon.png
Cost:
9 800 Sl icon.png
330 Ge icon.png
Mods ammo.png
type99mk1_belt_pack
Research:
3 500 Rp icon.png
Cost:
6 000 Sl icon.png
200 Ge icon.png
Mod arrow 1.png
Mods ammo.png
type99mk2_belt_pack
Research:
4 000 Rp icon.png
Cost:
6 900 Sl icon.png
230 Ge icon.png
Mod arrow 1.png
Mods weapon.png
type99mk1_new_gun
Research:
4 400 Rp icon.png
Cost:
7 600 Sl icon.png
250 Ge icon.png
Mods weapon.png
type99mk2_new_gun
Research:
5 700 Rp icon.png
Cost:
9 800 Sl icon.png
330 Ge icon.png

Unlocking all performance modules should be a Raiden pilot's first concern, as the default belts for all weapons are workable. After that, go for the weapon belts, as these make more targets possible (ground units).

Armaments

Offensive armament

Ammunition380 rounds
Fire rate516 shots/min
Ammunition420 rounds
Fire rate490 shots/min

The J2M5 is armed with:

  • 2 x 20 mm Type 99 Model 2 cannons, wing-mounted (210 rpg = 420 total)
  • 2 x 20 mm Type 99 Model 1 cannons, wing-mounted (190 rpg = 380 total)

Suspended armament

List of setups (1)
Setup 12 x 60 kg Navy Type 97 Number 6 ground bomb

The J2M5 can be outfitted with the following ordnance:

  • Without load
  • 2 x 60 kg Navy Type 97 Number 6 bombs (120 kg total)

Usage in battles

Although a stubby and small aircraft, the Mitsubishi J2M Raiden can be considered one of the best Japanese fighters. Wielding four 20 mm cannons, this aircraft is more than capable of dealing with heavy damage. However, the main advantage the Raiden has over its Allied counterparts is its climb rate. In Realistic Battles, the J2M5 can climb to higher altitudes very quickly, especially when given an air start. This facet of the Raiden's performance is particularly exemplified in the J2M5, the last in-game variant of the Raiden that features the greatest performance of the series. This is partially due to its mechanically-driven supercharger which allows the J2M5 to perform at altitudes once thought impossible by Japanese engineers. Once at a high altitude, it becomes possible to choose when, where, and who the J2M5 want to fight. The J2M5's 20 mm cannons may initially seem rather lacklustre but they have a knack for snapshots or quick bursts of fire that result in a victory while manoeuvring. Generally, the J2M5 performs similarly to the early Fw 190 A variants, having a deadly armament, good roll rate, low top speed, but higher climb rate. The J2M5 differs from this rule slightly as it was built for speed and high-altitude performance. The Raiden is best used as an energy fighter - instead of "turning and burning", or losing all built up speed in turns, attack enemies from a higher altitude and then regain that altitude once the attack has been delivered. The J2M5 excels at Boom & Zoom due to its high rate of climb, deadly armament, and high altitude characteristics.

Sharing this role with other "energy fighters" such as the Fw 190 D-13 the Raiden's main downside is its lack of manoeuvrability. Similar to its earlier mentioned German counterpart, the Raiden struggles to beat enemies in turn fights, especially Spitfires. If caught in a sticky situation, the Raiden pilot may choose to dive away or seek help from teammates. Trying to fight an enemy Spitfire in a turn battle with any J2M is a terrible idea unless the enemy aircraft is damaged or many teammates are nearby. Moreover, the J2M's high-speed manoeuvrability is very poor; often, it becomes a gamble when pulling out of a high-speed dive as the Raiden's elevator authority at high speeds is lacking. The entire aircraft locks up at excess speeds of 645 km/h (400 mph). It can be very difficult to pull out of a dive, roll, or turn when at high speeds with the J2M. The Raiden's manoeuvrability is more or less on par with its enemies in simulator battles, for the most part.

The Raiden pilot may also find themselves outclassed at extreme altitudes by aircraft such as the Ta 152 H-1. All these aircraft have to do to avoid the J2M5 is dive away and build up speed. Fortunately, this aircraft has a surprise - a massive ammunition pool totalling 800 rounds. With good aim and practice, it is possible to "snipe" enemies from upwards of a kilometre away.

The J2M5 wields two 20 mm Type 99 Mk. 1 cannon and two 20 mm Type 99 Mk. 2 cannons in the wings. The stock belts are particularly lacklustre for both of these weapons but since there is such a large amount of ammunition carried in both the effect is virtually negated. The "Stealth" belt has the best combination of AP/API and HEF to shred enemy aircraft, and are recommended for those who do not need a tracer shell to aim. Alternatively, for those not used to IJN 20 mm, the "Universal" belt is the best bet. The "Tracers" belt is filled with HEF-T shells, but they only contain half of the power of a standard HEF and can give away the plane's position.

Overall, the Raiden is best used as a surprise attack, high altitude, high damage output fighter. Where it lacks in the manoeuvrability category, it makes up for in armament and rate of climb. The J2M5 also has improved cockpit visibility over the J2M2 and J2M3 variants.

For ground attack, the J2M5 can equip two 60 kg bombs under the wings. While not the biggest, these bombs can help a team win a match, especially in arcade battles. The J2M5 can also wield armour-piercing ground targets ammunition for its 20 mm cannons, although 21 mm of penetration is nothing to boast about and should be ignored, unless targeting armoured personal carriers (APC) or similar armoured cars.

Manual Engine Control

MEC elements
Mixer Pitch Radiator Supercharger Turbocharger
Oil Water Type
Controllable Controllable
Not auto controlled
Controllable
Not auto controlled
Controllable
Not auto controlled
Separate Controllable
3 gears
Not controllable

Pros and cons

Pros:

  • Large ammunition pool
  • Large 70 mm bullet proof glass mounted at 42 degrees
  • Good roll rate at lower speeds
  • Good turn performance at lower speeds with full use of flaps
  • Robust engine, won't give up to quickly in case of oil leak
  • Improved cockpit visibility, sight was placed higher improving view of what is under-nose

Cons:

  • Very poor high-speed performance
  • Very slow in comparison to your foes and allies
  • Bad high altitude performance (7,000 m and above)
  • Prone to engine and fuel fires
  • Doesn't turn well, this can lead to a "culture shock" among people used to carelessly outturning all their foes in prior planes
  • Elevator doesn't respond well, especially at high speeds
  • Lack of armour around fuel tanks or engine, lack of armoured pilot seat
  • Differing muzzle velocities between the two marks of the Type 99 cannon on the J2M5 will require different leads for each to hit

History

Main article: History of the J2M

Nearing the end of the war, the focus of the J2Ms was shifted towards even more local interceptors as requested at a faster approach. With the J2M5, Raiden Model 33's a new and last engine revision was made, the Kasei 26a engine with a mechanically driven supercharger. This allowed the Model 33 to get higher speeds at higher altitudes compared to that of the J2M4, Model 32 at the cost of total range which was a sacrifice that was required as American bombers got closer and closer to the mainland.

Within the Model 33 there has been several prototype variants and armament configurations of only one becoming a production line variant, the J2M5a, Raiden Model 33 Ko which had four 20 mm Type 99 Model 2 cannons.

One other of these variants, the J2M5 with Type 5 30 mm cannons, which didn't make it to the production line, as by the time, bombers got through and bombed the Japanese logistics from December 1944 onward, which took its toll on the aircraft production overall.

A direct hit on the Mitsubishi aircraft plant caused the complete loss of airframes, machine tools, and jigs and eventually halted production. Production generally suffered less from direct hits on factories, which were rare, but from attacks on suppliers and consequent shortages of material and construction tools.

Media

Skins
Videos

See also

Links to the articles on the War Thunder Wiki that you think will be useful for the reader, for example:

  • reference to the series of the aircraft;
  • links to approximate analogues of other nations and research trees.

External links


Mitsubishi Company (三菱商会)
Fighters  A5M4 · Hagiri's A5M4
  A6M2 mod. 11 · A6M2 · A6M3 · A6M3 mod. 22 · A6M3 mod. 22Ko · A6M5 · A6M5 Ko · A6M5 otsu · A6M5 Hei · A6M6c
  A7M1 (NK9H) · A7M2
  J2M2 · J2M3 · J2M4 Kai · J2M5 · J2M5 (30 mm)
Hydroplanes  F1M2
Interceptors  Ki-83 · Ki-109
Bombers  G4M1
  Ki-21-Ia · Ki-21-I hei · Ki-67-I Ko · Ki-67-I otsu
Jet Fighters  Ki-200
Captured  ▃A6M2 · ␗A6M2
See also  Mitsubishi Heavy Industries, Ltd. (Post-War)

Japan fighters
Navy 
Carrier-based fighter 
A5M  A5M4 · Hagiri's A5M4
A6M  A6M2 mod. 11 · A6M2 · A6M3 · A6M3 mod. 22 · A6M3 mod. 22Ko · A6M5 · A6M5 Ko · A6M5 otsu · A6M5 Hei · A6M6c
A7He  A7He1*
A7M  A7M1 (NK9H) · A7M2
Land-based Fighter 
J2M  J2M2 · J2M3 · J2M4 Kai · J2M5 · J2M5 (30 mm)
J6K  J6K1
J7W  J7W1
N1K-J  N1K1-Ja · N1K2-J · N1K2-Ja
Fighter seaplane 
N1K  N1K1
A6M-N  A6M2-N
Army 
Ki-10  Ki-10-I · Ki-10-I C · Ki-10-II · Ki-10-II C
Ki-27  Ki-27 otsu · Ki-27 otsu Tachiarai
Ki-43  Ki-43-I · Ki-43-II · Ki-43-III otsu
Ki-44  Ki-44-I · Ki-44-I 34 · Ki-44-II otsu · Ki-44-II hei
Ki-61  Ki-61-I ko · Ki-61-I otsu · Ki-61-I hei · Tada's Ki-61-I hei · Ki-61-I tei · Ki-61-II Otsu Kai
Ki-84  Ki-84 ko · Ki-84 otsu · Ki-84 hei
Ki-87  Ki-87
Ki-94  Ki-94-II
Ki-100  Ki-100 · Ki-100-II
Other countries  ▅F4U-1A · ▅P-51C-11-NT · ▅Bf 109 E-7 · ▅Fw 190 A-5
  *Imported designation of the He 112 (A6M was in development - A7M would take A7 designation after the cancelation of the A7He)