Tada's Ki-61-I hei

From War Thunder Wiki
Jump to: navigation, search
Rank IV USSR | Premium | Golden Eagles
Tu-1 Pack
This page is about the Japanese fighter Tada's Ki-61-I hei. For other versions, see Ki-61 (Family).
Tada's Ki-61-I hei
Tada's Ki-61-I hei
AB RB SB
5.3 4.7 4.0
Purchase:2 980 Specs-Card-Eagle.png
Show in game

Description

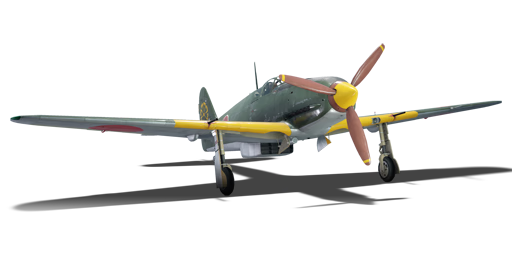
The Tada's Ki-61-I hei Hien is a premium rank IV Japanese fighter with a battle rating of 5.3 (AB), 4.7 (RB), and 4.0 (SB). It was introduced in Update "Starfighters". The plane is painted after the camouflage scheme of the pilot Chuichi Tada of the 78th Sentai based in Rabaul, New Guinea.

General info

Flight performance

Max speed
at 6 000 m591 km/h
Turn time21 s
Max altitude10 300 m
EngineKawasaki Ha-40
TypeInline
Cooling systemWater
Take-off weight4 t
Characteristics Max Speed
(km/h at 6,000 m)
Max altitude
(metres)
Turn time
(seconds)
Rate of climb
(metres/second)
Take-off run
(metres)
AB RB AB RB AB RB
Stock 572 556 10300 21.9 22.5 7.1 7.1 380
Upgraded 613 591 20.3 21.0 13.7 10.0

Details

Features
Combat flaps Take-off flaps Landing flaps Air brakes Arrestor gear
X X
Limits
Wings (km/h) Gear (km/h) Flaps (km/h) Max Static G
Combat Take-off Landing + -
850 250 292 282 230 ~11 ~8
Optimal velocities (km/h)
Ailerons Rudder Elevators Radiator
< 360 < 350 < 460 > 312

Survivability and armour

Crew1 person
Speed of destruction
Structural0 km/h
Gear250 km/h
  • 13 mm Steel plate behind the pilot

Modifications and economy

Repair cost
AB1 395 Sl icon.png
RB5 128 Sl icon.png
SB3 869 Sl icon.png
Crew training10 000 Sl icon.png
Experts250 000 Sl icon.png
Aces820 Ge icon.png
Research Aces870 000 Rp icon.png
Reward for battleAB / RB / SB
Talisman.png 2 × 90 / 230 / 420 % Sl icon.png
Talisman.png 2 × 160 / 160 / 160 % Rp icon.png
Modifications
Flight performance Survivability Weaponry
Mods aerodinamic fuse.png
Fuselage repair
Mods radiator.png
Radiator
Mods compressor.png
Compressor
Mods aerodinamic wing.png
Wings repair
Mods new engine.png
Engine
Mods metanol.png
Engine injection
Mods armor frame.png
Airframe
Mods armor cover.png
Cover
Mods ammo.png
safat12_belt_pack
Mod arrow 0.png
Mods pilon bomb.png
7 in (mod20)
Mod arrow 0.png
Mods weapon.png
ho103_new_gun
Mods pilon bomb.png
10 in (mod24)
Mod arrow 0.png
Mods ammo.png
mg15120_belt_pack
Mod arrow 0.png
Mods pilon bomb.png
12 in (mod30)
Mods weapon.png
mg15120_new_gun

Armaments

Offensive armament

Ammunition240 rounds
Fire rate700 shots/min
Weapon 22 x 12.7 mm Ho-103 machine gun
Ammunition500 rounds
Fire rate900 shots/min

The Tada's Ki-61-I hei is armed with:

  • 2 x 20 mm MG 151 cannons, wing-mounted (150 rpg = 300 total)
  • 2 x 12.7 mm Ho-103 machine guns, nose-mounted (400 rpg = 800 total)

Suspended armament

List of setups (3)
Setup 12 x 50 kg Army Type 94 GPHE bomb
Setup 22 x 100 kg Army Type 94 GPHE bomb
Setup 32 x 250 kg Army Type 92 GPHE bomb

The Tada's Ki-61-I hei can be outfitted with the following ordnance:

  • Without load
  • 2 x 50 kg Army Type 94 GPHE bombs (100 kg total)
  • 2 x 100 kg Army Type 94 GPHE bombs (200 kg total)
  • 2 x 250 kg Army Type 92 GPHE bombs (500 kg total)

Usage in battles

The "Hei" (丙, c) modification of the Ki-61 still retains the above average manoeuvrability, common to the Japanese aviation tree. However, the Hei Hien has some faults - its top speed is only 20 km/h higher than that of the early "Zeroes". Its climb rate is enough for its role, and it retains energy fairly well. While its acceleration holds itself pretty well, Its top speeds are not on par with other aircraft making it similar to the German Bf 109 G-6. Its guns are also a hit and miss - it is equipped with the deadly MG 151 20 mm cannons, and it can also equip German belts with Minengeschoß shells. However, the Japanese 12.7s are lower velocity and a bit on the weak side. The Hien's ammo count is average, albeit not as much as American aircraft. One thing to be noted is that the landing flaps are very effective and will slow you down even if you use WEP. That said, use them when you are trying to make somebody on your six overshoot you.

The Hei Hien's armament is flexible, as it is able to equip multiple kinds of bombs. With accuracy and shot placement, the large ammunition pool can work to your advantage. Equipping the air targets belt for the MG 151 cannons is the best choice for air combat. It features a high degree of Minengeschoß shells, specially made German HE shells with thin walls. There is no 20 mm cannon shell in the game with more high explosive than the Minengeschoß. As for the 12.7s, Stealth or Air target belts are your best bet. The best choice of bomb loadout is the 250 kg bombs due to the lack of precision needed. A pilot can miss a direct hit on a pillbox and still destroy it.

Realistic battles

Instead of simply turn fighting, the Ki-61 is very good at energy fighting, or "boom and zoom". Once at a high altitude, the Hien pilot may choose to dive lower to attack an enemy. If the enemy is not destroyed on the first pass, it is recommended to climb sharply and gain altitude. By doing this, the Hien sets itself up for another attack while not being in the range of the enemy's guns.

The Hei Hien is best utilised as a multi-purpose fighter. Although proficient at energy fighting, the Ki-61 is also generally good at standard manoeuvres. It may lose turn fights with some enemy aircraft like the Spitfire Mk Vb/trop, but nonetheless it can still be used in multiple roles. The Hien is your standard "jack of all trades". It's not incredibly good at anything it does but it is even across the board. This allows the Hien pilot to choose what role they want to play in the battle. One could play the reserved, high flying energy fighter, or the aggressive low flying dogfighter. The Ki-61 allows these choices.

If caught in a sticky situation, the Hien pilot may choose to do several things. Depending on your altitude, executing rolling scissors or an overshoot may be a valid tactic. Try to make the enemy pilot feel pressured to disengage. Depending on the enemy's aircraft, use your speed to your advantage and try to get away. The surest tactic would be communicating with teammates to ensure your assailant's death. Once tailed, the Hien pilot can "set up" an enemy by nosing up about 70 degrees so the entirety of the enemy plane is shown. At this stage, ideally, your teammate is arriving to save the day. In Realistic battles, if your team is made up of A6Ms it may also be beneficial to fly to them and start turn fighting.

Simulator battles

In Sim, the Ki-61 can be used in BnZ fighting, turn fighting, intercepting and some ground pounding. The Ki-61 is overall a pretty friendly plane to fly. It is quite fast, handles nicely at all speeds, has decent visibility especially over the nose, climbs great and has powerful armament. However its main disadvantage is the weak protection.

Before taking off, bring at least 30 minutes of fuel for longer patrol time. If you are not using MEC, use around 95% throttle when cruising below 3,000 m since the engine will slowly heat up at full throttle. But full throttle is fine at higher altitudes.

Only elevator trim is available, so when the stick is at its deadzone, the Ki-61 will roll and yaw to the left side. Therefore you always need to pull the stick to the right which can get a bit annoying. Usually, a trim of around -7% is enough. But when carrying the 2 x 250 kg bombload, no negative trim is needed.

For dogfighting, it is always safer to enter with an altitude advantage. Most dogfights in sim happen below 3,000m so the Ki-61 can easily climb up to that altitude. As mentioned in the description, its climb rate is actually great, don't get misled by the stat card. Once at an advantageous height, boom & zoom the enemies. The Ki-61 can easily accelerate to more than 550 km/h in a dive which is decently fast but requires more precise manoeuvres to get the correct lead, since the faster you go the smaller the shooting window is. A successful pass will usually cripple the enemy due to the destructive twin MG 151 cannons. Aside from BnZ, the Ki-61 is also excellent at turn fighting - with the appropriate opponent, of course. Except a few dedicated turn fighters, the Ki-61 can out-turn and get on most opponents' tail with combat flaps deployed. Note: do not turn with Spitfires or Zeros, you will never out-turn them. If you see a plane with a streamlined inline engine and large, elliptical wings (Spitfire) or something with rounded wingtips and stabiliser tips, a radial engine and a pointy tail (A6M), try some defensive manoeuvres like barrel rolls or disengage by diving towards a nearby friendly airfield. Note that the Ki-61's roll rate is very average so avoid manoeuvres like scissors.

When intercepting planes, it is crucial to know what the target is, because although you have powerful armament, most targets can still easily damage you in return. If it is a bomber/attacker with decent defensive firepower or great turret coverage then you might want to disengage after some attempts if you don't want to die. From the hard-hitting M2 Browning to the fast-firing MG 15, any gun can critically damage the Ki-61 especially on the engine, fuel tanks, and pilot which can always lead to a later crash. Before attacking try to get an altitude advantage and perform deflection shots. To maximise the damage it is better to aim for their wings and engines, as the fuselage usually soaks up quite some bullets. Only fire when the bomber passes in front of your guns. This short window might seem inadequate to do anything, but the 20 mm Mineshells will not disappoint. A few hits with the MG 151 is enough to cripple the target. But DO NOT follow behind a bomber's 6 unless you are sure that its tail gunners are unconscious. Chasing behind a bomber makes yourself pretty much stationary for the tail gunners, and you will be showered with bullets.

For ground pounding, the best loadout is the 2 x 250 kg bombs. With an extra 500 kg of weight attached outside, the Ki-61 handles much clumsier during take offs, especially on the roll axis. Longer distance is needed before lifting off. Dive at a shallow angle to approach the target, try to get as close as possible but avoid crashing into the ground. When the target fills up about 1/3 in the gunsight and the gunsight slices just above the target, drop the bombs and immediately pull up. It is best to set separate keybinds for firing MG and cannons as wasting precious cannon rounds can be fatal. The 2 MGs perform well in killing trucks, AA guns and artilleries as they have plenty of ammo. However, constantly watch your surrounding, especially your high 6 for any incoming enemies.

Enemies worth noting:

  • Me 264: This giant is one of the few bombers who get air spawns in Sim, so it usually flies higher than you think. On top of this, the Me 264 is armed with large calibre MG and cannons all over it, therefore tailing a 264 is basically suicide unless all of their gunners are knocked out. You can treat the 264 almost like a B-29 or B-17 as they are very similar in both design and defensive capabilities. It is best to head-on the 264 if you can as you can easily knock out the pilots due to its glazed nose while also taking minimal damage. However the bomber lacks a ventral turret on its belly, making it easy to deal damage from below, but be wary of the downwards facing rear 20 mm cannon near the tail. The safest way to attack is from a higher altitude, dive at an oblique angle and focus fire on the wings and nose. Never engage if you have no altitude advantage.
  • B-25, Ju 88, IL-2, etc: These aircraft have either powerful defensive guns, for example the B-25, or wide gun coverage such as the Ju 88. The most threatening one, the B-25, is fairly easy to distinguish. It has a short and wide fuselage, twin radial engine hanging under the wings and a H-tail. Focus your fire on the engines and constantly swing sideways to avoid getting hit. A few hits from the M2 Browning is a guaranteed death. The Ju 88, on the other hand, has great underside gun coverage so attacking from below isn't a very good option. Try engaging from the sides and concentrate the fire on the front half of it, as that is where all the vital components are located. Again, never engage any of these if you have no altitude advantage. Pin them on the map and leave them to teammates with more powerful firepower.
  • A6M, Spitfire, etc: If you see them on your tail try outrunning them by diving at around -40 degrees. The Ki-61 still remains responsive handling at 600 km/h, but its speed retention is not the best, meaning it will start to lose speed quickly and the enemy might catch up. If you are near a friendly airfield, great. If not, then hope for the best and run towards the friendly side. Don't forget to pitch up and down a little to mess up their aim, the early Spitfires and A6M only have a 60-round drum per cannon which will run out fairly fast. The leftover 7.7 mm machine guns will not be as destructive.

Manual Engine Control

MEC elements
Mixer Pitch Radiator Supercharger Turbocharger
Oil Water Type
Not controllable Controllable
Not auto controlled
Controllable
Not auto controlled
Controllable
Not auto controlled
Separate Not controllable
1 gear
Not controllable

Pros and cons

Pros:

  • Generally performs well in the most common tactics, both BnZ and turn-fighting, allowing flexible gameplay depending on the situation
  • Outstanding climb rate
  • Has decent dive speed, can easily out-dive slower opponents
  • Great firepower thanks to the pair of 20 mm MG 151 and the minengeschoss rounds
  • Large amount of ammunition for the 12.7 mm (400 rpg) is great for long battles
  • Some armour protection for the pilot means that it will not easily get pilot-sniped by small-calibre/low-penetrating guns from the back
  • Able to equip up to 2 x 250 kg bombs, meaning it is also useful in ground pounding/tank RB
  • Adequate over-the-nose visibility allows easier leading in Simulator

Cons:

  • Average backwards visibility can be lethal in simulator
  • Locks up at high speeds
  • The MG 151 has only 150 rpg which requires strict trigger control
  • No frontal armour, can be fatal in a head-on
  • Average roll rate which worsens as speed increases, can easily get out-rolled by Fw 190s and I-16s

History

Describe the history of the creation and combat usage of the aircraft in more detail than in the introduction. If the historical reference turns out to be too long, take it to a separate article, taking a link to the article about the vehicle and adding a block "/History" (example: https://wiki.warthunder.com/(Vehicle-name)/History) and add a link to it here using the main template. Be sure to reference text and sources by using <ref></ref>, as well as adding them at the end of the article with <references />. This section may also include the vehicle's dev blog entry (if applicable) and the in-game encyclopedia description (under === In-game description ===, also if applicable).

Media

Skins

See also

Links to the articles on the War Thunder Wiki that you think will be useful for the reader, for example:

  • reference to the series of the aircraft;
  • links to approximate analogues of other nations and research trees.

External links


Kawasaki Aircraft Industries (川崎航空機工業株式会社)
Biplane Fighters  Ki-10-I · Ki-10-I C · Ki-10-II · Ki-10-II C
Fighters  Ki-61-I ko · Ki-61-I otsu · Ki-61-I hei · Tada's Ki-61-I hei · Ki-61-I tei · Ki-61-II Otsu Kai
  Ki-100 · Ki-100-II
Interceptors  Ki-45 ko · Ki-45 otsu · Ki-45 hei · Ki-45 tei
  Ki-96
  Ki-102 otsu
  Ki-108 Kai
Bombers  Ki-32
  Ki-48-II otsu
Captured  ␗Ki-45 hei/tei · ␗Ki-61-I otsu · ▃Ki-61-Ib
See also  Kawasaki Shipyard Co.

Japan fighters
Navy 
Carrier-based fighter 
A5M  A5M4 · Hagiri's A5M4
A6M  A6M2 mod. 11 · A6M2 · A6M3 · A6M3 mod. 22 · A6M3 mod. 22Ko · A6M5 · A6M5 Ko · A6M5 otsu · A6M5 Hei · A6M6c
A7He  A7He1*
A7M  A7M1 (NK9H) · A7M2
Land-based Fighter 
J2M  J2M2 · J2M3 · J2M4 Kai · J2M5 · J2M5 (30 mm)
J6K  J6K1
J7W  J7W1
N1K-J  N1K1-Ja · N1K2-J · N1K2-Ja
Fighter seaplane 
N1K  N1K1
A6M-N  A6M2-N
Army 
Ki-10  Ki-10-I · Ki-10-I C · Ki-10-II · Ki-10-II C
Ki-27  Ki-27 otsu · Ki-27 otsu Tachiarai
Ki-43  Ki-43-I · Ki-43-II · Ki-43-III otsu
Ki-44  Ki-44-I · Ki-44-I 34 · Ki-44-II otsu · Ki-44-II hei
Ki-61  Ki-61-I ko · Ki-61-I otsu · Ki-61-I hei · Tada's Ki-61-I hei · Ki-61-I tei · Ki-61-II Otsu Kai
Ki-84  Ki-84 ko · Ki-84 otsu · Ki-84 hei
Ki-87  Ki-87
Ki-94  Ki-94-II
Ki-100  Ki-100 · Ki-100-II
Other countries  ▅F4U-1A · ▅P-51C-11-NT · ▅Bf 109 E-7 · ▅Fw 190 A-5
  *Imported designation of the He 112 (A6M was in development - A7M would take A7 designation after the cancelation of the A7He)

Japan premium aircraft
Fighters  Hagiri's A5M4 · A7He1 · Ki-27 otsu Tachiarai
  Ki-44-II otsu · ▅Bf 109 E-7 · ▅F4U-1A · Ki-100-II · Ki-44-I 34
  ▅Fw 190 A-5 · A7M1 (NK9H) · Tada's Ki-61-I hei · ▅P-51C-11-NT
  J2M4 Kai · A6M5 Ko · A6M6c · J2M5 · Ki-87 · J6K1
Twin-engine fighters  Ki-96
Jet fighters  F-86F-40 JASDF▅ · T-2 Early · F-4EJ ADTW
Bombers  Ki-21-I hei · Ki-48-II otsu · H8K3 · B7A2 (Homare 23) · ▅B-17E