A6M5

From War Thunder Wiki
Jump to: navigation, search
Rank VI USSR | Premium | Golden Eagles
Su-25K Pack
This page is about the Japanese fighter A6M5. For other versions, see A6M (Family).
a6m5_zero.png
GarageImage A6M5.jpg
ArtImage A6M5.png
A6M5
Research:26 000 Specs-Card-Exp.png
Purchase:76 000 Specs-Card-Lion.png
Show in game

Description

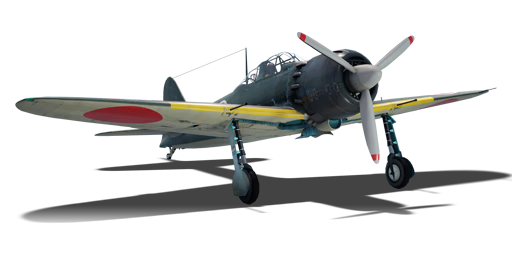
The A6M5 mod. 52, designated as the Type 0 Carrier-based Fighter Model 52 (零式艦上戦闘機五二型), was the last main-production variant of the A6M series. The wings were redesigned once again, cutting to the same length as that of the A6M3 mod. 32 but rounding out the tips. Aside from that, the engine performance was improved due to the modification of the Sakae engine's exhaust system to point the stacks aft and distributing them around the forward fuselage, providing an additional increase in thrust. Armour protection for the pilot and fuel tanks was increased, and self-sealing fuel tanks were included in later production. The A6M5 mod. 52 retained the armament of the A6M3 mod. 22A (Ko) which fielded the better Type 99 Model 2 (20 mm) over earlier A6Ms.

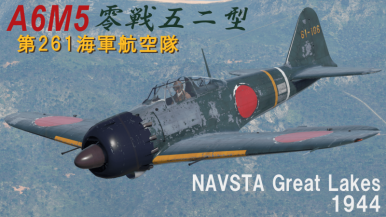
It has been in the game since the start of the Open Beta Test prior to Update 1.27. With all the modifications done to the A6M5 over the other A6Ms, performance has improved but it faces stronger enemy aircraft which proportionally perform even better. While still unrivalled in manoeuvre dogfights, capable of dodging, weaving, and out-turning the pursuer into getting on their six, staying on the six of an aircraft will be harder to maintain due to the higher top speeds all other aircraft will have over the A6M5. As the last main-production A6M, the A6M5s also come with a late-war modification which allow them to be converted into "bakusen", mounting a 250 kg bomb in place of the centreline drop tank.

Nicknames
  • IJN Pilot nickname: Reisen (零戦) / Zerosen (ゼロ戦) (Abbreviation of 0 - ).
  • Allied reporting name: Zeke / Zero.

General info

Flight performance

Arrestor gear
Accelerates braking by grabbing the brake cable on the deck of the aircraft carrier
Max speed
at 6 000 m565 km/h
Turn time16 s
Max altitude10 900 m
EngineNakajima Sakae 21
TypeRadial
Cooling systemAir
Take-off weight3 t

The A6M5 excels at low to medium speed turning engagements. It possesses an excellent horizontal turn time combined with an acceptable roll rate. This allows the plane to be an absolute monster if opposing planes get slow enough for it to catch and force them into a dogfight.

However, with its impressive dogfighting characteristics come the Zero's inherent weakness: speed. It is vulnerable to enemy fighters that do not engage it on the Zero's terms at low speed and instead chose to stick to high-speed passes.

There is a less noticeable decrease in the wingspan of ~1 m leading to slightly worse turning performance over early Zero variants but it helps push the speed to 565 km/h.

Characteristics Max Speed
(km/h at 6,000 m)
Max altitude
(metres)
Turn time
(seconds)
Rate of climb
(metres/second)
Take-off run
(metres)
AB RB AB RB AB RB
Stock 544 528 10900 16.6 17.2 12.1 12.1 190
Upgraded 587 565 15.8 16.0 20.0 15.6

Details

Features
Combat flaps Take-off flaps Landing flaps Air brakes Arrestor gear
X
Limits
Wings (km/h) Gear (km/h) Flaps (km/h) Max Static G
Combat Take-off Landing + -
703 300 397 368 220 ~14 ~6
Optimal velocities (km/h)
Ailerons Rudder Elevators Radiator
< 310 < 420 < 410 > 260

Survivability and armour

Crew1 person
Speed of destruction
Structural0 km/h
Gear300 km/h
  • No armour protection
  • No self-sealing fuel tanks

Modifications and economy

Repair costBasic → Reference
AB1 030 → 1 303 Sl icon.png
RB2 485 → 3 146 Sl icon.png
SB3 550 → 4 494 Sl icon.png
Total cost of modifications25 000 Rp icon.png
45 100 Sl icon.png
Talisman cost1 100 Ge icon.png
Crew training22 000 Sl icon.png
Experts76 000 Sl icon.png
Aces500 Ge icon.png
Research Aces320 000 Rp icon.png
Reward for battleAB / RB / SB
60 / 140 / 300 % Sl icon.png
142 / 142 / 142 % Rp icon.png
Modifications
Flight performance Survivability Weaponry
Mods aerodinamic fuse.png
Fuselage repair
Research:
1 700 Rp icon.png
Cost:
3 100 Sl icon.png
160 Ge icon.png
Mods radiator.png
Radiator
Research:
1 700 Rp icon.png
Cost:
3 100 Sl icon.png
160 Ge icon.png
Mods compressor.png
Compressor
Research:
1 400 Rp icon.png
Cost:
2 500 Sl icon.png
130 Ge icon.png
Mods aerodinamic wing.png
Wings repair
Research:
2 100 Rp icon.png
Cost:
3 800 Sl icon.png
200 Ge icon.png
Mods new engine.png
Engine
Research:
2 100 Rp icon.png
Cost:
3 800 Sl icon.png
200 Ge icon.png
Mods metanol.png
Engine injection
Research:
2 000 Rp icon.png
Cost:
3 600 Sl icon.png
190 Ge icon.png
Mods armor frame.png
Airframe
Research:
1 400 Rp icon.png
Cost:
2 500 Sl icon.png
130 Ge icon.png
Mods armor cover.png
Cover
Research:
2 000 Rp icon.png
Cost:
3 600 Sl icon.png
190 Ge icon.png
Mods ammo.png
type89_belt_pack
Research:
1 700 Rp icon.png
Cost:
3 100 Sl icon.png
160 Ge icon.png
Mod arrow 0.png
Mods weapon.png
type97_new_gun
Research:
1 400 Rp icon.png
Cost:
2 500 Sl icon.png
130 Ge icon.png
Mods pilon bomb.png
9 in (mod30)
Research:
1 400 Rp icon.png
Cost:
2 500 Sl icon.png
130 Ge icon.png
Mod arrow 1.png
Mods ammo.png
type99mk2_belt_pack
Research:
2 100 Rp icon.png
Cost:
3 800 Sl icon.png
200 Ge icon.png
Mod arrow 0.png
Mods weapon.png
type99mk2_new_gun
Research:
2 000 Rp icon.png
Cost:
3 600 Sl icon.png
190 Ge icon.png
Mods pilon bomb.png
12 in (mod30)
Research:
2 000 Rp icon.png
Cost:
3 600 Sl icon.png
190 Ge icon.png

Armaments

Offensive armament

Ammunition200 rounds
Fire rate490 shots/min
Ammunition1 400 rounds
Fire rate900 shots/min

The A6M5 is armed with:

  • 2 x 20 mm Type 99 Model 2 cannons, wing-mounted (100 rpg = 200 total)
  • 2 x 7.7 mm Type 97 machine guns, nose-mounted (700 rpg = 1,400 total)

Suspended armament

List of setups (2)
Setup 12 x 60 kg Navy Type 97 Number 6 ground bomb
Setup 21 x 250 kg Navy Type Number 25 Model 2 bomb

The A6M5 can be outfitted with the following ordnance:

  • Without load
  • 2 x 60 kg Navy Type 97 Number 6 bombs (120 kg total)
  • 1 x 250 kg Navy Type Number 25 Model 2 bomb (250 kg total)

Usage in battles

The A6M5 is an excellent dogfighter, nearly peerless in a low-speed engagement, even the renowned Spitfire looks clumsy and slow compared to an A6M5. However, it faces some extremely difficult opponents. Many opposing fighters tend to be specialized in performance-based energy manoeuvres with Boom and Zoom fighting styles rather than the classic turning and dogfighting of the A6M5. This can lead to the A6M5 struggling to engage them on the offensive due to its weak performance and low top speed and all too often is forced onto the defensive. The Zero is capable of evading attacks and striking back, but it requires a confident and knowledgeable pilot.

Aircraft position is incredibly important to the A6M5. While it can win any dogfight, a low-speed Zero distracted by getting its guns on target is a very easy target to dispatch. If in a dogfighting stance, success can be had with the A6M5; but to excel, consideration between different tactics need to be had. Pick the battles and only use dogfighting as a last resort and attempt to use Energy fighting as the primary mode of attack when possible.

The A6M5 can begin with a disadvantage, spawning from carriers on Pacific maps. However, this can help the Zero as it is quite a good low-speed climber thanks to its low wing-loading, spaded it will climb to 6 km in ~5 minutes. For manual engine control users, climb at ~220 km/h (100% prop pitch, 30% radiators and supercharger change at 3.4 km on WEP or 4 km otherwise), this will place the plane in a good position to select targets at a similar altitude to the Zero's position. The A6M5 performs considerably worse above 5 km, so be mindful of the limitations to prevent being in a position of disadvantage.

When fighting on the offensive, select a target lower than the Zero, or in rare cases slower, then stick to Energy fighting and dive on them. Reset after each attack, resist the temptation to be drawn into dogfight. Battles can be won, but it will cost a considerable amount of energy that might be needed later. The fight might also leave the player distracted and vulnerable to other fighters, so stay cautious.

Be conscious of the Zero's low dive limit of 740 km/h so do not power dive onto targets. Many fighters will also be able to outrun the A6M5 in an extended dive, in these cases it is better to give up and recover than engage in a protracted chase that will ultimately equalize on energy.

When fighting on the defensive, speed is critical in engagement because most of the enemies will be considerably faster than the A6M5. Use the barest minimum to evade opposition fire to keep the speed as high as possible. The biggest and longest window to return fire on an enemy is when they overshoot and begin to zoom away. The A6M5 has a very low stall speed of 121 km/h with flaps, so pursuing an opposition fighter in a zoom climb is possible. However, the Nakajima Sakae engine makes it difficult to recover energy quickly so choose when to extend carefully or the Zero will end up lacking the speed to evade when the enemies begin to attack.

A preferred evasion tactic is to perform a shallow spiral dive; turn tight enough to keep out of the opposition fighters guns, but try to keep it just close enough to make the enemies believe they could still catch the A6M5 in its sights. A rather difficult manoeuvre, but this move can tease enemies into longer turns and cause them to burn more energy while on the A6M5 tail. The enemy's lowered speed will benefit when the A6M5 moves around to gun them, especially when the enemy overshoots.

The A6M5 can be a frustrating bird to fly due to the considerable disadvantages on the performance front while emphasizing on manoeuvres to get the enemy into the sights. However, a skilled pilot with the A6M5 can be immensely rewarding in surviving and securing kills in defensive flying. Not a beginner-friendly plane, but an A6M5 player surviving in the War Thunder battlefield can consider themselves a skilled pilot.

  • In Simulator, the A6M Zero is overall a great plane to fly. Its advantages include the extremely smooth handling, impressive turn rate, low stall speed, the ability to not enter spins in extreme manoeuvres, decent rear visibility, and increased cannon ammo capacity. It is able to pull really tight turns or barrel rolls without losing control or going into a spin, allowing the player to use this stability to their advantage. Its disadvantages, however, are the fragile protection, wing-mounted guns, and the cockpit scattered with frames. Although not thick, these frames can still be obstructions in a fight. Also the gunsight is small and mounted very low, resulting in inadequate visibility over the nose. This can limit the player's ability to see the target in a turn fight since to lead the target, the player must cut inside its turn, meaning the nose will now block the target. The A6M can perform dogfighting, some ground pounding and some intercepting.
  • You can bring the minimum amount of fuel (29 minutes) since this model of the Zero only has a 100-round drum per cannon, as a result you might need to constantly return to airfield to reload so there is no need to bring more fuel. Set the convergence to 150-300 m. When taking off, the A6M will shift severely to the left so it is best to set separate keybind for left and right brakes to counter the torque.
  • For dogfighting, it is better to engage with an altitude advantage so climb to around 2,500 m. Track the opponent using lead or pure pursuit, as with lag pursuit you will eventually end up at the 6'o clock of the target aircraft whose fuselage will soak up most of your MG bullets, and your wing mounted cannons will become really awkward to aim. With the amazing stability the aim should be easy. Target their wings or nose and avoid the back half of the fuselage as there is usually nothing in there. You can turn with most planes with your combat/takeoff flaps deployed. Note that it is best to fire in 10-round/one-second bursts to avoid wasting cannon rounds. Once the cannons are out, the leftover 7.7 mm MGs can only effectively damage single engine fighters.
  • For ground pounding with bombs, look for tanks and pillboxes. First you need some separation between you and the target so you have enough time to line-up the drop. Dive at the target at a rather shallow angle, and release the 60 kg bombs when you are very close, with the target below the gunsight and filling up around half of it. For the 250 kg, drop it with the gunsight slightly more above the target. If you only use the MGs, your targets are trucks, AAA and howitzers. Dive at it and stabilise the plane so the gunsight stays overall still at the target. Then, once the target fills out around 1/6 of the gunsight, open fire. If your aim is accurate you can destroy one target in a single pass. However, it is very recommended to set keybind for firing MG only as you can definitely not waste the valuable cannon rounds. Save them for any unexpected dogfights.
  • Landing is easy thanks to the low stall speed and lovely handling. Line up and approach the airstrip at treetop, decrease speed to at most 210 km/h and deploy combat, takeoff and landing flaps in order. Further decelerate so the touchdown speed is no more than 180 km/h to avoid bouncing up. Keep braking until the plane reaches a full stop, you don't have to worry about the nose dipping down and causing a propeller strike.

Belt Selection:
7.7 mm Type 97
Though not very effective weapons being 7.7 mm, time and patience with the aiming can still secure tallies and the weapons are still better than nothing. "Stealth" allows for sneaky attacks while having several incendiary rounds that could start fires. "Tracer" can also be used as a pure AP belt, so while fires may be hard to start, it may penetrate the cockpit armour and hit the pilot, or even force the enemy into costly defensive evasion to help put them into the Zero's sights.

20 mm Type 99 Mk 2
These are quite effective cannons even if the rate of fire is a little low at ~500 rpm. "Stealth" belt provides a pattern of three HEF and two AP-I rounds, giving a good rounded HE fragmentation and AP damage potential with the added bonus of not letting the opponents see the shells as they travel by. "Universal" belt with a one HEF-T, two HEF, and one AP-I pattern is a decent second choice if a tracer element is needed to aim. "Tracer" belt with pure HEF-T is rather excellent, but the tracer round has less explosive filler than the pure HEF shell, so overall power is reduced with the ability to guide each shot. Finally, "Ground targets" belt give a mix of five AP-I, one HEF, and one HEF-T with the AP-I more useful against fighting ground targets, especially when there are ground targets such as light tanks on certain maps.

All enemy fighters will be considerably faster than the Zero, but less able to dogfight so should be approached in the same way.

Bombers should be avoided unless confident in aiming and crippling the bomber on the first pass. The Zeros are quite fragile and the defensive gunners on a bomber can easily shred the A6M5 if it is not approaching fast enough to engage and disengage before being hit.

Enemies worth noting:

  • P-61: this plane is one tough nut to crack. It is quite fast, packs a fatal punch, has a searching radar, and a deadly turret on top. The turret consists of 4 x 12.7 mm M2 Browning machine guns that cover the upper half of the plane, and most P-61 players tend to fly low or get you into their upper half to target you with the turret. Avoid being above them at all costs, utilise the Zero's manoeuvrability and sneak under their belly. Its appearance resembles a P-38: a center fuselage with two engine nacelles extending backwards and forming the twin tail like a frame, you will know it is a Black Widow and not a Lightning when red tracer bullets start shooting out from it.
  • I-16: the late I-16s are equipped with ShVAK cannons that can be pretty dangerous to your fragile airframe. They can turn equally well as the Zero, have superior roll rate but the stability is so terrible that as soon as they pull a little more on the stick, they will enter spins. Therefore it is quite easy to counter them: engage a turnfight with them and turn tighter and tighter, or do a few barrel rolls. They will quickly lose control and start spinning and it is quite hard to recover. Then simply get some separation, turn around and put some solid shots into them. They have an I-15's short and fat fuselage, a flat radial engine and triangular stabilisers located right after the low-mounted mono wings, all covered in olive green paint.
  • F4U, F6F, P-47, etc: these planes are a huge threat to the late Zeros as they have superior firepower, speed, dive acceleration and robust airframes. Their 12.7 mm MGs can easily tear you apart or simply pilot-snipe you even when they are far away, as the M2 Brownings have great velocity and trajectory. They can also set you aflame easily. Start a turnfight whenever you see these stubby planes. The F4U has a long cylindrical nose and the iconic inverted gull wing. The P-47 has a huge, jug-like fuselage, bubble canopy and elliptical trailing edge that usually have invasion stripes painted on them. The F6F, on the other hand, might get confused with other planes as it looks rather average.

Manual Engine Control

MEC elements
Mixer Pitch Radiator Supercharger Turbocharger
Oil Water Type
Controllable Controllable
Not auto controlled
Controllable
Not auto controlled
Controllable
Not auto controlled
Separate Controllable
2 gears
Not controllable

Pros and cons

Pros:

  • A6M for Carrier-based fighter:
    • Strictly air-to-air role
    • Decent cannon armament
    • Extremely manoeuvrable
      • Excellent turn rate
      • Excellent roll rate
    • Very short takeoff distance
  • AP-I:
  • Shreds soft targets, and can weaken / destroy weak top armoured tanks, especially engine decks
  • Easily sets fire to air targets
  • HEF(T):
  • Tracer can help you aim on target
  • The few rounds in the belt can still wreck havoc on enemy planes with their HE filler
  • "Stealth": Great for Air battles
  • No tracers
  • HEF:
  • Near full HE belt
  • Wrecks havoc on enemy planes with HE filler
  • AP-I:
  • Easily sets fire to air targets
  • Excellent manoeuvrability
  • Nose-mounted armament
  • Small radiator drag
  • A6M5 specific:
    • Can mount a bomb rack for a single 250 kg bomb, still strongly ill-advised for air-battles

Cons:

  • A6M for Carrier-based fighter:
    • Strictly air-to-air role
    • Limited ammo
    • Slow
    • Low dive speed, and easily compressed in a dive
  • Common Navy plane construction:

History

The Japanese had hopes of a new interceptor becoming available to fight against newer allied fighters. When no such plane could be produced, the A6M3 was modified to continue to fill that role. In late of 1943 changes were made to simplify the aircraft. These changes were made to help speed up production, as well to increase dive speed. The wings remained the same size and shape as the A6M3 Reisen mod. 22. Modifications were made including the removal of the wing folding mechanism. The A6M5 received heavier gauge wing skinning as well. Other noticeable modifications were made to the aircraft's exhaust. The A6M5 also had CO2 fire extinguishers installed in the wing fuel tanks starting from production number 4274 onward.


Archive of the in-game description

At the beginning of the war, A6M series planes were among the best fighter planes, not only in Japan but also in the world.

However, over time, better Japanese aircraft were needed to effectively counter such enemies as the American F6F Hellcat and the F4U Corsair. The Japanese Navy needed a carrier-based fighter with better speed than the A6Ms could offer. Japan had no engine more powerful than the Sakae 21 (used for the A6M3), so to create the A6M5 Model 52 they had to come up with a number of tricks to coax the best performance they could out of it. The plane's non-folding wings had rounded wingtips, and their span was reduced to 11 m (one meter shorter than the A6M2 Model 21). The exhaust system was improved by replacing the common exhaust system with separate exhaust nozzles for each pair of cylinders.

All of these changes reduced mobility but increased speed, making the model 52 the fastest of all the Zeros. A diving A6M5 model 52 could reach speeds of up to 657 kilometres per hour.

A total of 747 A6M5 model 52s were produced.


Media

Skins

See also

Aircraft of comparable role, configuration and era

External links


Mitsubishi Company (三菱商会)
Fighters  A5M4 · Hagiri's A5M4
  A6M2 mod. 11 · A6M2 · A6M3 · A6M3 mod. 22 · A6M3 mod. 22Ko · A6M5 · A6M5 Ko · A6M5 otsu · A6M5 Hei · A6M6c
  A7M1 (NK9H) · A7M2
  J2M2 · J2M3 · J2M4 Kai · J2M5 · J2M5 (30 mm)
Hydroplanes  F1M2
Interceptors  Ki-83 · Ki-109
Bombers  G4M1
  Ki-21-Ia · Ki-21-I hei · Ki-67-I Ko · Ki-67-I otsu
Jet Fighters  Ki-200
Captured  ▃A6M2 · ␗A6M2
See also  Mitsubishi Heavy Industries, Ltd. (Post-War)

Japan fighters
Navy 
Carrier-based fighter 
A5M  A5M4 · Hagiri's A5M4
A6M  A6M2 mod. 11 · A6M2 · A6M3 · A6M3 mod. 22 · A6M3 mod. 22Ko · A6M5 · A6M5 Ko · A6M5 otsu · A6M5 Hei · A6M6c
A7He  A7He1*
A7M  A7M1 (NK9H) · A7M2
Land-based Fighter 
J2M  J2M2 · J2M3 · J2M4 Kai · J2M5 · J2M5 (30 mm)
J6K  J6K1
J7W  J7W1
N1K-J  N1K1-Ja · N1K2-J · N1K2-Ja
Fighter seaplane 
N1K  N1K1
A6M-N  A6M2-N
Army 
Ki-10  Ki-10-I · Ki-10-I C · Ki-10-II · Ki-10-II C
Ki-27  Ki-27 otsu · Ki-27 otsu Tachiarai
Ki-43  Ki-43-I · Ki-43-II · Ki-43-III otsu
Ki-44  Ki-44-I · Ki-44-I 34 · Ki-44-II otsu · Ki-44-II hei
Ki-61  Ki-61-I ko · Ki-61-I otsu · Ki-61-I hei · Tada's Ki-61-I hei · Ki-61-I tei · Ki-61-II Otsu Kai
Ki-84  Ki-84 ko · Ki-84 otsu · Ki-84 hei
Ki-87  Ki-87
Ki-94  Ki-94-II
Ki-100  Ki-100 · Ki-100-II
Other countries  ▅F4U-1A · ▅P-51C-11-NT · ▅Bf 109 E-7 · ▅Fw 190 A-5
  *Imported designation of the He 112 (A6M was in development - A7M would take A7 designation after the cancelation of the A7He)