|
|
| Line 1: |
Line 1: |
| − | {{DISPLAYTITLE:Night Vision Devices}} | + | {{Specs-Card|code=us_m26e1_pershing}} |
| | + | {{About |
| | + | | about = American medium tank '''{{PAGENAME}}''' |
| | + | | usage = other uses |
| | + | | link = M26 (Family) |
| | + | }} |
| | | | |
| − | ==Introduction== | + | == Description == |
| | + | <!--In the description, the first part should be about the history of the creation and combat usage of the vehicle, as well as its key features. In the second part, tell the reader about the ground vehicle in the game. Insert a screenshot of the vehicle, so that if the novice player does not remember the vehicle by name, he will immediately understand what kind of vehicle the article is talking about.--> |
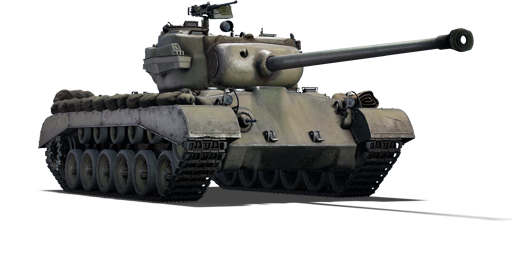
| | + | [[File:GarageImage_M26E1.jpg|420px|thumb|left]] |
| | + | {{break}} |
| | + | The '''{{Specs|name}}''' is a premium rank {{Specs|rank}} American medium tank {{Battle-rating}}. It was introduced in [[Update 1.47 "Big Guns"]]. Aside from the base model of a [[M26|M26 Pershing]], it boasts the long L/73 [[T54 (90 mm)|90 mm Gun T54]], very similar to the T15E2 on the [[T32|T32]], allowing it to compete effectively against Rank IV vehicles with the mobility of the Pershing. |
| | | | |
| − | [[Update 1.91 "Night Vision"]] added Night Vision Devices (NVDs) to a number of high tier tanks and helicopters. These devices provide a significant advantage in the now more common night battles. Two types of night vision devices were added, image intensifiers and thermal imaging systems. In addition infrared (IR) searchlights were added to tanks which historically had them.
| + | The only distinctive characteristic of the M26E1 compared to the original M26 is the "T54" 90 mm cannon. The cannon has a longer barrel with a small muzzle-brake compared to its original design. The longer 90 mm cannon comes with the standard AP shot, HE shot, M82 shot (APCBC), and HVAP shot. All these rounds, except for the HE shot, have a higher pen and velocity compared to the standard 90 mm M3. The M82 shot is considered the most useful and efficient round for this tank as it has enough explosive filler (140 g of Exp. D) to "one-shot" many tanks in its battle rating while having little to no difficulty entering the enemy's vehicle. |
| | | | |
| − | Night vision devices are usually unlocked as tier 3 - 4 modifications, however, some tanks or helicopters have them access to them at tier 1 - 2. In addition, some tanks have the option to upgrade their image intensifier to a thermal imager, by unlocking a second modification (on some tanks the thermal imager is included with the original modification).
| + | == General info == |
| | + | === Survivability and armour === |
| | + | <!--Describe armour protection. Note the most well protected and key weak areas. Appreciate the layout of modules as well as the number and location of crew members. Is the level of armour protection sufficient, is the placement of modules helpful for survival in combat? |
| | | | |
| − | Tanks and helicopters can have different night vision devices for different crew members, for example, the gunners' sight may have a thermal imager, while the commander's (or in the case of helicopters the pilot's) view may have image intensifiers, and the driver's view a less powerful image intensifier. They can only be used from their designated views, for example, the tank commander's night vision system can only be used in binoculars, the driver's night vision is only used from driver seat or third person view and gunner view is only used from sniper seat.
| + | If necessary use a visual template to indicate the most secure and weak zones of the armour.--> |
| | + | '''Armour type:''' |
| | | | |
| − | ===Controls===
| + | * Cast homogeneous armour (Front, turret) |
| | + | * Rolled homogeneous armour (Side, Rear, Roof) |
| | + | * Structural steel (Exterior boxes, Rear counterweight) |
| | | | |
| − | {| class="wikitable" style="text-align:center" | + | {| class="wikitable" |
| − | ! colspan="3" | Night Vision Controls | + | |- |
| | + | ! Armour !! Front (Slope angle) !! Sides !! Rear !! Roof |
| | |- | | |- |
| − | ! Control name
| + | | Hull || 101.6 mm (12-46°) ''Front glacis'' <br> 162.5 mm (25-60°) ''Upper front glacis'' <br> 76.2 mm (28-53°) ''Lower glacis'' || 76.2 mm ''Front'' <br> 50.8 mm (0-3°) ''Rear'' || 50.8 mm (7°) ''Top'' <br> 22.2 mm (71°) ''Bottom'' || 22.2 mm |
| − | ! Default Keybind<br />(PC keyboard & mouse)
| |
| − | ! Description
| |
| | |- | | |- |
| − | | Night Vision Mode || ??? || Toggles between standard view and image intensifier / thermal view | + | | Turret || 101.6 mm (9-73°) ''Turret front'' <br> 114.3 mm (1-84°) ''Gun mantlet''|| 76.2 mm (2-54°) || 76.2 (0-79°) + 100 mm (2°) || 25.4 mm |
| | |- | | |- |
| − | | IR Spotlight || ??? || Toggles the IR searchlight on and off
| + | ! Armour !! Sides !! Roof |
| | |- | | |- |
| − | | Changing the colour scheme of the thermal sight || ??? || Toggles the thermal sight between White Hot and Black Hot modes | + | | Cupola || 76.2 mm || 25.4 mm |
| | |- | | |- |
| | |} | | |} |
| | + | '''Notes:''' |
| | | | |
| − | {{Notice|Images in this article were created at night with the weather set to "Blind" so represent the operation of Night Vision devices under worst-case conditions (or close to it).}}
| + | * Suspension wheels and tracks are 20 mm thick. |
| | + | * Belly armour is 25.4 mm thick. |
| | + | * Counterweight on the turret rear is made of structural steel. |
| | | | |
| − | ==Image Intensifiers==
| + | Any tactic that works with the M26 Pershing can work with the M26E1. While its gun is quite potent, it also has quite a lengthy reload time after firing, minimum 11 seconds with an ace crew. As such, an M26E1 that fired is a great opportunity to pounce on provided no other enemies are around that remains a threat. |
| − | The most basic type of night vision device is an image intensifier. These devices work by amplifying the light which enters the sensor, as well as converting some light from the infrared spectrum into visible light. When image intensifiers are activated the screen picks up a green hue and you are generally able to see much further. Image intensifiers suffer from noise interference; this appears as a form of TV static over the screen; it is quite noticeable on early image intensifiers however more advanced systems (generally found on newer tanks) are less susceptible and the effect is much less noticeable, leading to them proving much clearer images.
| |
| | | | |
| − | {{Notice|Image intensifiers can only be used a night.|!}}
| + | The M26E1 has the same armour as the M26 Pershing, so any weapons that can cleave through one's armour can go through the others. The best target is for a straight-on hit on the front glacis as the direct effective thickness is 146 mm of cast armour. Side armour is also quite thin, ranging from 50 to 76 mm and can thus be easily pierced by most weapons at the BR. |
| | | | |
| − | ==Factors affecting performance== | + | === Mobility === |
| | + | <!-- ''Write about the mobility of the ground vehicle. Estimate the specific power and manoeuvrability, as well as the maximum speed forwards and backwards.'' --> |
| | | | |
| − | There are a number of characteristics which affect the performance of image intensifiers, these are the resolution, the light multiplication factor, and the susceptibility to noise. While individually some of these elements may have only a small impact on image quality, newer image intensifiers will have improvements to most or all of them, providing much better image quality.
| + | {{tankMobility|abMinHp= 775|rbMinHp= 442|<!--AoAweight=(optional) -->}} |
| | | | |
| − | ===Resolution=== | + | == Armaments == |
| − | Different image intensifiers are capable of producing images at different resolutions. The higher the resolution that an image intensifier is capable of outputting, the clearer the final image will be. The image intensifiers on tanks in-game typically have a resolution of 800 x 600 or 1600 x 1200, the difference between these resolutions is minimal and is often only noticeable when looking at long-range targets.
| + | === Main armament === |
| | + | <!--Give the reader information about the characteristics of the main gun. Assess its effectiveness in a battle based on the reloading speed, ballistics and the power of shells. Do not forget about the flexibility of the fire, that is how quickly the cannon can be aimed at the target, open fire on it and aim at another enemy. Add a link to the main article on the gun: <code><nowiki>{{main|Name of the weapon}}</nowiki></code>. Describe in general terms the ammunition available for the main gun. Give advice on how to use them and how to fill the ammunition storage.--> |
| | + | {{main|T54 (90 mm)}} |
| | | | |
| − | Below is an example of looking at a T-80U, located approximately 1.25 km away from the player, using an 800 x 600 intensifier and a 1600 x 1200 intensifier (all other stats are equal). Notice how the distant tank is slightly clearer and the barrel is visible with the higher resolution image intensifier.
| + | {| class="wikitable" style="text-align:center" |
| − | | |
| − | {{Notice|Click on an image to open it in full screen and get a better view}}
| |
| − | | |
| − | <gallery mode="packed" heights=200>
| |
| − | File:NightVision Low Res.jpg|A [[T-80U]] seen through an 800 x 600 image intensifier.
| |
| − | File:NightVision High Res.jpg|A [[T-80U]] seen through an 1600 x 1200 image intensifier.
| |
| − | </gallery>
| |
| − | | |
| − | ===Light Multiplier===
| |
| − | The light multiplier of an image intensifier determines by how much it will amplify the available light. Image intensifiers with a higher multiplier will produce a brighter image with more details visible. At present there is not a massive difference between the most and least powerful image intensifiers on tanks, however, it is noticeable, more so when an IR searchlight is in use.
| |
| − | | |
| − | The images below show the view of a target from a [[T-80U]] through the main gunsight (light multiplier of 9.0) and the driver's periscope (light multiplier 5.0), the target is being illuminated with an IR searchlight. Notice how the image through the gunsight is generally brighter and details like the grass and bushes are much more visible (there is obviously a zoom difference, but you can see that more is visible regardless).
| |
| − | | |
| − | {{Notice|Click on an image to open it in full screen and get a better view}}
| |
| − | | |
| − | <gallery mode="packed" heights=200>
| |
| − | File:NightVision 5.0 Mult.jpg|A [[Maus]] seen through an image intensifier with a 5.0 multiplier.
| |
| − | File:NightVision 9.0 Mult.jpg|A [[Maus]] seen through an image intensifier with a 9.0 multiplier.
| |
| − | </gallery>
| |
| − | | |
| − | ===Noise===
| |
| − | In-game image intensifiers are subject to noise. This presents itself as something resembling TV static covering the screen. Due to a difference in optics, sensors and associated circuitry, more advanced image intensifiers suffer much less from this issue and provide a much clearer image, whereas older and more rudimentary electronics are more susceptible to injecting noise on the final image. The images below show the same view when using an image intensifier with a high noise level and a low noise level (all other stats are equal). Notice how the high noise level sight looks slightly fuzzy and has a sort of static effect over the image, while the low noise one is relatively clear.
| |
| − | | |
| − | {{Notice|Click on an image to open it in full screen and get a better view}}
| |
| − | | |
| − | <gallery mode="packed" heights=200>
| |
| − | File:NightVision high noise.jpg|A [[Maus]] seen through an image intensifier with a high amount of noise.
| |
| − | File:NightVision low noise.jpg|A [[Maus]] seen through an image intensifier with a low amount of noise.
| |
| − | </gallery>
| |
| − | | |
| − | ==Infrared Spotlights==
| |
| − | [[File:IR Searchlight OnOff Compare.jpg|thumb|500px|right|The effect of turning on an IR searchlight on visibility]]
| |
| − | In addition to image intensifiers, some tanks are fitted with Infrared searchlights. Infrared (IR) searchlights are like regular searchlights, but they emit light on the infrared spectrum instead of the visible light spectrum; this means that the light they produce cannot normally be seen. However, as image intensifiers use light from the infrared spectrum and convert it to visible light, so IR searchlights can be seen through image intensifiers.
| |
| − | | |
| − | When activated an IR search not be visible unless you are looking through an image intensifier. If you are looking through an image intensifier then the area where the light is pointing will be brightly illuminated. The effect of an IR searchlight can be seen in the image to the right.
| |
| − | | |
| − | While IR searchlights obviously make seeing targets a lot easier in poor conditions their use does have a major drawback: any other players using image intensifiers can also see the light from your searchlight. As seen in the images below, by activating your IR searchlight you will immediately give your position away to any enemy players who are using an image intensifier. Other players on the ground will see the area where your light is pointing lit up, and the light itself will appear as a bright spot on the screen. Likewise, a helicopter will see the area lit up, and even though they may not be in a position to see the light itself, due the spread of the beam the lit-up area will form a sort of triangle with the tip pointing towards the source.
| |
| − | | |
| − | <gallery mode="packed" heights=200>
| |
| − | File:Tank with IR light off.jpg|A tank is hiding in the bushes, without it's light on it can not be seen.
| |
| − | File:Tank with IR light on.jpg|The same tank has now turned it's IR searchlight on, it's position is now fairly obvious.
| |
| − | File:Tank with IR ligh on from air.jpg|The same tank viewed from the air (as if by a helicopter), again it's position is obvious.
| |
| − | </gallery>
| |
| − | | |
| − | ===Factors affecting performance===
| |
| − | The main differentiating characteristics between different IR searchlights is their maximum range, and how wide the beam is. The maximum range is the furthest distance at which the IR searchlight can still illuminate objects. The beamwidth is measured in degrees and determines how wide the beam is, it can be seen in the image below.
| |
| − | | |
| − | Some IR searchlights are also slightly more or less powerful (brighter) than others, but at present, the difference between those currently in-game is so small it is not worth talking about.
| |
| − | | |
| − | [[File:IR Searchlight Beam.jpg|thumb|800px|left|A top-down view of a tank with its IR searchlight on, showing the beam width.]]{{Break}}
| |
| − | | |
| − | ==Thermal Imagers==
| |
| − | Thermal imagers are more advanced than image intensifiers; they use the infrared radiation emitted by objects to produce images showing temperature. Anything which is warmer than the background will stand out clearly on thermal imaging cameras. In game thermal imagers are usually only available for the gunner's sight. When a thermal sight is activated the colour scheme of the screen will change significantly to one of the two thermal imagining modes available, white hot and black hot. In white hot mode the terrain will appear as dark grey and thermal signatures (vehicles, fires, projectiles, etc.) will appear somewhere between lighter grey and bright white, depending on their temperature. In black hot mode the terrain will be be light grey and thermal signatures will show as between darker grey and black depending on temperature. Thermal imagers allow for targets to easily be spotted at very long range.
| |
| − | | |
| − | The two thermal modes can be seen in the images below. Notice how the engine compartment of the Abrams is much hotter than the rest of the tank. Also notice how a tank hiding in the bushes, which would normally be hard to see can easily be seen with thermal imaging.
| |
| − | | |
| − | {{Notice|Thermal imagers, can be used both at night and in the day to improve visibility.|!}}
| |
| − | | |
| − | <gallery mode="packed" heights=200>
| |
| − | File:Thermal Vision White Hot.jpg|White hot thermal imaging.
| |
| − | File:Thermal Vision Black Hot.jpg|Black hot thermal imaging.
| |
| − | </gallery>
| |
| − | | |
| − | ===Factors affecting performance===
| |
| − | Like image intensifiers, thermal imagers can only produce an output of a certain resolution, this resolution is the main differentiating factor between thermal sights on different vehicles. Most thermal imagers in game have a fairly low resolution leading to somewhat blurry and less detailed images, however some have higher resolutions, proving clearer images.
| |
| − | | |
| − | The images below show the same view through a 500 x 300 thermal imager (the lowest resolution in game) and a 1200 x 800 thermal imager (the highest resolution in game). Notice how the higher resolution imager produce a noticeably less blurry and more detailed image. This effect is more pronounced at longer ranges.
| |
| − | | |
| − | {{Notice|Click on an image to open it in full screen and get a better view}}
| |
| − | <gallery mode="packed" heights=200>
| |
| − | File:Thermal Vision Low Res.jpg|A [[T-80U]] seen through an 500 x 300 thermal imager.
| |
| − | File:Thermal Vision High Res.jpg|A [[T-80U]] seen through an 1200 x 800 thermal imager.
| |
| − | </gallery>
| |
| − | | |
| − | ==List of vehicles with Night Vision Devices==
| |
| − | ''As of v.1.95.0.70''
| |
| − | ===Ground vehicles===
| |
| − | {| class="wikitable sortable" style="text-align:center" | |
| | |- | | |- |
| − | ! rowspan="2" | Vehicle !! rowspan="2" | Country !! colspan="2" | Commander !! colspan="2" | Gunner !! colspan="2" | Driver !! rowspan="2" | Infrared<br>Searchlight
| + | ! colspan="6" | [[T54 (90 mm)|90 mm T54]] |
| | |- | | |- |
| − | ! Infrared !! Thermal !! Infrared !! Thermal !! Infrared !! Thermal | + | ! colspan="4" rowspan="1" style="width:5em" |Capacity |
| | + | ! rowspan="1" | Vertical <br> guidance |
| | + | ! rowspan="1" | Horizontal <br> guidance |
| | |- | | |- |
| − | | {{Specs-Link|us_adats_bradley|short}} || [[File:{{#unit:us_adats_bradley|country}}_flag.png|40px|link=]] || [[File:Icon GreenCheckmark.png|link=]] || [[File:Icon RedXCross.png|link=]] || [[File:Icon RedXCross.png|link=]] || [[File:Icon GreenCheckmark.png|link=]] || [[File:Icon GreenCheckmark.png|link=]] || [[File:Icon RedXCross.png|link=]] || [[File:Icon RedXCross.png|link=]] | + | | colspan="4" | 41 || -10°/+15° || ±180° |
| | |- | | |- |
| − | | {{Specs-Link|fr_amx_10rc|short}} || [[File:{{#unit:fr_amx_10rc|country}}_flag.png|40px|link=]] || [[File:Icon GreenCheckmark.png|link=]] || [[File:Icon RedXCross.png|link=]] || [[File:Icon RedXCross.png|link=]] || [[File:Icon GreenCheckmark.png|link=]] || [[File:Icon GreenCheckmark.png|link=]] || [[File:Icon RedXCross.png|link=]] || [[File:Icon RedXCross.png|link=]]
| + | ! colspan="6" | Turret rotation speed (°/s) |
| | |- | | |- |
| − | | {{Specs-Link|fr_amx_30|short}} || [[File:{{#unit:fr_amx_30|country}}_flag.png|40px|link=]] || [[File:Icon GreenCheckmark.png|link=]] || [[File:Icon RedXCross.png|link=]] || [[File:Icon GreenCheckmark.png|link=]] || [[File:Icon RedXCross.png|link=]] || [[File:Icon GreenCheckmark.png|link=]] || [[File:Icon RedXCross.png|link=]] || [[File:Icon RedXCross.png|link=]]
| + | ! style="width:4em" |Mode |
| | + | ! style="width:4em" |Stock |
| | + | ! style="width:4em" |Upgraded |
| | + | ! style="width:4em" |Prior + Full crew |
| | + | ! style="width:4em" |Prior + Expert qualif. |
| | + | ! style="width:4em" |Prior + Ace qualif. |
| | |- | | |- |
| − | | {{Specs-Link|fr_amx_30_1972|short}} || [[File:{{#unit:fr_amx_30_1972|country}}_flag.png|40px|link=]] || [[File:Icon GreenCheckmark.png|link=]] || [[File:Icon RedXCross.png|link=]] || [[File:Icon GreenCheckmark.png|link=]] || [[File:Icon RedXCross.png|link=]] || [[File:Icon GreenCheckmark.png|link=]] || [[File:Icon RedXCross.png|link=]] || [[File:Icon RedXCross.png|link=]] | + | | ''Arcade'' || 14.28 || 19.80 || 24.0 || 26.60 || 28.24 |
| | |- | | |- |
| − | | {{Specs-Link|fr_amx_30_ACRA|short}} || [[File:{{#unit:fr_amx_30_ACRA|country}}_flag.png|40px|link=]] || [[File:Icon GreenCheckmark.png|link=]] || [[File:Icon RedXCross.png|link=]] || [[File:Icon GreenCheckmark.png|link=]] || [[File:Icon RedXCross.png|link=]] || [[File:Icon GreenCheckmark.png|link=]] || [[File:Icon RedXCross.png|link=]] || [[File:Icon RedXCross.png|link=]] | + | | ''Realistic'' || 14.28 || 16.80 || 20.4 || 22.60 || 24.00 |
| | |- | | |- |
| − | | {{Specs-Link|fr_amx_30_super|short}} || [[File:{{#unit:fr_amx_30_super|country}}_flag.png|40px|link=]] || [[File:Icon GreenCheckmark.png|link=]] || [[File:Icon RedXCross.png|link=]] || [[File:Icon RedXCross.png|link=]] || [[File:Icon GreenCheckmark.png|link=]] || [[File:Icon GreenCheckmark.png|link=]] || [[File:Icon RedXCross.png|link=]] || [[File:Icon RedXCross.png|link=]]
| + | ! colspan="4" | Reloading rate (seconds) |
| | |- | | |- |
| − | | {{Specs-Link|fr_amx_30_b2|short}} || [[File:{{#unit:fr_amx_30_b2|country}}_flag.png|40px|link=]] || [[File:Icon GreenCheckmark.png|link=]] || [[File:Icon RedXCross.png|link=]] || [[File:Icon RedXCross.png|link=]] || [[File:Icon GreenCheckmark.png|link=]] || [[File:Icon GreenCheckmark.png|link=]] || [[File:Icon RedXCross.png|link=]] || [[File:Icon RedXCross.png|link=]]
| + | ! colspan="1" style="width:4em" |Stock |
| | + | ! colspan="1" style="width:4em" |Prior + Full crew |
| | + | ! colspan="1" style="width:4em" |Prior + Expert qualif. |
| | + | ! colspan="1" style="width:4em" |Prior + Ace qualif. |
| | |- | | |- |
| − | | {{Specs-Link|fr_amx_30_b2_brenus|short}} || [[File:{{#unit:fr_amx_30_b2_brenus|country}}_flag.png|40px|link=]] || [[File:Icon GreenCheckmark.png|link=]] || [[File:Icon RedXCross.png|link=]] || [[File:Icon RedXCross.png|link=]] || [[File:Icon GreenCheckmark.png|link=]] || [[File:Icon GreenCheckmark.png|link=]] || [[File:Icon RedXCross.png|link=]] || [[File:Icon RedXCross.png|link=]] | + | | 14.43 || 12.77 || 11.77 || 11.10 |
| | |- | | |- |
| − | | {{Specs-Link|fr_amx_40|short}} || [[File:{{#unit:fr_amx_40|country}}_flag.png|40px|link=]] || [[File:Icon GreenCheckmark.png|link=]] || [[File:Icon RedXCross.png|link=]] || [[File:Icon RedXCross.png|link=]] || [[File:Icon GreenCheckmark.png|link=]] || [[File:Icon GreenCheckmark.png|link=]] || [[File:Icon RedXCross.png|link=]] || [[File:Icon RedXCross.png|link=]] | + | |} |
| | + | |
| | + | ===== Ammunition ===== |
| | + | {| class="wikitable sortable" style="text-align:center" width="100%" |
| | + | ! colspan="8" | Penetration statistics |
| | |- | | |- |
| − | | {{Specs-Link|ussr_asu_57|short}} || [[File:{{#unit:ussr_asu_57|country}}_flag.png|40px|link=]] || [[File:Icon RedXCross.png|link=]] || [[File:Icon RedXCross.png|link=]] || [[File:Icon RedXCross.png|link=]] || [[File:Icon RedXCross.png|link=]] || [[File:Icon GreenCheckmark.png|link=]] || [[File:Icon RedXCross.png|link=]] || [[File:Icon RedXCross.png|link=]]
| + | ! rowspan="2" data-sort-type="text" | Ammunition |
| | + | ! rowspan="2" class="unsortable" | Type of <br /> warhead |
| | + | ! colspan="6" | '''Penetration''' '''''in mm''''' '''@ 90°''' |
| | |- | | |- |
| − | | {{Specs-Link|ussr_asu_85|short}} || [[File:{{#unit:ussr_asu_85|country}}_flag.png|40px|link=]] || [[File:Icon GreenCheckmark.png|link=]] || [[File:Icon RedXCross.png|link=]] || [[File:Icon GreenCheckmark.png|link=]] || [[File:Icon RedXCross.png|link=]] || [[File:Icon GreenCheckmark.png|link=]] || [[File:Icon RedXCross.png|link=]] || [[File:Icon GreenCheckmark.png|link=]]
| + | ! 10m |
| | + | ! 100m |
| | + | ! 500m |
| | + | ! 1000m |
| | + | ! 1500m |
| | + | ! 2000m |
| | |- | | |- |
| − | | {{Specs-Link|it_fiat_6616_cockerill|short}} || [[File:{{#unit:it_fiat_6616_cockerill|country}}_flag.png|40px|link=]] || [[File:Icon RedXCross.png|link=]] || [[File:Icon RedXCross.png|link=]] || [[File:Icon GreenCheckmark.png|link=]] || [[File:Icon RedXCross.png|link=]] || [[File:Icon RedXCross.png|link=]] || [[File:Icon RedXCross.png|link=]] || [[File:Icon RedXCross.png|link=]] | + | | AP Shot || AP || 210 || 208 || 193 || 177 || 162 || 148 |
| | |- | | |- |
| − | | {{Specs-Link|it_aubl_74_60_70m|short}} || [[File:{{#unit:it_aubl_74_60_70m|country}}_flag.png|40px|link=]] || [[File:Icon RedXCross.png|link=]] || [[File:Icon RedXCross.png|link=]] || [[File:Icon GreenCheckmark.png|link=]] || [[File:Icon RedXCross.png|link=]] || [[File:Icon RedXCross.png|link=]] || [[File:Icon RedXCross.png|link=]] || [[File:Icon RedXCross.png|link=]] | + | | HE Shell || HE || 13 || 13 || 13 || 13 || 13 || 13 |
| | + | |- |
| | + | | T41 || APCBC || 224 || 221 || 206 || 188 || 172 || 157 |
| | |- | | |- |
| − | | {{Specs-Link|it_c1_ariete|short}} || [[File:{{#unit:it_c1_ariete|country}}_flag.png|40px|link=]] || [[File:Icon GreenCheckmark.png|link=]] || [[File:Icon RedXCross.png|link=]] || [[File:Icon RedXCross.png|link=]] || [[File:Icon GreenCheckmark.png|link=]] || [[File:Icon GreenCheckmark.png|link=]] || [[File:Icon RedXCross.png|link=]] || [[File:Icon RedXCross.png|link=]] | + | | HVAP Shot || APCR || 270 || 266 || 250 || 231 || 214 || 195 |
| | |- | | |- |
| − | | {{Specs-Link|it_c1_ariete_preserie|short}} || [[File:{{#unit:it_c1_ariete_preserie|country}}_flag.png|40px|link=]] || [[File:Icon GreenCheckmark.png|link=]] || [[File:Icon RedXCross.png|link=]] || [[File:Icon RedXCross.png|link=]] || [[File:Icon GreenCheckmark.png|link=]] || [[File:Icon GreenCheckmark.png|link=]] || [[File:Icon RedXCross.png|link=]] || [[File:Icon RedXCross.png|link=]] | + | |} |
| | + | {| class="wikitable sortable" style="text-align:center" width="100%" |
| | + | ! colspan="10" | Shell details |
| | |- | | |- |
| − | | {{Specs-Link|it_c1_ariete_pso|short}} || [[File:{{#unit:it_c1_ariete_pso|country}}_flag.png|40px|link=]] || [[File:Icon GreenCheckmark.png|link=]] || [[File:Icon RedXCross.png|link=]] || [[File:Icon RedXCross.png|link=]] || [[File:Icon GreenCheckmark.png|link=]] || [[File:Icon GreenCheckmark.png|link=]] || [[File:Icon RedXCross.png|link=]] || [[File:Icon RedXCross.png|link=]]
| + | ! rowspan="2" data-sort-type="text" | Ammunition |
| | + | ! rowspan="2" |Velocity <br /> in m/s |
| | + | ! rowspan="2" |Projectile<br />Mass in kg |
| | + | ! rowspan="2" | ''Fuse delay'' |
| | + | ''in m:'' |
| | + | ! rowspan="2" | ''Fuse sensitivity'' |
| | + | ''in mm:'' |
| | + | ! rowspan="2" | ''Explosive Mass in g<br /> (TNT equivalent):'' |
| | + | ! rowspan="2" | ''Normalization At 30° <br> from horizontal:'' |
| | + | ! colspan="3" | ''Ricochet:'' |
| | |- | | |- |
| − | | {{Specs-Link|ussr_bmp_1|short}} || [[File:{{#unit:ussr_bmp_1|country}}_flag.png|40px|link=]] || [[File:Icon GreenCheckmark.png|link=]] || [[File:Icon RedXCross.png|link=]] || [[File:Icon GreenCheckmark.png|link=]] || [[File:Icon RedXCross.png|link=]] || [[File:Icon GreenCheckmark.png|link=]] || [[File:Icon RedXCross.png|link=]] || [[File:Icon GreenCheckmark.png|link=]]
| + | ! 0% |
| | + | ! 50% |
| | + | ! 100% |
| | |- | | |- |
| − | | {{Specs-Link|ussr_bmp_2|short}} || [[File:{{#unit:ussr_bmp_2|country}}_flag.png|40px|link=]] || [[File:Icon GreenCheckmark.png|link=]] || [[File:Icon RedXCross.png|link=]] || [[File:Icon GreenCheckmark.png|link=]] || [[File:Icon RedXCross.png|link=]] || [[File:Icon GreenCheckmark.png|link=]] || [[File:Icon RedXCross.png|link=]] || [[File:Icon GreenCheckmark.png|link=]] | + | | AP Shot || 975 || 11 || N/A || N/A || N/A || -1° || 47° || 60° || 65° |
| | |- | | |- |
| − | | {{Specs-Link|ussr_bmp_3|short}} || [[File:{{#unit:ussr_bmp_3|country}}_flag.png|40px|link=]] || [[File:Icon GreenCheckmark.png|link=]] || [[File:Icon GreenCheckmark.png|link=]] || [[File:Icon GreenCheckmark.png|link=]] || [[File:Icon GreenCheckmark.png|link=]] || [[File:Icon GreenCheckmark.png|link=]] || [[File:Icon RedXCross.png|link=]] || [[File:Icon GreenCheckmark.png|link=]] | + | | HE Shell || 975 || 11 || 0.4 || 0.5 || 925 || +0° || 79° || 80° || 81° |
| | + | |- |
| | + | | T41 || 975 || 11 || 1.2 || 20 || 137.2 || +4° || 48° || 63° || 71° |
| | |- | | |- |
| − | | {{Specs-Link|germ_begleitpanzer_57|short}} || [[File:{{#unit:germ_begleitpanzer_57|country}}_flag.png|40px|link=]] || [[File:Icon GreenCheckmark.png|link=]] || [[File:Icon RedXCross.png|link=]] || [[File:Icon RedXCross.png|link=]] || [[File:Icon GreenCheckmark.png|link=]] || [[File:Icon GreenCheckmark.png|link=]] || [[File:Icon RedXCross.png|link=]] || [[File:Icon RedXCross.png|link=]] | + | | HVAP Shot || 1143 || 7.6 || N/A || N/A || N/A || +1.5° || 66° || 70° || 72° |
| | |- | | |- |
| − | | {{Specs-Link|cn_cm11|short}} || [[File:{{#unit:cn_cm11|country}}_flag.png|40px|link=]] || [[File:Icon GreenCheckmark.png|link=]] || [[File:Icon RedXCross.png|link=]] || [[File:Icon RedXCross.png|link=]] || [[File:Icon GreenCheckmark.png|link=]] || [[File:Icon GreenCheckmark.png|link=]] || [[File:Icon RedXCross.png|link=]] || [[File:Icon RedXCross.png|link=]] | + | |} |
| − | |-
| + | |
| − | | {{Specs-Link|it_b1_centauro|short}} || [[File:{{#unit:it_b1_centauro|country}}_flag.png|40px|link=]] || [[File:Icon GreenCheckmark.png|link=]] || [[File:Icon RedXCross.png|link=]] || [[File:Icon RedXCross.png|link=]] || [[File:Icon GreenCheckmark.png|link=]] || [[File:Icon GreenCheckmark.png|link=]] || [[File:Icon RedXCross.png|link=]] || [[File:Icon RedXCross.png|link=]]
| + | ===== [[Ammo racks|Ammo racks]] ===== |
| − | |-
| + | [[File:Ammoracks M26E1.png|thumb|339x339px|Ammo racks of the M26E1. Turret storage (1) is a 5 round ready rack. Floor storage (2) is consumed from left to right.]] |
| − | | {{Specs-Link|it_b1_centauro_romor|short}} || [[File:{{#unit:it_b1_centauro_romor|country}}_flag.png|40px|link=]] || [[File:Icon GreenCheckmark.png|link=]] || [[File:Icon RedXCross.png|link=]] || [[File:Icon RedXCross.png|link=]] || [[File:Icon GreenCheckmark.png|link=]] || [[File:Icon GreenCheckmark.png|link=]] || [[File:Icon RedXCross.png|link=]] || [[File:Icon RedXCross.png|link=]]
| + | ''Last Updated: 1.93.0.35'' |
| − | |-
| + | {| class="wikitable" style="text-align:center" |
| − | | {{Specs-Link|uk_centurion_mk_10|short}} || [[File:{{#unit:uk_centurion_mk_10|country}}_flag.png|40px|link=]] || [[File:Icon GreenCheckmark.png|link=]] || [[File:Icon RedXCross.png|link=]] || [[File:Icon GreenCheckmark.png|link=]] || [[File:Icon RedXCross.png|link=]] || [[File:Icon GreenCheckmark.png|link=]] || [[File:Icon RedXCross.png|link=]] || [[File:Icon RedXCross.png|link=]]
| |
| − | |-
| |
| − | | {{Specs-Link|uk_challenger_II|short}} || [[File:{{#unit:uk_challenger_II|country}}_flag.png|40px|link=]] || [[File:Icon GreenCheckmark.png|link=]] || [[File:Icon RedXCross.png|link=]] || [[File:Icon RedXCross.png|link=]] || [[File:Icon GreenCheckmark.png|link=]] || [[File:Icon GreenCheckmark.png|link=]] || [[File:Icon RedXCross.png|link=]] || [[File:Icon RedXCross.png|link=]]
| |
| − | |-
| |
| − | | {{Specs-Link|uk_challenger_1|short}} || [[File:{{#unit:uk_challenger_1|country}}_flag.png|40px|link=]] || [[File:Icon GreenCheckmark.png|link=]] || [[File:Icon RedXCross.png|link=]] || [[File:Icon RedXCross.png|link=]] || [[File:Icon GreenCheckmark.png|link=]] || [[File:Icon GreenCheckmark.png|link=]] || [[File:Icon RedXCross.png|link=]] || [[File:Icon RedXCross.png|link=]]
| |
| − | |-
| |
| − | | {{Specs-Link|uk_challenger_mk_3|short}} || [[File:{{#unit:uk_challenger_mk_3|country}}_flag.png|40px|link=]] || [[File:Icon GreenCheckmark.png|link=]] || [[File:Icon RedXCross.png|link=]] || [[File:Icon RedXCross.png|link=]] || [[File:Icon GreenCheckmark.png|link=]] || [[File:Icon GreenCheckmark.png|link=]] || [[File:Icon RedXCross.png|link=]] || [[File:Icon RedXCross.png|link=]]
| |
| − | |-
| |
| − | | {{Specs-Link|uk_chieftain_mk_3|short}} || [[File:{{#unit:uk_chieftain_mk_3|country}}_flag.png|40px|link=]] || [[File:Icon GreenCheckmark.png|link=]] || [[File:Icon RedXCross.png|link=]] || [[File:Icon GreenCheckmark.png|link=]] || [[File:Icon RedXCross.png|link=]] || [[File:Icon GreenCheckmark.png|link=]] || [[File:Icon RedXCross.png|link=]] || [[File:Icon GreenCheckmark.png|link=]]
| |
| − | |-
| |
| − | | {{Specs-Link|uk_chieftain_mk_5|short}} || [[File:{{#unit:uk_chieftain_mk_5|country}}_flag.png|40px|link=]] || [[File:Icon GreenCheckmark.png|link=]] || [[File:Icon RedXCross.png|link=]] || [[File:Icon GreenCheckmark.png|link=]] || [[File:Icon RedXCross.png|link=]] || [[File:Icon GreenCheckmark.png|link=]] || [[File:Icon RedXCross.png|link=]] || [[File:Icon GreenCheckmark.png|link=]]
| |
| − | |-
| |
| − | | {{Specs-Link|uk_chieftain_mk_10|short}} || [[File:{{#unit:uk_chieftain_mk_10|country}}_flag.png|40px|link=]] || [[File:Icon GreenCheckmark.png|link=]] || [[File:Icon RedXCross.png|link=]] || [[File:Icon GreenCheckmark.png|link=]] || [[File:Icon RedXCross.png|link=]] || [[File:Icon GreenCheckmark.png|link=]] || [[File:Icon RedXCross.png|link=]] || [[File:Icon GreenCheckmark.png|link=]]
| |
| − | |-
| |
| − | | {{Specs-Link|uk_falcon|short}} || [[File:{{#unit:uk_falcon|country}}_flag.png|40px|link=]] || [[File:Icon RedXCross.png|link=]] || [[File:Icon RedXCross.png|link=]] || [[File:Icon RedXCross.png|link=]] || [[File:Icon RedXCross.png|link=]] || [[File:Icon GreenCheckmark.png|link=]] || [[File:Icon RedXCross.png|link=]] || [[File:Icon RedXCross.png|link=]]
| |
| − | |-
| |
| − | | {{Specs-Link|us_m1_ip_abrams|short}} || [[File:{{#unit:us_m1_ip_abrams|country}}_flag.png|40px|link=]] || [[File:Icon GreenCheckmark.png|link=]] || [[File:Icon RedXCross.png|link=]] || [[File:Icon RedXCross.png|link=]] || [[File:Icon GreenCheckmark.png|link=]] || [[File:Icon GreenCheckmark.png|link=]] || [[File:Icon RedXCross.png|link=]] || [[File:Icon RedXCross.png|link=]]
| |
| − | |-
| |
| − | | {{Specs-Link|ussr_it_1|short}} || [[File:{{#unit:ussr_it_1|country}}_flag.png|40px|link=]] || [[File:Icon GreenCheckmark.png|link=]] || [[File:Icon RedXCross.png|link=]] || [[File:Icon GreenCheckmark.png|link=]] || [[File:Icon RedXCross.png|link=]] || [[File:Icon GreenCheckmark.png|link=]] || [[File:Icon RedXCross.png|link=]] || [[File:Icon GreenCheckmark.png|link=]]
| |
| − | |-
| |
| − | | {{Specs-Link|germ_kanonenjagdpanzer|short}} || [[File:{{#unit:germ_kanonenjagdpanzer|country}}_flag.png|40px|link=]] || [[File:Icon GreenCheckmark.png|link=]] || [[File:Icon RedXCross.png|link=]] || [[File:Icon GreenCheckmark.png|link=]] || [[File:Icon RedXCross.png|link=]] || [[File:Icon GreenCheckmark.png|link=]] || [[File:Icon RedXCross.png|link=]] || [[File:Icon RedXCross.png|link=]]
| |
| − | |-
| |
| − | | {{Specs-Link|germ_kpz_70|short}} || [[File:{{#unit:germ_kpz_70|country}}_flag.png|40px|link=]] || [[File:Icon GreenCheckmark.png|link=]] || [[File:Icon RedXCross.png|link=]] || [[File:Icon GreenCheckmark.png|link=]] || [[File:Icon RedXCross.png|link=]] || [[File:Icon GreenCheckmark.png|link=]] || [[File:Icon RedXCross.png|link=]] || [[File:Icon RedXCross.png|link=]]
| |
| − | |-
| |
| − | | {{Specs-Link|fr_leclerc_s1|short}} || [[File:{{#unit:fr_leclerc_s1|country}}_flag.png|40px|link=]] || [[File:Icon RedXCross.png|link=]] || [[File:Icon GreenCheckmark.png|link=]] || [[File:Icon RedXCross.png|link=]] || [[File:Icon GreenCheckmark.png|link=]] || [[File:Icon GreenCheckmark.png|link=]] || [[File:Icon RedXCross.png|link=]] || [[File:Icon RedXCross.png|link=]]
| |
| − | |-
| |
| − | | {{Specs-Link|germ_leopard_2a4|short}} || [[File:{{#unit:germ_leopard_2a4|country}}_flag.png|40px|link=]] || [[File:Icon GreenCheckmark.png|link=]] || [[File:Icon RedXCross.png|link=]] || [[File:Icon RedXCross.png|link=]] || [[File:Icon GreenCheckmark.png|link=]] || [[File:Icon GreenCheckmark.png|link=]] || [[File:Icon RedXCross.png|link=]] || [[File:Icon RedXCross.png|link=]]
| |
| − | |-
| |
| − | | {{Specs-Link|germ_leopard_2a5|short}} || [[File:{{#unit:germ_leopard_2a5|country}}_flag.png|40px|link=]] || [[File:Icon RedXCross.png|link=]] || [[File:Icon GreenCheckmark.png|link=]] || [[File:Icon RedXCross.png|link=]] || [[File:Icon GreenCheckmark.png|link=]] || [[File:Icon GreenCheckmark.png|link=]] || [[File:Icon RedXCross.png|link=]] || [[File:Icon RedXCross.png|link=]]
| |
| − | |-
| |
| − | | {{Specs-Link|germ_leopard_2k|short}} || [[File:{{#unit:germ_leopard_2k|country}}_flag.png|40px|link=]] || [[File:Icon GreenCheckmark.png|link=]] || [[File:Icon RedXCross.png|link=]] || [[File:Icon GreenCheckmark.png|link=]] || [[File:Icon RedXCross.png|link=]] || [[File:Icon GreenCheckmark.png|link=]] || [[File:Icon RedXCross.png|link=]] || [[File:Icon RedXCross.png|link=]]
| |
| − | |-
| |
| − | | {{Specs-Link|germ_leopard_I_a1|short}} || [[File:{{#unit:germ_leopard_I_a1|country}}_flag.png|40px|link=]] || [[File:Icon GreenCheckmark.png|link=]] || [[File:Icon RedXCross.png|link=]] || [[File:Icon GreenCheckmark.png|link=]] || [[File:Icon RedXCross.png|link=]] || [[File:Icon GreenCheckmark.png|link=]] || [[File:Icon RedXCross.png|link=]] || [[File:Icon RedXCross.png|link=]]
| |
| | |- | | |- |
| − | | {{Specs-Link|germ_leopard_a1a1_120|short}} || [[File:{{#unit:germ_leopard_a1a1_120|country}}_flag.png|40px|link=]] || [[File:Icon GreenCheckmark.png|link=]] || [[File:Icon RedXCross.png|link=]] || [[File:Icon RedXCross.png|link=]] || [[File:Icon GreenCheckmark.png|link=]] || [[File:Icon GreenCheckmark.png|link=]] || [[File:Icon RedXCross.png|link=]] || [[File:Icon RedXCross.png|link=]]
| + | ! class="wikitable unsortable" |Full<br /> ammo |
| | + | ! class="wikitable unsortable" |1st<br /> rack empty |
| | + | !2nd |
| | + | rack empty |
| | + | ! class="wikitable unsortable" |Visual<br /> discrepancy |
| | |- | | |- |
| − | | {{Specs-Link|germ_leopard_I|short}} || [[File:{{#unit:germ_leopard_I|country}}_flag.png|40px|link=]] || [[File:Icon GreenCheckmark.png|link=]] || [[File:Icon RedXCross.png|link=]] || [[File:Icon GreenCheckmark.png|link=]] || [[File:Icon RedXCross.png|link=]] || [[File:Icon GreenCheckmark.png|link=]] || [[File:Icon RedXCross.png|link=]] || [[File:Icon RedXCross.png|link=]] | + | | '''41''' || 5 ''(+36)'' |
| − | |-
| + | |1 ''(+40)''|| style="text-align:center" | Yes |
| − | | {{Specs-Link|us_m1_abrams|short}} || [[File:{{#unit:us_m1_abrams|country}}_flag.png|40px|link=]] || [[File:Icon GreenCheckmark.png|link=]] || [[File:Icon RedXCross.png|link=]] || [[File:Icon RedXCross.png|link=]] || [[File:Icon GreenCheckmark.png|link=]] || [[File:Icon GreenCheckmark.png|link=]] || [[File:Icon RedXCross.png|link=]] || [[File:Icon RedXCross.png|link=]]
| |
| − | |-
| |
| − | | {{Specs-Link|us_m1a1_abrams|short}} || [[File:{{#unit:us_m1a1_abrams|country}}_flag.png|40px|link=]] || [[File:Icon GreenCheckmark.png|link=]] || [[File:Icon RedXCross.png|link=]] || [[File:Icon RedXCross.png|link=]] || [[File:Icon GreenCheckmark.png|link=]] || [[File:Icon GreenCheckmark.png|link=]] || [[File:Icon RedXCross.png|link=]] || [[File:Icon RedXCross.png|link=]]
| |
| − | |-
| |
| − | | {{Specs-Link|us_m1a2_abrams|short}} || [[File:{{#unit:us_m1a2_abrams|country}}_flag.png|40px|link=]] || [[File:Icon RedXCross.png|link=]] || [[File:Icon GreenCheckmark.png|link=]] || [[File:Icon RedXCross.png|link=]] || [[File:Icon GreenCheckmark.png|link=]] || [[File:Icon RedXCross.png|link=]] || [[File:Icon GreenCheckmark.png|link=]] || [[File:Icon RedXCross.png|link=]]
| |
| − | |-
| |
| − | | {{Specs-Link|us_m3_bradley|short}} || [[File:{{#unit:us_m3_bradley|country}}_flag.png|40px|link=]] || [[File:Icon GreenCheckmark.png|link=]] || [[File:Icon RedXCross.png|link=]] || [[File:Icon RedXCross.png|link=]] || [[File:Icon GreenCheckmark.png|link=]] || [[File:Icon GreenCheckmark.png|link=]] || [[File:Icon RedXCross.png|link=]] || [[File:Icon RedXCross.png|link=]]
| |
| − | |-
| |
| − | | {{Specs-Link|jp_m41_walker_bulldog|short}} || [[File:{{#unit:jp_m41_walker_bulldog|country}}_flag.png|40px|link=]] || [[File:Icon RedXCross.png|link=]] || [[File:Icon RedXCross.png|link=]] || [[File:Icon RedXCross.png|link=]] || [[File:Icon RedXCross.png|link=]] || [[File:Icon GreenCheckmark.png|link=]] || [[File:Icon RedXCross.png|link=]] || [[File:Icon RedXCross.png|link=]]
| |
| − | |-
| |
| − | | {{Specs-Link|us_m41_walker_bulldog|short}} || [[File:{{#unit:us_m41_walker_bulldog|country}}_flag.png|40px|link=]] || [[File:Icon RedXCross.png|link=]] || [[File:Icon RedXCross.png|link=]] || [[File:Icon RedXCross.png|link=]] || [[File:Icon RedXCross.png|link=]] || [[File:Icon GreenCheckmark.png|link=]] || [[File:Icon RedXCross.png|link=]] || [[File:Icon RedXCross.png|link=]]
| |
| − | |-
| |
| − | | {{Specs-Link|cn_m42_duster|short}} || [[File:{{#unit:cn_m42_duster|country}}_flag.png|40px|link=]] || [[File:Icon RedXCross.png|link=]] || [[File:Icon RedXCross.png|link=]] || [[File:Icon RedXCross.png|link=]] || [[File:Icon RedXCross.png|link=]] || [[File:Icon GreenCheckmark.png|link=]] || [[File:Icon RedXCross.png|link=]] || [[File:Icon RedXCross.png|link=]]
| |
| − | |-
| |
| − | | {{Specs-Link|jp_m42_duster|short}} || [[File:{{#unit:jp_m42_duster|country}}_flag.png|40px|link=]] || [[File:Icon RedXCross.png|link=]] || [[File:Icon RedXCross.png|link=]] || [[File:Icon RedXCross.png|link=]] || [[File:Icon RedXCross.png|link=]] || [[File:Icon GreenCheckmark.png|link=]] || [[File:Icon RedXCross.png|link=]] || [[File:Icon RedXCross.png|link=]]
| |
| − | |-
| |
| − | | {{Specs-Link|us_m42_duster|short}} || [[File:{{#unit:us_m42_duster|country}}_flag.png|40px|link=]] || [[File:Icon RedXCross.png|link=]] || [[File:Icon RedXCross.png|link=]] || [[File:Icon RedXCross.png|link=]] || [[File:Icon RedXCross.png|link=]] || [[File:Icon GreenCheckmark.png|link=]] || [[File:Icon RedXCross.png|link=]] || [[File:Icon RedXCross.png|link=]]
| |
| − | |-
| |
| − | | {{Specs-Link|us_m47_patton_II|short}} || [[File:{{#unit:us_m47_patton_II|country}}_flag.png|40px|link=]] || [[File:Icon RedXCross.png|link=]] || [[File:Icon RedXCross.png|link=]] || [[File:Icon RedXCross.png|link=]] || [[File:Icon RedXCross.png|link=]] || [[File:Icon GreenCheckmark.png|link=]] || [[File:Icon RedXCross.png|link=]] || [[File:Icon RedXCross.png|link=]]
| |
| − | |-
| |
| − | | {{Specs-Link|it_m47_105|short}} || [[File:{{#unit:it_m47_105|country}}_flag.png|40px|link=]] || [[File:Icon RedXCross.png|link=]] || [[File:Icon RedXCross.png|link=]] || [[File:Icon RedXCross.png|link=]] || [[File:Icon RedXCross.png|link=]] || [[File:Icon GreenCheckmark.png|link=]] || [[File:Icon RedXCross.png|link=]] || [[File:Icon RedXCross.png|link=]]
| |
| − | |-
| |
| − | | {{Specs-Link|cn_m48a1_patton_III|short}} || [[File:{{#unit:cn_m48a1_patton_III|country}}_flag.png|40px|link=]] || [[File:Icon RedXCross.png|link=]] || [[File:Icon RedXCross.png|link=]] || [[File:Icon RedXCross.png|link=]] || [[File:Icon RedXCross.png|link=]] || [[File:Icon GreenCheckmark.png|link=]] || [[File:Icon RedXCross.png|link=]] || [[File:Icon RedXCross.png|link=]]
| |
| − | |-
| |
| − | | {{Specs-Link|us_m48a1_patton_III|short}} || [[File:{{#unit:us_m48a1_patton_III|country}}_flag.png|40px|link=]] || [[File:Icon RedXCross.png|link=]] || [[File:Icon RedXCross.png|link=]] || [[File:Icon RedXCross.png|link=]] || [[File:Icon RedXCross.png|link=]] || [[File:Icon GreenCheckmark.png|link=]] || [[File:Icon RedXCross.png|link=]] || [[File:Icon RedXCross.png|link=]]
| |
| − | |-
| |
| − | | {{Specs-Link|germ_mkpz_m48a2c|short}} || [[File:{{#unit:germ_mkpz_m48a2c|country}}_flag.png|40px|link=]] || [[File:Icon GreenCheckmark.png|link=]] || [[File:Icon RedXCross.png|link=]] || [[File:Icon GreenCheckmark.png|link=]] || [[File:Icon RedXCross.png|link=]] || [[File:Icon GreenCheckmark.png|link=]] || [[File:Icon RedXCross.png|link=]] || [[File:Icon GreenCheckmark.png|link=]]
| |
| − | |-
| |
| − | | {{Specs-Link|germ_mkpz_m48a2ga2|short}} || [[File:{{#unit:germ_mkpz_m48a2ga2|country}}_flag.png|40px|link=]] || [[File:Icon GreenCheckmark.png|link=]] || [[File:Icon RedXCross.png|link=]] || [[File:Icon GreenCheckmark.png|link=]] || [[File:Icon RedXCross.png|link=]] || [[File:Icon GreenCheckmark.png|link=]] || [[File:Icon RedXCross.png|link=]] || [[File:Icon GreenCheckmark.png|link=]]
| |
| − | |-
| |
| − | | {{Specs-Link|us_m60|short}} || [[File:{{#unit:us_m60|country}}_flag.png|40px|link=]] || [[File:Icon GreenCheckmark.png|link=]] || [[File:Icon RedXCross.png|link=]] || [[File:Icon GreenCheckmark.png|link=]] || [[File:Icon RedXCross.png|link=]] || [[File:Icon GreenCheckmark.png|link=]] || [[File:Icon RedXCross.png|link=]] || [[File:Icon RedXCross.png|link=]]
| |
| − | |-
| |
| − | | {{Specs-Link|us_m60a1|short}} || [[File:{{#unit:us_m60a1|country}}_flag.png|40px|link=]] || [[File:Icon GreenCheckmark.png|link=]] || [[File:Icon RedXCross.png|link=]] || [[File:Icon GreenCheckmark.png|link=]] || [[File:Icon RedXCross.png|link=]] || [[File:Icon GreenCheckmark.png|link=]] || [[File:Icon RedXCross.png|link=]] || [[File:Icon RedXCross.png|link=]]
| |
| − | |-
| |
| − | | {{Specs-Link|it_m60a1_ariete|short}} || [[File:{{#unit:it_m60a1_ariete|country}}_flag.png|40px|link=]] || [[File:Icon GreenCheckmark.png|link=]] || [[File:Icon RedXCross.png|link=]] || [[File:Icon GreenCheckmark.png|link=]] || [[File:Icon RedXCross.png|link=]] || [[File:Icon GreenCheckmark.png|link=]] || [[File:Icon RedXCross.png|link=]] || [[File:Icon RedXCross.png|link=]]
| |
| − | |-
| |
| − | | {{Specs-Link|us_m60a1_rise_passive_era|short}} || [[File:{{#unit:us_m60a1_rise_passive_era|country}}_flag.png|40px|link=]] || [[File:Icon GreenCheckmark.png|link=]] || [[File:Icon RedXCross.png|link=]] || [[File:Icon GreenCheckmark.png|link=]] || [[File:Icon RedXCross.png|link=]] || [[File:Icon GreenCheckmark.png|link=]] || [[File:Icon RedXCross.png|link=]] || [[File:Icon RedXCross.png|link=]]
| |
| − | |-
| |
| − | | {{Specs-Link|us_m60a2|short}} || [[File:{{#unit:us_m60a2|country}}_flag.png|40px|link=]] || [[File:Icon GreenCheckmark.png|link=]] || [[File:Icon RedXCross.png|link=]] || [[File:Icon GreenCheckmark.png|link=]] || [[File:Icon RedXCross.png|link=]] || [[File:Icon GreenCheckmark.png|link=]] || [[File:Icon RedXCross.png|link=]] || [[File:Icon GreenCheckmark.png|link=]]
| |
| − | |-
| |
| − | | {{Specs-Link|cn_m60a3_tts|short}} || [[File:{{#unit:cn_m60a3_tts|country}}_flag.png|40px|link=]] || [[File:Icon GreenCheckmark.png|link=]] || [[File:Icon RedXCross.png|link=]] || [[File:Icon RedXCross.png|link=]] || [[File:Icon GreenCheckmark.png|link=]] || [[File:Icon GreenCheckmark.png|link=]] || [[File:Icon RedXCross.png|link=]] || [[File:Icon RedXCross.png|link=]]
| |
| − | |-
| |
| − | | {{Specs-Link|us_m60a3_tts|short}} || [[File:{{#unit:us_m60a3_tts|country}}_flag.png|40px|link=]] || [[File:Icon GreenCheckmark.png|link=]] || [[File:Icon RedXCross.png|link=]] || [[File:Icon RedXCross.png|link=]] || [[File:Icon GreenCheckmark.png|link=]] || [[File:Icon GreenCheckmark.png|link=]] || [[File:Icon RedXCross.png|link=]] || [[File:Icon RedXCross.png|link=]]
| |
| − | |-
| |
| − | | {{Specs-Link|us_m103|short}} || [[File:{{#unit:us_m103|country}}_flag.png|40px|link=]] || [[File:Icon RedXCross.png|link=]] || [[File:Icon RedXCross.png|link=]] || [[File:Icon RedXCross.png|link=]] || [[File:Icon RedXCross.png|link=]] || [[File:Icon GreenCheckmark.png|link=]] || [[File:Icon RedXCross.png|link=]] || [[File:Icon RedXCross.png|link=]]
| |
| − | |-
| |
| − | | {{Specs-Link|cn_m113a1_tow|short}} || [[File:{{#unit:cn_m113a1_tow|country}}_flag.png|40px|link=]] || [[File:Icon GreenCheckmark.png|link=]] || [[File:Icon RedXCross.png|link=]] || [[File:Icon GreenCheckmark.png|link=]] || [[File:Icon RedXCross.png|link=]] || [[File:Icon GreenCheckmark.png|link=]] || [[File:Icon RedXCross.png|link=]] || [[File:Icon RedXCross.png|link=]]
| |
| − | |-
| |
| − | | {{Specs-Link|it_m113a1_tow|short}} || [[File:{{#unit:it_m113a1_tow|country}}_flag.png|40px|link=]] || [[File:Icon GreenCheckmark.png|link=]] || [[File:Icon RedXCross.png|link=]] || [[File:Icon GreenCheckmark.png|link=]] || [[File:Icon RedXCross.png|link=]] || [[File:Icon GreenCheckmark.png|link=]] || [[File:Icon RedXCross.png|link=]] || [[File:Icon RedXCross.png|link=]]
| |
| − | |-
| |
| − | | {{Specs-Link|us_m163_vulcan|short}} || [[File:{{#unit:us_m163_vulcan|country}}_flag.png|40px|link=]] || [[File:Icon RedXCross.png|link=]] || [[File:Icon RedXCross.png|link=]] || [[File:Icon GreenCheckmark.png|link=]] || [[File:Icon RedXCross.png|link=]] || [[File:Icon GreenCheckmark.png|link=]] || [[File:Icon RedXCross.png|link=]] || [[File:Icon RedXCross.png|link=]]
| |
| − | |-
| |
| − | | {{Specs-Link|us_m247|short}} || [[File:{{#unit:us_m247|country}}_flag.png|40px|link=]] || [[File:Icon GreenCheckmark.png|link=]] || [[File:Icon RedXCross.png|link=]] || [[File:Icon GreenCheckmark.png|link=]] || [[File:Icon RedXCross.png|link=]] || [[File:Icon GreenCheckmark.png|link=]] || [[File:Icon RedXCross.png|link=]] || [[File:Icon RedXCross.png|link=]]
| |
| − | |-
| |
| − | | {{Specs-Link|us_m551|short}} || [[File:{{#unit:us_m551|country}}_flag.png|40px|link=]] || [[File:Icon GreenCheckmark.png|link=]] || [[File:Icon RedXCross.png|link=]] || [[File:Icon GreenCheckmark.png|link=]] || [[File:Icon RedXCross.png|link=]] || [[File:Icon GreenCheckmark.png|link=]] || [[File:Icon RedXCross.png|link=]] || [[File:Icon RedXCross.png|link=]]
| |
| − | |-
| |
| − | | {{Specs-Link|us_m901_itv|short}} || [[File:{{#unit:us_m901_itv|country}}_flag.png|40px|link=]] || [[File:Icon GreenCheckmark.png|link=]] || [[File:Icon RedXCross.png|link=]] || [[File:Icon RedXCross.png|link=]] || [[File:Icon GreenCheckmark.png|link=]] || [[File:Icon GreenCheckmark.png|link=]] || [[File:Icon RedXCross.png|link=]] || [[File:Icon RedXCross.png|link=]]
| |
| − | |-
| |
| − | | {{Specs-Link|us_mbt_70|short}} || [[File:{{#unit:us_mbt_70|country}}_flag.png|40px|link=]] || [[File:Icon GreenCheckmark.png|link=]] || [[File:Icon RedXCross.png|link=]] || [[File:Icon GreenCheckmark.png|link=]] || [[File:Icon RedXCross.png|link=]] || [[File:Icon GreenCheckmark.png|link=]] || [[File:Icon RedXCross.png|link=]] || [[File:Icon RedXCross.png|link=]]
| |
| − | |- | |
| − | | {{Specs-Link|us_magach_3|short}} || [[File:{{#unit:us_magach_3|country}}_flag.png|40px|link=]] || [[File:Icon RedXCross.png|link=]] || [[File:Icon RedXCross.png|link=]] || [[File:Icon RedXCross.png|link=]] || [[File:Icon RedXCross.png|link=]] || [[File:Icon GreenCheckmark.png|link=]] || [[File:Icon RedXCross.png|link=]] || [[File:Icon RedXCross.png|link=]] | |
| − | |-
| |
| − | | {{Specs-Link|us_merkava_mk_1|short}} || [[File:{{#unit:us_merkava_mk_1|country}}_flag.png|40px|link=]] || [[File:Icon GreenCheckmark.png|link=]] || [[File:Icon RedXCross.png|link=]] || [[File:Icon GreenCheckmark.png|link=]] || [[File:Icon RedXCross.png|link=]] || [[File:Icon GreenCheckmark.png|link=]] || [[File:Icon RedXCross.png|link=]] || [[File:Icon RedXCross.png|link=]]
| |
| − | |-
| |
| − | | {{Specs-Link|us_merkava_mk_2b_late|short}} || [[File:{{#unit:us_merkava_mk_2b_late|country}}_flag.png|40px|link=]] || [[File:Icon GreenCheckmark.png|link=]] || [[File:Icon RedXCross.png|link=]] || [[File:Icon RedXCross.png|link=]] || [[File:Icon GreenCheckmark.png|link=]] || [[File:Icon GreenCheckmark.png|link=]] || [[File:Icon RedXCross.png|link=]] || [[File:Icon RedXCross.png|link=]]
| |
| − | |-
| |
| − | | {{Specs-Link|it_of_40_mk_1|short}} || [[File:{{#unit:it_of_40_mk_1|country}}_flag.png|40px|link=]] || [[File:Icon GreenCheckmark.png|link=]] || [[File:Icon RedXCross.png|link=]] || [[File:Icon GreenCheckmark.png|link=]] || [[File:Icon RedXCross.png|link=]] || [[File:Icon GreenCheckmark.png|link=]] || [[File:Icon RedXCross.png|link=]] || [[File:Icon RedXCross.png|link=]]
| |
| − | |-
| |
| − | | {{Specs-Link|it_of_40_mtca|short}} || [[File:{{#unit:it_of_40_mtca|country}}_flag.png|40px|link=]] || [[File:Icon GreenCheckmark.png|link=]] || [[File:Icon RedXCross.png|link=]] || [[File:Icon GreenCheckmark.png|link=]] || [[File:Icon RedXCross.png|link=]] || [[File:Icon GreenCheckmark.png|link=]] || [[File:Icon RedXCross.png|link=]] || [[File:Icon RedXCross.png|link=]]
| |
| − | |-
| |
| − | | {{Specs-Link|it_of_40_mk_2a|short}} || [[File:{{#unit:it_of_40_mk_2a|country}}_flag.png|40px|link=]] || [[File:Icon GreenCheckmark.png|link=]] || [[File:Icon RedXCross.png|link=]] || [[File:Icon GreenCheckmark.png|link=]] || [[File:Icon RedXCross.png|link=]] || [[File:Icon GreenCheckmark.png|link=]] || [[File:Icon RedXCross.png|link=]] || [[File:Icon RedXCross.png|link=]]
| |
| − | |-
| |
| − | | {{Specs-Link|it_otomatic|short}} || [[File:{{#unit:it_otomatic|country}}_flag.png|40px|link=]] || [[File:Icon GreenCheckmark.png|link=]] || [[File:Icon RedXCross.png|link=]] || [[File:Icon RedXCross.png|link=]] || [[File:Icon GreenCheckmark.png|link=]] || [[File:Icon GreenCheckmark.png|link=]] || [[File:Icon RedXCross.png|link=]] || [[File:Icon RedXCross.png|link=]]
| |
| − | |-
| |
| − | | {{Specs-Link|ussr_object_120|short}} || [[File:{{#unit:ussr_object_120|country}}_flag.png|40px|link=]] || [[File:Icon GreenCheckmark.png|link=]] || [[File:Icon RedXCross.png|link=]] || [[File:Icon GreenCheckmark.png|link=]] || [[File:Icon RedXCross.png|link=]] || [[File:Icon GreenCheckmark.png|link=]] || [[File:Icon RedXCross.png|link=]] || [[File:Icon GreenCheckmark.png|link=]]
| |
| − | |-
| |
| − | | {{Specs-Link|ussr_object_685|short}} || [[File:{{#unit:ussr_object_685|country}}_flag.png|40px|link=]] || [[File:Icon GreenCheckmark.png|link=]] || [[File:Icon RedXCross.png|link=]] || [[File:Icon GreenCheckmark.png|link=]] || [[File:Icon RedXCross.png|link=]] || [[File:Icon GreenCheckmark.png|link=]] || [[File:Icon RedXCross.png|link=]] || [[File:Icon GreenCheckmark.png|link=]]
| |
| − | |-
| |
| − | | {{Specs-Link|ussr_object_906|short}} || [[File:{{#unit:ussr_object_906|country}}_flag.png|40px|link=]] || [[File:Icon GreenCheckmark.png|link=]] || [[File:Icon RedXCross.png|link=]] || [[File:Icon GreenCheckmark.png|link=]] || [[File:Icon RedXCross.png|link=]] || [[File:Icon GreenCheckmark.png|link=]] || [[File:Icon RedXCross.png|link=]] || [[File:Icon GreenCheckmark.png|link=]]
| |
| − | |-
| |
| − | | {{Specs-Link|cn_pt_76|short}} || [[File:{{#unit:cn_pt_76|country}}_flag.png|40px|link=]] || [[File:Icon RedXCross.png|link=]] || [[File:Icon RedXCross.png|link=]] || [[File:Icon RedXCross.png|link=]] || [[File:Icon RedXCross.png|link=]] || [[File:Icon GreenCheckmark.png|link=]] || [[File:Icon RedXCross.png|link=]] || [[File:Icon RedXCross.png|link=]]
| |
| − | |-
| |
| − | | {{Specs-Link|ussr_pt_76b|short}} || [[File:{{#unit:ussr_pt_76b|country}}_flag.png|40px|link=]] || [[File:Icon RedXCross.png|link=]] || [[File:Icon RedXCross.png|link=]] || [[File:Icon RedXCross.png|link=]] || [[File:Icon RedXCross.png|link=]] || [[File:Icon GreenCheckmark.png|link=]] || [[File:Icon RedXCross.png|link=]] || [[File:Icon RedXCross.png|link=]]
| |
| − | |-
| |
| − | | {{Specs-Link|germ_panther_II|short}} || [[File:{{#unit:germ_panther_II|country}}_flag.png|40px|link=]] || [[File:Icon GreenCheckmark.png|link=]] || [[File:Icon RedXCross.png|link=]] || [[File:Icon RedXCross.png|link=]] || [[File:Icon RedXCross.png|link=]] || [[File:Icon GreenCheckmark.png|link=]] || [[File:Icon RedXCross.png|link=]] || [[File:Icon GreenCheckmark.png|link=]]
| |
| − | |-
| |
| − | | {{Specs-Link|germ_raketenjagdpanzer_2_hot|short}} || [[File:{{#unit:germ_raketenjagdpanzer_2_hot|country}}_flag.png|40px|link=]] || [[File:Icon GreenCheckmark.png|link=]] || [[File:Icon RedXCross.png|link=]] || [[File:Icon GreenCheckmark.png|link=]] || [[File:Icon RedXCross.png|link=]] || [[File:Icon GreenCheckmark.png|link=]] || [[File:Icon RedXCross.png|link=]] || [[File:Icon RedXCross.png|link=]]
| |
| − | |-
| |
| − | | {{Specs-Link|uk_rooikat_76|short}} || [[File:{{#unit:uk_rooikat_76|country}}_flag.png|40px|link=]] || [[File:Icon GreenCheckmark.png|link=]] || [[File:Icon RedXCross.png|link=]] || [[File:Icon GreenCheckmark.png|link=]] || [[File:Icon RedXCross.png|link=]] || [[File:Icon GreenCheckmark.png|link=]] || [[File:Icon RedXCross.png|link=]] || [[File:Icon RedXCross.png|link=]]
| |
| − | |-
| |
| − | | {{Specs-Link|germ_bmp_1_ddr|short}} || [[File:{{#unit:germ_bmp_1_ddr|country}}_flag.png|40px|link=]] || [[File:Icon GreenCheckmark.png|link=]] || [[File:Icon RedXCross.png|link=]] || [[File:Icon GreenCheckmark.png|link=]] || [[File:Icon RedXCross.png|link=]] || [[File:Icon GreenCheckmark.png|link=]] || [[File:Icon RedXCross.png|link=]] || [[File:Icon GreenCheckmark.png|link=]]
| |
| − | |-
| |
| − | | {{Specs-Link|ussr_su_122_54|short}} || [[File:{{#unit:ussr_su_122_54|country}}_flag.png|40px|link=]] || [[File:Icon RedXCross.png|link=]] || [[File:Icon RedXCross.png|link=]] || [[File:Icon RedXCross.png|link=]] || [[File:Icon RedXCross.png|link=]] || [[File:Icon GreenCheckmark.png|link=]] || [[File:Icon RedXCross.png|link=]] || [[File:Icon RedXCross.png|link=]]
| |
| − | |-
| |
| − | | {{Specs-Link|uk_centurion_shot_kal_d|short}} || [[File:{{#unit:uk_centurion_shot_kal_d|country}}_flag.png|40px|link=]] || [[File:Icon RedXCross.png|link=]] || [[File:Icon RedXCross.png|link=]] || [[File:Icon RedXCross.png|link=]] || [[File:Icon RedXCross.png|link=]] || [[File:Icon GreenCheckmark.png|link=]] || [[File:Icon RedXCross.png|link=]] || [[File:Icon RedXCross.png|link=]]
| |
| − | |-
| |
| − | | {{Specs-Link|ussr_9p149|short}} || [[File:{{#unit:ussr_9p149|country}}_flag.png|40px|link=]] || [[File:Icon GreenCheckmark.png|link=]] || [[File:Icon RedXCross.png|link=]] || [[File:Icon RedXCross.png|link=]] || [[File:Icon GreenCheckmark.png|link=]] || [[File:Icon GreenCheckmark.png|link=]] || [[File:Icon RedXCross.png|link=]] || [[File:Icon RedXCross.png|link=]]
| |
| − | |-
| |
| − | | {{Specs-Link|uk_stormer_hvm|short}} || [[File:{{#unit:uk_stormer_hvm|country}}_flag.png|40px|link=]] || [[File:Icon GreenCheckmark.png|link=]] || [[File:Icon RedXCross.png|link=]] || [[File:Icon RedXCross.png|link=]] || [[File:Icon GreenCheckmark.png|link=]] || [[File:Icon GreenCheckmark.png|link=]] || [[File:Icon RedXCross.png|link=]] || [[File:Icon RedXCross.png|link=]]
| |
| − | |-
| |
| − | | {{Specs-Link|uk_fv102_striker|short}} || [[File:{{#unit:uk_fv102_striker|country}}_flag.png|40px|link=]] || [[File:Icon GreenCheckmark.png|link=]] || [[File:Icon RedXCross.png|link=]] || [[File:Icon RedXCross.png|link=]] || [[File:Icon GreenCheckmark.png|link=]] || [[File:Icon GreenCheckmark.png|link=]] || [[File:Icon RedXCross.png|link=]] || [[File:Icon RedXCross.png|link=]]
| |
| − | |-
| |
| − | | {{Specs-Link|sw_strv_103_0|short}} || [[File:{{#unit:sw_strv_103_0|country}}_flag.png|40px|link=]] || [[File:Icon GreenCheckmark.png|link=]] || [[File:Icon RedXCross.png|link=]] || [[File:Icon GreenCheckmark.png|link=]] || [[File:Icon RedXCross.png|link=]] || [[File:Icon GreenCheckmark.png|link=]] || [[File:Icon RedXCross.png|link=]] || [[File:Icon RedXCross.png|link=]]
| |
| − | |-
| |
| − | | {{Specs-Link|uk_fv438_swingfire|short}} || [[File:{{#unit:uk_fv438_swingfire|country}}_flag.png|40px|link=]] || [[File:Icon RedXCross.png|link=]] || [[File:Icon RedXCross.png|link=]] || [[File:Icon RedXCross.png|link=]] || [[File:Icon RedXCross.png|link=]] || [[File:Icon GreenCheckmark.png|link=]] || [[File:Icon RedXCross.png|link=]] || [[File:Icon RedXCross.png|link=]]
| |
| − | |-
| |
| − | | {{Specs-Link|ussr_t_10m|short}} || [[File:{{#unit:ussr_t_10m|country}}_flag.png|40px|link=]] || [[File:Icon GreenCheckmark.png|link=]] || [[File:Icon RedXCross.png|link=]] || [[File:Icon GreenCheckmark.png|link=]] || [[File:Icon RedXCross.png|link=]] || [[File:Icon GreenCheckmark.png|link=]] || [[File:Icon RedXCross.png|link=]] || [[File:Icon GreenCheckmark.png|link=]]
| |
| − | |-
| |
| − | | {{Specs-Link|us_t54e1|short}} || [[File:{{#unit:us_t54e1|country}}_flag.png|40px|link=]] || [[File:Icon RedXCross.png|link=]] || [[File:Icon RedXCross.png|link=]] || [[File:Icon RedXCross.png|link=]] || [[File:Icon RedXCross.png|link=]] || [[File:Icon GreenCheckmark.png|link=]] || [[File:Icon RedXCross.png|link=]] || [[File:Icon RedXCross.png|link=]]
| |
| − | |-
| |
| − | | {{Specs-Link|ussr_t_55a|short}} || [[File:{{#unit:ussr_t_55a|country}}_flag.png|40px|link=]] || [[File:Icon GreenCheckmark.png|link=]] || [[File:Icon RedXCross.png|link=]] || [[File:Icon GreenCheckmark.png|link=]] || [[File:Icon RedXCross.png|link=]] || [[File:Icon GreenCheckmark.png|link=]] || [[File:Icon RedXCross.png|link=]] || [[File:Icon GreenCheckmark.png|link=]]
| |
| − | |-
| |
| − | | {{Specs-Link|ussr_t_55_am|short}} || [[File:{{#unit:ussr_t_55_am|country}}_flag.png|40px|link=]] || [[File:Icon GreenCheckmark.png|link=]] || [[File:Icon RedXCross.png|link=]] || [[File:Icon GreenCheckmark.png|link=]] || [[File:Icon RedXCross.png|link=]] || [[File:Icon GreenCheckmark.png|link=]] || [[File:Icon RedXCross.png|link=]] || [[File:Icon GreenCheckmark.png|link=]]
| |
| − | |-
| |
| − | | {{Specs-Link|ussr_t_62|short}} || [[File:{{#unit:ussr_t_62|country}}_flag.png|40px|link=]] || [[File:Icon GreenCheckmark.png|link=]] || [[File:Icon RedXCross.png|link=]] || [[File:Icon GreenCheckmark.png|link=]] || [[File:Icon RedXCross.png|link=]] || [[File:Icon GreenCheckmark.png|link=]] || [[File:Icon RedXCross.png|link=]] || [[File:Icon GreenCheckmark.png|link=]]
| |
| − | |-
| |
| − | | {{Specs-Link|ussr_t_62m1|short}} || [[File:{{#unit:ussr_t_62m1|country}}_flag.png|40px|link=]] || [[File:Icon GreenCheckmark.png|link=]] || [[File:Icon RedXCross.png|link=]] || [[File:Icon GreenCheckmark.png|link=]] || [[File:Icon RedXCross.png|link=]] || [[File:Icon GreenCheckmark.png|link=]] || [[File:Icon RedXCross.png|link=]] || [[File:Icon GreenCheckmark.png|link=]]
| |
| − | |-
| |
| − | | {{Specs-Link|ussr_t_64a_1971|short}} || [[File:{{#unit:ussr_t_64a_1971|country}}_flag.png|40px|link=]] || [[File:Icon GreenCheckmark.png|link=]] || [[File:Icon RedXCross.png|link=]] || [[File:Icon GreenCheckmark.png|link=]] || [[File:Icon RedXCross.png|link=]] || [[File:Icon GreenCheckmark.png|link=]] || [[File:Icon RedXCross.png|link=]] || [[File:Icon GreenCheckmark.png|link=]]
| |
| − | |-
| |
| − | | {{Specs-Link|ussr_t_64_b_1984|short}} || [[File:{{#unit:ussr_t_64_b_1984|country}}_flag.png|40px|link=]] || [[File:Icon GreenCheckmark.png|link=]] || [[File:Icon RedXCross.png|link=]] || [[File:Icon GreenCheckmark.png|link=]] || [[File:Icon RedXCross.png|link=]] || [[File:Icon GreenCheckmark.png|link=]] || [[File:Icon RedXCross.png|link=]] || [[File:Icon GreenCheckmark.png|link=]]
| |
| − | |-
| |
| − | | {{Specs-Link|ussr_t_72a|short}} || [[File:{{#unit:ussr_t_72a|country}}_flag.png|40px|link=]] || [[File:Icon GreenCheckmark.png|link=]] || [[File:Icon RedXCross.png|link=]] || [[File:Icon GreenCheckmark.png|link=]] || [[File:Icon RedXCross.png|link=]] || [[File:Icon GreenCheckmark.png|link=]] || [[File:Icon RedXCross.png|link=]] || [[File:Icon GreenCheckmark.png|link=]]
| |
| − | |-
| |
| − | | {{Specs-Link|ussr_t_80b|short}} || [[File:{{#unit:ussr_t_80b|country}}_flag.png|40px|link=]] || [[File:Icon GreenCheckmark.png|link=]] || [[File:Icon RedXCross.png|link=]] || [[File:Icon GreenCheckmark.png|link=]] || [[File:Icon GreenCheckmark.png|link=]] || [[File:Icon GreenCheckmark.png|link=]] || [[File:Icon RedXCross.png|link=]] || [[File:Icon GreenCheckmark.png|link=]]
| |
| − | |-
| |
| − | | {{Specs-Link|ussr_t_80u|short}} || [[File:{{#unit:ussr_t_80u|country}}_flag.png|40px|link=]] || [[File:Icon GreenCheckmark.png|link=]] || [[File:Icon RedXCross.png|link=]] || [[File:Icon GreenCheckmark.png|link=]] || [[File:Icon GreenCheckmark.png|link=]] || [[File:Icon GreenCheckmark.png|link=]] || [[File:Icon RedXCross.png|link=]] || [[File:Icon GreenCheckmark.png|link=]]
| |
| − | |-
| |
| − | | {{Specs-Link|us_t92|short}} || [[File:{{#unit:us_t92|country}}_flag.png|40px|link=]] || [[File:Icon RedXCross.png|link=]] || [[File:Icon RedXCross.png|link=]] || [[File:Icon RedXCross.png|link=]] || [[File:Icon RedXCross.png|link=]] || [[File:Icon GreenCheckmark.png|link=]] || [[File:Icon RedXCross.png|link=]] || [[File:Icon RedXCross.png|link=]]
| |
| − | |-
| |
| − | | {{Specs-Link|us_t95e1|short}} || [[File:{{#unit:us_t95e1|country}}_flag.png|40px|link=]] || [[File:Icon RedXCross.png|link=]] || [[File:Icon RedXCross.png|link=]] || [[File:Icon RedXCross.png|link=]] || [[File:Icon RedXCross.png|link=]] || [[File:Icon GreenCheckmark.png|link=]] || [[File:Icon RedXCross.png|link=]] || [[File:Icon RedXCross.png|link=]]
| |
| − | |-
| |
| − | | {{Specs-Link|germ_thyssen_henschel_tam|short}} || [[File:{{#unit:germ_thyssen_henschel_tam|country}}_flag.png|40px|link=]] || [[File:Icon RedXCross.png|link=]] || [[File:Icon RedXCross.png|link=]] || [[File:Icon RedXCross.png|link=]] || [[File:Icon RedXCross.png|link=]] || [[File:Icon GreenCheckmark.png|link=]] || [[File:Icon RedXCross.png|link=]] || [[File:Icon RedXCross.png|link=]]
| |
| − | |-
| |
| − | | {{Specs-Link|jp_type_16|short}} || [[File:{{#unit:jp_type_16|country}}_flag.png|40px|link=]] || [[File:Icon RedXCross.png|link=]] || [[File:Icon GreenCheckmark.png|link=]] || [[File:Icon RedXCross.png|link=]] || [[File:Icon GreenCheckmark.png|link=]] || [[File:Icon GreenCheckmark.png|link=]] || [[File:Icon RedXCross.png|link=]] || [[File:Icon RedXCross.png|link=]]
| |
| − | |-
| |
| − | | {{Specs-Link|jp_type_61|short}} || [[File:{{#unit:jp_type_61|country}}_flag.png|40px|link=]] || [[File:Icon RedXCross.png|link=]] || [[File:Icon RedXCross.png|link=]] || [[File:Icon RedXCross.png|link=]] || [[File:Icon RedXCross.png|link=]] || [[File:Icon GreenCheckmark.png|link=]] || [[File:Icon RedXCross.png|link=]] || [[File:Icon RedXCross.png|link=]]
| |
| − | |-
| |
| − | | {{Specs-Link|cn_type_69|short}} || [[File:{{#unit:cn_type_69|country}}_flag.png|40px|link=]] || [[File:Icon GreenCheckmark.png|link=]] || [[File:Icon RedXCross.png|link=]] || [[File:Icon GreenCheckmark.png|link=]] || [[File:Icon RedXCross.png|link=]] || [[File:Icon GreenCheckmark.png|link=]] || [[File:Icon RedXCross.png|link=]] || [[File:Icon RedXCross.png|link=]]
| |
| − | |-
| |
| − | | {{Specs-Link|jp_type_74|short}} || [[File:{{#unit:jp_type_74|country}}_flag.png|40px|link=]] || [[File:Icon GreenCheckmark.png|link=]] || [[File:Icon RedXCross.png|link=]] || [[File:Icon GreenCheckmark.png|link=]] || [[File:Icon RedXCross.png|link=]] || [[File:Icon GreenCheckmark.png|link=]] || [[File:Icon RedXCross.png|link=]] || [[File:Icon GreenCheckmark.png|link=]]
| |
| − | |-
| |
| − | | {{Specs-Link|jp_type_74_mod_g_kai|short}} || [[File:{{#unit:jp_type_74_mod_g_kai|country}}_flag.png|40px|link=]] || [[File:Icon GreenCheckmark.png|link=]] || [[File:Icon RedXCross.png|link=]] || [[File:Icon RedXCross.png|link=]] || [[File:Icon GreenCheckmark.png|link=]] || [[File:Icon GreenCheckmark.png|link=]] || [[File:Icon RedXCross.png|link=]] || [[File:Icon GreenCheckmark.png|link=]]
| |
| − | |-
| |
| − | | {{Specs-Link|jp_type_75_mlrs|short}} || [[File:{{#unit:jp_type_75_mlrs|country}}_flag.png|40px|link=]] || [[File:Icon RedXCross.png|link=]] || [[File:Icon RedXCross.png|link=]] || [[File:Icon RedXCross.png|link=]] || [[File:Icon RedXCross.png|link=]] || [[File:Icon GreenCheckmark.png|link=]] || [[File:Icon RedXCross.png|link=]] || [[File:Icon RedXCross.png|link=]]
| |
| − | |-
| |
| − | | {{Specs-Link|jp_type_75|short}} || [[File:{{#unit:jp_type_75|country}}_flag.png|40px|link=]] || [[File:Icon RedXCross.png|link=]] || [[File:Icon RedXCross.png|link=]] || [[File:Icon RedXCross.png|link=]] || [[File:Icon RedXCross.png|link=]] || [[File:Icon GreenCheckmark.png|link=]] || [[File:Icon RedXCross.png|link=]] || [[File:Icon RedXCross.png|link=]]
| |
| − | |-
| |
| − | | {{Specs-Link|jp_type_87|short}} || [[File:{{#unit:jp_type_87|country}}_flag.png|40px|link=]] || [[File:Icon RedXCross.png|link=]] || [[File:Icon RedXCross.png|link=]] || [[File:Icon RedXCross.png|link=]] || [[File:Icon RedXCross.png|link=]] || [[File:Icon GreenCheckmark.png|link=]] || [[File:Icon RedXCross.png|link=]] || [[File:Icon GreenCheckmark.png|link=]]
| |
| − | |-
| |
| − | | {{Specs-Link|jp_type_89|short}} || [[File:{{#unit:jp_type_89|country}}_flag.png|40px|link=]] || [[File:Icon GreenCheckmark.png|link=]] || [[File:Icon RedXCross.png|link=]] || [[File:Icon RedXCross.png|link=]] || [[File:Icon GreenCheckmark.png|link=]] || [[File:Icon GreenCheckmark.png|link=]] || [[File:Icon RedXCross.png|link=]] || [[File:Icon RedXCross.png|link=]]
| |
| − | |-
| |
| − | | {{Specs-Link|jp_type_90|short}} || [[File:{{#unit:jp_type_90|country}}_flag.png|40px|link=]] || [[File:Icon GreenCheckmark.png|link=]] || [[File:Icon RedXCross.png|link=]] || [[File:Icon RedXCross.png|link=]] || [[File:Icon GreenCheckmark.png|link=]] || [[File:Icon GreenCheckmark.png|link=]] || [[File:Icon RedXCross.png|link=]] || [[File:Icon RedXCross.png|link=]]
| |
| − | |-
| |
| − | | {{Specs-Link|jp_type_90b|short}} || [[File:{{#unit:jp_type_90b|country}}_flag.png|40px|link=]] || [[File:Icon GreenCheckmark.png|link=]] || [[File:Icon RedXCross.png|link=]] || [[File:Icon RedXCross.png|link=]] || [[File:Icon GreenCheckmark.png|link=]] || [[File:Icon GreenCheckmark.png|link=]] || [[File:Icon RedXCross.png|link=]] || [[File:Icon RedXCross.png|link=]]
| |
| − | |-
| |
| − | | {{Specs-Link|germ_vt_1_2|short}} || [[File:{{#unit:germ_vt_1_2|country}}_flag.png|40px|link=]] || [[File:Icon GreenCheckmark.png|link=]] || [[File:Icon RedXCross.png|link=]] || [[File:Icon GreenCheckmark.png|link=]] || [[File:Icon RedXCross.png|link=]] || [[File:Icon GreenCheckmark.png|link=]] || [[File:Icon RedXCross.png|link=]] || [[File:Icon RedXCross.png|link=]]
| |
| − | |-
| |
| − | | {{Specs-Link|uk_vickers_mbt_mk_1|short}} || [[File:{{#unit:uk_vickers_mbt_mk_1|country}}_flag.png|40px|link=]] || [[File:Icon RedXCross.png|link=]] || [[File:Icon RedXCross.png|link=]] || [[File:Icon RedXCross.png|link=]] || [[File:Icon RedXCross.png|link=]] || [[File:Icon GreenCheckmark.png|link=]] || [[File:Icon RedXCross.png|link=]] || [[File:Icon RedXCross.png|link=]]
| |
| − | |-
| |
| − | | {{Specs-Link|uk_vickers_mk7|short}} || [[File:{{#unit:uk_vickers_mk7|country}}_flag.png|40px|link=]] || [[File:Icon GreenCheckmark.png|link=]] || [[File:Icon RedXCross.png|link=]] || [[File:Icon RedXCross.png|link=]] || [[File:Icon GreenCheckmark.png|link=]] || [[File:Icon GreenCheckmark.png|link=]] || [[File:Icon RedXCross.png|link=]] || [[File:Icon RedXCross.png|link=]]
| |
| − | |-
| |
| − | | {{Specs-Link|uk_fv510_isv|short}} || [[File:{{#unit:uk_fv510_isv|country}}_flag.png|40px|link=]] || [[File:Icon GreenCheckmark.png|link=]] || [[File:Icon RedXCross.png|link=]] || [[File:Icon RedXCross.png|link=]] || [[File:Icon GreenCheckmark.png|link=]] || [[File:Icon GreenCheckmark.png|link=]] || [[File:Icon RedXCross.png|link=]] || [[File:Icon RedXCross.png|link=]]
| |
| − | |-
| |
| − | | {{Specs-Link|us_xm1_chrysler|short}} || [[File:{{#unit:us_xm1_chrysler|country}}_flag.png|40px|link=]] || [[File:Icon GreenCheckmark.png|link=]] || [[File:Icon RedXCross.png|link=]] || [[File:Icon RedXCross.png|link=]] || [[File:Icon GreenCheckmark.png|link=]] || [[File:Icon GreenCheckmark.png|link=]] || [[File:Icon RedXCross.png|link=]] || [[File:Icon RedXCross.png|link=]]
| |
| − | |-
| |
| − | | {{Specs-Link|us_xm1_gm|short}} || [[File:{{#unit:us_xm1_gm|country}}_flag.png|40px|link=]] || [[File:Icon GreenCheckmark.png|link=]] || [[File:Icon RedXCross.png|link=]] || [[File:Icon RedXCross.png|link=]] || [[File:Icon GreenCheckmark.png|link=]] || [[File:Icon GreenCheckmark.png|link=]] || [[File:Icon RedXCross.png|link=]] || [[File:Icon RedXCross.png|link=]]
| |
| − | |-
| |
| − | | {{Specs-Link|us_xm_803|short}} || [[File:{{#unit:us_xm_803|country}}_flag.png|40px|link=]] || [[File:Icon GreenCheckmark.png|link=]] || [[File:Icon RedXCross.png|link=]] || [[File:Icon GreenCheckmark.png|link=]] || [[File:Icon RedXCross.png|link=]] || [[File:Icon GreenCheckmark.png|link=]] || [[File:Icon RedXCross.png|link=]] || [[File:Icon RedXCross.png|link=]]
| |
| − | |-
| |
| − | | {{Specs-Link|cn_type_86|short}} || [[File:{{#unit:cn_type_86|country}}_flag.png|40px|link=]] || [[File:Icon GreenCheckmark.png|link=]] || [[File:Icon RedXCross.png|link=]] || [[File:Icon GreenCheckmark.png|link=]] || [[File:Icon RedXCross.png|link=]] || [[File:Icon GreenCheckmark.png|link=]] || [[File:Icon RedXCross.png|link=]] || [[File:Icon GreenCheckmark.png|link=]]
| |
| − | |-
| |
| − | | {{Specs-Link|ussr_zprk_2s6|short}} || [[File:{{#unit:ussr_zprk_2s6|country}}_flag.png|40px|link=]] || [[File:Icon GreenCheckmark.png|link=]] || [[File:Icon RedXCross.png|link=]] || [[File:Icon RedXCross.png|link=]] || [[File:Icon GreenCheckmark.png|link=]] || [[File:Icon GreenCheckmark.png|link=]] || [[File:Icon RedXCross.png|link=]] || [[File:Icon GreenCheckmark.png|link=]]
| |
| − | |-
| |
| − | | {{Specs-Link|ussr_zsu_23_4|short}} || [[File:{{#unit:ussr_zsu_23_4|country}}_flag.png|40px|link=]] || [[File:Icon GreenCheckmark.png|link=]] || [[File:Icon RedXCross.png|link=]] || [[File:Icon RedXCross.png|link=]] || [[File:Icon RedXCross.png|link=]] || [[File:Icon GreenCheckmark.png|link=]] || [[File:Icon RedXCross.png|link=]] || [[File:Icon GreenCheckmark.png|link=]]
| |
| − | |-
| |
| − | | {{Specs-Link|cn_type_59d|short}} || [[File:{{#unit:cn_type_59d|country}}_flag.png|40px|link=]] || [[File:Icon GreenCheckmark.png|link=]] || [[File:Icon RedXCross.png|link=]] || [[File:Icon RedXCross.png|link=]] || [[File:Icon GreenCheckmark.png|link=]] || [[File:Icon GreenCheckmark.png|link=]] || [[File:Icon RedXCross.png|link=]] || [[File:Icon RedXCross.png|link=]]
| |
| − | |-
| |
| − | | {{Specs-Link|cn_ztz_96|short}} || [[File:{{#unit:cn_ztz_96|country}}_flag.png|40px|link=]] || [[File:Icon GreenCheckmark.png|link=]] || [[File:Icon RedXCross.png|link=]] || [[File:Icon GreenCheckmark.png|link=]] || [[File:Icon RedXCross.png|link=]] || [[File:Icon GreenCheckmark.png|link=]] || [[File:Icon RedXCross.png|link=]] || [[File:Icon RedXCross.png|link=]]
| |
| − | |-
| |
| − | | {{Specs-Link|germ_le_kpz_m41|short}} || [[File:{{#unit:germ_le_kpz_m41|country}}_flag.png|40px|link=]] || [[File:Icon RedXCross.png|link=]] || [[File:Icon RedXCross.png|link=]] || [[File:Icon RedXCross.png|link=]] || [[File:Icon RedXCross.png|link=]] || [[File:Icon GreenCheckmark.png|link=]] || [[File:Icon RedXCross.png|link=]] || [[File:Icon RedXCross.png|link=]]
| |
| − | |-
| |
| − | | {{Specs-Link|germ_mkpz_m47|short}} || [[File:{{#unit:germ_mkpz_m47|country}}_flag.png|40px|link=]] || [[File:Icon RedXCross.png|link=]] || [[File:Icon RedXCross.png|link=]] || [[File:Icon RedXCross.png|link=]] || [[File:Icon RedXCross.png|link=]] || [[File:Icon GreenCheckmark.png|link=]] || [[File:Icon RedXCross.png|link=]] || [[File:Icon RedXCross.png|link=]]
| |
| − | |-
| |
| − | | {{Specs-Link|cn_t_62|short}} || [[File:{{#unit:cn_t_62|country}}_flag.png|40px|link=]] || [[File:Icon GreenCheckmark.png|link=]] || [[File:Icon RedXCross.png|link=]] || [[File:Icon GreenCheckmark.png|link=]] || [[File:Icon RedXCross.png|link=]] || [[File:Icon GreenCheckmark.png|link=]] || [[File:Icon RedXCross.png|link=]] || [[File:Icon GreenCheckmark.png|link=]]
| |
| | |- | | |- |
| | |} | | |} |
| | | | |
| − | ===Helicopters=== | + | === Machine guns === |
| − | {| class="wikitable sortable" style="text-align:center" | + | <!--Offensive and anti-aircraft machine guns not only allow you to fight some aircraft but also are effective against lightly armoured vehicles. Evaluate machine guns and give recommendations on its use.--> |
| | + | {{main|Browning M2 (12.7 mm)}} |
| | + | |
| | + | {| class="wikitable" style="text-align:center" |
| | |- | | |- |
| − | ! rowspan="2" | Vehicle !! rowspan="2" | Country !! Pilot !! Gunner !! colspan="2" | Gunsight | + | ! colspan="7" | [[Browning M2 (12.7 mm)|12.7 mm M2HB]] |
| | |- | | |- |
| − | ! Infrared !! Infrared !! Infrared !! Thermal | + | ! colspan="7" | ''Pintle mount'' |
| | |- | | |- |
| − | | {{Specs-Link|a_129_a|short}} || [[File:{{#unit:a_129_a|country}}_flag.png|40px|link=]] || [[File:Icon GreenCheckmark.png|link=]] || [[File:Icon GreenCheckmark.png|link=]] || [[File:Icon RedXCross.png|link=]] || [[File:Icon GreenCheckmark.png|link=]]
| + | ! colspan="4" rowspan="1" style="width:5em" |Capacity (Belt capacity) |
| | + | ! rowspan="1" | Fire rate <br> (shots/minute) |
| | + | ! rowspan="1" | Vertical <br> guidance |
| | + | ! rowspan="1" | Horizontal <br> guidance |
| | |- | | |- |
| − | | {{Specs-Link|ah_1f|short}} || [[File:{{#unit:ah_1f|country}}_flag.png|40px|link=]] || [[File:Icon GreenCheckmark.png|link=]] || [[File:Icon GreenCheckmark.png|link=]] || [[File:Icon RedXCross.png|link=]] || [[File:Icon GreenCheckmark.png|link=]] | + | | colspan="4" | 1,000 (200) || 576 || -10°/+70° || ±60° |
| | |- | | |- |
| − | | {{Specs-Link|ah_1g|short}} || [[File:{{#unit:ah_1g|country}}_flag.png|40px|link=]] || [[File:Icon GreenCheckmark.png|link=]] || [[File:Icon GreenCheckmark.png|link=]] || [[File:Icon RedXCross.png|link=]] || [[File:Icon RedXCross.png|link=]]
| + | ! colspan="7" | ''Coaxial mount'' |
| | |- | | |- |
| − | | {{Specs-Link|ah_1s|short}} || [[File:{{#unit:ah_1s|country}}_flag.png|40px|link=]] || [[File:Icon GreenCheckmark.png|link=]] || [[File:Icon GreenCheckmark.png|link=]] || [[File:Icon RedXCross.png|link=]] || [[File:Icon GreenCheckmark.png|link=]]
| + | ! colspan="4" rowspan="1" style="width:5em" |Capacity (Belt capacity) |
| | + | ! rowspan="1" | Fire rate <br> (shots/minute) |
| | + | ! rowspan="1" | Vertical <br> guidance |
| | + | ! rowspan="1" | Horizontal <br> guidance |
| | |- | | |- |
| − | | {{Specs-Link|ah_1z|short}} || [[File:{{#unit:ah_1z|country}}_flag.png|40px|link=]] || [[File:Icon GreenCheckmark.png|link=]] || [[File:Icon GreenCheckmark.png|link=]] || [[File:Icon RedXCross.png|link=]] || [[File:Icon GreenCheckmark.png|link=]] | + | | colspan="4" | 1,000 (200) || 576 || N/A || N/A |
| − | |-
| |
| − | | {{Specs-Link|bo_105cb2|short}} || [[File:{{#unit:bo_105cb2|country}}_flag.png|40px|link=]] || [[File:Icon GreenCheckmark.png|link=]] || [[File:Icon GreenCheckmark.png|link=]] || [[File:Icon RedXCross.png|link=]] || [[File:Icon RedXCross.png|link=]]
| |
| − | |-
| |
| − | | {{Specs-Link|bo_105pah1|short}} || [[File:{{#unit:bo_105pah1|country}}_flag.png|40px|link=]] || [[File:Icon GreenCheckmark.png|link=]] || [[File:Icon GreenCheckmark.png|link=]] || [[File:Icon RedXCross.png|link=]] || [[File:Icon RedXCross.png|link=]]
| |
| − | |-
| |
| − | | {{Specs-Link|bo_105pah1_a1|short}} || [[File:{{#unit:bo_105pah1_a1|country}}_flag.png|40px|link=]] || [[File:Icon GreenCheckmark.png|link=]] || [[File:Icon GreenCheckmark.png|link=]] || [[File:Icon RedXCross.png|link=]] || [[File:Icon RedXCross.png|link=]]
| |
| − | |-
| |
| − | | {{Specs-Link|tiger_had_france|short}} || [[File:{{#unit:tiger_had_france|country}}_flag.png|40px|link=]] || [[File:Icon GreenCheckmark.png|link=]] || [[File:Icon GreenCheckmark.png|link=]] || [[File:Icon GreenCheckmark.png|link=]] || [[File:Icon GreenCheckmark.png|link=]]
| |
| − | |-
| |
| − | | {{Specs-Link|tiger_hap_france|short}} || [[File:{{#unit:tiger_hap_france|country}}_flag.png|40px|link=]] || [[File:Icon GreenCheckmark.png|link=]] || [[File:Icon GreenCheckmark.png|link=]] || [[File:Icon GreenCheckmark.png|link=]] || [[File:Icon GreenCheckmark.png|link=]]
| |
| − | |-
| |
| − | | {{Specs-Link|tiger_uht|short}} || [[File:{{#unit:tiger_uht|country}}_flag.png|40px|link=]] || [[File:Icon GreenCheckmark.png|link=]] || [[File:Icon GreenCheckmark.png|link=]] || [[File:Icon GreenCheckmark.png|link=]] || [[File:Icon GreenCheckmark.png|link=]]
| |
| − | |-
| |
| − | | {{Specs-Link|g_lynx|short}} || [[File:{{#unit:g_lynx|country}}_flag.png|40px|link=]] || [[File:Icon GreenCheckmark.png|link=]] || [[File:Icon GreenCheckmark.png|link=]] || [[File:Icon RedXCross.png|link=]] || [[File:Icon GreenCheckmark.png|link=]]
| |
| − | |-
| |
| − | | {{Specs-Link|h_34|short}} || [[File:{{#unit:h_34|country}}_flag.png|40px|link=]] || [[File:Icon GreenCheckmark.png|link=]] || [[File:Icon GreenCheckmark.png|link=]] || [[File:Icon RedXCross.png|link=]] || [[File:Icon RedXCross.png|link=]]
| |
| − | |-
| |
| − | | {{Specs-Link|h_34_france|short}} || [[File:{{#unit:h_34_france|country}}_flag.png|40px|link=]] || [[File:Icon GreenCheckmark.png|link=]] || [[File:Icon GreenCheckmark.png|link=]] || [[File:Icon RedXCross.png|link=]] || [[File:Icon RedXCross.png|link=]]
| |
| − | |-
| |
| − | | {{Specs-Link|iar_316b|short}} || [[File:{{#unit:iar_316b|country}}_flag.png|40px|link=]] || [[File:Icon GreenCheckmark.png|link=]] || [[File:Icon GreenCheckmark.png|link=]] || [[File:Icon RedXCross.png|link=]] || [[File:Icon RedXCross.png|link=]]
| |
| − | |-
| |
| − | | {{Specs-Link|ka_50|short}} || [[File:{{#unit:ka_50|country}}_flag.png|40px|link=]] || [[File:Icon GreenCheckmark.png|link=]] || [[File:Icon GreenCheckmark.png|link=]] || [[File:Icon RedXCross.png|link=]] || [[File:Icon RedXCross.png|link=]]
| |
| − | |-
| |
| − | | {{Specs-Link|lynx_ah_mk1|short}} || [[File:{{#unit:lynx_ah_mk1|country}}_flag.png|40px|link=]] || [[File:Icon GreenCheckmark.png|link=]] || [[File:Icon GreenCheckmark.png|link=]] || [[File:Icon RedXCross.png|link=]] || [[File:Icon GreenCheckmark.png|link=]]
| |
| − | |-
| |
| − | | {{Specs-Link|mi_4av|short}} || [[File:{{#unit:mi_4av|country}}_flag.png|40px|link=]] || [[File:Icon GreenCheckmark.png|link=]] || [[File:Icon GreenCheckmark.png|link=]] || [[File:Icon RedXCross.png|link=]] || [[File:Icon RedXCross.png|link=]]
| |
| − | |-
| |
| − | | {{Specs-Link|mi_24a|short}} || [[File:{{#unit:mi_24a|country}}_flag.png|40px|link=]] || [[File:Icon GreenCheckmark.png|link=]] || [[File:Icon GreenCheckmark.png|link=]] || [[File:Icon RedXCross.png|link=]] || [[File:Icon RedXCross.png|link=]]
| |
| − | |-
| |
| − | | {{Specs-Link|mi_24d|short}} || [[File:{{#unit:mi_24d|country}}_flag.png|40px|link=]] || [[File:Icon GreenCheckmark.png|link=]] || [[File:Icon GreenCheckmark.png|link=]] || [[File:Icon RedXCross.png|link=]] || [[File:Icon RedXCross.png|link=]]
| |
| − | |-
| |
| − | | {{Specs-Link|mi_24p|short}} || [[File:{{#unit:mi_24p|country}}_flag.png|40px|link=]] || [[File:Icon GreenCheckmark.png|link=]] || [[File:Icon GreenCheckmark.png|link=]] || [[File:Icon RedXCross.png|link=]] || [[File:Icon RedXCross.png|link=]]
| |
| − | |-
| |
| − | | {{Specs-Link|mi_24p_german|short}} || [[File:{{#unit:mi_24p_german|country}}_flag.png|40px|link=]] || [[File:Icon GreenCheckmark.png|link=]] || [[File:Icon GreenCheckmark.png|link=]] || [[File:Icon RedXCross.png|link=]] || [[File:Icon RedXCross.png|link=]]
| |
| − | |-
| |
| − | | {{Specs-Link|mi_24p_german_hfs80|short}} || [[File:{{#unit:mi_24p_german_hfs80|country}}_flag.png|40px|link=]] || [[File:Icon GreenCheckmark.png|link=]] || [[File:Icon GreenCheckmark.png|link=]] || [[File:Icon RedXCross.png|link=]] || [[File:Icon RedXCross.png|link=]]
| |
| − | |-
| |
| − | | {{Specs-Link|mi_24v|short}} || [[File:{{#unit:mi_24v|country}}_flag.png|40px|link=]] || [[File:Icon GreenCheckmark.png|link=]] || [[File:Icon GreenCheckmark.png|link=]] || [[File:Icon RedXCross.png|link=]] || [[File:Icon RedXCross.png|link=]]
| |
| − | |-
| |
| − | | {{Specs-Link|mi_28n|short}} || [[File:{{#unit:mi_28n|country}}_flag.png|40px|link=]] || [[File:Icon GreenCheckmark.png|link=]] || [[File:Icon GreenCheckmark.png|link=]] || [[File:Icon RedXCross.png|link=]] || [[File:Icon GreenCheckmark.png|link=]]
| |
| − | |-
| |
| − | | {{Specs-Link|mi_35m|short}} || [[File:{{#unit:mi_35m|country}}_flag.png|40px|link=]] || [[File:Icon GreenCheckmark.png|link=]] || [[File:Icon GreenCheckmark.png|link=]] || [[File:Icon RedXCross.png|link=]] || [[File:Icon GreenCheckmark.png|link=]]
| |
| − | |-
| |
| − | | {{Specs-Link|sa_313b|short}} || [[File:{{#unit:sa_313b|country}}_flag.png|40px|link=]] || [[File:Icon GreenCheckmark.png|link=]] || [[File:Icon GreenCheckmark.png|link=]] || [[File:Icon RedXCross.png|link=]] || [[File:Icon RedXCross.png|link=]]
| |
| − | |-
| |
| − | | {{Specs-Link|sa_313b_france|short}} || [[File:{{#unit:sa_313b_france|country}}_flag.png|40px|link=]] || [[File:Icon GreenCheckmark.png|link=]] || [[File:Icon GreenCheckmark.png|link=]] || [[File:Icon RedXCross.png|link=]] || [[File:Icon RedXCross.png|link=]]
| |
| − | |-
| |
| − | | {{Specs-Link|sa_316b|short}} || [[File:{{#unit:sa_316b|country}}_flag.png|40px|link=]] || [[File:Icon GreenCheckmark.png|link=]] || [[File:Icon GreenCheckmark.png|link=]] || [[File:Icon RedXCross.png|link=]] || [[File:Icon RedXCross.png|link=]]
| |
| − | |-
| |
| − | | {{Specs-Link|sa_341f|short}} || [[File:{{#unit:sa_341f|country}}_flag.png|40px|link=]] || [[File:Icon GreenCheckmark.png|link=]] || [[File:Icon GreenCheckmark.png|link=]] || [[File:Icon RedXCross.png|link=]] || [[File:Icon GreenCheckmark.png|link=]]
| |
| − | |-
| |
| − | | {{Specs-Link|sa_342m|short}} || [[File:{{#unit:sa_342m|country}}_flag.png|40px|link=]] || [[File:Icon GreenCheckmark.png|link=]] || [[File:Icon GreenCheckmark.png|link=]] || [[File:Icon RedXCross.png|link=]] || [[File:Icon GreenCheckmark.png|link=]]
| |
| − | |-
| |
| − | | {{Specs-Link|scout_ah_mk1|short}} || [[File:{{#unit:scout_ah_mk1|country}}_flag.png|40px|link=]] || [[File:Icon GreenCheckmark.png|link=]] || [[File:Icon GreenCheckmark.png|link=]] || [[File:Icon RedXCross.png|link=]] || [[File:Icon RedXCross.png|link=]]
| |
| − | |-
| |
| − | | {{Specs-Link|uh_1b|short}} || [[File:{{#unit:uh_1b|country}}_flag.png|40px|link=]] || [[File:Icon GreenCheckmark.png|link=]] || [[File:Icon GreenCheckmark.png|link=]] || [[File:Icon RedXCross.png|link=]] || [[File:Icon RedXCross.png|link=]]
| |
| − | |-
| |
| − | | {{Specs-Link|uh_1c|short}} || [[File:{{#unit:uh_1c|country}}_flag.png|40px|link=]] || [[File:Icon GreenCheckmark.png|link=]] || [[File:Icon GreenCheckmark.png|link=]] || [[File:Icon RedXCross.png|link=]] || [[File:Icon RedXCross.png|link=]]
| |
| − | |-
| |
| − | | {{Specs-Link|uh_1c_xm_30|short}} || [[File:{{#unit:uh_1c_xm_30|country}}_flag.png|40px|link=]] || [[File:Icon GreenCheckmark.png|link=]] || [[File:Icon GreenCheckmark.png|link=]] || [[File:Icon RedXCross.png|link=]] || [[File:Icon RedXCross.png|link=]]
| |
| − | |-
| |
| − | | {{Specs-Link|uh_1d|short}} || [[File:{{#unit:uh_1d|country}}_flag.png|40px|link=]] || [[File:Icon GreenCheckmark.png|link=]] || [[File:Icon GreenCheckmark.png|link=]] || [[File:Icon RedXCross.png|link=]] || [[File:Icon RedXCross.png|link=]]
| |
| − | |-
| |
| − | | {{Specs-Link|wasp_has_mk1|short}} || [[File:{{#unit:wasp_has_mk1|country}}_flag.png|40px|link=]] || [[File:Icon GreenCheckmark.png|link=]] || [[File:Icon GreenCheckmark.png|link=]] || [[File:Icon RedXCross.png|link=]] || [[File:Icon RedXCross.png|link=]]
| |
| | |- | | |- |
| | |} | | |} |
| | + | |
| | + | == Usage in battles == |
| | + | <!--Describe the tactics of playing in the vehicle, the features of using vehicles in the team and advice on tactics. Refrain from creating a "guide" - do not impose a single point of view but instead give the reader food for thought. Describe the most dangerous enemies and give recommendations on fighting them. If necessary, note the specifics of the game in different modes (AB, RB, SB).--> |
| | + | The M26E1 was a post-World War II modification of the standard [[M26|M26 Pershing]]. This modification changes the barrel length to 73 calibres long with the new [[T54 (90 mm)|90 mm T54 gun]]. The gun offers some of the most powerful penetration in-game for Rank IV and is equipped with AP, HE, APCBC and HVAP Rounds. The M26E1 suffers from a very weak side and rear amour, though this is a common weakness on every tank. The front and front part of the turret is able to bounce some enemy shots but can be penetrated by most other tanks in its 6.7 [[Battle_ratings|Battle Rating]] range so beware. |
| | + | |
| | + | Playing the M26E1 is similar to the [[M26|M26 Pershing]]. Armour and mobility of the two tanks are the same. The only advantage sticking out is the M26E1's more powerful gun due to the longer length. Though more powerful, the reload time is also longer than the normal M26 Pershing, so the playstyle should be more conservative to avoid being caught in an attack while reloading. |
| | + | |
| | + | Though equipped with a very powerful gun, the M26E1 suffers from the same M26 Pershing armour. Thus, it is very vulnerable to most tanks at its rank and so most of its combat life should be taking cover and avoiding large open spaces. The M26E1 presents the same mobility of the Pershing so this can be exploited in close quarters over the more cumbersome [[Panther F|Panther]], [[Tiger II (H)|Tiger II]], and [[IS-2 (1944)|IS-2]]'s. Staying in cover and scooting out to take out the enemy from their weak points on the front or their vulnerable side armour should be the prime attack move for the M26E1 before retreating back into cover. |
| | + | |
| | + | Fighting against medium tanks will be relatively easy due to the gun's penetration value. Unless bounced, the gun could even penetrate the front glacis of the [[Panther G|Panther]] tanks. The main problem the tank will face is the Tiger II and [[T32|T32]] heavy tanks and the later IS tanks such as the [[IS-3]] and [[IS-4M]] due to their thick front armour. Flanking may be necessary for these heavy tanks, but some accurate shots to some known weak points on the front of these tanks can also work. |
| | + | |
| | + | * [[Tiger II (P)]] and [[Tiger II (H)|(H)]]: These are the more common German heavy tanks seen with the battle rating and are the most dangerous. The best tactic is to use the 90 mm gun to penetrate the turret cheeks and knock out the gunner. In the time period when the firing method is disabled, move in with the M26E1's mobility and hit it on the sides if possible. |
| | + | * [[Jagdpanther]]: The 88 mm gun is a threat to the tank, but in close range, the 90 mm APCBC round can penetrate the front armour, and the APCR can be used if wanting a definite result. |
| | + | * [[IS-2 (1944)|IS-2]]: The IS-2 tank's 122 mm cannon can make short work of the M26E1, thus it is best to avoid being shot at in the first place. If in the situation where a fight with the IS-2 must be head on, fire a round through the turret cheeks and incapacitate the gunner for a more opportune moment to aim to destroy the tank. Shooting a lower glacis also works and if lucky may even knock out the tank. |
| | + | |
| | + | === Pros and cons === |
| | + | <!--Summarise and briefly evaluate the vehicle in terms of its characteristics and combat effectiveness. Mark its pros and cons in a bulleted list. Try not to use more than 6 points for each of the characteristics. Avoid using categorical definitions such as "bad", "good" and the like - use substitutions with softer forms such as "inadequate" and "effective".--> |
| | + | '''Pros:''' |
| | + | |
| | + | * Amazing 90mm gun that is much better than original M26's 90 mm M3 gun. |
| | + | * T41 APHE shell is comparable to the Long 88mm APHE shell. Has great accuracy, penetration values, and damage potential. |
| | + | * APCR shell has fantastic penetration values. Can cut right though the front of the Jagdtiger's superstructure at ranges excess of 500 meters. |
| | + | * 10 degrees of gun depression. Good ability to hull down fight and shooting over hills. |
| | + | * Armed with 2 .50 cal machine guns. Very good at damaging guns barrels, tracks, and lightly armored vehicles. |
| | + | * Much better engine than the Super Pershing. Great mobility and acceleration. |
| | + | * Many players will think this tank is just an M26, not realizing this tank has the same gun as the Super Pershing and T32. |
| | + | |
| | + | '''Cons:''' |
| | + | |
| | + | * Even with an Ace crew, the reload rate is mediocre. Reloading is several seconds slower than the Tiger II's 88mm. |
| | + | * Frontal armor is not adequate for the BR. Long 88mm shells and 122mm shells will slice right through it at rages exceeding 1000 meters. |
| | + | * Despite the good gun depression, the turret armor is mediocre at best. |
| | + | * Underwhelming top speed for a medium tank. T44's will run rings around this tank. |
| | + | * Low ammunition count for the 90mm gun. |
| | + | * Players thinking this tank is a mere M26 is a double edged sword. Many enemy players will just run out in front of you and shoot. |
| | + | |
| | + | == History == |
| | + | <!--Describe the history of the creation and combat usage of the ground vehicle in more detail than in the introduction. If the historical reference turns out to be too long, take it to a separate article, taking a link to the article about the vehicle and adding a block "/ History" (example: <nowiki>https://wiki.warthunder.com/(Vehicle-name)/History</nowiki>) and add a link to it here using the <code>main</code> template. Be sure to reference text and sources by using <code><nowiki><ref></nowiki></code>, as well as adding them at the end of the article. This section may also include the vehicle's dev blog entry (if applicable) and the in-game encyclopedia description (under <code><nowiki>=== In-game description ===</nowiki></code>, also if applicable).--> |
| | + | |
| | + | The '''M26E1''' was a post-war variant of the [[M26|M26 Pershing]] with the intent on increasing its firepower. During World War II, the 90 mm M3 mounted on the original M26 Pershing was equivalent to the German's 88 mm KwK 36 on the [[Tiger H1|Tiger I]]. But looking for an upgrade, Ordnance developed the T15E1 90 mm gun, which was equivalent to the 88 mm KwK 43 on the [[Tiger II (H)|Tiger II]]. This cannon was mounted on the then development model ''T26E1'' to make the ''[[T26E1-1|T26E1-1]]'' tank. The T15E1 90 mm cannon was visibly much longer than the original 90 mm M3, with the length of 73 calibres compared to the 53 calibres of the M3 cannon. This allowed the cannon to have a much larger ammo charge and muzzle velocity. The first T26E1-1 model made was the only "Super Pershing" model sent to Europe. |
| | + | |
| | + | A second version was made from the T26E3 model, the production model of the T26E1, with a modified gun to use two-piece ammunition rather than a one-piece version, plus a new gun mounting to remove the stabilizer springs required to hold the gun. 25 of these tanks were built and were designated the ''T26E4''. |
| | + | |
| | + | After World War II, two military model M26 Pershings were converted to mount the T54 gun, which was essentially the same 90 mm cannon as the T15E1 but had ammunition which was shorter and fatter than the previous versions. The muzzle brake was shaved down from two to one baffle to compensate for the smaller chamber the cannon presented. This M26 Pershing with the T54 cannons was designated the '''M26E1 Medium Tank''', but production was never reached due to budget constraints. |
| | + | |
| | + | === In-game description === |
| | + | Two models of the M26E1 medium tank were built. They were equipped with long-barreled, single-load 90mm cannons that were supposed to be statistically superior to German 88mm guns with 71-caliber barrels. The project became irrelevant when the war ended and was abandoned. |
| | | | |
| | == Media == | | == Media == |
| − | <!--Excellent additions to the article would be video guides, screenshots from the game, and photos.-->
| + | ''Excellent additions to the article would be video guides, screenshots from the game, and photos.'' |
| − | {{Youtube-gallery|E941IRtmZdE|'''The Shooting Range #165''' - ''Pages of History'' section at 05:30 discusses the development of night vision systems.|aFj2LOWdj5o|'''The Shooting Range #165''' - ''Tactics & Strategy'' section at 09:00 discusses the night battles.}}
| + | |
| | + | == See also == |
| | + | ''Links to the articles on the War Thunder Wiki that you think will be useful for the reader, for example:'' |
| | + | |
| | + | * ''reference to the series of the vehicles;'' |
| | + | * ''links to approximate analogues of other nations and research trees.'' |
| | | | |
| − | ==External Links== | + | == External links == |
| | + | ''Paste links to sources and external resources, such as:'' |
| | | | |
| − | * [https://warthunder.com/en/news/6336-development-night-vision-devices-and-thermal-sights-en [Devblog<nowiki>]</nowiki> Night Vision Devices and Thermal Sights] | + | * ''topic on the official game forum;'' |
| | + | * ''encyclopedia page on the tank;'' |
| | + | * ''other literature.'' |
| | | | |
| − | [[Category:Game mechanics]]
| + | {{USA medium tanks}} |
| | + | {{USA premium ground vehicles}} |