Difference between revisions of "F-105D"
Inceptor57 (talk | contribs) |
(Tag: Visual edit) |
||
| Line 5: | Line 5: | ||
== Description == | == Description == | ||
| − | + | <!-- ''In the description, the first part should be about the history of and the creation and combat usage of the aircraft, as well as its key features. In the second part, tell the reader about the aircraft in the game. Insert a screenshot of the vehicle, so that if the novice player does not remember the vehicle by name, he will immediately understand what kind of vehicle the article is talking about.'' --> | |
| − | + | The '''{{Specs|name}}''' is a rank {{Specs|rank}} American strike aircraft {{Battle-rating}}. It was introduced in [[Update "Winged Lions"]]. | |
| − | |||
== General info == | == General info == | ||
=== Flight performance === | === Flight performance === | ||
{{Specs-Avia-Flight}} | {{Specs-Avia-Flight}} | ||
| − | <!-- ''Describe how the aircraft behaves in the air. Speed, manoeuvrability, acceleration and allowable loads - these are the most important characteristics of the vehicle.'' --> | + | <!-- ''Describe how the aircraft behaves in the air. Speed, manoeuvrability, acceleration and allowable loads - these are the most important characteristics of the vehicle.'' -->{| class="wikitable" style="text-align:center" width="70%" |
| − | |||
| − | |||
| − | {| class="wikitable" style="text-align:center" width="70%" | ||
! rowspan="2" | Characteristics | ! rowspan="2" | Characteristics | ||
! colspan="2" | Max Speed<br>(km/h at 10,668 m) | ! colspan="2" | Max Speed<br>(km/h at 10,668 m) | ||
| Line 29: | Line 25: | ||
|- | |- | ||
! Upgraded | ! Upgraded | ||
| − | | | + | | ___ || ___ || __._ || __._ || __._ || __._ |
|- | |- | ||
|} | |} | ||
| + | |||
| + | '''F-105D "Thunderchief"''', a.k.a. '''"Thud"''' is an US supersonic VI rank Strike Aircraft. The plane is notorious for its massive load carriage capacity, and is equipped with Pratt & Whitney J75-P-19W Engine. It has the WEP, which distinguishes it from another VI rank strike Aircraft in the US Aviation tree: A-4E. With its Swept Wings and powerful jet engine, It can quickly exceed Mach 1 during the flight and is the fastest plane in its BR, outperforming even notorious F-104C. | ||
| + | |||
| + | While it has an incredible climb rate of 149.3 m/s in AB and 141.5 m/s in RB, a large part of its potential is mostly negated by the heavy ordinance that the plane is usually carrying. The same goes for the turn time, which is better than average, ranging from 28.5 to 29.5 seconds in AB and RB respectively, but it is noticeably increased even by the stock bomb ordinance by 3.2 seconds. | ||
| + | |||
| + | The plane is relatively easy to control even at high speeds. However, it is recommended to have a very experienced crew on the plane, well trained in G-Tolerance. The plane also has large airbrakes which are, unlike other planes, placed in the tail segment behind the engine, serving as an exhaust pipe, when in a closed position and drastically decreasing speed when expanded. It has a notorious survivability issue related to flares or lack thereof, so speed and unusually heavy maneuvers are to be well used to effectively utilize this plane. | ||
==== Details ==== | ==== Details ==== | ||
| Line 55: | Line 57: | ||
! Combat !! Take-off !! Landing !! + !! - | ! Combat !! Take-off !! Landing !! + !! - | ||
|- | |- | ||
| − | | {{Specs|destruction|body}} || {{Specs|destruction|gear}} || 2,350 || 827 || 444 || ~ | + | | {{Specs|destruction|body}} || {{Specs|destruction|gear}} || 2,350 || 827 || 444 || ~11 || ~5 |
|- | |- | ||
|} | |} | ||
| Line 78: | Line 80: | ||
! colspan="2" | {{Annotation|Basic mass|Mass of the aircraft with pilot and engine oil, but no fuel or weapons load}} || colspan="2" | Wing loading (full fuel) | ! colspan="2" | {{Annotation|Basic mass|Mass of the aircraft with pilot and engine oil, but no fuel or weapons load}} || colspan="2" | Wing loading (full fuel) | ||
|- | |- | ||
| − | | colspan="2" | | + | | colspan="2" | _____ || _ |
| colspan="2" | _,___ kg || colspan="2" | ___ kg/m<sup>2</sup> | | colspan="2" | _,___ kg || colspan="2" | ___ kg/m<sup>2</sup> | ||
|- | |- | ||
| Line 84: | Line 86: | ||
! colspan="3" | Mass with fuel (no weapons load) || rowspan="2" | Max Takeoff<br>Weight | ! colspan="3" | Mass with fuel (no weapons load) || rowspan="2" | Max Takeoff<br>Weight | ||
|- | |- | ||
| − | ! Weight || colspan="2" | Type | + | ! Weight (each) || colspan="2" | Type |
! _m fuel || __m fuel || __m fuel | ! _m fuel || __m fuel || __m fuel | ||
|- | |- | ||
| − | | | + | | ___ kg || colspan="2" | ___ |
| _,___ kg || _,___ kg || _,___ kg || _,___ kg | | _,___ kg || _,___ kg || _,___ kg || _,___ kg | ||
|- | |- | ||
| Line 93: | Line 95: | ||
! colspan="4" | Thrust to weight ratio @ 0 m (___%/WEP) | ! colspan="4" | Thrust to weight ratio @ 0 m (___%/WEP) | ||
|- | |- | ||
| − | ! Condition || 100% || WEP | + | ! Condition || 100% || ___%/WEP |
! _m fuel || __m fuel || __m fuel || MTOW | ! _m fuel || __m fuel || __m fuel || MTOW | ||
|- | |- | ||
| − | | ''Stationary'' || | + | | ''Stationary'' || ___ kgf || ___ kgf |
| _.__ || _.__ || _.__ || _.__ | | _.__ || _.__ || _.__ || _.__ | ||
|- | |- | ||
| − | | ''Optimal'' || ___ kgf<br>(_ km/h) || | + | | ''Optimal'' || ___ kgf<br>(_ km/h) || ___ kgf<br>(_ km/h) |
| _.__ || _.__ || _.__ || _.__ | | _.__ || _.__ || _.__ || _.__ | ||
|- | |- | ||
| Line 107: | Line 109: | ||
{{Specs-Avia-Armour}} | {{Specs-Avia-Armour}} | ||
<!-- ''Examine the survivability of the aircraft. Note how vulnerable the structure is and how secure the pilot is, whether the fuel tanks are armoured, etc. Describe the armour, if there is any, and also mention the vulnerability of other critical aircraft systems.'' --> | <!-- ''Examine the survivability of the aircraft. Note how vulnerable the structure is and how secure the pilot is, whether the fuel tanks are armoured, etc. Describe the armour, if there is any, and also mention the vulnerability of other critical aircraft systems.'' --> | ||
| − | + | F-105D is more or less defended and can withstand considerable punishment due to its large size. It has three separate self-sealing fuel tanks placed on the top of part of the fuselage, also covering the engine. the pilots' head is defended from the back by a 12.7 mm thick steel plate on the chair, though the front glass is not bulletproof unlike those of F11f and A-4E. the steel plate shouldn't be relied on for the pilots' survival due to its minuscule size. | |
| − | |||
| − | |||
| − | |||
| − | |||
| − | ' | ||
| − | + | The main sphere, where the "Thuds" defensive capabilities are compromised is definitely the countermeasures part. It has Chaff, which enables it to effectively distract the SARH missiles, but doesn't have any flares at all. This will prove an especially concerning matter when fighting against all-aspect fire-and-forget missiles such as R60 and R60M. The plane has to solely rely on its maneuvrability to deflect them. | |
| − | |||
| − | |||
| − | |||
| − | |||
=== Modifications and economy === | === Modifications and economy === | ||
| Line 139: | Line 132: | ||
{{main|LDGP Mk 82 (500 lb)|M117 cone 45 (750 lb)|LDGP Mk 83 (1,000 lb)|LDGP Mk 84 (2,000 lb)|M118 (3,000 lb)}} | {{main|LDGP Mk 82 (500 lb)|M117 cone 45 (750 lb)|LDGP Mk 83 (1,000 lb)|LDGP Mk 84 (2,000 lb)|M118 (3,000 lb)}} | ||
{{main|AGM-12B Bullpup|AGM-12C Bullpup|AIM-9B Sidewinder|AIM-9E Sidewinder|FFAR Mighty Mouse}} | {{main|AGM-12B Bullpup|AGM-12C Bullpup|AIM-9B Sidewinder|AIM-9E Sidewinder|FFAR Mighty Mouse}} | ||
| − | |||
| − | |||
| − | |||
| − | |||
The '''''{{PAGENAME}}''''' can be outfitted with the following ordnance: | The '''''{{PAGENAME}}''''' can be outfitted with the following ordnance: | ||
| − | * Without load | + | * Without load |
| − | |||
| − | |||
| − | |||
| − | |||
| − | |||
* 4 x AIM-9B Sidewinder missiles | * 4 x AIM-9B Sidewinder missiles | ||
* 4 x AIM-9E Sidewinder missiles | * 4 x AIM-9E Sidewinder missiles | ||
| − | |||
| − | |||
| − | |||
| − | |||
| − | |||
| − | |||
| − | |||
* 4 x AGM-12B Bullpup missiles | * 4 x AGM-12B Bullpup missiles | ||
* 2 x AGM-12B Bullpup missiles + 32 x countermeasures | * 2 x AGM-12B Bullpup missiles + 32 x countermeasures | ||
* 2 x AGM-12C Bullpup missiles | * 2 x AGM-12C Bullpup missiles | ||
* 2 x AGM-12C Bullpup missiles + 32 x countermeasures | * 2 x AGM-12C Bullpup missiles + 32 x countermeasures | ||
| − | |||
| − | |||
| − | |||
| − | |||
| − | |||
| − | |||
| − | |||
| − | |||
| − | |||
| − | |||
| − | |||
| − | |||
| − | |||
| − | |||
* 76 x FFAR Mighty Mouse rockets | * 76 x FFAR Mighty Mouse rockets | ||
* 38 x FFAR Mighty Mouse rockets + 32 x countermeasures | * 38 x FFAR Mighty Mouse rockets + 32 x countermeasures | ||
| − | |||
| − | |||
| − | |||
| − | |||
| − | |||
| − | |||
| − | |||
| − | |||
* 14 x 500 lb LDGP Mk 82 bombs (7,000 lb total) | * 14 x 500 lb LDGP Mk 82 bombs (7,000 lb total) | ||
* 14 x 500 lb LDGP Mk 82 bombs + 32 x countermeasures (7,000 lb total) | * 14 x 500 lb LDGP Mk 82 bombs + 32 x countermeasures (7,000 lb total) | ||
| + | * 14 x 500 lb LDGP Mk 82 bombs + 2 x AIM-9B Sidewinder missiles (7,000 lb total) | ||
* 14 x 750 lb M117 cone 45 bombs + 32 x countermeasures (10,500 lb total) | * 14 x 750 lb M117 cone 45 bombs + 32 x countermeasures (10,500 lb total) | ||
* 16 x 750 lb M117 cone 45 bombs (12,000 lb total) | * 16 x 750 lb M117 cone 45 bombs (12,000 lb total) | ||
| + | * 14 x 750 lb M117 cone 45 bombs + 4 x AIM-9B Sidewinder missiles (10,500 lb total) | ||
| + | * 14 x 750 lb M117 cone 45 bombs + 4 x AIM-9E Sidewinder missiles (10,500 lb total) | ||
| + | * 14 x 750 lb M117 cone 45 bombs + 2 x AGM-12B Bullpup missiles (10,500 lb total) | ||
| + | * 8 x 750 lb M117 cone 45 bombs + 2 x AGM-12C Bullpup missiles (6,000 lb total) | ||
| + | * 6 x 750 lb M117 cone 45 bombs + 2 x AGM-12C Bullpup missiles + 32 x countermeasures (4,500 lb total) | ||
| + | * 6 x 750 lb M117 cone 45 bombs + 2 x AGM-12C Bullpup missiles + 4 x AIM-9B Sidewinder missiles (4,500 lb total) | ||
| + | * 6 x 750 lb M117 cone 45 bombs + 2 x AGM-12C Bullpup missiles + 4 x AIM-9E Sidewinder missiles (4,500 lb total) | ||
| + | * 6 x 750 lb M117 cone 45 bombs + 2 x AGM-12B Bullpup missiles + 4 x AIM-9B Sidewinder missiles (4,500 lb total) | ||
| + | * 6 x 750 lb M117 cone 45 bombs + 2 x AGM-12B Bullpup missiles + 4 x AIM-9E Sidewinder missiles (4,500 lb total) | ||
* 6 x 750 lb M117 cone 45 bombs + 2 x 2,000 lb LDGP Mk 84 bombs + 32 x countermeasures (8,500 lb total) | * 6 x 750 lb M117 cone 45 bombs + 2 x 2,000 lb LDGP Mk 84 bombs + 32 x countermeasures (8,500 lb total) | ||
* 8 x 750 lb M117 cone 45 bombs + 2 x 2,000 lb LDGP Mk 84 bombs (10,000 lb total) | * 8 x 750 lb M117 cone 45 bombs + 2 x 2,000 lb LDGP Mk 84 bombs (10,000 lb total) | ||
* 8 x 750 lb M117 cone 45 bombs + 2 x 3,000 lb M118 bombs (12,000 lb total) | * 8 x 750 lb M117 cone 45 bombs + 2 x 3,000 lb M118 bombs (12,000 lb total) | ||
* 6 x 750 lb M117 cone 45 bombs + 2 x 3,000 lb M118 bombs + 32 x countermeasures (10,500 lb total) | * 6 x 750 lb M117 cone 45 bombs + 2 x 3,000 lb M118 bombs + 32 x countermeasures (10,500 lb total) | ||
| + | * 6 x 750 lb M117 cone 45 bombs + 2 x 2,000 lb LDGP Mk 84 bombs + 4 x AIM-9B Sidewinder missiles (8,500 lb total) | ||
| + | * 6 x 750 lb M117 cone 45 bombs + 2 x 2,000 lb LDGP Mk 84 bombs + 4 x AIM-9E Sidewinder missiles (8,500 lb total) | ||
| + | * 6 x 750 lb M117 cone 45 bombs + 2 x 3,000 lb M118 bombs + 4 x AIM-9B Sidewinder missiles (10,500 lb total) | ||
| + | * 6 x 750 lb M117 cone 45 bombs + 2 x 3,000 lb M118 bombs + 4 x AIM-9E Sidewinder missiles (10,500 lb total) | ||
* 11 x 1,000 lb LDGP Mk 83 bombs (11,000 lb total) | * 11 x 1,000 lb LDGP Mk 83 bombs (11,000 lb total) | ||
| − | * | + | * 9 x 1,000 lb LDGP Mk 83 bombs + 2 x AGM-12B Bullpup missiles (9,000 lb total) |
| − | |||
| − | |||
| − | |||
| − | |||
| − | |||
| − | |||
| − | |||
| − | |||
| − | |||
| − | |||
| − | |||
| − | |||
| − | |||
| − | |||
| − | |||
| − | |||
* 3 x 1,000 lb LDGP Mk 83 bombs + 2 x AGM-12B Bullpup missiles + 4 x AIM-9B Sidewinder missiles (3,000 lb total) | * 3 x 1,000 lb LDGP Mk 83 bombs + 2 x AGM-12B Bullpup missiles + 4 x AIM-9B Sidewinder missiles (3,000 lb total) | ||
* 3 x 1,000 lb LDGP Mk 83 bombs + 2 x AGM-12B Bullpup missiles + 4 x AIM-9E Sidewinder missiles (3,000 lb total) | * 3 x 1,000 lb LDGP Mk 83 bombs + 2 x AGM-12B Bullpup missiles + 4 x AIM-9E Sidewinder missiles (3,000 lb total) | ||
| + | * 5 x 1,000 lb LDGP Mk 83 bombs + 2 x AGM-12C Bullpup missiles (5,000 lb total) | ||
| + | * 3 x 1,000 lb LDGP Mk 83 bombs + 2 x AGM-12C Bullpup missiles + 32 x countermeasures (3,000 lb total) | ||
* 3 x 1,000 lb LDGP Mk 83 bombs + 2 x AGM-12C Bullpup missiles + 4 x AIM-9B Sidewinder missiles (3,000 lb total) | * 3 x 1,000 lb LDGP Mk 83 bombs + 2 x AGM-12C Bullpup missiles + 4 x AIM-9B Sidewinder missiles (3,000 lb total) | ||
* 3 x 1,000 lb LDGP Mk 83 bombs + 2 x AGM-12C Bullpup missiles + 4 x AIM-9E Sidewinder missiles (3,000 lb total) | * 3 x 1,000 lb LDGP Mk 83 bombs + 2 x AGM-12C Bullpup missiles + 4 x AIM-9E Sidewinder missiles (3,000 lb total) | ||
| − | |||
| − | |||
| − | |||
| − | |||
| − | |||
| − | |||
| − | |||
* 9 x 1,000 lb LDGP Mk 83 bombs + 4 x AIM-9B Sidewinder missiles (9,000 lb total) | * 9 x 1,000 lb LDGP Mk 83 bombs + 4 x AIM-9B Sidewinder missiles (9,000 lb total) | ||
* 9 x 1,000 lb LDGP Mk 83 bombs + 4 x AIM-9E Sidewinder missiles (9,000 lb total) | * 9 x 1,000 lb LDGP Mk 83 bombs + 4 x AIM-9E Sidewinder missiles (9,000 lb total) | ||
| + | * 5 x 1,000 lb LDGP Mk 83 bombs + 2 x 3,000 lb M118 bombs (11,000 lb total) | ||
| + | * 3 x 1,000 lb LDGP Mk 83 bombs + 2 x 3,000 lb M118 bombs + 32 x countermeasures (9,000 lb total) | ||
* 3 x 1,000 lb LDGP Mk 83 bombs + 2 x 3,000 lb M118 bombs + 4 x AIM-9B Sidewinder missiles (9,000 lb total) | * 3 x 1,000 lb LDGP Mk 83 bombs + 2 x 3,000 lb M118 bombs + 4 x AIM-9B Sidewinder missiles (9,000 lb total) | ||
* 3 x 1,000 lb LDGP Mk 83 bombs + 2 x 3,000 lb M118 bombs + 4 x AIM-9E Sidewinder missiles (9,000 lb total) | * 3 x 1,000 lb LDGP Mk 83 bombs + 2 x 3,000 lb M118 bombs + 4 x AIM-9E Sidewinder missiles (9,000 lb total) | ||
| + | * 3 x 2,000 lb LDGP Mk 84 bombs (6,000 lb total) | ||
| + | * 3 x 2,000 lb LDGP Mk 84 bombs + 32 x countermeasures (6,000 lb total) | ||
* 3 x 2,000 lb LDGP Mk 84 bombs + 4 x AIM-9B Sidewinder missiles (6,000 lb total) | * 3 x 2,000 lb LDGP Mk 84 bombs + 4 x AIM-9B Sidewinder missiles (6,000 lb total) | ||
* 3 x 2,000 lb LDGP Mk 84 bombs + 4 x AIM-9E Sidewinder missiles (6,000 lb total) | * 3 x 2,000 lb LDGP Mk 84 bombs + 4 x AIM-9E Sidewinder missiles (6,000 lb total) | ||
| + | * 3 x 3,000 lb M118 bombs (9,000 lb total) | ||
| + | * 3 x 3,000 lb M118 bombs + 32 x countermeasures (9,000 lb total) | ||
* 3 x 3,000 lb M118 bombs + 4 x AIM-9B Sidewinder missiles (9,000 lb total) | * 3 x 3,000 lb M118 bombs + 4 x AIM-9B Sidewinder missiles (9,000 lb total) | ||
* 3 x 3,000 lb M118 bombs + 4 x AIM-9E Sidewinder missiles (9,000 lb total) | * 3 x 3,000 lb M118 bombs + 4 x AIM-9E Sidewinder missiles (9,000 lb total) | ||
| − | |||
| − | |||
| − | |||
| − | |||
| − | |||
| − | |||
| − | |||
| − | |||
| − | |||
| − | |||
| − | |||
| − | |||
| − | |||
| − | |||
| − | |||
| − | |||
| − | |||
| − | |||
| − | |||
| − | |||
| − | |||
| − | |||
== Usage in battles == | == Usage in battles == | ||
| Line 261: | Line 193: | ||
''Describe the tactics of playing in the aircraft, the features of using aircraft in a team and advice on tactics. Refrain from creating a "guide" - do not impose a single point of view, but instead, give the reader food for thought. Examine the most dangerous enemies and give recommendations on fighting them. If necessary, note the specifics of the game in different modes (AB, RB, SB).'' | ''Describe the tactics of playing in the aircraft, the features of using aircraft in a team and advice on tactics. Refrain from creating a "guide" - do not impose a single point of view, but instead, give the reader food for thought. Examine the most dangerous enemies and give recommendations on fighting them. If necessary, note the specifics of the game in different modes (AB, RB, SB).'' | ||
| − | + | F-105D is a strike aircraft, with a large variety of ground attack ordnance. The very first Bomb modification of M117 allows the player to wipe out two bases in a single flight in air RB. Ultimately, the plane can carry 3 M118 3000 lb bombs with a TNT explosive mass of ~3200 kg. Alternatively, the plane can be equipped with guided AGM Bullpups. Lau-3/A also allows equipping "Mighty Mouse" unguided missiles, but these aren't the greatest of possible options Thus, depending on the objective, the plane offers the player a wide range of choices to attack ground targets. Remember that speed is the main advantage and perk of the "Thud". With It, alongside a powerful engine and highly effective airbrakes, the plane can effectively utilize hit and run tactics. This is particularly well suited for Air RB, as due to it being a Striker, F-105D can be spawned in the air, unlike the fighter planes, essentially guaranteeing that a base or two can be taken care of at least. Also note, that the plane is fully equipped with all available ballistic computers, similarly to "Harriers". | |
| − | + | Even though the plane was never designed for air-to-air fights, it can perform well as a fighter. Its wide-ranged radar allows the ready detection of the enemies from the distance. The plane is equipped with a 20mm M61A1 cannon, with impressive 1000 rounds, allowing the pilot to make a mistake or two with the aim, without the risk of fast depletion of ammo. This is once again notably relevant in air RB, as depletion of ammo forces the plane to return to base for rearmament. Though the fact that the cannon is placed on the left corner of the plane should be taken into consideration. Additionally, the plane can be equipped with Aim-9B Sidewinder AAM from a get-go, and later modification unlocks the Aim-9E variant as well. Though to say that these are exceptionally good weapons would be an overstatement. However, the high speed of the "Thud" ensures that the plane can get sufficiently close to the enemy to utilize them. | |
| − | + | Always keep in mind the main security issue with the plane: The lack of flares. While it is equipped with chaff, which makes it well-defended from SARH AAMs, flares are usually far more vital, as far more planes can carry IR missiles. Note, that in case of an uptier (which will happen more often than not), you may be teamed against MiG-21s, MiG-23s, MiG-27s, and other planes that are using all-aspect R-60 and R-60M missiles. Thus, when you spot one of such adversaries always be ready to perform extreme maneuvers if approaching on being approached by them head-on to dodge the potential incoming missiles. | |
| − | |||
| − | + | Overall, F-105D "Thunderchief" is a versatile aircraft that can perform various duties, but the sphere where it shines the most is ground attacks and CAS and Despite certain security issues, "Thud" will prove to be a loyal friend to its pilot. | |
| − | |||
| − | |||
| − | |||
| − | |||
| − | |||
| − | |||
| − | |||
| − | |||
| − | |||
=== Pros and cons === | === Pros and cons === | ||
| Line 285: | Line 207: | ||
'''Pros:''' | '''Pros:''' | ||
| − | * | + | * Large and Assorted variation of ordinances fit for every possible Ground Operation. |
| − | * | + | * Large amount of Bombs can be equipped from the start. |
| − | * | + | * Exceptional high speed and great acceleration thanks to its powerful Engine. |
| − | * | + | * 20mm M61A1 Cannon has a notoriously high amount of 1000 rounds. |
| − | + | * Good Maneuverability, considering its size. | |
| − | * | + | * Good Climb Rate. |
| − | * | + | * Excellent wide-ranged Radar |
| − | * Excellent | ||
| − | |||
| − | |||
| − | |||
* | * | ||
| Line 301: | Line 219: | ||
'''Cons:''' | '''Cons:''' | ||
| − | * Lacks | + | * Lacks Flares, Making the plane vulnerable for IR missiles. |
| − | + | * In Air RB, planes wings might be ripped off at high speeds. | |
| − | + | * Lacks RWR | |
| − | + | * No Combat Flaps | |
| − | + | * Atrociously High Repair Costs | |
| − | |||
| − | |||
| − | * | ||
| − | |||
| − | * Lacks | ||
| − | * | ||
| − | * High | ||
| − | |||
| − | |||
* | * | ||
| Line 321: | Line 230: | ||
<!-- ''Describe the history of the creation and combat usage of the aircraft in more detail than in the introduction. If the historical reference turns out to be too long, take it to a separate article, taking a link to the article about the vehicle and adding a block "/History" (example: <nowiki>https://wiki.warthunder.com/(Vehicle-name)/History</nowiki>) and add a link to it here using the <code>main</code> template. Be sure to reference text and sources by using <code><nowiki><ref></ref></nowiki></code>, as well as adding them at the end of the article with <code><nowiki><references /></nowiki></code>. This section may also include the vehicle's dev blog entry (if applicable) and the in-game encyclopedia description (under <code><nowiki>=== In-game description ===</nowiki></code>, also if applicable).'' --> | <!-- ''Describe the history of the creation and combat usage of the aircraft in more detail than in the introduction. If the historical reference turns out to be too long, take it to a separate article, taking a link to the article about the vehicle and adding a block "/History" (example: <nowiki>https://wiki.warthunder.com/(Vehicle-name)/History</nowiki>) and add a link to it here using the <code>main</code> template. Be sure to reference text and sources by using <code><nowiki><ref></ref></nowiki></code>, as well as adding them at the end of the article with <code><nowiki><references /></nowiki></code>. This section may also include the vehicle's dev blog entry (if applicable) and the in-game encyclopedia description (under <code><nowiki>=== In-game description ===</nowiki></code>, also if applicable).'' --> | ||
''Describe the history of the creation and combat usage of the aircraft in more detail than in the introduction. If the historical reference turns out to be too long, take it to a separate article, taking a link to the article about the vehicle and adding a block "/History" (example: <nowiki>https://wiki.warthunder.com/(Vehicle-name)/History</nowiki>) and add a link to it here using the <code>main</code> template. Be sure to reference text and sources by using <code><nowiki><ref></ref></nowiki></code>, as well as adding them at the end of the article with <code><nowiki><references /></nowiki></code>. This section may also include the vehicle's dev blog entry (if applicable) and the in-game encyclopedia description (under <code><nowiki>=== In-game description ===</nowiki></code>, also if applicable).'' | ''Describe the history of the creation and combat usage of the aircraft in more detail than in the introduction. If the historical reference turns out to be too long, take it to a separate article, taking a link to the article about the vehicle and adding a block "/History" (example: <nowiki>https://wiki.warthunder.com/(Vehicle-name)/History</nowiki>) and add a link to it here using the <code>main</code> template. Be sure to reference text and sources by using <code><nowiki><ref></ref></nowiki></code>, as well as adding them at the end of the article with <code><nowiki><references /></nowiki></code>. This section may also include the vehicle's dev blog entry (if applicable) and the in-game encyclopedia description (under <code><nowiki>=== In-game description ===</nowiki></code>, also if applicable).'' | ||
| + | |||
| + | F-105 "Thunderchief" was one of the planes created by the "Republic Aviation Company" team headed by Georgian-American Aviation Pioneer Aleksandre Kartvelishvili, more commonly known as Alexander Kartveli. Planes designed by Kartveli include, among others, P-47 "Thunderbolt" and F-84 "Thunderstreak". The project that ultimately resulted in the creation of F-105 was one of the attempts to upgrade or replace the latter in the 1950s. Previous projects that attempted this weren't satisfactory and One of them included XF-84H, an infamous monstrosity, known by its nickname "Thunderscreech", with sound so loud and powerful, that it could be heard as far as 25 miles and made people near the plane physically ill. | ||
| + | |||
| + | The Project of designing "Thunderchief" was launched in 1950. It was originally envisioned to be a single-seat nuclear striker, deploying the bomb at a low altitude and supersonic speed. The various ordinance could be attached to the fuselage and the wings, in addition to the internal compartment meant for the nuke. The frame was engineered to adequately respond to these requirements, incorporating, among others, swept wings, fuselage aimed to minimize the aerodynamic drag, and air intakes placed at the connection point of wings and the fuselage. It was also notorious for its sheer size, exceeding even quite large F-4 Phantoms, and remains the largest single-engine plane series ever built. | ||
| + | |||
| + | The size of the "Thunderchief", High Speed, and being one of the first planes to use computer equipment made the creation of F-105 an actual learning experience. The plane at first proved to have several major issues due to these factors and resulted in the initial skeptical reception of the plane by the pilots. They gave the new plane several derogatory nicknames, such as "Hog", "Lead Sled", "Squat Bomber", but most notoriously, "Thud". However, the major issues were quickly identified and resolved. Despite the initial unwelcoming reception, gradually the plane became beloved by the pilots, and in the words of one of the pilots of the plane, Colonel Jack Broughton, "The Thud has justified herself, and the name that was originally spoken with a sneer has become one of utmost respect through the air fraternity". The reasons for the endearment of the plane by pilots ranged from its survivability, to its speed, to simply its pretty design. | ||
| + | |||
| + | While the "Thud" was never used by the military for its original purpose to deliver the Nuke, instead it became notorious in Vietnam. When the war began, the US needed planes that would be fit to adequately respond to the major obstacles in Northern Vietnam. The nature of the extremely dangerous, long-haul missions into the north demanded an aircraft of unprecedented versatility and survivability. The "Thud" possessed both. Despite the many obstacles, Thud pilots persevered. The Thunderstick bombing and navigation system that had previously caused operational headaches was now paying off–in spades. Hauling a 12,000-pound bombload, the F-105 could fly the 600-mile route to the North from bases deep within Thailand, pushing Mach 1 down Thud Ridge on approach to target Hanoi while skimming the terrain and dodging SAMs, MiGs, and anti-aircraft artillery, and put its bombs right on the money. Kicking in the afterburner, the Thud was on its merry way back to Thailand via a rendezvous with a Boeing KC-135 tanker. It is also deserving to note, that despite the fact, that the plane was never primarily intended to be a fighter, it managed to shoot down 27 MiGs on its own, as well as one with the help of F-4D Phantom. | ||
| + | |||
| + | After the cessation of the intensive bombardment of Vietnam in 1968, US Air Force began more intensive incorporation of F-4 Phantoms in its inventory, as numbers of F-105 were decisively depleted due to intensive and prolonged war in Indochina. The "Thuds" that remained in an airworthy condition remained in the service of the US Airforce until 1983. | ||
== Media == | == Media == | ||
| Line 326: | Line 245: | ||
;Videos | ;Videos | ||
| − | {{Youtube-gallery|4H9GuHPLOcs|'''The Shooting Range #283''' - ''Metal Beasts'' section at 00:28 discusses the {{PAGENAME}}.}} | + | {{Youtube-gallery|4H9GuHPLOcs|'''The Shooting Range #283''' - ''Metal Beasts'' section at 00:28 discusses the {{PAGENAME}}.|x7QWMFBZwc4|F-105 ⚡THUNDERCHIEF⚡ {{!}} Massive American Bomb Payload|MR2F677wYm0|"F 105 Thunderchief"-A rather comprehensive document about the Plane and its history.}} |
== See also == | == See also == | ||
| Line 346: | Line 265: | ||
* ''other literature.'' | * ''other literature.'' | ||
| − | {{USA jet aircraft | + | {{USA jet aircraft}} |
Revision as of 21:57, 22 December 2021

Contents
Description
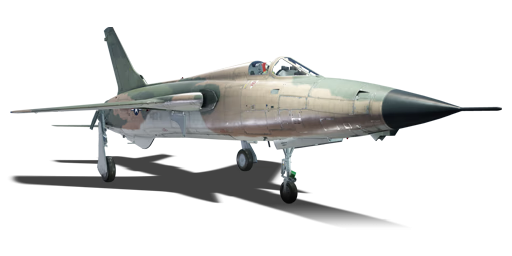
The F-105D Thunderchief is a rank VII American strike aircraft with a battle rating of 10.7 (AB), 10.0 (RB), and 9.7 (SB). It was introduced in Update "Winged Lions".
General info
Flight performance
| Characteristics | Max Speed (km/h at 10,668 m) |
Max altitude (metres) |
Turn time (seconds) |
Rate of climb (metres/second) |
Take-off run (metres) | |||
|---|---|---|---|---|---|---|---|---|
| AB | RB | AB | RB | AB | RB | |||
| Stock | 2,129 | 2,102 | 12192 | 28.5 | 29.5 | 149.3 | 141.5 | 1,050 |
| Upgraded | ___ | ___ | __._ | __._ | __._ | __._ | ||
F-105D "Thunderchief", a.k.a. "Thud" is an US supersonic VI rank Strike Aircraft. The plane is notorious for its massive load carriage capacity, and is equipped with Pratt & Whitney J75-P-19W Engine. It has the WEP, which distinguishes it from another VI rank strike Aircraft in the US Aviation tree: A-4E. With its Swept Wings and powerful jet engine, It can quickly exceed Mach 1 during the flight and is the fastest plane in its BR, outperforming even notorious F-104C.
While it has an incredible climb rate of 149.3 m/s in AB and 141.5 m/s in RB, a large part of its potential is mostly negated by the heavy ordinance that the plane is usually carrying. The same goes for the turn time, which is better than average, ranging from 28.5 to 29.5 seconds in AB and RB respectively, but it is noticeably increased even by the stock bomb ordinance by 3.2 seconds.
The plane is relatively easy to control even at high speeds. However, it is recommended to have a very experienced crew on the plane, well trained in G-Tolerance. The plane also has large airbrakes which are, unlike other planes, placed in the tail segment behind the engine, serving as an exhaust pipe, when in a closed position and drastically decreasing speed when expanded. It has a notorious survivability issue related to flares or lack thereof, so speed and unusually heavy maneuvers are to be well used to effectively utilize this plane.
Details
| Features | |||||
|---|---|---|---|---|---|
| Combat flaps | Take-off flaps | Landing flaps | Air brakes | Arrestor gear | Drogue chute |
| X | ✓ | ✓ | ✓ | X | ✓ |
| Limits | ||||||
|---|---|---|---|---|---|---|
| Wings (km/h) | Gear (km/h) | Flaps (km/h) | Max Static G | |||
| Combat | Take-off | Landing | + | - | ||
| 0 | 546 | 2,350 | 827 | 444 | ~11 | ~5 |
| Optimal velocities (km/h) | |||
|---|---|---|---|
| Ailerons | Rudder | Elevators | Radiator |
| < 720 | < 950 | < 800 | N/A |
Engine performance
| Engine | Aircraft mass | |||||
|---|---|---|---|---|---|---|
| Engine name | Number | Basic mass | Wing loading (full fuel) | |||
| _____ | _ | _,___ kg | ___ kg/m2 | |||
| Engine characteristics | Mass with fuel (no weapons load) | Max Takeoff Weight | ||||
| Weight (each) | Type | _m fuel | __m fuel | __m fuel | ||
| ___ kg | ___ | _,___ kg | _,___ kg | _,___ kg | _,___ kg | |
| Maximum engine thrust @ 0 m (RB/SB) | Thrust to weight ratio @ 0 m (___%/WEP) | |||||
| Condition | 100% | ___%/WEP | _m fuel | __m fuel | __m fuel | MTOW |
| Stationary | ___ kgf | ___ kgf | _.__ | _.__ | _.__ | _.__ |
| Optimal | ___ kgf (_ km/h) |
___ kgf (_ km/h) |
_.__ | _.__ | _.__ | _.__ |
Survivability and armour
F-105D is more or less defended and can withstand considerable punishment due to its large size. It has three separate self-sealing fuel tanks placed on the top of part of the fuselage, also covering the engine. the pilots' head is defended from the back by a 12.7 mm thick steel plate on the chair, though the front glass is not bulletproof unlike those of F11f and A-4E. the steel plate shouldn't be relied on for the pilots' survival due to its minuscule size.
The main sphere, where the "Thuds" defensive capabilities are compromised is definitely the countermeasures part. It has Chaff, which enables it to effectively distract the SARH missiles, but doesn't have any flares at all. This will prove an especially concerning matter when fighting against all-aspect fire-and-forget missiles such as R60 and R60M. The plane has to solely rely on its maneuvrability to deflect them.
Modifications and economy
| Flight performance | Survivability | Weaponry | ||||||||||||||||||||||||
|---|---|---|---|---|---|---|---|---|---|---|---|---|---|---|---|---|---|---|---|---|---|---|---|---|---|---|
|
|
|
Armaments
Offensive armament
The F-105D is armed with:
- 1 x 20 mm M61A1 cannon, nose-mounted (1,028 rpg)
Suspended armament
The F-105D can be outfitted with the following ordnance:
- Without load
- 4 x AIM-9B Sidewinder missiles
- 4 x AIM-9E Sidewinder missiles
- 4 x AGM-12B Bullpup missiles
- 2 x AGM-12B Bullpup missiles + 32 x countermeasures
- 2 x AGM-12C Bullpup missiles
- 2 x AGM-12C Bullpup missiles + 32 x countermeasures
- 76 x FFAR Mighty Mouse rockets
- 38 x FFAR Mighty Mouse rockets + 32 x countermeasures
- 14 x 500 lb LDGP Mk 82 bombs (7,000 lb total)
- 14 x 500 lb LDGP Mk 82 bombs + 32 x countermeasures (7,000 lb total)
- 14 x 500 lb LDGP Mk 82 bombs + 2 x AIM-9B Sidewinder missiles (7,000 lb total)
- 14 x 750 lb M117 cone 45 bombs + 32 x countermeasures (10,500 lb total)
- 16 x 750 lb M117 cone 45 bombs (12,000 lb total)
- 14 x 750 lb M117 cone 45 bombs + 4 x AIM-9B Sidewinder missiles (10,500 lb total)
- 14 x 750 lb M117 cone 45 bombs + 4 x AIM-9E Sidewinder missiles (10,500 lb total)
- 14 x 750 lb M117 cone 45 bombs + 2 x AGM-12B Bullpup missiles (10,500 lb total)
- 8 x 750 lb M117 cone 45 bombs + 2 x AGM-12C Bullpup missiles (6,000 lb total)
- 6 x 750 lb M117 cone 45 bombs + 2 x AGM-12C Bullpup missiles + 32 x countermeasures (4,500 lb total)
- 6 x 750 lb M117 cone 45 bombs + 2 x AGM-12C Bullpup missiles + 4 x AIM-9B Sidewinder missiles (4,500 lb total)
- 6 x 750 lb M117 cone 45 bombs + 2 x AGM-12C Bullpup missiles + 4 x AIM-9E Sidewinder missiles (4,500 lb total)
- 6 x 750 lb M117 cone 45 bombs + 2 x AGM-12B Bullpup missiles + 4 x AIM-9B Sidewinder missiles (4,500 lb total)
- 6 x 750 lb M117 cone 45 bombs + 2 x AGM-12B Bullpup missiles + 4 x AIM-9E Sidewinder missiles (4,500 lb total)
- 6 x 750 lb M117 cone 45 bombs + 2 x 2,000 lb LDGP Mk 84 bombs + 32 x countermeasures (8,500 lb total)
- 8 x 750 lb M117 cone 45 bombs + 2 x 2,000 lb LDGP Mk 84 bombs (10,000 lb total)
- 8 x 750 lb M117 cone 45 bombs + 2 x 3,000 lb M118 bombs (12,000 lb total)
- 6 x 750 lb M117 cone 45 bombs + 2 x 3,000 lb M118 bombs + 32 x countermeasures (10,500 lb total)
- 6 x 750 lb M117 cone 45 bombs + 2 x 2,000 lb LDGP Mk 84 bombs + 4 x AIM-9B Sidewinder missiles (8,500 lb total)
- 6 x 750 lb M117 cone 45 bombs + 2 x 2,000 lb LDGP Mk 84 bombs + 4 x AIM-9E Sidewinder missiles (8,500 lb total)
- 6 x 750 lb M117 cone 45 bombs + 2 x 3,000 lb M118 bombs + 4 x AIM-9B Sidewinder missiles (10,500 lb total)
- 6 x 750 lb M117 cone 45 bombs + 2 x 3,000 lb M118 bombs + 4 x AIM-9E Sidewinder missiles (10,500 lb total)
- 11 x 1,000 lb LDGP Mk 83 bombs (11,000 lb total)
- 9 x 1,000 lb LDGP Mk 83 bombs + 2 x AGM-12B Bullpup missiles (9,000 lb total)
- 3 x 1,000 lb LDGP Mk 83 bombs + 2 x AGM-12B Bullpup missiles + 4 x AIM-9B Sidewinder missiles (3,000 lb total)
- 3 x 1,000 lb LDGP Mk 83 bombs + 2 x AGM-12B Bullpup missiles + 4 x AIM-9E Sidewinder missiles (3,000 lb total)
- 5 x 1,000 lb LDGP Mk 83 bombs + 2 x AGM-12C Bullpup missiles (5,000 lb total)
- 3 x 1,000 lb LDGP Mk 83 bombs + 2 x AGM-12C Bullpup missiles + 32 x countermeasures (3,000 lb total)
- 3 x 1,000 lb LDGP Mk 83 bombs + 2 x AGM-12C Bullpup missiles + 4 x AIM-9B Sidewinder missiles (3,000 lb total)
- 3 x 1,000 lb LDGP Mk 83 bombs + 2 x AGM-12C Bullpup missiles + 4 x AIM-9E Sidewinder missiles (3,000 lb total)
- 9 x 1,000 lb LDGP Mk 83 bombs + 4 x AIM-9B Sidewinder missiles (9,000 lb total)
- 9 x 1,000 lb LDGP Mk 83 bombs + 4 x AIM-9E Sidewinder missiles (9,000 lb total)
- 5 x 1,000 lb LDGP Mk 83 bombs + 2 x 3,000 lb M118 bombs (11,000 lb total)
- 3 x 1,000 lb LDGP Mk 83 bombs + 2 x 3,000 lb M118 bombs + 32 x countermeasures (9,000 lb total)
- 3 x 1,000 lb LDGP Mk 83 bombs + 2 x 3,000 lb M118 bombs + 4 x AIM-9B Sidewinder missiles (9,000 lb total)
- 3 x 1,000 lb LDGP Mk 83 bombs + 2 x 3,000 lb M118 bombs + 4 x AIM-9E Sidewinder missiles (9,000 lb total)
- 3 x 2,000 lb LDGP Mk 84 bombs (6,000 lb total)
- 3 x 2,000 lb LDGP Mk 84 bombs + 32 x countermeasures (6,000 lb total)
- 3 x 2,000 lb LDGP Mk 84 bombs + 4 x AIM-9B Sidewinder missiles (6,000 lb total)
- 3 x 2,000 lb LDGP Mk 84 bombs + 4 x AIM-9E Sidewinder missiles (6,000 lb total)
- 3 x 3,000 lb M118 bombs (9,000 lb total)
- 3 x 3,000 lb M118 bombs + 32 x countermeasures (9,000 lb total)
- 3 x 3,000 lb M118 bombs + 4 x AIM-9B Sidewinder missiles (9,000 lb total)
- 3 x 3,000 lb M118 bombs + 4 x AIM-9E Sidewinder missiles (9,000 lb total)
Usage in battles
Describe the tactics of playing in the aircraft, the features of using aircraft in a team and advice on tactics. Refrain from creating a "guide" - do not impose a single point of view, but instead, give the reader food for thought. Examine the most dangerous enemies and give recommendations on fighting them. If necessary, note the specifics of the game in different modes (AB, RB, SB).
F-105D is a strike aircraft, with a large variety of ground attack ordnance. The very first Bomb modification of M117 allows the player to wipe out two bases in a single flight in air RB. Ultimately, the plane can carry 3 M118 3000 lb bombs with a TNT explosive mass of ~3200 kg. Alternatively, the plane can be equipped with guided AGM Bullpups. Lau-3/A also allows equipping "Mighty Mouse" unguided missiles, but these aren't the greatest of possible options Thus, depending on the objective, the plane offers the player a wide range of choices to attack ground targets. Remember that speed is the main advantage and perk of the "Thud". With It, alongside a powerful engine and highly effective airbrakes, the plane can effectively utilize hit and run tactics. This is particularly well suited for Air RB, as due to it being a Striker, F-105D can be spawned in the air, unlike the fighter planes, essentially guaranteeing that a base or two can be taken care of at least. Also note, that the plane is fully equipped with all available ballistic computers, similarly to "Harriers".
Even though the plane was never designed for air-to-air fights, it can perform well as a fighter. Its wide-ranged radar allows the ready detection of the enemies from the distance. The plane is equipped with a 20mm M61A1 cannon, with impressive 1000 rounds, allowing the pilot to make a mistake or two with the aim, without the risk of fast depletion of ammo. This is once again notably relevant in air RB, as depletion of ammo forces the plane to return to base for rearmament. Though the fact that the cannon is placed on the left corner of the plane should be taken into consideration. Additionally, the plane can be equipped with Aim-9B Sidewinder AAM from a get-go, and later modification unlocks the Aim-9E variant as well. Though to say that these are exceptionally good weapons would be an overstatement. However, the high speed of the "Thud" ensures that the plane can get sufficiently close to the enemy to utilize them.
Always keep in mind the main security issue with the plane: The lack of flares. While it is equipped with chaff, which makes it well-defended from SARH AAMs, flares are usually far more vital, as far more planes can carry IR missiles. Note, that in case of an uptier (which will happen more often than not), you may be teamed against MiG-21s, MiG-23s, MiG-27s, and other planes that are using all-aspect R-60 and R-60M missiles. Thus, when you spot one of such adversaries always be ready to perform extreme maneuvers if approaching on being approached by them head-on to dodge the potential incoming missiles.
Overall, F-105D "Thunderchief" is a versatile aircraft that can perform various duties, but the sphere where it shines the most is ground attacks and CAS and Despite certain security issues, "Thud" will prove to be a loyal friend to its pilot.
Pros and cons
Summarise and briefly evaluate the vehicle in terms of its characteristics and combat effectiveness. Mark its pros and cons in the bulleted list. Try not to use more than 6 points for each of the characteristics. Avoid using categorical definitions such as "bad", "good" and the like - use substitutions with softer forms such as "inadequate" and "effective".
Pros:
- Large and Assorted variation of ordinances fit for every possible Ground Operation.
- Large amount of Bombs can be equipped from the start.
- Exceptional high speed and great acceleration thanks to its powerful Engine.
- 20mm M61A1 Cannon has a notoriously high amount of 1000 rounds.
- Good Maneuverability, considering its size.
- Good Climb Rate.
- Excellent wide-ranged Radar
Cons:
- Lacks Flares, Making the plane vulnerable for IR missiles.
- In Air RB, planes wings might be ripped off at high speeds.
- Lacks RWR
- No Combat Flaps
- Atrociously High Repair Costs
History
Describe the history of the creation and combat usage of the aircraft in more detail than in the introduction. If the historical reference turns out to be too long, take it to a separate article, taking a link to the article about the vehicle and adding a block "/History" (example: https://wiki.warthunder.com/(Vehicle-name)/History) and add a link to it here using the main template. Be sure to reference text and sources by using <ref></ref>, as well as adding them at the end of the article with <references />. This section may also include the vehicle's dev blog entry (if applicable) and the in-game encyclopedia description (under === In-game description ===, also if applicable).
F-105 "Thunderchief" was one of the planes created by the "Republic Aviation Company" team headed by Georgian-American Aviation Pioneer Aleksandre Kartvelishvili, more commonly known as Alexander Kartveli. Planes designed by Kartveli include, among others, P-47 "Thunderbolt" and F-84 "Thunderstreak". The project that ultimately resulted in the creation of F-105 was one of the attempts to upgrade or replace the latter in the 1950s. Previous projects that attempted this weren't satisfactory and One of them included XF-84H, an infamous monstrosity, known by its nickname "Thunderscreech", with sound so loud and powerful, that it could be heard as far as 25 miles and made people near the plane physically ill.
The Project of designing "Thunderchief" was launched in 1950. It was originally envisioned to be a single-seat nuclear striker, deploying the bomb at a low altitude and supersonic speed. The various ordinance could be attached to the fuselage and the wings, in addition to the internal compartment meant for the nuke. The frame was engineered to adequately respond to these requirements, incorporating, among others, swept wings, fuselage aimed to minimize the aerodynamic drag, and air intakes placed at the connection point of wings and the fuselage. It was also notorious for its sheer size, exceeding even quite large F-4 Phantoms, and remains the largest single-engine plane series ever built.
The size of the "Thunderchief", High Speed, and being one of the first planes to use computer equipment made the creation of F-105 an actual learning experience. The plane at first proved to have several major issues due to these factors and resulted in the initial skeptical reception of the plane by the pilots. They gave the new plane several derogatory nicknames, such as "Hog", "Lead Sled", "Squat Bomber", but most notoriously, "Thud". However, the major issues were quickly identified and resolved. Despite the initial unwelcoming reception, gradually the plane became beloved by the pilots, and in the words of one of the pilots of the plane, Colonel Jack Broughton, "The Thud has justified herself, and the name that was originally spoken with a sneer has become one of utmost respect through the air fraternity". The reasons for the endearment of the plane by pilots ranged from its survivability, to its speed, to simply its pretty design.
While the "Thud" was never used by the military for its original purpose to deliver the Nuke, instead it became notorious in Vietnam. When the war began, the US needed planes that would be fit to adequately respond to the major obstacles in Northern Vietnam. The nature of the extremely dangerous, long-haul missions into the north demanded an aircraft of unprecedented versatility and survivability. The "Thud" possessed both. Despite the many obstacles, Thud pilots persevered. The Thunderstick bombing and navigation system that had previously caused operational headaches was now paying off–in spades. Hauling a 12,000-pound bombload, the F-105 could fly the 600-mile route to the North from bases deep within Thailand, pushing Mach 1 down Thud Ridge on approach to target Hanoi while skimming the terrain and dodging SAMs, MiGs, and anti-aircraft artillery, and put its bombs right on the money. Kicking in the afterburner, the Thud was on its merry way back to Thailand via a rendezvous with a Boeing KC-135 tanker. It is also deserving to note, that despite the fact, that the plane was never primarily intended to be a fighter, it managed to shoot down 27 MiGs on its own, as well as one with the help of F-4D Phantom.
After the cessation of the intensive bombardment of Vietnam in 1968, US Air Force began more intensive incorporation of F-4 Phantoms in its inventory, as numbers of F-105 were decisively depleted due to intensive and prolonged war in Indochina. The "Thuds" that remained in an airworthy condition remained in the service of the US Airforce until 1983.
Media
- Videos
See also
Links to the articles on the War Thunder Wiki that you think will be useful for the reader, for example:
- reference to the series of the aircraft;
- links to approximate analogues of other nations and research trees.
External links
Paste links to sources and external resources, such as:
- topic on the official game forum;
- other literature.
| USA jet aircraft | |
|---|---|
| Fighters | |
| F-4 | F-4C Phantom II · F-4E Phantom II · F-4J Phantom II · F-4S Phantom II |
| F-5 | F-5A · F-5C · F-5E · F-20A |
| F-8 | F8U-2 · F-8E |
| F-80 | F-80A-5 · F-80C-10 |
| F-84 | F-84B-26 · F-84F · F-84G-21-RE |
| F-86 | F-86A-5 · F-86F-25 · F-86F-2 · F-86F-35 |
| F-89 | F-89B · F-89D |
| F-100 | F-100D |
| F-104 | F-104A · F-104C |
| F-14 | F-14A Early · F-14B |
| F-15 | F-15A |
| F-16 | F-16A · F-16A ADF · F-16C |
| F9F | F9F-2 · F9F-5 · F9F-8 |
| Other | P-59A · F2H-2 · F3D-1 · F3H-2 · F4D-1 · F11F-1 |
| Strike Aircraft | |
| FJ-4 | FJ-4B · FJ-4B VMF-232 |
| A-4 | A-4B · A-4E Early |
| A-6 | A-6E TRAM |
| A-7 | A-7D · A-7E · A-7K |
| AV-8 | AV-8A · AV-8C |
| A-10 | A-10A · A-10A Late |
| B-57 | B-57A · B-57B |
| F-105 | F-105D |
| F-111 | F-111A |
