A13 Mk I (3rd R.T.R.)
| This page is about the British light tank A13 Mk I (3rd R.T.R.). For other versions, see A13 (Family). |
Contents
Description
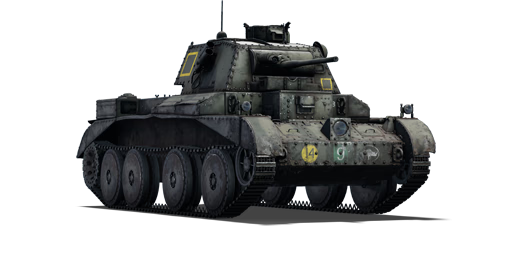
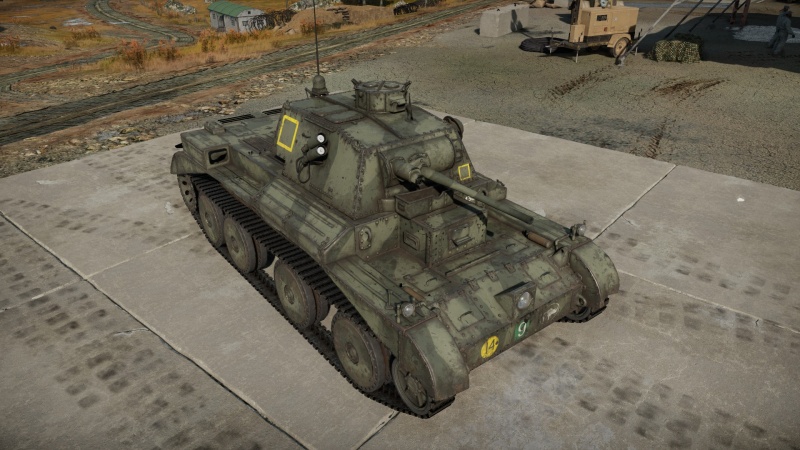
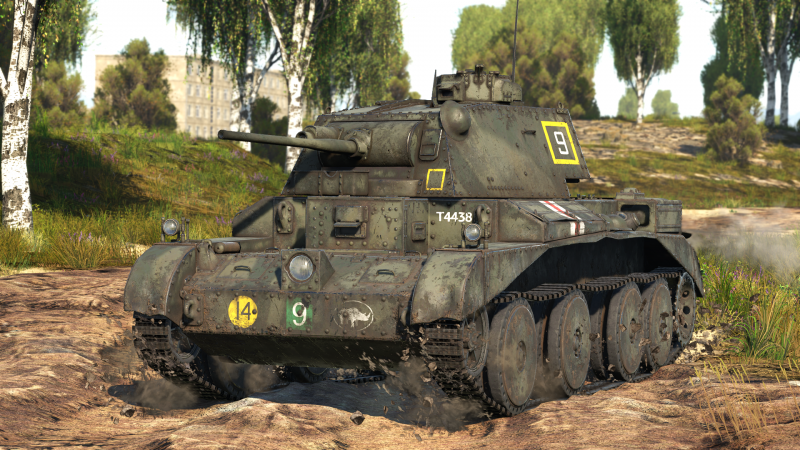
During World War II, the British Army's 3rd Royal Tank Regiment (3rd R.T.R.) was equipped with the A13 Mark I. The 3rd R.T.R. was a British Army armoured regiment that existed from 1917 to 1992. It was a unit of the Royal Tank Regiment, which was itself a unit of the Royal Armoured Corps. In 1917, it was known as the C Battalion, Tank Corps. With the onset of World War II, the British army was once again deployed to France. 3rd R.T.R., commanded by Lieutenant Colonel Reginald Keller, was ready for deployment as part of the 1st Armoured Division in 1940 when it was abruptly redirected to Calais. It took part in the four-day Siege of Calais as part of the Battle of France. Unfortunately, all of its tanks were destroyed, and many of its soldiers were killed or captured; nevertheless, some of its forces retreated to Dunkirk or were evacuated from Calais before the port was overrun.
Introduced in Update 1.55 "Royal Armour" and was the prize in the 2015 "Christmas gift" giveaway, the A13 Mark I (3rd R.T.R.) is a highly manoeuvrable tank, with an acceptable tank gun, excellent mobility, and incredibly light armour. The A13 Mark I (3rd R.T.R.) should not be used as a frontline tank. Instead, utilize your mobility to your advantage: spot, flank, and support your allies, and blind your enemies with strategically constructed smoke screens in vital areas. In flanking tactics, emphasize targeting secluded targets so you can fully exploit the element of surprise and outflank your opponent. Never expose yourself for too long since even anti-aircraft guns can penetrate your light armour. However, in muddy terrain, the A13 Mark I (3rd R.T.R.) might feel slow and has a tendency to slide sideways.
At some point, it was also given for free if you chose Britain as your first nation when you started the game.
General info
Survivability and armour
Armour type:
- Rolled homogeneous armour (hull, turret)
- Cast homogeneous armour (Gun mantlet)
| Armour | Front (Slope angle) | Sides | Rear | Roof |
|---|---|---|---|---|
| Hull | 14 mm Front plate 14 mm (0-62°) Front glacis 14 mm (64°) Lower glacis |
7 + 7 mm | 14 mm (0-62°) | 14 mm |
| Turret | 14 mm (0-15°) Turret front 14 mm (1-63°) Gun mantlet |
14 mm (21°) | 14 mm (2°) | 14 mm |
| Cupola | 14 mm | 14 mm | 14 mm | 14 mm |
Notes:
- Suspension wheels and tracks are 15 mm thick while the torsion bars in between the side armour are 10 mm thick.
- Hoisting points and optics covers are 14mm thick.
- The sides of the hull benefit from spaced armour (2 x 7 mm spaced ~10 cm apart) but the thickness of the plates is too poor to properly act as such: HEAT and HE shells have no problem defeating it.
- 2 smoke launchers are installed on the right side of the turret. Smoke grenades can be launched individually in the direction the gun is pointing at, 50 m away from your tank. The reload sequence takes places once both launchers are empty.
- The A13 Mk I (3rd R.T.R.) is among the least armoured tanks in the game. Be aware that even when angling, most enemies can reliably penetrate you from 1,000 m distance.
- Even when only exposing the turret of your tank to shoot at an enemy, you can receive devastating damage as your thinly armoured turret is pretty wide and contains 3 crew members out of 4.
Mobility
| Game Mode | Max Speed (km/h) | Weight (tons) | Engine power (horsepower) | Power-to-weight ratio (hp/ton) | |||
|---|---|---|---|---|---|---|---|
| Forward | Reverse | Stock | Upgraded | Stock | Upgraded | ||
| Arcade | 54 | 7 | 13.8 | 527 | 649 | 38.19 | 47.03 |
| Realistic | 48 | 6 | 301 | 340 | 21.81 | 24.64 | |
The acceleration is good and the top speed is in line with light tanks at the same BR. The reverse speed is slow and won't let you overextend. The tracks are narrow, which gives the A13 Mk I (3rd R.T.R.) poor handling on soft terrain (snow, mud, sand). The tracks are also long, which causes the tank to understeer and lose a lot of speed when turning. All this combined with the lack of neutral steering makes turning on the spot slow.
Modifications and economy
Armaments
Main armament
The cannon loses accuracy and penetration power quickly over distance. The accuracy loss is noticeable as soon as 500 m distance and becomes a handicap over 700 m. Penetration at close range is good but becomes ineffective at 500 m and beyond. The high muzzle velocity allows for rather flat trajectories but targeting enemies at long range will be hindered by the loss of accuracy.
Vertical stabilizer (shoulder stop) allows you to fire when moving at slow pace (a few km/h). The turret traverse speed is average but rather slow when compared than other tanks at the same BR. The depression angle is very important and allows you to shoot easily from behind a ridge. Recoil is barely noticeable. The reload time is very short, allowing you to shower your enemies with a continuous rain of shells. Targeting procedure is quick and simple.
| 40 mm QF 2-pounder | Turret rotation speed (°/s) | Reloading rate (seconds) | |||||||||||
|---|---|---|---|---|---|---|---|---|---|---|---|---|---|
| Mode | Capacity | Vertical | Horizontal | Stabilizer | Stock | Upgraded | Full | Expert | Aced | Stock | Full | Expert | Aced |
| Arcade | 87 | -15°/+20° | ±180° | Shoulder | 34.3 | 47.4 | 57.6 | 63.7 | 67.8 | 3.64 | 3.22 | 2.97 | 2.80 |
| Realistic | 21.4 | 25.2 | 30.6 | 33.8 | 36.0 | ||||||||
Ammunition
The available choice of ammunition focuses on armoured targets:
- Shot Mk.1 AP/T : AP; a solid shot with no explosive filler offering a good penetration power until 500 m.
- Shot Mk.1 APHV/T: AP; the same projectile but with higher muzzle velocity, offering a good penetration power until 1,000 m.
- Shot Mk.IXB APCBC/T: APCBC; a solid shot with a ballistic cap and no explosive filler, offering the best penetration power from 0 to 500 m for the A13 Mk I (3rd R.T.R.).
- Shell Mk.1 AP/T: APHE; an armour-piercing shell with explosive filler that will knock out any tank that it penetrates but has an average penetration power. Use it preferably when enemies are at close range.
Projectiles without explosive filler will most of the time incapacitate enemy tanks and require a second shot to properly knock them out. Knowledge of the positions of crew members in the targeted tank is crucial when playing with solid shots.
| Penetration statistics | |||||||
|---|---|---|---|---|---|---|---|
| Ammunition | Type of warhead |
Penetration @ 0° Angle of Attack (mm) | |||||
| 10 m | 100 m | 500 m | 1,000 m | 1,500 m | 2,000 m | ||
| Shot Mk.1 AP/T | AP | 72 | 68 | 52 | 37 | 27 | 19 |
| Shot Mk.IXB APCBC/T | APCBC | 89 | 86 | 77 | 66 | 57 | 50 |
| Shot Mk.1 APHV/T | AP | 80 | 75 | 58 | 41 | 30 | 21 |
| Shell Mk.1 AP/T | APHE | 66 | 62 | 49 | 36 | 26 | 20 |
| Shell details | ||||||||||||
|---|---|---|---|---|---|---|---|---|---|---|---|---|
| Ammunition | Type of warhead |
Velocity (m/s) |
Projectile mass (kg) |
Fuse delay (m) |
Fuse sensitivity (mm) |
Explosive mass (TNT equivalent) (g) |
Ricochet | |||||
| 0% | 50% | 100% | ||||||||||
| Shot Mk.1 AP/T | AP | 792 | 1.08 | - | - | - | 47° | 60° | 65° | |||
| Shot Mk.IXB APCBC/T | APCBC | 792 | 1.24 | - | - | - | 48° | 63° | 71° | |||
| Shot Mk.1 APHV/T | AP | 853 | 1.08 | - | - | - | 47° | 60° | 65° | |||
| Shell Mk.1 AP/T | APHE | 792 | 1.08 | 1.2 | 9 | 20.9 | 47° | 60° | 65° | |||
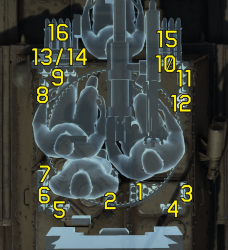
Ammo racks

| Full ammo |
1st rack empty |
2nd rack empty |
3rd rack empty |
4th rack empty |
5th rack empty |
6th rack empty |
7th rack empty |
8th rack empty |
|---|---|---|---|---|---|---|---|---|
| 87 | 78 (+9) | 75 (+12) | 72 (+15) | 69 (+18) | 66 (+21) | 62 (+25) | 60 (+27) | 56 (+31) |
| 9th rack empty |
10th rack empty |
11th rack empty |
12th rack empty |
13th rack empty |
14th rack empty |
15th rack empty |
16th rack empty |
Visual discrepancy |
| 51 (+36) | 47 (+40) | 43 (+44) | 41 (+46) | 36 (+51) | 31 (+56) | 16 (+71) | 1 (+86) | No |
Note:
- To minimize the risk of ammo rack detonation, keep racks 1 to 14 empty (31 (+56) shells). This will guarantee the center hull is empty of shells.
Machine guns
The rate of fire of the 7.7 mm Vickers is slow compared to other MGs at the same BR. The small calibre will only allow you to use it as a spotting gun or to mow down minor obstacles blocking your line of sight. Except for engaging vehicles with crew members in the open, your MG won't deal much damage to enemies.
| 7.7 mm Vickers | ||||
|---|---|---|---|---|
| Mount | Capacity (Belt) | Fire rate | Vertical | Horizontal |
| Coaxial | 3,500 (250) | 390 | - | - |
Usage in battles
This vehicle's role is that of a light tank in the truest sense, sporting an acceptable gun, great mobility and virtually no armour to speak of.
This tank has a very active playstyle and should not be used in the front lines. Instead, use your mobility to your advantage: Spot, flank and provide artillery support for your teammates, blind your enemies with well-placed smokes screens in key avenues. Make sure to only target secluded enemies in flanking tactics so you can take full advantage of the element of surprise and outflank your opponent. Never expose yourself for too long because even anti-aircraft guns are a potential threat to your non-angled armour. The QF 2-pounder has an awfully long-range accuracy so you must get close to your enemies to actually land a shot where you expect. Load up this agile (but reluctant) cat with ammo and flank your enemies with a constant flow of bullets.
Pros and cons
Pros:
- Good gun for its rank with fast reload
- High top speed and good HP/ton ratio
- Slim target, is hard to get spotted and shot at
- Has a shoulder stabiliser, an advantage in CQC
- Brings lots of ammo to the fight (87 rounds max)
- Has forward-launching smoke launchers
- Decent turret slewing rate
- -15° gun depression ensures great terrain adaptation
- Four crewmen and a three-man turret increases survivability
- Very effective in its historical role, a flanker and scout
Cons:
- Next to no armour, can be frontally penetrated by HMG
- Loses speed when turning
- Wiggles when trying to turn on 5th gear
- Very slow reverse speed, might get the player destroyed
- The coaxial Vickers MG has an incredibly slow fire rate, hard to finish off fast targets like AS 42
- Not effective at anything other than how it was historically used; ill-advised to brawl or support heavier vehicles
History
Development
The British development on their cruiser tanks, tanks that focus on mobility to exploit breakthroughs beyond enemy lines, took a turn in 1936 after General Giffard LeQuesne Martel became the Assistant Director of Mechanization at the British War Office, the head of the army in the government. Martel, an advocate of the tanks, and developer of the concept of "tankettes", witnessed a tank demonstration in 1936 that had Soviet designs. The one that attracted his attention was the BT light tank. The BT's use of the Christie suspension had Martel argue for the usage of the same suspension in their tank designs, to which the British government complied with the purchase and licensing of the system from the Nuffield Organization.
The acquired vehicle from the purchase of the Christie suspension was labelled as the A13E1 and became part of the design development under the designation Cruiser Mk III (A13). The General Staff requested for the vehicle to have 30 mm of armour, a 2-pounder gun, and a road speed of 48 km/h. The original vehicle was extensively reworked due to many interior and mechanical issues. Until the tank design was finished, the British Army adopted the Cruiser Mk I (A9) tank for use, but these tanks were delayed due to the A13's near completion. The first prototype was delivered in 1937 under the name A13E2, this featured the turret from the A9 cruiser tank, with a 2-pounder and a Vickers machine gun. The armour on the prototype was 15 mm and the design could reach a top speed under a governor of 48 km/h (64 km/h ungoverned). The last and revised design was the A13E3 that became adopted by the British Army and ordered into production in 1939. The General Staff specification number for the tank was the A13 Mk. I, Cruiser Tank Mark III. 65 of these tanks were ordered from the Nuffield Mechanization & Aero Limited, to which 30 were built before the War Office decided to upgrade the A13 Mk.I with more armour than the A13 Mk.II, Cruiser Tank Mk IV. Some of the A13 Mk.I Cruiser Mk III was also converted into Mk IV to stay modernized.
Combat usage
The A13 first saw combat in the Battle of France under the British Expeditionary Force in 1940. The A13 encountered many troubles during its employment, the crew having little to no training with the new tanks due to their rushed adoption into service. The tanks were in poor condition and some were even missing parts. The A13s were used in the 1st Armoured Division, but many were either destroyed by the superior German armoured forces or abandoned at Calais during the evacuation of Allied troops at Dunkirk, which forced the units to leave behind their heavier equipment.
After the disaster at France, the A13 were still used to support the war. Some were sent to Greece to support their defence against Germany in the Battle of Greece, but a majority were sent to North Africa as part of the Western Desert Campaign near Libya under the 7th Armoured Division. Compared to the time in France, the A13s in North Africa fared much better, ironing out most of its initial defects, and was even more suited to the environment than other tank designs. The A13 was popular with the crew for its high speed, reliability, and a powerful 2-pounder cannon that could engage a majority of Axis tanks in 1941. However, there was an insufficient number of A13s available for use, so tank units were mixed with the faster cruiser tanks and slower infantry tanks, which caused tactical and logistical difficulties trying to accommodate all of the tanks. Another deficiency with the tank and every other British tank with the 2-pounder was the lack of high-explosive shell issued to the tankers, which made them vulnerable to anti-tank guns, which caused a majority of British tank losses in the North African Campaign. Still, the A13 fared very well with its armour and armament until late 1941 where better armoured Panzer IIIs and Panzer IVs began to appear on the battlefield.
Due to its growing obsolescence on the battlefield, the A13 was replaced in 1941 by the better armoured A15 Crusader tank.
Media
- Skins
- Videos
See also
- Other vehicles of similar role or configuration
External links
- [Special] Collect a famous А13 Mk I 3rd RTR for Christmas!
- [Wikipedia] Cruiser Mk III
- [Tanks Encyclopedia] Cruiser Mk.III, A13
- [Wikipedia] 3rd Royal Tank Regiment
| Nuffield Mechanizations and Aero Limited | |
|---|---|
| Cruiser Tanks | |
| Tank, Cruiser, Mk III (A13 Mk I) | A13 Mk I · A13 Mk I (3rd R.T.R.) |
| Tank, Cruiser, Mk IV (A13 Mk II) | A13 Mk II · A13 Mk II 1939 |
| Tank, Cruiser, Mk VI, Crusader (A15) | Crusader II · Crusader "The Saint" · Crusader III |
| Tank Destroyers | Tortoise |
| SPAAs | Crusader AA Mk I · Crusader AA Mk II |
| Export | ▄Crusader Mk.II |
| Britain light tanks | |
|---|---|
| A13 | A13 Mk I · A13 Mk I (3rd R.T.R.) · A13 Mk II · A13 Mk II 1939 |
| A15 | Crusader II · Crusader "The Saint" · Crusader III |
| A17 | Tetrarch I |
| IFV | Warrior · Desert Warrior (Kuwait) |
| Wheeled | Daimler Mk II · AEC Mk II · Fox · Vickers Mk.11 |
| Other | VFM5 |
| South Africa | |
| SARC | SARC MkIVa · SARC MkVI (2pdr) · SARC MkVI (6pdr) |
| Ratel | Ratel 90 · Ratel 20 |
| Rooikat | Rooikat Mk.1D · Rooikat 105 · Rooikat MTTD |
| Other | Concept 3 · Eland 90 Mk.7 |
| USA | Stuart I · Stuart III |
| Britain premium ground vehicles | |
|---|---|
| Light tanks | A13 Mk I (3rd R.T.R.) · A13 Mk II 1939 · AEC Mk II · Crusader "The Saint" · Rooikat 105 |
| Medium tanks | A.C.I · Grant I · Cromwell V (RP-3) · Sherman IC "Trzyniec" · A.C.IV · Comet I "Iron Duke IV" |
| Centurion Mk.2 · ▄Strv 81 (RB 52) · Centurion Mk.5 AVRE · Centurion Mk.5/1 · ▄Sho't Kal Dalet · Centurion Action X | |
| Vijayanta · Khalid · Challenger DS · Challenger 2 OES | |
| Heavy tanks | Independent · Matilda Hedgehog · Excelsior · TOG II · Churchill Crocodile · Black Prince |
| Tank destroyers | Alecto I · Achilles (65 Rg.) · QF 3.7 Ram |


