Crusader II

From War Thunder Wiki
Jump to: navigation, search
Rank VI Israel | Premium | Golden Eagles
Merkava Mk.2D Pack
This page is about the British light tank Crusader II. For other versions, see Crusader (Family).
Crusader II
uk_crusader_mk_2.png
GarageImage Crusader II.jpg
ArtImage Crusader II.png
Crusader II
AB RB SB
2.3 2.7 2.7
Class:
Research:7 900 Specs-Card-Exp.png
Purchase:10 000 Specs-Card-Lion.png
Show in game

Description

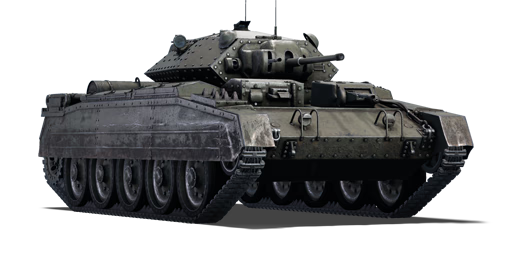
The Tank, Cruiser Mark VIA, Crusader II (A15) is the second variant of the A15 Crusader cruiser tank family. The Crusader light tanks were one of the major British cruiser tank families during World War II. Over 5,000 Crusader tanks of all variants were produced, and they contributed significantly to British triumphs in the North Africa campaign. The chassis of this light tank was modified in order to produce anti-aircraft, fire support, observation, communication, bulldozer, and recovery vehicle variants, although it would not see active action outside of Africa. The first Crusader I tanks entered service in 1941, and while manoeuvrable, they were severely lacking in armour and firepower. The Crusader II followed with thicker armour but the same armament as the Crusader I: a 40 mm Ordnance QF 2-pounder tank gun.

Introduced in Update 1.55 "Royal Armour", the Crusader II is a capable short-range light tank. It is armed with a fast-firing 40 mm Ordnance QF 2-pounder tank gun, which is ideal for knocking out tanks with a cramped interior and crew members that are close to each other. It is an enjoyable light tank to play with because of its quick reload, primitive vertical gun stabilizer, and strong handling. Handling is substantially improved over the A13 cruiser tanks since cross-country performance is much better and the vehicle does not slide during abrupt breaking. Given its low profile and lack of armour, driving and fighting in the open field should be avoided whenever possible, unless there is enough cover or the terrain is shaped in such a way that the hull-down tactics, which this tank excels at, can be used. The tank also boasts good gun depression and a difficult to hit turret design.

General info

Survivability and armour

Smoke grenades
Creation of a smoke screen in front of the vehicle
Armourfront / side / back
Hull20 / 28 / 14
Turret52 / 24 / 30
Crew5 people
Visibility76 %

The armour on the Crusader II is the typical light tank armour. The frontal hull's thickest part is the 20 mm glacis which can only bounce reserve level vehicles' shells (e.g. H.35), while anything better (e.g. Chi-Ha Kai, BT-7, M5A1) will penetrate it with ease. The turret front is not much better, being 30 mm. However, the curved cylindrical gun mantlet has some chances of bouncing poorly aimed shells if you are lucky. The heavily angled turret sides might also deflect some. The MG turret, being enclosed on the back side, can act as spaced armour and stop some penetrating rounds from entering the hull with its 30 mm rear armour. Still, normal cannons at this BR will have no problem penetrating the Crusader II's frontal armour. The sides (~14 mm) are even weaker and will only stop rifle-calibre bullets.

Penetrating solid rounds or small calibre shells tend to knock out 1-2 crew normally, as there is a fair gap between the driving compartment and the fighting compartment. Thus, vehicles with low-calibre guns (e.g. M5A1, M22) will need a few shots to destroy you. However, against explosive or larger calibre shells, the shrapnel will easily travel through the gap and hurt any crew behind. The 3 turret crew are packed very closely and are prone to be all knocked out by a single explosive shell. Overall, the survivability of the Crusader II is low, like every other light tank.

Armour type:

  • Rolled homogeneous armour
  • Cast homogeneous armour (Gun mantlet, Machine gun mantlet, Driver's port)
  • Structural steel (Side skirts)
Armour Front Sides Rear Roof
Hull 20 mm (33°) Front plate
9 mm (78-85°), 20 mm (61°) Front glacis
20 mm (27-64°) Lower glacis
18 mm (1°) Driver's port
14 + 4 mm 14 mm (44-51°) Top
(14-51°) 14 mm Bottom
7 mm
Main Turret 30 mm (11°) Turret front
30 mm (6-58°) Gun mantlet
14 mm (40-49°) 17 + 12.7 mm (36°) Top
9 mm (66°) Bottom
12.7 mm
Secondary Turret 30 mm (1-32°) Turret front
20 mm (3-67°) Gun mantlet
30 mm (1-3°) 30 mm (5-6°) 9 mm

Notes:

  • Suspension wheels and tracks are 15 mm thick.

Mobility

Speedforward / back
AB47 / 8 km/h
RB and SB43 / 7 km/h
Number of gears4 forward
1 back
Weight16.3 t
Engine power
AB649 hp
RB and SB340 hp
Power-to-weight ratio
AB39.8 hp/t
RB and SB20.9 hp/t

The Crusader II's mobility is decent. It has a power-to-weight ratio of ~20, giving it adequate acceleration on all terrains. It can reach an average speed of ~40 km/h on hard surfaces, and ~30 km/h on soft surfaces in a reasonable amount of time. It also has great hull traverse and can turn the hull rather easily without moving forward/backward first. This gives the Crusader II the ability to quickly relocate tactically, which is useful if you need to flank any enemy, for example a Valentine.

However, as one might expect, the reverse speed is only -7 km/h which is far from enough to get the Crusader out of a dangerous situation in time. A lot of the times the Crusader can only turn the hull around to retreat. When turning on the move, the Crusader will lose quite some speed. Its top speed is also somewhat limited, capped at 43 km/h - it will not get as fast as some other light tanks like BT-7, M22, and the M5 Stuarts who can go over 50+ km/h. This can be dangerous if the Crusader wants to cap a point in the middle of the map at the start of the match: either faster teammates will get there first, or faster enemies will.

Game Mode Max Speed (km/h) Weight (tons) Engine power (horsepower) Power-to-weight ratio (hp/ton)
Forward Reverse Stock Upgraded Stock Upgraded
Arcade 47 8 16.3 527 649 32.33 39.82
Realistic 43 7 301 340 18.47 20.86

Modifications and economy

Repair costBasic → Reference
AB322 → 462 Sl icon.png
RB360 → 517 Sl icon.png
SB452 → 649 Sl icon.png
Total cost of modifications6 930 Rp icon.png
6 740 Sl icon.png
Talisman cost530 Ge icon.png
Crew training3 000 Sl icon.png
Experts10 000 Sl icon.png
Aces115 Ge icon.png
Research Aces160 000 Rp icon.png
Reward for battleAB / RB / SB
30 / 30 / 30 % Sl icon.png
112 / 112 / 112 % Rp icon.png
Modifications
Mobility Protection Firepower
Mods new tank traks.png
Tracks
Research:
350 Rp icon.png
Cost:
340 Sl icon.png
80 Ge icon.png
Mods new tank suspension.png
Suspension
Research:
260 Rp icon.png
Cost:
250 Sl icon.png
60 Ge icon.png
Mods new tank break.png
Brake System
Research:
260 Rp icon.png
Cost:
250 Sl icon.png
60 Ge icon.png
Mods new tank filter.png
Filters
Research:
430 Rp icon.png
Cost:
420 Sl icon.png
100 Ge icon.png
Mods new tank transmission.png
Transmission
Research:
450 Rp icon.png
Cost:
440 Sl icon.png
105 Ge icon.png
Mods new tank engine.png
Engine
Research:
450 Rp icon.png
Cost:
440 Sl icon.png
105 Ge icon.png
Mods tank tool kit.png
Improved Parts
Research:
350 Rp icon.png
Cost:
340 Sl icon.png
80 Ge icon.png
Mods extinguisher.png
Improved FPE
Research:
260 Rp icon.png
Cost:
250 Sl icon.png
60 Ge icon.png
Mods tank reinforcement uk.png
Crew Replenishment
Research:
430 Rp icon.png
Cost:
420 Sl icon.png
100 Ge icon.png
Mods new tank horizontal aiming.png
Horizontal Drive
Research:
350 Rp icon.png
Cost:
340 Sl icon.png
80 Ge icon.png
Mods tank ammo.png
40mm_uk_2pdr_APHV_ammo_pack
Research:
350 Rp icon.png
Cost:
340 Sl icon.png
80 Ge icon.png
Mods tank cannon.png
Adjustment of Fire
Research:
260 Rp icon.png
Cost:
250 Sl icon.png
60 Ge icon.png
Mods airstrike.png
Airstrike
Research:
260 Rp icon.png
Cost:
250 Sl icon.png
60 Ge icon.png
Mods tank ammo.png
40mm_uk_2pdr_APHE_ammo_pack
Research:
260 Rp icon.png
Cost:
250 Sl icon.png
60 Ge icon.png
Mods new tank vertical aiming.png
Elevation Mechanism
Research:
430 Rp icon.png
Cost:
420 Sl icon.png
100 Ge icon.png
Mods scouting.png
Improved optics
Research:
430 Rp icon.png
Cost:
420 Sl icon.png
100 Ge icon.png
Mods art support.png
Artillery Support
Research:
450 Rp icon.png
Cost:
440 Sl icon.png
105 Ge icon.png
Mods tank ammo.png
40mm_uk_2pdr_APCBC_ammo_pack
Research:
450 Rp icon.png
Cost:
440 Sl icon.png
105 Ge icon.png
Mods smoke screen.png
Smoke grenade
Research:
450 Rp icon.png
Cost:
440 Sl icon.png
105 Ge icon.png

Armaments

Main armament

Shoulder stabilizer
Reduces the swing of the gun in one plane while moving
Ammunition110 rounds
Reloadbasic crew → aces
3.6 → 2.8 s
Vertical guidance-15° / 20°
Main article: QF 2-pounder (40 mm)

The Crusader is armed with a 40 mm QF 2pdr cannon, which is rather capable, even for the battle rating. It reloads very fast, at ~3 seconds, similar to the American 37 mm and the Soviet 45 mm guns, allowing the Crusader to quickly fire off multiple shots at a target. It has an amazing gun depression of -15° meaning the Crusader will be able to press its gun down over the majority of hills, giving it great map adaptability. Its turret also rotates quickly at around 25°/s, thus the Crusader can deal with surprise attacks effectively. Lastly, a shoulder stabiliser will help speeding up the targeting process once the tank is moving below ~7 km/h which is beneficial for quick stop-and-shoot scenarios and CQC especially against non-stabilised tanks, like the Pz.IIIs. All these aspects give the Crusader admirable versatility on the battlefield.

40 mm QF 2-pounder Turret rotation speed (°/s) Reloading rate (seconds)
Mode Capacity Vertical Horizontal Stabilizer Stock Upgraded Full Expert Aced Stock Full Expert Aced
Arcade 110 -15°/+20° ±180° Vertical 34.27 47.44 57.60 63.69 67.76 3.64 3.22 2.97 2.80
Realistic 21.42 25.20 30.60 33.84 36.00

Ammunition

The player might already be familiar with the ammo types. The stock Shot Mk.1 AP/T has average penetration so it is best to ignore it as soon as access to alternative shells is obtained.

Against lighter opponents, the best ammo is the Shell Mk.1 AP/T APHE which has a 20 g explosive filler and a maximum penetration of 66 mm. This shell can usually one-shot compact light vehicles (e.g. BT-5, M22) in one shot. But for spacious vehicles like the LVT series the explosives will struggle a lot.

However, you may also face better armoured foes like the early M4, T-80, Pz.III, M3 Lee, etc. Now the Shot Mk.IXB APCBC/T can become handy. With a max penetration of 89 mm, it will go through almost all tanks' weak spots as well as the parts where your other ammo types will not penetrate (e.g. M4 turret side (76 mm), KV-1 hull side (75 mm)). With careful aiming and its fast reload rate, the Crusader can quickly punch multiple holes on the enemy. Note that you must know the weak spots as well as crew locations of common tanks since this APCBC is a solid shell without any explosives.

The Shot Mk.1 APHV/T only offers a slightly faster velocity but not better penetration or explosive filler, making it pretty much useless when comparing to the above shell types.

Penetration statistics
Ammunition Type of
warhead
Penetration @ 0° Angle of Attack (mm)
10 m 100 m 500 m 1,000 m 1,500 m 2,000 m
Shot Mk.1 AP/T AP 72 68 52 37 27 19
Shot Mk.IXB APCBC/T APCBC 89 86 77 66 57 50
Shot Mk.1 APHV/T AP 80 75 58 41 30 21
Shell Mk.1 AP/T APHE 66 62 49 36 26 20
Shell details
Ammunition Type of
warhead
Velocity
(m/s)
Projectile
mass (kg)
Fuse delay
(m)
Fuse sensitivity
(mm)
Explosive mass
(TNT equivalent) (g)
Ricochet
0% 50% 100%
Shot Mk.1 AP/T AP 792 1.08 - - - 47° 60° 65°
Shot Mk.IXB APCBC/T APCBC 792 1.24 - - - 48° 63° 71°
Shot Mk.1 APHV/T AP 853 1.08 - - - 47° 60° 65°
Shell Mk.1 AP/T APHE 792 1.08 1.2 9 20.9 47° 60° 65°

Ammo racks

Ammo racks of the Crusader II
Full
ammo
1st
rack empty
2nd
rack empty
3rd
rack empty
4th
rack empty
5th
rack empty
Visual
discrepancy
110 89 (+21) 67 (+43) 45 (+65) 23 (+87) (+109) No

Notes:

  • Racks disappear after all shells in the rack have been shot or loaded.
  • Turret & center empty: 45 (+65) shells.

Machine guns

Ammunition3 375 rounds
Belt capacity225 rounds
Reloadbasic crew → aces
10.4 → 8.0 s
Fire rate600 shots/min
Ammunition4 950 rounds
Belt capacity225 rounds
Reloadbasic crew → aces
10.4 → 8.0 s
Fire rate600 shots/min
Main article: BESA (7.92 mm)

There are 2 x 7.92 mm BESA machine guns on the Crusader II, one being coaxial and the other inside a small turret at the front of the hull. MGs of this calibre only have less than 20 mm penetration at most, meaning they are only good against non-armoured vehicles. Vehicles with open fighting compartment and exposed crew (e.g. GAZ-AAA (DshK), ZiS-30, Sd.Kfz 6/2, etc) are most vulnerable to such MG fire. These 2 MGs can also be useful to clear obstacles like fences, trees, etc so the tank will not slow down driving over them. On super rare occasions you might see planes flying very low, within the Crusader II's elevation angle. The 2 MGs can get some hits or even critical hits if aimed carefully.

Note that the smaller MG turret rotates very very slowly, at around 10°/s.

7.92 mm BESA
Mount Capacity (Belt) Fire rate Vertical Horizontal
Hull 4,950 (225) 600 ±10° ±50°
Coaxial 3,375 (225) 600 N/A N/A

Usage in battles

The Crusader Mk II is a quite effective low-range light tank, it is equipped with a fast firing 40 mm cannon, which is excellent at taking out tanks with a cramped interior and the crew close to each other, very fast reload, gun stabilization and its good handling makes up for shell doing not so much damage.

Since it is a light tank it does not have much armour, driving and fighting in the open field should be avoided whatever it is possible, unless there is enough of cover or the terrain shaped in a way so it is possible to use the hull down tactics at which this tank excels at because of its very low profile. The tank also has excellent gun depression and the turret shape makes it hard to hit.

The combination of manoeuvrability, a great high speed, and good acceleration makes it good at flanking and rushing the enemy positions. Although its max speed may be lacking compared to other fast tanks such as the Stuarts or BTs, it is compensated by its acceleration. It can get to max speed very fast and the turning ability is very good at any speed, except for moving in the same place. Other than that tank is very stable and pleasant to drive.

Any frontal engagement with enemy SPAA units should be avoided, try engaging them only at a long distance, when flanking them, or with the Artillery upgrade (most SPAAs at the rank would have an open cabin so it is easy for artillery to kill their crews). Dealing with other light tanks should not be an issue. Although the 40 mm cannon lacks accuracy, its reload speed is fast and it should not be an issue hitting targets at a close distance. However, fighting against medium tanks and other bigger vehicles could be a problem, as its highly recommended to know the crew position in the enemy tank and where to aim for them. As for shell choice it is recommended to use the last unlockable shell, the Shell Mk. 1 AP/T, as it has more explosive filling that would help take out enemy crews more easily.

Enemies worth noting:

  • M4A3 (105): this M4 Sherman is equipped with a deadly 105 mm howitzer firing HE and HEAT shells, the former having no problem destroying the Crusader II with overpressure while the latter can easily penetrate the Crusader. Thus, the Crusader must avoid getting hit by the M4. The Crusader II cannot penetrate the frontal armour of the M4A3 (105), so flanking becomes a good tactic. Use your speed and agility to get to the side/rear of the M4. If shooting at the hull side, the APHE will be enough. If shooting at turret side, you will need the Shot Mk.IXB APCBC/T to penetrate the turret. Try disabling the M4's engine, transmission or driver first, then take your time to finish it because it has an extremely low turret rotation speed so it will not get its gun on you quickly once it cannot traverse its hull.
  • B1 ter: this is an upgraded model of the B1 bis heavy tank, featuring thicker armour. Its hull sides have additional armour plates that is slightly sloped, and the Crusader II's 40 mm gun will struggle to penetrate it. The hull front is ~70 mm sloped, which can also resist the Crusader II's shells. The frontal turret and the gun mantlet can be bouncy but other areas like the cupola and turret ring are weakspots. Targeting there will take out the B1's 47 mm gunner who is also the commander. The turret sides/rear are of course easier to penetrate, if you get the chance. The hull rear can also be penetrated, but multiple shots will be required to destroy its transmission or engine due to your small calibre. Do not get hit by the B1, it will be fatal.

Pros and cons

Pros:

  • 5-man crew increases survivability. More unlikely to get taken by a single shot from small-calibre guns (e.g. from M2A4)
  • Spherical gun mantlet and sloped turret sides may bounce shells from certain angles
  • 2-pdr cannon can frontally penetrate almost all tanks it will face, like M3A1 Stuart, Chi-He
  • Low profile, harder to get spotted and shot at
  • Very good acceleration with good handling
  • Useful smoke grenades

Cons:

  • Overall weak armour, anyone (including SPAAs) can penetrate it
  • Inaccurate gun is bad for sniping
  • The only shell with an explosive filler drastically lacks penetration power
  • Crew is packed together, can be knocked out easily with a single shot by large-calibre shells, notably the early Pz.IV models
  • Reverse speed of -7 km/h is slow
  • Strongest AP shell only have about 1.4kg of mass, dealing little spall

History

Development

In 1938, the General Staff of the British Army requested for a cruiser tank that was lighter and more affordable than the heavier A16 cruiser design developed by Nuffield Mechanizations & Aero. One of these designs was the designation Tank, Cruiser Mk.V based off the A13 cruiser tanks, named the "Covenanter", and Nuffield was invited to become part of its development team, but they refused due to interest in developing their own cruiser tank. Their tank was designated the Tank, Cruiser Mk.VI Crusader and fell under the General Staff specification of A15. The Crusader was a parallel design to the Covenanter, but was ready six weeks earlier than the Covenanter despite starting at a later time. The Crusader was adopted into service with the British Army in 1941 and the 5,300 units were manufactured between 1940 to 1943.

Design

The Crusader features a new design that differs from its cruiser tank predecessors. The Christie suspension system on the Crusader had five road wheels for it instead of the usual four, which improves weight distribution of the increased 20 ton weight of the Crusader compared to the 14 tons of the A13 cruisers. The engine, steering system, and cooling system on the Crusader was different as well, but the Covenanter and Crusader use the same main turret. The polygonal shape of the turret gives the crew inside more room for the turret ring diameter.

The Crusader Mk.I and Mk.II were equipped with the 2-pounder, which was aimed by the gunner inside with a padded shaft that allows them to elevate the gun by simply adjusting his own height. Later in the war where an up-gun of the tank armament was necessary and newer tanks such as the Cromwell was delayed, the Crusader was upgraded into the Crusader Mk III variant with a 6-pounder instead, which restricted turret space, requiring the turret crew to be reduced from three to two. These saw first action the Second Battle of El Alamein in October 1942.

Combat Usage

The Crusader first saw action at North Africa, right after the British had been pushed back to the Egyptian border by Axis forces. The Crusaders were part of the huge shipment in the Malta Convoys to reequip the British forces there. Enough Crusaders arrive that the entire 6th Royal Tank Regiment was refitted with them, which joined up with the 2nd Royal Tank Regiment to form the 7th Armoured Brigade "Desert Rats". The brigade's first action was in Operation Battleaxe, though it was delayed due to adapting the tanks for the desert environment. The operation, which called for the relieve of the siege of Tobruk in June, was initiated in June to which 11 Crusader tanks were lost to anti-tank guns, plus many more to mechanical faults. While more Crusader tanks came in to reinforce the cruiser tank forces, there were never enough to supply the continuously expanding armoured units as 7th Brigade was combine with the 7th Hussars, the 2nd Armoured Brigade was added to the 7th Armoured Division, and the 8th Hussars was combined with the 4th Armoured Brigade. Overall, the Crusaders proved effective in the North African Campaign, the Crusader was faster than any tanks on the opposing side and the 2-pounder was lethal to the Panzer III, but the tank suffered from its thin armour, mechanical problems in the desert, and the growing deficiency of the 2-pounder, which didn't have enough range to destroy farther tanks. The Crusader design also caused the ammo racks on the tank to easily ignite due to unprotected racks and shot traps on the turret design. Anti-tank guns continue to be the main reason the Crusader units suffer losses, rather than to enemy tanks.

By the end of 1941, only the 2nd Armoured Brigade retained the Crusaders, the rest of the other tank units were being refitted with better tanks, such as the M3 Grant medium tank from the American Lend-Lease. Crusader units were also refitted with the more powerful Crusader Mk.III with the 6-pounder, which improved the Crusader's ability to destroy the gradually stronger German tanks. After General Bernard Montgomery took command of the British Army in 1942, more British tank units were reequipped with the Grant and M4 Sherman tanks while the Crusaders were relegated from the front-lines to "light squadrons" meant to flank the enemy and attacked at its exposed sides. When the British 1st Army engaged the Axis at Tunisia, some tank regiments still use Crusaders mixed in with Valentine tanks. These units in the 26th Armoured Brigade, code named "Blade Force", worked alongside the 78th Infantry Division as an independent armoured column. During Tunisia, the 1st Army was already converting the tank regiments into Shermans, but the 8th Army continued to use the Crusaders for much longer, which would see use at the Battle of Wadi Akarit and Mareth Line.

After the North African Campaign, the Crusaders no longer saw any use in the front-lines and were used in other roles such as gun tractors with 17-pounders or anti-aircraft mounts such as the Crusader AA Mk I and Mk II Some Crusader tanks equipped the tank regiments that stayed back at the British Homelands such as the 11th Armoured Division.

Survivors

About 21 Crusaders still exist intact in various parts of the world. The most notable places with the Crusaders are South Africa with 8 known survivors, a running Crusader Mk III at Bovington Tank Museum at England, and an anti-aircraft version at Musée des Blindés in France.

Media

Skins
Videos

See also

Links to the articles on the War Thunder Wiki that you think will be useful for the reader, for example:

  • reference to the series of the vehicles;
  • links to approximate analogues of other nations and research trees.

External links

Paste links to sources and external resources, such as:

  • topic on the official game forum;
  • other literature.


Nuffield Mechanizations and Aero Limited
Cruiser Tanks 
Tank, Cruiser, Mk III (A13 Mk I)  A13 Mk I · A13 Mk I (3rd R.T.R.)
Tank, Cruiser, Mk IV (A13 Mk II)  A13 Mk II · A13 Mk II 1939
Tank, Cruiser, Mk VI, Crusader (A15)  Crusader II · Crusader "The Saint" · Crusader III
Tank Destroyers  Tortoise
SPAAs  Crusader AA Mk I · Crusader AA Mk II
Export  ▄Crusader Mk.II

Britain light tanks
A13  A13 Mk I · A13 Mk I (3rd R.T.R.) · A13 Mk II · A13 Mk II 1939
A15  Crusader II · Crusader "The Saint" · Crusader III
A17  Tetrarch I
IFV  Warrior
Wheeled  Daimler Mk II · AEC Mk II · Fox · Vickers Mk.11
Other  VFM5
South Africa 
SARC  SARC MkIVa · SARC MkVI (2pdr) · SARC MkVI (6pdr)
Ratel  Ratel 90 · Ratel 20
Rooikat  Rooikat Mk.1D · Rooikat 105 · Rooikat MTTD
Other  Concept 3 · Eland 90 Mk.7
USA  Stuart I · Stuart III