Crusader III

From War Thunder Wiki
Jump to: navigation, search
RANK 4 FRANCE
Somua SM PACK
This page is about the British light tank Crusader III. For other versions, see Crusader (Family).
Crusader III
uk_crusader_mk_3.png
GarageImage Crusader III.jpg
ArtImage Crusader III.png
Crusader III
AB RB SB
3.0 3.0 3.0
Class:
Research:4 600 Specs-Card-Exp.png
Purchase:16 000 Specs-Card-Lion.png
Show in game

Description

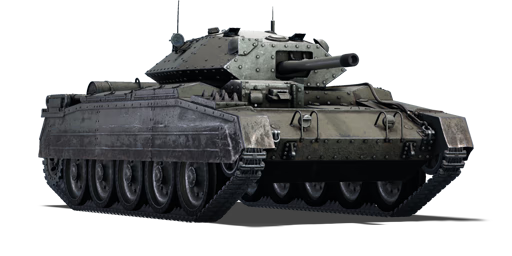
The Tank, Cruiser Mark VIB, Crusader III (A15) is the third variant of the A15 Crusader cruiser tank family. Due to design delays with the British Army's seventh cruiser tank, the Cavalier (A24), the Crusader III was the first British tank to be equipped with the 57 mm Ordnance QF 6-pounder tank gun. An extractor fan was also installed in the turret to remove fumes produced by the tank gun's fire. The tank crew was reduced to three as the larger tank gun limited turret space. To make room for ammunition storage, the auxiliary turret was removed. The Crusader III was also equipped with the Mark IV Liberty engine, which solved many of the earlier reliability difficulties. Production began in May 1942, with 144 units completed by July. The Crusader III first saw service in October 1942, with approximately 100 units taking part in the Second Battle of El Alamein.

Introduced in Update 1.55 "Royal Armour", the Crusader III boasts significant improvements in firepower over the Crusader II. Despite being categorized as a light tank, the Crusader III is only light due to its light armour. The 57 mm Ordnance QF 6-pounder outperforms the previous 40 mm Ordnance QF 2-pounder mounted on the Crusader II. This translates to enough firepower to engage most tanks from the front. Furthermore, as a result of its low profile, players can easily hide behind vegetation and obstacles such as walls, shooting from a concealed position or retreating under smoke if the situation becomes too dangerous. Overall, this tank suits the playstyle of a frontline support tank; moreover, players can act as flankers and either neutralize threats or scout for enemy tanks for allies.

General info

Survivability and armour

Smoke grenades
Creation of a smoke screen in front of the vehicle
Armourfront / side / back
Hull20 / 14 / 14
Turret30 / 28 / 28
Crew3 people
Visibility76 %

Like the previous Crusader II, the Crusader III's armour is just like other common light tanks. The hull front glacis is only 20 mm, which is not enough to stop pretty much any round unless angled at an extreme. The most noticeable difference is the absence of the MG turret next to the driver, which directly exposes the unsloped hull armour behind, reducing its sturdiness. The hull side is ~30 mm, which can deflect some low-penetrating rounds when angling, but generally it is still very weak. The turret front loses the huge rounded gun mantlet of the Crusader II. Although it now looks cleaner and uncluttered, the flat 30 mm armour becomes truly untrustworthy against any vehicle as it simply cannot bounce anything. The turret side is sloped but thin, at 14 mm it will not stop any shell unless the shell happens to hit a heavily angled part. Overall the Crusader III has poor armour protection and can only resist MG bullets and some autocannon shells. Even SPAAs (e.g. Wirbelwind, M15 CGMC, etc) can penetrate it frontally.

The post-penetration survivability is a lot worse than the Crusader II. Because of the lack of MG turret, the MG gunner is also gone, leaving only 3 crew members, 2 of which are closely packed inside the turret. At this BR there will be a lot more vehicles using explosive-packed shells (e.g. M24, Pz.IV F2, Chi-Nu, T-34 1942, etc) and they will easily penetrate the Crusader III and wipe out all the crew. Make use of your smoke grenades when needed to increase your low survivability.

Armour type:

  • Rolled homogeneous armour
  • Cast homogeneous armour (Gun mantlet, Driver's port)
  • Structural steel (Side skirts)
Armour Front Sides Rear Roof
Hull 20 mm (33°) Front plate
9 mm (78-85°), 20 mm (61°) Front glacis
20 mm (26-64°) Lower glacis
4 + 14 + 14.27 mm 14 mm (44-50°) Top
(14-52°) 14 mm Bottom
7 mm
Turret 31.75 mm (1°) + 19.05 mm (1°) Turret front
30 mm (0-44°) Gun mantlet
14 mm (50°) 17 mm (28-53°) 12.7 mm

Notes:

  • Suspension wheels and tracks are 15 mm thick.
  • Interior 14.27 mm side armour is made of rolled homogeneous armour.

Mobility

Speedforward / back
AB47 / 8 km/h
RB and SB43 / 7 km/h
Number of gears4 forward
1 back
Weight20.3 t
Engine power
AB649 hp
RB and SB340 hp
Power-to-weight ratio
AB32.0 hp/t
RB and SB16.7 hp/t

The Crusader III is about 4 tons heavier than the preceding Crusader II but has no engine upgrades, lowering its power-to-weight ratio. This is on par with most medium tanks but lower than most light tanks, resulting in a more sluggish acceleration especially on bad terrains like mud and snow. The maximum forward speed is unaffected, though the Crusader III now needs more time to pick up speed, limiting its tactical agility. The hull traverse remains satisfactory.

The reverse is still bad, at -7 km/h. You must be extra aware about potential enemies as the reverse and acceleration of the Crusader III will not let you escape very quickly. In general, the Crusader III somewhat feels a lot more like a fast medium tank (e.g. M4A4, Pz.IV G) rather than a light tank (e.g. M24, Sd.Kfz.234/2) which may affect its playstyle. The poor turning speed can be particularly dangerous if flanked by a faster/more manoeuvrable tank, (e.g. M3A3 (Italy), M5A1, M22, or BT-7).

Game Mode Max Speed (km/h) Weight (tons) Engine power (horsepower) Power-to-weight ratio (hp/ton)
Forward Reverse Stock Upgraded Stock Upgraded
Arcade 47 8 20.3 527 649 25.96 31.97
Realistic 43 7 301 340 14.83 16.75

Modifications and economy

Repair costBasic → Reference
AB453 → 650 Sl icon.png
RB507 → 728 Sl icon.png
SB629 → 903 Sl icon.png
Total cost of modifications8 470 Rp icon.png
9 540 Sl icon.png
Talisman cost640 Ge icon.png
Crew training4 500 Sl icon.png
Experts16 000 Sl icon.png
Aces160 Ge icon.png
Research Aces190 000 Rp icon.png
Reward for battleAB / RB / SB
30 / 40 / 50 % Sl icon.png
118 / 118 / 118 % Rp icon.png
Modifications
Mobility Protection Firepower
Mods new tank traks.png
Tracks
Research:
420 Rp icon.png
Cost:
470 Sl icon.png
90 Ge icon.png
Mods new tank suspension.png
Suspension
Research:
320 Rp icon.png
Cost:
360 Sl icon.png
70 Ge icon.png
Mods new tank break.png
Brake System
Research:
320 Rp icon.png
Cost:
360 Sl icon.png
70 Ge icon.png
Mods new tank filter.png
Filters
Research:
530 Rp icon.png
Cost:
600 Sl icon.png
115 Ge icon.png
Mods new tank transmission.png
Transmission
Research:
550 Rp icon.png
Cost:
620 Sl icon.png
115 Ge icon.png
Mods new tank engine.png
Engine
Research:
550 Rp icon.png
Cost:
620 Sl icon.png
115 Ge icon.png
Mods tank tool kit.png
Improved Parts
Research:
420 Rp icon.png
Cost:
470 Sl icon.png
90 Ge icon.png
Mods extinguisher.png
Improved FPE
Research:
320 Rp icon.png
Cost:
360 Sl icon.png
70 Ge icon.png
Mods tank reinforcement uk.png
Crew Replenishment
Research:
530 Rp icon.png
Cost:
600 Sl icon.png
115 Ge icon.png
Mods new tank horizontal aiming.png
Horizontal Drive
Research:
420 Rp icon.png
Cost:
470 Sl icon.png
90 Ge icon.png
Mods tank ammo.png
57mm_britain_6pdr_AP_HV_ammo_pack
Research:
420 Rp icon.png
Cost:
470 Sl icon.png
90 Ge icon.png
Mods tank ammo.png
57mm_britain_6pdr_APC_ammo_pack
Research:
320 Rp icon.png
Cost:
360 Sl icon.png
70 Ge icon.png
Mod arrow 0.png
Mods tank cannon.png
Adjustment of Fire
Research:
320 Rp icon.png
Cost:
360 Sl icon.png
70 Ge icon.png
Mods airstrike.png
Airstrike
Research:
320 Rp icon.png
Cost:
360 Sl icon.png
70 Ge icon.png
Mods tank ammo.png
57mm_britain_6pdr_APCBC_ammo_pack
Research:
530 Rp icon.png
Cost:
600 Sl icon.png
115 Ge icon.png
Mods new tank vertical aiming.png
Elevation Mechanism
Research:
530 Rp icon.png
Cost:
600 Sl icon.png
115 Ge icon.png
Mods art support.png
Artillery Support
Research:
550 Rp icon.png
Cost:
620 Sl icon.png
115 Ge icon.png
Mods scouting.png
Improved optics
Research:
550 Rp icon.png
Cost:
620 Sl icon.png
115 Ge icon.png
Mods smoke screen.png
Smoke grenade
Research:
550 Rp icon.png
Cost:
620 Sl icon.png
115 Ge icon.png

Armaments

Main armament

Shoulder stabilizer
Reduces the swing of the gun in one plane while moving
Ammunition65 rounds
Reloadbasic crew → aces
5.2 → 4.0 s
Vertical guidance-12° / 20°

The Crusader III is upgunned with a more powerful 57 mm QF 6pdr Mk.III cannon. Despite the increased calibre, the cannon still has an impressive short reload time of ~5 seconds. This makes up for its lack of explosive shells and allows the Crusader III to fire more rounds to finish an enemy. The gun depression is -12°, although it is 3° less than the Crusader II it is still excellent, meaning that the Crusader III can peek over most ridges in most maps, giving it more flexible engagement opportunities. A vertical shoulder stabiliser assists your aiming when the tank is slower than ~7 km/h, giving you a significant advantage over the non-stabilised opponents like the T-34, Pz.IV F2, Chi-Nu, etc.

Do watch out for any M4 and M24 as they have proper vertical stabiliser and can stabilise their guns at slightly higher speeds. The turret rotation is just as fast as the Crusader II, at ~24°/s the Crusader III will be able to respond to fast moving targets as well as engage targets at multiple directions easily.

57 mm 6pdr OQF Mk.III Turret rotation speed (°/s) Reloading rate (seconds)
Mode Capacity Vertical Horizontal Stabilizer Stock Upgraded Full Expert Aced Stock Full Expert Aced
Arcade 65 -12°/+20° ±180° Shoulder 34.3 47.4 57.6 63.7 67.8 5.20 4.60 4.24 4.00
Realistic 21.4 25.2 30.6 33.8 36.0

Ammunition

The default Shot Mk.5 ammo is just enough to destroy light and medium tanks within normal combat distance (0-600 m). With a well placed shot lining up crew compartments, the solid ammo can actually result in some one-shots especially when the target tank is compact (e.g. M24, T-34).

When dealing with heavier armoured targets, the researchable Shot Mk.9 with its maximum 122 mm penetration becomes useful. It can penetrate heavy tanks like a KV-1 (L-11) when they are not angling. Other targets include the Pz.IV H and the StuG III G which have 100 mm flat frontal hull armour. One drawback is that it is the slowest travelling AP shell the Crusader III has (~800 m/s), so more lead is needed when shooting moving targets.

The other 3 unlockable ammo types - Shot Mk.5 HV, Shot Mk.8, and Shell Mk.10 - are not of much use. They do not offer better penetration than the Mk.9 APCBC, and the HE is useless given its small calibre and the fact that most of the times the player will not have time to switch ammo when engaging unarmoured targets like the GAZ-MM (72-K) and the Sd.Kfz. 6/2.

Penetration statistics
Ammunition Type of
warhead
Penetration @ 0° Angle of Attack (mm)
10 m 100 m 500 m 1,000 m 1,500 m 2,000 m
Shot Mk.5 AP 101 97 82 66 53 43
Shot Mk.5 HV AP 108 104 87 70 57 46
Shot Mk.8 APC 110 106 89 72 59 48
Shot Mk.9 APCBC 122 118 101 84 70 58
Shell Mk.10 HE 9 9 9 9 9 9
Shell details
Ammunition Type of
warhead
Velocity
(m/s)
Projectile
mass (kg)
Fuse delay Fuse sensitivity
(mm)
Explosive mass
(TNT equivalent) (g)
Ricochet
0% 50% 100%
Shot Mk.5 AP 815 2.8 - - - 47° 60° 65°
Shot Mk.5 HV AP 853 2.8 - - - 47° 60° 65°
Shot Mk.8 APC 853 2.87 - - - 48° 63° 71°
Shot Mk.9 APCBC 801 3.23 - - - 48° 63° 71°
Shell Mk.10 HE 655 2.72 0 0.1 590 79° 80° 81°

Ammo racks

Ammo racks of the Crusader III
Full
ammo
1st
rack empty
2nd
rack empty
3rd
rack empty
4th
rack empty
Visual
discrepancy
65 46 (+19) 31 (+34) 16 (+49) (+64) No

Notes:

  • Turret empty: 46 (+19) shells

Optics

Crusader III Optics
Default magnification Maximum magnification
Main Gun optics x1.9 x3.5
Comparable optics AMR.35 ZT3

Machine guns

Ammunition3 375 rounds
Belt capacity225 rounds
Reloadbasic crew → aces
10.4 → 8.0 s
Fire rate600 shots/min
Main article: BESA (7.92 mm)

The Crusader III loses the MG turret on the hull, leaving one coaxial 7.92 mm BESA MG. This MG is only good at knocking out completely exposed crew on open vehicles like the Sd.Kfz. 6/2 and GAZ-AAA (DShK) trucks. Its fast rate of fire of 600 rounds/min makes it quite effective at this. It can also destroy map obstacles like wooden fences and barrels, and mark enemies out on the minimap. Apart from these, the BESA MG cannot possibly hurt even lightly-armoured vehicles like the BTR-152A and Marder III due to its low penetration.

7.92 mm BESA
Mount Capacity (Belt) Fire rate Vertical Horizontal
Coaxial 3,375 (225) 600 N/A N/A

Usage in battles

A Crusader III heading to combat on Poland.

The Crusader tank was designed to be fast and highly mobile, exploiting gaps in enemy battle lines by penetrating the flanks and disrupting the enemy from behind. In the game, the Crusader should be used in a similar fashion. It is quick, well armed and highly manoeuvrable, making it great at rushing capture points and exploiting the enemies flanks. The 57 mm gun is excellent for its tier, with high penetration and good ballistics. Very few tanks can withstand a hit from this gun without major damage. When uptiered, it is a good sneaky flanker in later rank matches with the gun being still effective.

The tank's low profile is its main advantage. You can hide easily among vegetation and obstacles like walls, shooting from a concealed position or retreating under smoke if the situation is looking a little too dangerous.

Of course, you can't have everything. The tank has thin armour, so it isn't suitable as a front line tank unless in a supporting role. The armour is sloped on some areas, so you may bounce some smaller calibre shells. Explosive shells are your worst nightmare, so avoid getting hit by them. The 57 mm gun has great penetration, but the Crusader has very thin armour. There are still plenty of enemies that can give you some trouble.

While the battle is about staying alive in the tank, do not forget about the allies. This Crusader is a great support tank, not just in firepower, but is also capable of scouting and repairing for the team.

In recap, preferably play as a faster medium tank in a support role amidst the frontline during early module research, additionally players can act as flankers and either eliminate the threats themselves or scout the enemy tanks for allies in SPGs or Strike Aircraft.

Enemies worth noting

  • T-34 (1940) - You will begin encountering early models of T-34s at this tier. You can penetrate their turret easily and drivers port easily, but they can pose a serious problem when angled properly. Also, the 76 mm L-11 gun can easily take you out with its massive explosive power. Try to take out the gunner first and then deal with the rest of the crew members for a safe kill.
  • Pz.IV F1 - The rapid-fire 75 mm short-barrelled gun can fire HEAT or APCBC rounds, which can penetrate and cause serious damage to the Crusader. Luckily, the F1 has flat armour which can be easily penetrated from the front. Range is your friend with these tanks. Their gun is very difficult to aim accurately over 500 m. Hit it before it hits you and you will most likely come out on top.
  • Pz.IV F2 - You may have to face off against the dreaded Panzer IV F2. Its gun is accurate, high penetration and causes massive damage upon penetration. It will kill you easily at range. Fortunately, it has the same weak flat armour as the F1, so can be easily dealt with if you get off the first shot
  • KV-1 (L-11) - These heavy tanks are rare at your battle rating, but can still be faced. They have great, bouncy armour and a deadly gun. Try to hit the turret cheeks or the side/rear armour.
  • Pz.III L - This Panzer III has a great, high-velocity gun and excellent frontal armour. The extra 20 mm high hardness plates make a massive difference to the frontal armour, making it more bouncy and harder to penetrate. Fortunately, your gun can reliably penetrate the Panzer III L. If you are unsure, aim for the drivers port to kill the driver, gunner and commander.
  • StuG III G: the StuG III tank destroyers have powerful anti-tank guns and low silhouette, making them deadly hunters. The G model features 30 mm add-on armour at the front, plus the option to use 20 mm add-on tracks, increasing the total thickness to 100 mm. Though it is poorly angled, this thickness can still resist quite some shots at this BR especially when taking hits from far away. However its sides are very thin, only 30 mm plus 5 mm side skirts which can be easily penetrated by the Crusader III even when angling. The Crusader can frontally penetrate the StuG III G's non-sloped armour up close (<400 m). Shoot the right side to knock out the gunner and commander in one go. Avoid the sloped parts between the flat parts. Be careful as its 75 mm cannon can easily knock you out in return with a single shot, at any range.

Almost every tank can kill you easily, even with Rank I guns. Stay mobile or hidden, take advantage of the tanks low profile and shoot only when you know you can penetrate. This can make you a formidable tank on the battlefield.

Pros and cons

Pros:

  • Low profile acts as first way of protection
  • Lethal semi-stabilized and also quick firing gun; capable of fighting higher rank vehicles as ▀T 34 747 (r), Pz.Bef.Wg.IV J or ▀KV-IB
  • Armour is thin but has odd angles, causing some rounds to bounce
  • Reverse speed is much better than the Cromwell chassis, though still only average
  • Good manoeuvrability
  • Carries 50 smoke grenades, can lay down long smoke screens to cover allies on large areas

Cons:

  • Low power to weight ratio; not as fast as other light tanks at this rank
  • Weak armour overall, turret is flat and easily pierced by most guns at the rank
  • Only 3 crew members, relatively easy to kill in one shot

History

Development

In 1938, the General Staff of the British Army requested for a cruiser tank that was lighter and more affordable than the heavier A16 cruiser design developed by Nuffield Mechanizations & Aero. One of these designs was the designation Tank, Cruiser Mk.V based off the A13 cruiser tanks, named the "Covenanter", and Nuffield was invited to become part of its development team, but they refused due to interest in developing their own cruiser tank. Their tank was designated the Tank, Cruiser Mk.VI Crusader and fell under the General Staff specification of A15. The Crusader was a parallel design to the Covenanter but was ready six weeks earlier than the Covenanter despite starting at a later time. The Crusader was adopted into service with the British Army in 1941 and the 5,300 units were manufactured between 1940 to 1943.

Design

The Crusader features a new design that differs from its cruiser tank predecessors. The Christie suspension system on the Crusader had five road wheels for it instead of the usual four, which improves weight distribution of the increased 20-ton weight of the Crusader compared to the 14 tons of the A13 cruisers. The engine, steering system, and cooling system on the Crusader was different as well, but the Covenanter and Crusader use the same main turret. The polygonal shape of the turret gives the crew inside more room for the turret ring diameter.

The Crusader Mk.I and Mk.II were equipped with the 2-pounder, which was aimed by the gunner inside with a padded shaft that allows them to elevate the gun by simply adjusting his own height. Later in the war where an up-gun of the tank armament was necessary and newer tanks such as the Cromwell was delayed, the Crusader was upgraded into the Crusader Mk III variant with a 6-pounder instead, which restricted turret space, requiring the turret crew to be reduced from three to two. These first saw action in the Second Battle of El Alamein in October 1942.

Combat usage

The Crusader first saw action at North Africa, right after the British had been pushed back to the Egyptian border by Axis forces. The Crusaders were part of the huge shipment in the Malta Convoys to reequip the British forces there. Enough Crusaders arrive that the entire 6th Royal Tank Regiment was refitted with them, which joined up with the 2nd Royal Tank Regiment to form the 7th Armoured Brigade "Desert Rats". The brigade's first action was in Operation Battleaxe, though it was delayed due to adapting the tanks for the desert environment. The operation, which called for the relieve of the siege of Tobruk in June, was initiated in June to which 11 Crusader tanks were lost to anti-tank guns, plus many more to mechanical faults. While more Crusader tanks came in to reinforce the cruiser tank forces, there were never enough to supply the continuously expanding armoured units as 7th Brigade was combined with the 7th Hussars, the 2nd Armoured Brigade was added to the 7th Armoured Division, and the 8th Hussars was combined with the 4th Armoured Brigade. Overall, the Crusaders proved effective in the North African Campaign, the Crusader was faster than any tanks on the opposing side and the 2-pounder was lethal to the Panzer III, but the tank suffered from its thin armour, mechanical problems in the desert, and the growing deficiency of the 2-pounder, which didn't have enough range to destroy farther tanks. The Crusader design also caused the ammo racks on the tank to easily ignite due to unprotected racks and shot traps on the turret design. Anti-tank guns continue to be the main reason the Crusader units suffer losses, rather than to enemy tanks.

By the end of 1941, only the 2nd Armoured Brigade retained the Crusaders, the rest of the other tank units were being refitted with better tanks, such as the M3 Grant medium tank from the American Lend-Lease. Crusader units were also refitted with the more powerful Crusader Mk.III with the 6-pounder, which improved the Crusader's ability to destroy the gradually stronger German tanks. After General Bernard Montgomery took command of the British Army in 1942, more British tank units were re-equipped with the Grant and M4 Sherman tanks while the Crusaders were relegated from the front-lines to "light squadrons" meant to flank the enemy and attacked at its exposed sides. When the British 1st Army engaged the Axis at Tunisia, some tank regiments still use Crusaders mixed in with Valentine tanks. These units in the 26th Armoured Brigade, code-named "Blade Force", worked alongside the 78th Infantry Division as an independent armoured column. During Tunisia, the 1st Army was already converting the tank regiments into Shermans, but the 8th Army continued to use the Crusaders for much longer, which would see use at the Battle of Wadi Akarit and Mareth Line.

After the North African Campaign, the Crusaders no longer saw any use in the front-lines and were used in other roles such as gun tractors with 17-pounders or anti-aircraft mounts such as the Crusader AA Mk.I and Mk.II. Some Crusader tanks equipped the tank regiments that stayed back at the British Homelands such as the 11th Armoured Division.

Survivors

About 21 Crusaders still exist intact in various parts of the world. The most notable places with the Crusaders are South Africa with 8 known survivors, a running Crusader Mk.III at Bovington Tank Museum at England, and an anti-aircraft version at Musée des Blindés of Saumur in France

Media

Skins
Videos

See also

Links to the articles on the War Thunder Wiki that you think will be useful for the reader, for example:

  • reference to the series of the vehicles;
  • links to approximate analogues of other nations and research trees.

External links

Paste links to sources and external resources, such as:

  • topic on the official game forum;
  • other literature.


Nuffield Mechanizations and Aero Limited
Cruiser Tanks 
Tank, Cruiser, Mk III (A13 Mk I)  A13 Mk I · A13 Mk I (3rd R.T.R.)
Tank, Cruiser, Mk IV (A13 Mk II)  A13 Mk II · A13 Mk II 1939
Tank, Cruiser, Mk VI, Crusader (A15)  Crusader II · Crusader "The Saint" · Crusader III
Tank Destroyers  Tortoise
SPAAs  Crusader AA Mk I · Crusader AA Mk II
Export  ▄Crusader Mk.II

Britain light tanks
A13  A13 Mk I · A13 Mk I (3rd R.T.R.) · A13 Mk II · A13 Mk II 1939
A15  Crusader II · Crusader "The Saint" · Crusader III
A17  Tetrarch I
IFV  Warrior
Wheeled  Daimler Mk II · AEC Mk II · Fox · Vickers Mk.11
Other  VFM5
South Africa 
SARC  SARC MkIVa · SARC MkVI (2pdr) · SARC MkVI (6pdr)
Ratel  Ratel 90 · Ratel 20
Rooikat  Rooikat Mk.1D · Rooikat 105 · Rooikat MTTD
Other  Concept 3 · Eland 90 Mk.7
USA  Stuart I · Stuart III