A13 Mk I

From War Thunder Wiki
Jump to: navigation, search
Rank 6 USA
F-5C Pack
This page is about the British light tank A13 Mk I. For other versions, see A13 (Family).
A13 Mk I
uk_a_13_mk1.png
GarageImage A13 Mk I.jpg
ArtImage A13 Mk I.png
A13 Mk I
AB RB SB
1.0 1.0 1.0
Class:
Research:Free
Purchase:Free
Show in game

Description

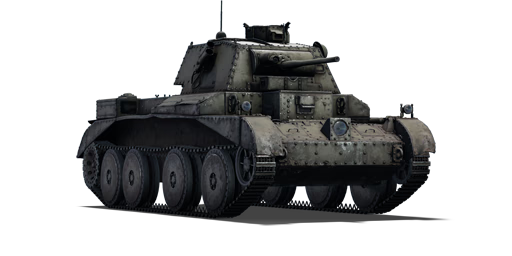
The Tank, Cruiser, Mark III (A13 Mark I) is the first variant of the A13 cruiser tank family. It was the third cruiser tank designed for the British Army. The tank is equipped with the Christie suspension system, which allows for higher speeds and better cross-country performance than previous cruiser tank families, which used triple-wheeled bogie suspension. Like other British cruisers, the A13 Mark I was quick but under-armed and mechanically unstable. The A13 Mark I was part of the British Expeditionary Force sent to France, and equipped units in the 1st Armoured Division, however, most of them were destroyed. In 1940-1941, a few were used in Greece and the Western Desert of Libya, supplying elements of the 7th Armoured Division. The design was used as the basis for the A13 Mark II.

Introduced in Update 1.55 "Royal Armour", the A13 Mark I is a highly manoeuvrable tank with a decent tank gun, good mobility, and extremely light armour. The A13 Mark I should not be utilized on the front lines. Instead, use your mobility to your advantage by spotting, flanking, and supporting your teammates while obscuring your foes with strategically placed smoke screens in key areas. Target isolated targets in flanking tactics to fully use the element of surprise and outflank your opponent. Never expose yourself for an extended period of time since even anti-aircraft guns are capable of damaging your light tank. In muddy terrain, however, the A13 Mark I may seem slow and has a tendency to slide sideways.

General info

A13 Mk I on Jungle

Survivability and armour

Smoke grenades
Creation of a smoke screen in front of the vehicle
Armourfront / side / back
Hull14 / 14 / 14
Turret14 / 14 / 14
Crew4 people
Visibility93 %

Armour type:

  • Rolled homogeneous armour
  • Cast homogeneous armour (Gun mantlet)
Armour Front Sides Rear Roof
Hull 14 mm Front plate
14 mm (0-62°) Front glacis
14 mm (64°) Lower glacis
7 + 7 mm 14 mm (0-62°) 14 mm
Turret 14 mm (0-15°) Turret front
14 mm (1-63°) Gun mantlet
14 mm (21°) 14 mm (2°) 14 mm
Cupola 14 mm 14 mm 14 mm 14 mm

Notes:

A13 Mk I on Jungle
  • Suspension wheels and tracks are 15 mm thick while the torsion bars in between the side armour are 10 mm thick.
  • There is a 14 mm thick armour plate between the engine bay and the driving compartment.

The A13 Mk I's armour is only strong enough to provide protection against rifle-calibre machine guns. Even tanks or SPAAs armed with heavy machine guns will be able to penetrate the thin, flat armour from close range, and aircraft with HMGs or cannons will be able to strafe you and inflict serious or fatal damage. Additionally, the four crew members are packed such that a single explosive shell to the turret or front of the hull will knock out all of them. To make matters worse, they are completely surrounded by ammo, making getting ammo-racked a serious risk. The best strategy for survival is to avoid exposing yourself and shoot to disable enemies immediately whenever possible, as you will likely not be able to survive return fire from a skilled opponent. Should you take a hit and survive, consider using your smoke grenades to disengage and find cover quickly.

The A13 Mk I is equipped with smoke grenades. Use your forward-launching smoke to create a wall of smoke in a strategic place. It can be used to cover your allies when capturing a point, or to cover your movement when flanking in a street (urban environment). However, you can only carry two smoke grenades, and firing the smoke grenade launcher uses both of them so it is best to save them for a crucial moment.

Mobility

Speedforward / back
AB54 / 7 km/h
RB and SB48 / 6 km/h
Number of gears5 forward
1 back
Weight13.8 t
Engine power
AB649 hp
RB and SB340 hp
Power-to-weight ratio
AB47.0 hp/t
RB and SB24.6 hp/t
Game Mode Max Speed (km/h) Weight (tons) Engine power (horsepower) Power-to-weight ratio (hp/ton)
Forward Reverse Stock Upgraded Stock Upgraded
Arcade 54 7 13.8 527 649 38.19 47.03
Realistic 48 6 301 340 21.81 24.64

The A13 Mk I is quite a fast light tank on flat ground without obstacles, but it suffers from the gearbox's poor ratios in rougher terrain. Turning and climbing, and especially turning and climbing simultaneously, can feel slippery or stuttery. Despite this shortcoming, you are more than fast enough to act as a flanker or spotter, and you can easily get around to the side of unaware or slow opponents and take them by surprise.

Even though the A13 has good mobility, it sometimes handles strangely: it loses speed on turns, does not accelerate quite as fast as its overpowered engine should allow and hill-climbing is difficult. All of these flaws come from the gearbox, which has bad and uneven ratios, resulting in a kick when changing speeds. Know that you should always keep an eye on the "gear" counter top-left of your screen (activate it in the options menu) since it provides you crucial information on how your tank will react to your commands. With a bit of practice, one should swiftly master these peculiarities.

Modifications and economy

Repair cost
ABfree
RBfree
SBfree
Total cost of modifications3 770 Rp icon.png
170 Sl icon.png
Talisman cost190 Ge icon.png
Crew trainingfree
Experts1 000 Sl icon.png
Aces10 Ge icon.png
Research Aces80 000 Rp icon.png
Reward for battleAB / RB / SB
10 / 10 / 10 % Sl icon.png
100 / 100 / 100 % Rp icon.png
Modifications
Mobility Protection Firepower
Mods new tank traks.png
Tracks
Research:
330 Rp icon.png
Cost:
15 Sl icon.png
45 Ge icon.png
Mods new tank suspension.png
Suspension
Mods new tank break.png
Brake System
Research:
300 Rp icon.png
Cost:
13 Sl icon.png
40 Ge icon.png
Mods new tank filter.png
Filters
Mods new tank transmission.png
Transmission
Mods new tank engine.png
Engine
Mods tank tool kit.png
Improved Parts
Mods extinguisher.png
Improved FPE
Mods tank reinforcement uk.png
Crew Replenishment
Mods new tank horizontal aiming.png
Horizontal Drive
Research:
330 Rp icon.png
Cost:
15 Sl icon.png
45 Ge icon.png
Mods tank ammo.png
40mm_uk_2pdr_APHV_ammo_pack
Research:
330 Rp icon.png
Cost:
15 Sl icon.png
45 Ge icon.png
Mods tank cannon.png
Adjustment of Fire
Research:
300 Rp icon.png
Cost:
13 Sl icon.png
40 Ge icon.png
Mods tank ammo.png
40mm_uk_2pdr_APHE_ammo_pack
Research:
300 Rp icon.png
Cost:
13 Sl icon.png
40 Ge icon.png
Mods new tank vertical aiming.png
Elevation Mechanism
Research:
410 Rp icon.png
Cost:
18 Sl icon.png
55 Ge icon.png
Mods smoke screen.png
Smoke grenade
Research:
410 Rp icon.png
Cost:
18 Sl icon.png
55 Ge icon.png
Mods art support.png
Artillery Support
Research:
530 Rp icon.png
Cost:
25 Sl icon.png
70 Ge icon.png
Mods tank ammo.png
40mm_uk_2pdr_APCBC_ammo_pack
Research:
530 Rp icon.png
Cost:
25 Sl icon.png
70 Ge icon.png

Armaments

Main armament

Shoulder stabilizer
Reduces the swing of the gun in one plane while moving
Ammunition87 rounds
Reloadbasic crew → aces
3.6 → 2.8 s
Vertical guidance-15° / 20°
Main article: QF 2-pounder (40 mm)
40 mm QF 2-pounder Turret rotation speed (°/s) Reloading rate (seconds)
Mode Capacity Vertical Horizontal Stabilizer Stock Upgraded Full Expert Aced Stock Full Expert Aced
Arcade 87 -15°/+20° ±180° Shoulder-stop, Vertical 15.23 21.08 25.60 28.31 30.12 3.64 3.22 2.97 2.80
Realistic 9.52 11.20 13.60 15.04 16.00

The QF 2-pounder is a very versatile gun, capable of a high rate of fire and fair accuracy at close range. The A13 Mk I mounts it in a good turret, which has solid traverse speed and excellent gun depression, as well as a shoulder stabilizer that allows for accurate fire when coming to a stop and at slow speeds. The QF has only two main drawbacks - a lack of post-penetration damage, as the only shells with good penetration have no explosive filler, and poor accuracy at longer ranges. These can be overcome by keeping engagements around the 100-200 m range and aiming accurately, first taking out the enemy's weapon and then knocking out their crew or detonating their ammunition with follow-up shots, which are assisted by the weapon's fast reload speed.

Since the 40 mm QF 2-pounder is used on most British tanks at Rank I, it is important to know it well. This cannon has a major disadvantage at distance since its projectiles lose around 20 mm of penetration for every 500 m they travel. As if this was not enough, it has poor accuracy. Even with the Adjustment of fire modification, one should target large components (crew, engine, transmission) or, as distance increases (500 m or more), the general centre of the foe. Firing it, you will easily notice its other flaw: it inflicts almost no post-penetration damage, which means you can't exclusively aim at the centre of mass of enemy vehicles, you will have to target crew members positions.

On the other hand, this cannon has five major advantages: reload speed, close-quarter penetration, a primitive stabilizing system, lots of ammo and awesome gun depression. Its fast reloading speed allows you to compensate for its poor accuracy. Missed a shot? Why not take another even before you can re-position! The cannon's close quarters penetration, which is one of the best at its tier, is also a plus. Your enemies will only block your shot if you happen to hit a steeply-angled plate of armour. The primitive shoulder-stabilizer allows the tank to fire on the move as well. That being said, it works best at low speeds and on relatively flat road, but it still allows the cannon to be much more precise than the comparable BT-7 with its 20-K. Last but not least, small shells means more shells. The A13 can bring up to 87 shells into the game, much more than you need to knock out 3-4 tanks. This allows you to try and suppress an enemy and keep it in cover by constantly firing near it (at this rank, this tactic can prove effective against new players). Finally, its good gun depression combined with its excellent elevation speed enables it to fire over hills, exposing only a small bit of the turret, shooting and disappearing swiftly. Proper use of these features allows this tank to compete well at its BR.

Ammunition

  • Shot Mk.1 AP/T - Stock armour-piercing solid shot. Decently effective against most vehicles at this tier, but loses penetration very quickly at range.
  • Shot Mk.IXB APCBC/T - Ballistic-capped solid shot, best penetrating shell available for the A13 Mk I. Very effective against most vehicles at this tier, and much better at maintaining penetration at range than Mk. 1 shot. However, it becomes much less effective beyond 500 m.
  • Shot Mk.1 APHV/T - AP solid shot with a higher velocity than the previous ones. Easier to aim but loses penetration extremely quickly at range.
  • Shell Mk.1 AP/T - APHE shell containing an explosive filler and which is likely to knock out anything it penetrates in a single shot. Although it penetrates less than the other shells, it is devastating against tanks with weaker armour but will encounter difficulty with the tougher tanks at this battle rating.

Penetration statistics
Ammunition Type of
warhead
Penetration @ 0° Angle of Attack (mm)
10 m 100 m 500 m 1,000 m 1,500 m 2,000 m
Shot Mk.1 AP/T AP 72 68 52 37 27 19
Shot Mk.IXB APCBC/T APCBC 89 86 77 66 57 50
Shot Mk.1 APHV/T AP 80 75 58 41 30 21
Shell Mk.1 AP/T APHE 66 62 49 36 26 20
Shell details
Ammunition Type of
warhead
Velocity
(m/s)
Projectile
mass (kg)
Fuse delay
(m)
Fuse sensitivity
(mm)
Explosive mass
(TNT equivalent) (g)
Ricochet
0% 50% 100%
Shot Mk.1 AP/T AP 792 1.08 - - - 47° 60° 65°
Shot Mk.IXB APCBC/T APCBC 792 1.24 - - - 48° 63° 71°
Shot Mk.1 APHV/T AP 853 1.08 - - - 47° 60° 65°
Shell Mk.1 AP/T APHE 792 1.08 1.2 9 20.9 47° 60° 65°

Ammo racks

Ammo racks of the A13 Mk I
Full
ammo
1st
rack empty
2nd
rack empty
3rd
rack empty
4th
rack empty
5th
rack empty
6th
rack empty
7th
rack empty
8th
rack empty
87 78 (+9) 75 (+12) 72 (+15) 69 (+18) 66 (+21) 62 (+25) 60 (+27) 56 (+31)
9th
rack empty
10th
rack empty
11th
rack empty
12th
rack empty
13th
rack empty
14th
rack empty
15th
rack empty
16th
rack empty
Visual
discrepancy
51 (+36) 47 (+40) 43 (+44) 41 (+46) 36 (+51) 31 (+56) 16 (+71) (+86) No

Note:

  • Centre hull empty: 41 (+46) shells.

Optics

A13 Mk I Optics
Which ones Default magnification Maximum magnification
Main Gun optics x1.85 x3.5
Comparable optics AMR.35 ZT3

Machine guns

Ammunition3 500 rounds
Belt capacity250 rounds
Reloadbasic crew → aces
10.4 → 8.0 s
Fire rate390 shots/min
Main article: Vickers (7.7 mm)
7.7 mm Vickers
Mount Capacity (Belt) Fire rate Vertical Horizontal
Coaxial 3,500 (250) 390 N/A N/A

The Vickers machine gun is mostly only useful for spotting other tanks for teammates or knocking out crew in open-top vehicles. As a rifle-calibre MG it cannot damage other tanks, and the very low fire rate of 390 RPM as well as having only 20 degrees of turret elevation makes it difficult to use effectively against aircraft.

Usage in battles

A13 Mk I on Jungle

This vehicle's role is that of a light tank in the truest sense, sporting a potent gun, great mobility and virtually no armour to speak of. It is ill-advised to use the A13 as a frontline tank. Instead, use your mobility to your advantage: spot, flank and provide support for your teammates, blind your enemies with well-placed smokes screens in key avenues. Make sure to prioritize targeting secluded enemies in flanking tactics so you can take full advantage of the element of surprise and outflank your opponent. Never expose yourself for too long as even anti-aircraft guns are a potential threat to your non-angled armour. The QF 2-pounder has an awful long-range accuracy so you must get close to your enemies to actually land a shot where you expect. Load up this agile (but reluctant) cat with ammo and flank your enemies with a constant flow of bullets.

Pros and cons

Pros:

  • Exceptional gun characteristics for its rank
  • Fast with a good power-to-weight ratio
  • Has a "shoulder lock", which is a primitive form of stabilisation; this makes stopping and firing a useful tactic as the 2-pdr doesn't bounce as much as a non-stabilised gun
  • Brings lots of ammo to the fight (87 rounds max)
  • Has forward-launching smoke launchers
  • Adequate turret traverse speed
  • -15° gun depression ensures great terrain adaptability
  • Four crewmen and a three-man turret
  • Fast reload, makes finishing off a target both quicker and easier
  • Very effective in a flanker and scout role

Cons:

  • Extremely thin armour, can be frontally penetrated by HMG
  • Loses speed when turning
  • Wiggles when trying to turn on 5th gear
  • The Vickers MG has a slow rate of fire, ineffective at hitting fast/small targets like AS 42

History

Development

The British development on their cruiser tanks, tanks that focus on mobility to exploit breakthroughs beyond enemy lines, took a turn in 1936 after General Giffard LeQuesne Martel became the Assistant Director of Mechanization at the British War Office, the head of the army in the government. Martel, an advocate of the tanks, and developer of the concept of "tankettes", witnessed a tank demonstration in 1936 that had Soviet designs. The one that attracted his attention was the BT light tank. The BT's use of the Christie suspension had Martel argue for the usage of the same suspension in their tank designs, to which the British government complied with the purchase and licensing of the system from the Nuffield Organization.

The acquired vehicle from the purchase of the Christie suspension was labelled as the A13E1 and became part of the design development under the designation Cruiser Mk III (A13). The General Staff requested for the vehicle to have 30 mm of armour, a 2-pounder gun, and a road speed of 48 km/h. The original vehicle was extensively reworked due to many interior and mechanical issues. Until the tank design was finished, the British Army adopted the Cruiser Mk I (A9) tank for use, but these tanks were delayed due to the A13's near completion. The first prototype was delivered in 1937 under the name A13E2, this featured the turret from the A9 cruiser tank, with a 2-pounder and a Vickers machine gun. The armour on the prototype was 15 mm and the design could reach a top speed under a governor of 48 km/h (64 km/h ungoverned). The last and revised design was the A13E3 that became adopted by the British Army and ordered into production in 1939. The General Staff specification number for the tank was the A13 Mk. I, Cruiser Tank Mark III. 65 of these tanks were ordered from the Nuffield Mechanization & Aero Limited, to which 30 were built before the War Office decided to upgrade the A13 Mk.I with more armour than the A13 Mk.II, Cruiser Tank Mk IV. Some of the A13 Mk.I Cruiser Mk III was also converted into Mk IV to stay modernized.

Combat usage

The A13 first saw combat in the Battle of France under the British Expeditionary Force in 1940. The A13 encountered many troubles during its employment, the crew having little to no training with the new tanks due to their rushed adoption into service. The tanks were in poor condition and some were even missing parts. The A13s were used in the 1st Armoured Division, but many were either destroyed by the superior German armoured forces or abandoned at Calais during the evacuation of Allied troops at Dunkirk, which forced the units to leave behind their heavier equipment.

After the disaster at France, the A13 were still used to support the war. Some were sent to Greece to support their defence against Germany in the Battle of Greece, but a majority were sent to North Africa as part of the Western Desert Campaign near Libya under the 7th Armoured Division. Compared to the time in France, the A13s in North Africa fared much better, ironing out most of its initial defects, and was even more suited to the environment than other tank designs. The A13 was popular with the crew for its high speed, reliability, and a powerful 2-pounder cannon that could engage a majority of Axis tanks in 1941. However, there was an insufficient number of A13s available for use, so tank units were mixed with the faster cruiser tanks and slower infantry tanks, which caused tactical and logistical difficulties trying to accommodate all of the tanks. Another deficiency with the tank and every other British tank with the 2-pounder was the lack of high-explosive shell issued to the tankers, which made them vulnerable to anti-tank guns, which caused a majority of British tank losses in the North African Campaign. Still, the A13 fared very well with its armour and armament until late 1941 where better armoured Panzer IIIs and Panzer IVs began to appear on the battlefield.

Due to its growing obsolescence on the battlefield, the A13 was replaced in 1941 by the better armoured A15 Crusader tank.

Media

Skins
Videos

See also

Links to the articles on the War Thunder Wiki that you think will be useful for the reader, for example:

  • reference to the series of the vehicles;
  • links to approximate analogues of other nations and research trees.

External links

Paste links to sources and external resources, such as:

  • topic on the official game forum;
  • other literature.


Nuffield Mechanizations and Aero Limited
Cruiser Tanks 
Tank, Cruiser, Mk III (A13 Mk I)  A13 Mk I · A13 Mk I (3rd R.T.R.)
Tank, Cruiser, Mk IV (A13 Mk II)  A13 Mk II · A13 Mk II 1939
Tank, Cruiser, Mk VI, Crusader (A15)  Crusader II · Crusader "The Saint" · Crusader III
Tank Destroyers  Tortoise
SPAAs  Crusader AA Mk I · Crusader AA Mk II
Export  ▄Crusader Mk.II

Britain light tanks
A13  A13 Mk I · A13 Mk I (3rd R.T.R.) · A13 Mk II · A13 Mk II 1939
A15  Crusader II · Crusader "The Saint" · Crusader III
A17  Tetrarch I
IFV  Warrior
Wheeled  Daimler Mk II · AEC Mk II · Fox · Vickers Mk.11
Other  VFM5
South Africa 
SARC  SARC MkIVa · SARC MkVI (2pdr) · SARC MkVI (6pdr)
Ratel  Ratel 90 · Ratel 20
Rooikat  Rooikat Mk.1D · Rooikat 105 · Rooikat MTTD
Other  Concept 3 · Eland 90 Mk.7
USA  Stuart I · Stuart III