Difference between revisions of "User:DnaGonite/pageTest"
(→Armaments) |
|||
| Line 1: | Line 1: | ||
{{About | {{About | ||
| − | | about = | + | | about = premium Japanese medium tank '''Type 74 (G)''' |
| − | | usage = other | + | | usage = other versions |
| − | | link = | + | | link = Type 74 (Family) |
}} | }} | ||
{{Custom-Specs-Card | {{Custom-Specs-Card | ||
| − | |code= | + | |code=jp_type_74_mod_g_kai |
| − | |images={{Specs-Card-Image| | + | |images={{Specs-Card-Image|GarageImage_Type 74 (G).jpg|ArtImage_Type 74 (G).png}} |
| + | |store=6703 | ||
| + | |card_name=Type 74 (G) (Example) | ||
}} | }} | ||
== Description == | == Description == | ||
<!-- ''In the description, the first part should be about the history of the creation and combat usage of the vehicle, as well as its key features. In the second part, tell the reader about the ground vehicle in the game. Insert a screenshot of the vehicle, so that if the novice player does not remember the vehicle by name, he will immediately understand what kind of vehicle the article is talking about.'' --> | <!-- ''In the description, the first part should be about the history of the creation and combat usage of the vehicle, as well as its key features. In the second part, tell the reader about the ground vehicle in the game. Insert a screenshot of the vehicle, so that if the novice player does not remember the vehicle by name, he will immediately understand what kind of vehicle the article is talking about.'' --> | ||
| − | The '''{{Specs|name}}''' is a rank {{Specs|rank}} | + | The '''{{Specs|name}}''' is a premium gift rank {{Specs|rank}} Japanese medium tank {{Battle-rating}}. It was introduced in [[Update 1.87 "Locked On"]]. Compared to its tech tree counterparts, the [[Type 74 (E)]] and [[Type 74 (F)|(F)]], it has the IR floodlight replaced by a thermal imaging system and a minuscule upgrade to its protection in the addition of sideskirts. |
| − | |||
| − | |||
| − | |||
| − | |||
== General info == | == General info == | ||
| Line 21: | Line 19: | ||
{{Specs-Tank-Armour}} | {{Specs-Tank-Armour}} | ||
<!-- ''Describe armour protection. Note the most well protected and key weak areas. Appreciate the layout of modules as well as the number and location of crew members. Is the level of armour protection sufficient, is the placement of modules helpful for survival in combat? If necessary use a visual template to indicate the most secure and weak zones of the armour.'' --> | <!-- ''Describe armour protection. Note the most well protected and key weak areas. Appreciate the layout of modules as well as the number and location of crew members. Is the level of armour protection sufficient, is the placement of modules helpful for survival in combat? If necessary use a visual template to indicate the most secure and weak zones of the armour.'' --> | ||
| + | The armour on the Type 74 is nothing special and shouldn't be relied upon to survive a shot from the enemy. It is therefore better to not get hit by an enemy tank shell to begin with. Its only merit is being able to resist autocannon rounds from light tanks or IFVs, which can buy precious seconds for the Type 74 (G) to retaliate before the enemy gets a good shot. | ||
| + | |||
| + | With four crew members, the survivability of the Type 74 (G) after penetration is on-par with other tank designs from USA and Germany. The prominence of APFSDS shells at this rank combined with the thin armour of the Type 74 (G) can mean instances where an APFSDS penetrates the armour and goes right through with minimal shrapnel damage, and so relatively little interior damage outside of the APFSDS' direct flight path. | ||
| + | |||
| + | The special thing about this tank is its pneumatic suspension. It give you the possibility to be fully hull-down on mountains. That capacity can make the Type 74 (G) less visible and therefore less exposed to enemy fire. | ||
| + | |||
'''Armour type:''' | '''Armour type:''' | ||
| − | * Rolled homogeneous armour (Hull, | + | * Rolled homogeneous armour (Hull, Side skirts) |
| − | * Cast homogeneous armour (Turret, | + | * Cast homogeneous armour (Turret, Gun mantlet, Cupola) |
{| class="wikitable" | {| class="wikitable" | ||
|- | |- | ||
| − | ! Armour !! Front !! Sides !! Rear !! Roof | + | ! Armour !! Front (Slope angle) !! Sides !! Rear !! Roof |
|- | |- | ||
| − | | Hull || | + | | Hull || 40 mm (73°) ''Front glacis - upper section'' <br> 80 mm (64°) ''Front glacis - lower section'' <br> 80 mm (57°) ''Lower glacis'' <br> 50 mm ''Hull over the tracks''<br> 50 mm ''Driver port'' || 50 mm (44°) ''Top - front part'' <br> 35 mm (44°) ''Top - center and rear parts'' <br> 30 mm ''Bottom'' <br> 10 mm ''Side skirts'' <br> 10 mm (55°) ''Belly'' || 20 mm ''Top'' <br> 20 mm (47°) ''Bottom'' || 25 mm |
|- | |- | ||
| − | | Turret || | + | | Turret || 132 mm (25°) ''Turret front'' <br> 200 mm (40°) ''Gun mantlet - upper section'' <br> 100 mm ''Gun mantlet - lower section'' || 132 mm (30°) ''Front half'' <br> 67 mm (40°) ''Rear half'' || 37 mm (18°) ''Vertical part'' <br> 40 mm (70°) ''Turret ring area'' || 67 mm (82°) ''Front'' <br> 37 mm ''Rear'' |
| + | |- | ||
| + | | Cupola || 80 mm (61°) || colspan="2" style="text-align:center" | 80 mm (55°) || 80 mm | ||
|- | |- | ||
|} | |} | ||
| + | |||
'''Notes:''' | '''Notes:''' | ||
| − | * | + | * Suspension wheels and tracks are 20 mm thick. |
| − | + | * Frontally, the driver port as well as the hull over the tracks are weak spots on the Type 74 (G). | |
| − | + | * The bottom of the hull is only 10 mm thick, making it vulnerable to powerful HE shells shot under the belly. | |
| − | |||
| − | |||
| − | |||
| − | |||
| − | |||
| − | |||
| − | |||
| − | |||
| − | * The | ||
| − | |||
| − | |||
| − | |||
| − | |||
| − | |||
| − | |||
| − | |||
=== Mobility === | === Mobility === | ||
| Line 61: | Line 52: | ||
<!-- ''Write about the mobility of the ground vehicle. Estimate the specific power and manoeuvrability, as well as the maximum speed forwards and backwards.'' --> | <!-- ''Write about the mobility of the ground vehicle. Estimate the specific power and manoeuvrability, as well as the maximum speed forwards and backwards.'' --> | ||
| − | + | The Type 74 (G)'s mobility is pretty decent and comparable to the [[OF-40 Mk.2A]] or [[Leopard A1A1]], but slightly slower. The Type 74 (G) however has a reverse speed of only -14 km/h against -25 km/h for the previously mentioned tanks. | |
| − | + | While the Type 74 (G) can outspeed Soviet, British, and most American medium tanks, don't expect to be faster than a [[BMP-2|BMP]], [[TAM]], [[M3 Bradley|Bradley]], or the faster premiums like [[OF-40 (MTCA)]] or [[AMX-30 Super]]. | |
| − | + | {{tankMobility|abMinHp= 1116|rbMinHp= 637}} | |
=== Modifications and economy === | === Modifications and economy === | ||
| Line 75: | Line 66: | ||
{{Specs-Tank-Weapon|1}} | {{Specs-Tank-Weapon|1}} | ||
<!-- ''Give the reader information about the characteristics of the main gun. Assess its effectiveness in a battle based on the reloading speed, ballistics and the power of shells. Do not forget about the flexibility of the fire, that is how quickly the cannon can be aimed at the target, open fire on it and aim at another enemy. Add a link to the main article on the gun: <code><nowiki>{{main|Name of the weapon}}</nowiki></code>. Describe in general terms the ammunition available for the main gun. Give advice on how to use them and how to fill the ammunition storage.'' --> | <!-- ''Give the reader information about the characteristics of the main gun. Assess its effectiveness in a battle based on the reloading speed, ballistics and the power of shells. Do not forget about the flexibility of the fire, that is how quickly the cannon can be aimed at the target, open fire on it and aim at another enemy. Add a link to the main article on the gun: <code><nowiki>{{main|Name of the weapon}}</nowiki></code>. Describe in general terms the ammunition available for the main gun. Give advice on how to use them and how to fill the ammunition storage.'' --> | ||
| − | {{main| | + | {{main|L7A3 (105 mm)}} |
| + | |||
| + | The gun is identical to the tech tree versions of the Type 74, a 105 mm L7A3 cannon. It possesses one of the more potent kinetic shells of the rank with its Type 93 APFSDS. Although the reload time is not as fast as other 105 mm armed tanks that can be encountered, like the [[Leopard A1A1]], [[OF-40]], and the [[AMX-30 Super]], the Type 93 APFSDS has even greater penetration power than the L44 cannon on the [[Leopard A1A1 (L/44)]]. | ||
| + | |||
| + | The gun comes with a stabilizer so firing on the move with the Type 74 (G) is possible. The gun depression of 6 degrees is, on paper, relatively poor that doesn't allow for effective fighting from ridgelines, requiring a position that exposes the tank more to get a shot at your target. However, the pneumatic suspension can compensate for the lack of gun depression, and so it must be utilised to get the most out of the Type 74 (G). | ||
{| class="wikitable" style="text-align:center" width="100%" | {| class="wikitable" style="text-align:center" width="100%" | ||
|- | |- | ||
| − | ! colspan="5" | [[ | + | ! colspan="5" | [[L7A3 (105 mm)|105 mm L7A3]] || colspan="5" | Turret rotation speed (°/s) || colspan="4" | Reloading rate (seconds) |
|- | |- | ||
! Mode !! Capacity !! Vertical !! Horizontal !! Stabilizer | ! Mode !! Capacity !! Vertical !! Horizontal !! Stabilizer | ||
| Line 86: | Line 81: | ||
|- | |- | ||
! ''Arcade'' | ! ''Arcade'' | ||
| − | | rowspan="2" | | + | | rowspan="2" | 50 || rowspan="2" | -6°/+9° || rowspan="2" | ±180° || rowspan="2" | Two-plane || 22.8 || 31.6 || 38.4 || 42.5 || 45.2 || rowspan="2" | 8.71 || rowspan="2" | 7.70 || rowspan="2" | 7.10 || rowspan="2" | 6.70 |
|- | |- | ||
! ''Realistic'' | ! ''Realistic'' | ||
| − | | 14. | + | | 14.3 || 16.8 || 20.4 || 22.6 || 24.0 |
|- | |- | ||
|} | |} | ||
==== Ammunition ==== | ==== Ammunition ==== | ||
| − | The available ammunition | + | The available ammunition offers a complete range to engage all types of targets: |
| − | * ''' | + | * '''Type 91''': HEATFS; a shaped charge that can penetrate any vehicle's armour frontally. Like the APFSDS shot, increased armour thickness results in reduced amount of spalling (shrapnel) after penetration. You are able to take out enemies on any distance, since the HEAT round does not lose penetration with distance travelled - very handy on large maps. Unlike APFSDS it has one downside: given that it is a chemical round, its fuse is highly sensitive in regards to its practical application in battle. As a result, virtually anything, such as trees or even a fence, will set it off prematurely, so you cannot fire through obstructions with this kind of round. Knowledge of potential opponents vehicle layouts will be very handy to use. |
| − | * ''' | + | * '''M735''': APFSDS; a kinetic rod with high penetration power but without explosive filler. It is capable of easily penetrating the majority of the foes it meets, but these rounds do require finesse as to their placing. Because the projectile lacks an explosive filler, the best bet is to try and either knock out the majority of the enemy tank's crew or to destroy the enemy by ammo or fuel detonation through hitting their respective storage capacities. This, of course, requires knowledge about the vehicles the Type 74 (G) may face - so be sure to use the game's x-ray view in the hangar and analyse potential foes for their weak spots! Also, keep in mind that with increased armour thickness the amount of shrapnel shrinks. |
| − | * ''' | + | * '''M416''': Smoke; useful to blind enemy vehicles that are too remote for you to disable so that you can progress towards objectives. |
| − | {{User:U38088265/pageTest/ammo1| | + | * '''Type 93''': APFSDS; a kinetic rod with increased penetration power compared to the M735. |
| + | |||
| + | {{User:U38088265/pageTest/ammo1|Type 91|M735|M416|Type 93}} | ||
==== [[Ammo racks]] ==== | ==== [[Ammo racks]] ==== | ||
| − | [[File: | + | [[File:Ammoracks_Type_74_(C).png|right|thumb|x250px|[[Ammo racks]] of the Type 74 (G)]] |
| + | <!-- '''Last updated: 2.15.1.70''' --> | ||
{| class="wikitable" style="text-align:center" | {| class="wikitable" style="text-align:center" | ||
|- | |- | ||
| Line 109: | Line 107: | ||
! 2nd<br>rack empty | ! 2nd<br>rack empty | ||
! 3rd<br>rack empty | ! 3rd<br>rack empty | ||
| − | |||
| − | |||
| − | |||
| − | |||
! Visual<br>discrepancy | ! Visual<br>discrepancy | ||
|- | |- | ||
| − | | ''' | + | | '''50''' || 17 ''(+33)'' || 10 ''(+40)'' || 1 ''(+49)'' || Yes |
|- | |- | ||
|} | |} | ||
'''Notes''': | '''Notes''': | ||
| − | * | + | * Shells are modeled individually and disappear after having been shot or loaded. |
| − | * | + | * Racks 2 and 3 are first stage ammo racks. They total 16 shells and get filled first when loading up the tank. |
| + | ** These racks are also emptied early: the depletion order at full capacity is: 2 - 3 - 1. | ||
| + | ** Simply not firing when the gun is loaded will move ammo from racks 1-8 into rack 9. Firing will interrupt the restocking of the ready rack. | ||
| + | * The visual discrepancy concerns racks 1 and 3. | ||
| + | ** Rack 1 has 3 shells which, while modelled in the rack, are never present (crossed out shells). | ||
| + | ** Rack 1 is modelled as 30 shells but contains 34 shells. | ||
| + | ** Rack 3 has a shell which remains in the rack even after having been shot. | ||
=== Machine guns === | === Machine guns === | ||
{{Specs-Tank-Weapon|2}} | {{Specs-Tank-Weapon|2}} | ||
| + | {{Specs-Tank-Weapon|3}} | ||
<!-- ''Offensive and anti-aircraft machine guns not only allow you to fight some aircraft but also are effective against lightly armoured vehicles. Evaluate machine guns and give recommendations on its use.'' --> | <!-- ''Offensive and anti-aircraft machine guns not only allow you to fight some aircraft but also are effective against lightly armoured vehicles. Evaluate machine guns and give recommendations on its use.'' --> | ||
| − | {{main| | + | {{main|M2HB (12.7 mm)|Type 74 (7.62 mm)}} |
{| class="wikitable" style="text-align:center" width="50%" | {| class="wikitable" style="text-align:center" width="50%" | ||
|- | |- | ||
| − | ! colspan="5" | [[ | + | ! colspan="5" | [[M2HB (12.7 mm)|12.7 mm M2HB]] |
| + | |- | ||
| + | ! Mount !! Capacity (Belt) !! Fire rate !! Vertical !! Horizontal | ||
| + | |- | ||
| + | | Pintle || 600 (200) || 577 || -10°/+60° || -180°/+80° | ||
| + | |- | ||
| + | |} | ||
| + | {| class="wikitable" style="text-align:center" width="50%" | ||
| + | |- | ||
| + | ! colspan="5" | [[Type 74 (7.62 mm)|7.62 mm Type 74]] | ||
|- | |- | ||
! Mount !! Capacity (Belt) !! Fire rate !! Vertical !! Horizontal | ! Mount !! Capacity (Belt) !! Fire rate !! Vertical !! Horizontal | ||
|- | |- | ||
| − | | Coaxial || | + | | Coaxial || 4,500 (250) || 701 || N/A || N/A |
|- | |- | ||
|} | |} | ||
| − | + | While it's not recommended, it's still possible to use 12.7 mm to fight light tanks like [[AUBL/74 HVG]] or [[Rooikat Mk.1D]] and most SPAA tanks at <100 m range. | |
| − | |||
| − | |||
| − | + | Do not charge them with just the MG, especially at long range, as even poorly armoured rank V light tanks can survive frontal MG fire long enough to disarm and explode the Type 74 - let them come to you, hit them with the main gun and ensure they never move again by firing at their sides or flat parts, while hiding yours. | |
| − | + | Any melee oriented light tanks like [[BMP-2]] or [[Warrior]] with add-on armour will have enough armour to absorb the MG fire and will greet Type 74 back with point blank ATGM attack, which machine guns will be unable to stop at such range. | |
| − | + | == Usage in battles == | |
| + | <!-- ''Describe the tactics of playing in the vehicle, the features of using vehicles in the team and advice on tactics. Refrain from creating a "guide" - do not impose a single point of view but instead give the reader food for thought. Describe the most dangerous enemies and give recommendations on fighting them. If necessary, note the specifics of the game in different modes (AB, RB, SB).'' --> | ||
| − | + | The Type 74 (G) is a classic MBT with good mobility and firepower. It's fast enough to be somewhat competitive with its peers (although low-speed acceleration and manoeuvrability are lacking, which makes urban fighting sometimes tedious), and can sometimes reach favourable early-game positions before the enemy. The Type 74 (G) is slower than the [[AMX-30 Super]], [[OF-40 (MTCA)]], and most IFVs, so watch out for those tanks in situations where mobility is required. The Type 74 (G)'s reverse speed is mediocre, so peeking an enemy in order to take a shot can be dangerous; the enemy may have time to fire back before the Type 74 (G) can retreat into cover. All in all, this tank has good mobility, but it can't be depended on in a pinch, and it certainly doesn't give the Type 74 (G) a significant advantage over the enemy. | |
| − | + | The armour on the Type 74 is nothing special and shouldn't be relied on to survive a shot from the enemy. Any APFSDS shell can penetrate the Type 74 (G)'s armour from practically any angle. It is therefore better to not get hit by an enemy tank shell to begin with. The armour's only merit is being able to resist machine gun and autocannon rounds from light tanks or IFVs such as the [[BMP-2]], which can buy precious seconds for the Type 74 (G) to retaliate before the enemy gets a good shot. With four crew members, the survivability of the Type 74 (G) after penetration is on-par with other tank designs from the USA and Germany. The prominence of APFSDS shells in this rank combined with the thin armour of the Type 74 (G) can mean instances where an APFSDS shell penetrates the armour and goes right through with minimal shrapnel damage, and so relatively little interior damage outside of the APFSDS' direct flight path. | |
| − | + | With the Type 74 (G), it is recommended to take no more than 15 shells into battle, since these first 15 shells are stored in a relatively safe compartment in the turret. With these shells, the tank is able to penetrate most enemy tanks except at very long ranges. The Type 93 APFSDS shell is one of the best at this tier, and a quick reload time lets the Type 74 (G) be a deadly weapon on the battlefield. The Type 74 (G) has a worse rotation than most Western MBTs, although it is better that that of Soviet tanks. This difference can mean the difference between life and death in situations where quick aiming is important. This tank is also able to use a pneumatic suspension system to lower or raise its hull on its suspension. This is useful when firing from behind cover. The Type 74 (G) can go fully hull-down when behind a ridgeline, and ridgeline sniping is therefore one of this vehicle's strengths. While it's not recommended, it is possible to use the tank's 12.7 mm machine gun to fight light tanks like the [[AUBL/74 HVG]]. | |
| − | |||
| − | |||
| − | |||
| − | |||
=== Pros and cons === | === Pros and cons === | ||
| Line 163: | Line 168: | ||
'''Pros:''' | '''Pros:''' | ||
| − | * | + | * Decent mobility, enough to be competitive and reach most of your favourite positions |
| − | * | + | * Very good APFSDS shell (Type 93) - one of the best in its rank |
| − | * | + | * Good lineup with Type 89, Type 87, Type 16 and regular Type 74 |
| − | + | * Some armour to stop autocannons from IFVs and MBTs, such as the BMP-2, XM803, MBT-70 and the French tanks with 20 mm coax guns | |
| − | * | + | * Pneumatic suspension |
| − | * | ||
'''Cons:''' | '''Cons:''' | ||
| − | * | + | * Slower than for example Leopard A1A1 or OF-40, and quite a bit slower than AMX-30 Super and OF-40 MTCA |
| − | * | + | * Worse turret rotation than other western MBTs, but still better than Soviet tanks |
| − | + | * Mediocre reverse speed at only 16 km/h compared to the mentioned competitors | |
| − | * | + | * Generally a little bit more sluggish in the steering than the other nations' MBTs |
| − | + | * Loud engine (especially when adjusting suspension) can reveal the tank's position | |
| − | * | ||
== History == | == History == | ||
<!-- ''Describe the history of the creation and combat usage of the vehicle in more detail than in the introduction. If the historical reference turns out to be too long, take it to a separate article, taking a link to the article about the vehicle and adding a block "/History" (example: <nowiki>https://wiki.warthunder.com/(Vehicle-name)/History</nowiki>) and add a link to it here using the <code>main</code> template. Be sure to reference text and sources by using <code><nowiki><ref></ref></nowiki></code>, as well as adding them at the end of the article with <code><nowiki><references /></nowiki></code>. This section may also include the vehicle's dev blog entry (if applicable) and the in-game encyclopedia description (under <code><nowiki>=== In-game description ===</nowiki></code>, also if applicable).'' --> | <!-- ''Describe the history of the creation and combat usage of the vehicle in more detail than in the introduction. If the historical reference turns out to be too long, take it to a separate article, taking a link to the article about the vehicle and adding a block "/History" (example: <nowiki>https://wiki.warthunder.com/(Vehicle-name)/History</nowiki>) and add a link to it here using the <code>main</code> template. Be sure to reference text and sources by using <code><nowiki><ref></ref></nowiki></code>, as well as adding them at the end of the article with <code><nowiki><references /></nowiki></code>. This section may also include the vehicle's dev blog entry (if applicable) and the in-game encyclopedia description (under <code><nowiki>=== In-game description ===</nowiki></code>, also if applicable).'' --> | ||
| − | + | {{main|Type_74_(E)#History|l1=History of the Type 74}} | |
| − | |||
| − | |||
| − | |||
| − | |||
| − | |||
| − | |||
| − | |||
| − | |||
| − | |||
| − | |||
| − | |||
| − | |||
| − | |||
| − | |||
| − | |||
| − | |||
| − | |||
| − | |||
| − | + | In 1993, a program was launched to upgrade 4 Type 74 tanks to a new Type 74 Kai (mod. G) standard. The tanks were equipped with the NBC protection system of the Type 90, a passive infrared camera like the Type 90, a laser detection device linked with smoke launchers and side skirts. The program was abandoned quickly as the upgrade proved too expensive in a context of military budget reduction due to the end of the Cold War. | |
| − | |||
| − | |||
| − | In | ||
| − | |||
| − | |||
| − | |||
| − | |||
| − | |||
| − | |||
| − | |||
| − | |||
| − | |||
== Media == | == Media == | ||
| Line 219: | Line 192: | ||
;Skins | ;Skins | ||
| − | * [https://live.warthunder.com/feed/camouflages/?vehicle= | + | * [https://live.warthunder.com/feed/camouflages/?vehicle=jp_type_74_mod_g_kai Skins and camouflages for the Type 74 (G) from live.warthunder.com.] |
| + | |||
| + | ;Videos | ||
| + | {{Youtube-gallery|G5JNh_dXF-4|'''Premium Vehicles: Type 74 mod G\Kai''' - ''War Thunder Wiki''|rF7B9ROJLEg|'''Type 74 (G): Slower Top Tier Experience''' - ''Napalmratte''|C1HCuRbl9lw|'''Real Sound Recording: Type 74 Edition''' - ''DMM GAMES Official Channel''|TZEt-V6V2WQ|'''JGSDF Type 74: 360° Video''' - ''DMM GAMES Official Channel''}} | ||
== See also == | == See also == | ||
| Line 226: | Line 202: | ||
* ''links to approximate analogues of other nations and research trees.'' --> | * ''links to approximate analogues of other nations and research trees.'' --> | ||
| − | ; | + | ;Related Development |
| − | * [[ | + | * [[STB-1]] - <small>(Prototype Stage)</small> |
| − | * [[ | + | * [[Type 74 (Family)]] |
| − | * [[ | + | * [[Type 87]] - <small>(SPAAG built on a modified Type 74 Hull)</small> |
| − | * [[ | + | |
| − | * [[ | + | ;Other vehicles of similar configuration and role |
| − | * [[ | + | * [[Leopard 1 (Family)]] |
| − | * [[ | + | ** [[Leopard 1A5]] |
| − | * [[ | + | * [[AMX-30 (Family)]] |
| + | ** [[AMX-30 Super]] | ||
| + | * [[OF-40 (Family)]] | ||
== External links == | == External links == | ||
| Line 241: | Line 219: | ||
* ''other literature.'' --> | * ''other literature.'' --> | ||
| − | * [[wt:en/news/ | + | * [[wt:en/news/6067-development-shop-type-74-mod-g-kai-and-pre-order-of-the-japanese-packs-en|[Shop] Type 74 mod G/Kai and Pre-Order of the Japanese Packs]] |
| + | |||
| + | {{Japan medium tanks}} | ||
| + | {{Japan premium ground vehicles}} | ||
Revision as of 09:23, 23 December 2022
| This page is about the premium Japanese medium tank Type 74 (G). For other versions, see Type 74 (Family). |
.jpg)
.png)
Contents
Description
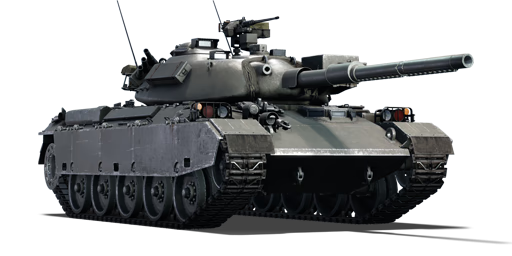
The Type 74 mod G/Kai is a premium gift rank VI Japanese medium tank with a battle rating of 9.3 (AB/RB/SB). It was introduced in Update 1.87 "Locked On". Compared to its tech tree counterparts, the Type 74 (E) and (F), it has the IR floodlight replaced by a thermal imaging system and a minuscule upgrade to its protection in the addition of sideskirts.
General info
Survivability and armour
The armour on the Type 74 is nothing special and shouldn't be relied upon to survive a shot from the enemy. It is therefore better to not get hit by an enemy tank shell to begin with. Its only merit is being able to resist autocannon rounds from light tanks or IFVs, which can buy precious seconds for the Type 74 (G) to retaliate before the enemy gets a good shot.
With four crew members, the survivability of the Type 74 (G) after penetration is on-par with other tank designs from USA and Germany. The prominence of APFSDS shells at this rank combined with the thin armour of the Type 74 (G) can mean instances where an APFSDS penetrates the armour and goes right through with minimal shrapnel damage, and so relatively little interior damage outside of the APFSDS' direct flight path.
The special thing about this tank is its pneumatic suspension. It give you the possibility to be fully hull-down on mountains. That capacity can make the Type 74 (G) less visible and therefore less exposed to enemy fire.
Armour type:
- Rolled homogeneous armour (Hull, Side skirts)
- Cast homogeneous armour (Turret, Gun mantlet, Cupola)
| Armour | Front (Slope angle) | Sides | Rear | Roof |
|---|---|---|---|---|
| Hull | 40 mm (73°) Front glacis - upper section 80 mm (64°) Front glacis - lower section 80 mm (57°) Lower glacis 50 mm Hull over the tracks 50 mm Driver port |
50 mm (44°) Top - front part 35 mm (44°) Top - center and rear parts 30 mm Bottom 10 mm Side skirts 10 mm (55°) Belly |
20 mm Top 20 mm (47°) Bottom |
25 mm |
| Turret | 132 mm (25°) Turret front 200 mm (40°) Gun mantlet - upper section 100 mm Gun mantlet - lower section |
132 mm (30°) Front half 67 mm (40°) Rear half |
37 mm (18°) Vertical part 40 mm (70°) Turret ring area |
67 mm (82°) Front 37 mm Rear |
| Cupola | 80 mm (61°) | 80 mm (55°) | 80 mm | |
Notes:
- Suspension wheels and tracks are 20 mm thick.
- Frontally, the driver port as well as the hull over the tracks are weak spots on the Type 74 (G).
- The bottom of the hull is only 10 mm thick, making it vulnerable to powerful HE shells shot under the belly.
Mobility
The Type 74 (G)'s mobility is pretty decent and comparable to the OF-40 Mk.2A or Leopard A1A1, but slightly slower. The Type 74 (G) however has a reverse speed of only -14 km/h against -25 km/h for the previously mentioned tanks.
While the Type 74 (G) can outspeed Soviet, British, and most American medium tanks, don't expect to be faster than a BMP, TAM, Bradley, or the faster premiums like OF-40 (MTCA) or AMX-30 Super.
| Game Mode | Max Speed (km/h) | Weight (tons) | Engine power (horsepower) | Power-to-weight ratio (hp/ton) | |||
|---|---|---|---|---|---|---|---|
| Forward | Reverse | Stock | Upgraded | Stock | Upgraded | ||
| Arcade | 59 | 19 | 38.5 | 1116 | 1,660 | 28.99 | 43.12 |
| Realistic | 54 | 17 | 637 | 870 | 16.55 | 22.6 | |
Modifications and economy
| Mobility | Protection | Firepower | ||||||||||||||||||||||||
|---|---|---|---|---|---|---|---|---|---|---|---|---|---|---|---|---|---|---|---|---|---|---|---|---|---|---|
|
|
|
Armaments
Main armament
The gun is identical to the tech tree versions of the Type 74, a 105 mm L7A3 cannon. It possesses one of the more potent kinetic shells of the rank with its Type 93 APFSDS. Although the reload time is not as fast as other 105 mm armed tanks that can be encountered, like the Leopard A1A1, OF-40, and the AMX-30 Super, the Type 93 APFSDS has even greater penetration power than the L44 cannon on the Leopard A1A1 (L/44).
The gun comes with a stabilizer so firing on the move with the Type 74 (G) is possible. The gun depression of 6 degrees is, on paper, relatively poor that doesn't allow for effective fighting from ridgelines, requiring a position that exposes the tank more to get a shot at your target. However, the pneumatic suspension can compensate for the lack of gun depression, and so it must be utilised to get the most out of the Type 74 (G).
| 105 mm L7A3 | Turret rotation speed (°/s) | Reloading rate (seconds) | |||||||||||
|---|---|---|---|---|---|---|---|---|---|---|---|---|---|
| Mode | Capacity | Vertical | Horizontal | Stabilizer | Stock | Upgraded | Full | Expert | Aced | Stock | Full | Expert | Aced |
| Arcade | 50 | -6°/+9° | ±180° | Two-plane | 22.8 | 31.6 | 38.4 | 42.5 | 45.2 | 8.71 | 7.70 | 7.10 | 6.70 |
| Realistic | 14.3 | 16.8 | 20.4 | 22.6 | 24.0 | ||||||||
Ammunition
The available ammunition offers a complete range to engage all types of targets:
- Type 91: HEATFS; a shaped charge that can penetrate any vehicle's armour frontally. Like the APFSDS shot, increased armour thickness results in reduced amount of spalling (shrapnel) after penetration. You are able to take out enemies on any distance, since the HEAT round does not lose penetration with distance travelled - very handy on large maps. Unlike APFSDS it has one downside: given that it is a chemical round, its fuse is highly sensitive in regards to its practical application in battle. As a result, virtually anything, such as trees or even a fence, will set it off prematurely, so you cannot fire through obstructions with this kind of round. Knowledge of potential opponents vehicle layouts will be very handy to use.
- M735: APFSDS; a kinetic rod with high penetration power but without explosive filler. It is capable of easily penetrating the majority of the foes it meets, but these rounds do require finesse as to their placing. Because the projectile lacks an explosive filler, the best bet is to try and either knock out the majority of the enemy tank's crew or to destroy the enemy by ammo or fuel detonation through hitting their respective storage capacities. This, of course, requires knowledge about the vehicles the Type 74 (G) may face - so be sure to use the game's x-ray view in the hangar and analyse potential foes for their weak spots! Also, keep in mind that with increased armour thickness the amount of shrapnel shrinks.
- M416: Smoke; useful to blind enemy vehicles that are too remote for you to disable so that you can progress towards objectives.
- Type 93: APFSDS; a kinetic rod with increased penetration power compared to the M735.
| Penetration statistics | |||||||
|---|---|---|---|---|---|---|---|
| Ammunition | Type of warhead |
Penetration @ 0° Angle of Attack (mm) | |||||
| 10 m | 100 m | 500 m | 1,000 m | 1,500 m | 2,000 m | ||
| Type 91 | HEATFS | 400 | 400 | 400 | 400 | 400 | 400 |
| M735 | APFSDS | 353 | 350 | 342 | 333 | 322 | 312 |
| Type 93 | APFSDS | 405 | 403 | 396 | 388 | 378 | 370 |
| Shell details | ||||||||||||
|---|---|---|---|---|---|---|---|---|---|---|---|---|
| Ammunition | Type of warhead |
Velocity (m/s) |
Projectile mass (kg) |
Fuse delay (m) |
Fuse sensitivity (mm) |
Explosive mass (TNT equivalent) (kg) |
Ricochet | |||||
| 0% | 50% | 100% | ||||||||||
| Type 91 | HEATFS | 1,150 | 10.5 | 0.05 | 0.1 | 1.27 | 65° | 72° | 77° | |||
| M735 | APFSDS | 1,501 | 3.7 | - | - | - | 76° | 77° | 80° | |||
| Type 93 | APFSDS | 1,501 | 3.4 | - | - | - | 78° | 80° | 81° | |||
| Smoke shell characteristics | ||||||
|---|---|---|---|---|---|---|
| Ammunition | Velocity (m/s) |
Projectile mass (kg) |
Screen radius (m) |
Screen deploy time (s) |
Screen hold time (s) |
Explosive mass (TNT equivalent) (g) |
| M416 | 732 | 11.6 | 20 | 5 | 25 | 50 |
Ammo racks
.png)
| Full ammo |
1st rack empty |
2nd rack empty |
3rd rack empty |
Visual discrepancy |
|---|---|---|---|---|
| 50 | 17 (+33) | 10 (+40) | 1 (+49) | Yes |
Notes:
- Shells are modeled individually and disappear after having been shot or loaded.
- Racks 2 and 3 are first stage ammo racks. They total 16 shells and get filled first when loading up the tank.
- These racks are also emptied early: the depletion order at full capacity is: 2 - 3 - 1.
- Simply not firing when the gun is loaded will move ammo from racks 1-8 into rack 9. Firing will interrupt the restocking of the ready rack.
- The visual discrepancy concerns racks 1 and 3.
- Rack 1 has 3 shells which, while modelled in the rack, are never present (crossed out shells).
- Rack 1 is modelled as 30 shells but contains 34 shells.
- Rack 3 has a shell which remains in the rack even after having been shot.
Machine guns
| 12.7 mm M2HB | ||||
|---|---|---|---|---|
| Mount | Capacity (Belt) | Fire rate | Vertical | Horizontal |
| Pintle | 600 (200) | 577 | -10°/+60° | -180°/+80° |
| 7.62 mm Type 74 | ||||
|---|---|---|---|---|
| Mount | Capacity (Belt) | Fire rate | Vertical | Horizontal |
| Coaxial | 4,500 (250) | 701 | N/A | N/A |
While it's not recommended, it's still possible to use 12.7 mm to fight light tanks like AUBL/74 HVG or Rooikat Mk.1D and most SPAA tanks at <100 m range.
Do not charge them with just the MG, especially at long range, as even poorly armoured rank V light tanks can survive frontal MG fire long enough to disarm and explode the Type 74 - let them come to you, hit them with the main gun and ensure they never move again by firing at their sides or flat parts, while hiding yours.
Any melee oriented light tanks like BMP-2 or Warrior with add-on armour will have enough armour to absorb the MG fire and will greet Type 74 back with point blank ATGM attack, which machine guns will be unable to stop at such range.
Usage in battles
The Type 74 (G) is a classic MBT with good mobility and firepower. It's fast enough to be somewhat competitive with its peers (although low-speed acceleration and manoeuvrability are lacking, which makes urban fighting sometimes tedious), and can sometimes reach favourable early-game positions before the enemy. The Type 74 (G) is slower than the AMX-30 Super, OF-40 (MTCA), and most IFVs, so watch out for those tanks in situations where mobility is required. The Type 74 (G)'s reverse speed is mediocre, so peeking an enemy in order to take a shot can be dangerous; the enemy may have time to fire back before the Type 74 (G) can retreat into cover. All in all, this tank has good mobility, but it can't be depended on in a pinch, and it certainly doesn't give the Type 74 (G) a significant advantage over the enemy.
The armour on the Type 74 is nothing special and shouldn't be relied on to survive a shot from the enemy. Any APFSDS shell can penetrate the Type 74 (G)'s armour from practically any angle. It is therefore better to not get hit by an enemy tank shell to begin with. The armour's only merit is being able to resist machine gun and autocannon rounds from light tanks or IFVs such as the BMP-2, which can buy precious seconds for the Type 74 (G) to retaliate before the enemy gets a good shot. With four crew members, the survivability of the Type 74 (G) after penetration is on-par with other tank designs from the USA and Germany. The prominence of APFSDS shells in this rank combined with the thin armour of the Type 74 (G) can mean instances where an APFSDS shell penetrates the armour and goes right through with minimal shrapnel damage, and so relatively little interior damage outside of the APFSDS' direct flight path.
With the Type 74 (G), it is recommended to take no more than 15 shells into battle, since these first 15 shells are stored in a relatively safe compartment in the turret. With these shells, the tank is able to penetrate most enemy tanks except at very long ranges. The Type 93 APFSDS shell is one of the best at this tier, and a quick reload time lets the Type 74 (G) be a deadly weapon on the battlefield. The Type 74 (G) has a worse rotation than most Western MBTs, although it is better that that of Soviet tanks. This difference can mean the difference between life and death in situations where quick aiming is important. This tank is also able to use a pneumatic suspension system to lower or raise its hull on its suspension. This is useful when firing from behind cover. The Type 74 (G) can go fully hull-down when behind a ridgeline, and ridgeline sniping is therefore one of this vehicle's strengths. While it's not recommended, it is possible to use the tank's 12.7 mm machine gun to fight light tanks like the AUBL/74 HVG.
Pros and cons
Pros:
- Decent mobility, enough to be competitive and reach most of your favourite positions
- Very good APFSDS shell (Type 93) - one of the best in its rank
- Good lineup with Type 89, Type 87, Type 16 and regular Type 74
- Some armour to stop autocannons from IFVs and MBTs, such as the BMP-2, XM803, MBT-70 and the French tanks with 20 mm coax guns
- Pneumatic suspension
Cons:
- Slower than for example Leopard A1A1 or OF-40, and quite a bit slower than AMX-30 Super and OF-40 MTCA
- Worse turret rotation than other western MBTs, but still better than Soviet tanks
- Mediocre reverse speed at only 16 km/h compared to the mentioned competitors
- Generally a little bit more sluggish in the steering than the other nations' MBTs
- Loud engine (especially when adjusting suspension) can reveal the tank's position
History
In 1993, a program was launched to upgrade 4 Type 74 tanks to a new Type 74 Kai (mod. G) standard. The tanks were equipped with the NBC protection system of the Type 90, a passive infrared camera like the Type 90, a laser detection device linked with smoke launchers and side skirts. The program was abandoned quickly as the upgrade proved too expensive in a context of military budget reduction due to the end of the Cold War.
Media
- Skins
- Videos
See also
- Related Development
- STB-1 - (Prototype Stage)
- Type 74 (Family)
- Type 87 - (SPAAG built on a modified Type 74 Hull)
- Other vehicles of similar configuration and role
External links
| Japan medium tanks | |
|---|---|
| Type 97 | Chi-Ha · Chi-Ha Kai · Chi-Ha Kai TD · Chi-Ha Short Gun |
| Type 1 | Chi-He · Chi-He (5th Regiment) · Ho-I |
| Type 3 | Chi-Nu · Chi-Nu II |
| Type 4 | Chi-To · Chi-To Late |
| Type 5 | Chi-Ri II |
| Type 61 MBT | ST-A1* · ST-A2* · ST-A3* · Type 61 |
| Type 74 MBT | ST-B2* · Type 74 (C) · Type 74 (E) · Type 74 (F) · Type 74 (G) |
| Type 90 MBT | Type 90 · Type 90 (B) · Type 90B "Fuji" |
| Type 10 MBT | TKX (P)* · TKX* · Type 10 |
| Other | Ka-Chi |
| USA | ▅M4A3 (76) W · ▅M47 |
| *Prototype | |
| Japan premium ground vehicles | |
|---|---|
| Light tanks | Ha-Go Commander · Type 16 (FPS) |
| Medium tanks | Chi-Ha Short Gun · Chi-He (5th Regiment) · Ka-Chi · Chi-Nu II · Type 74 (G) · Type 90B "Fuji" |
| Heavy tanks | Ro-Go · ▅Heavy Tank No.6 |
| Tank destroyers | Ho-Ri Prototype · Type 75 MLRS |
