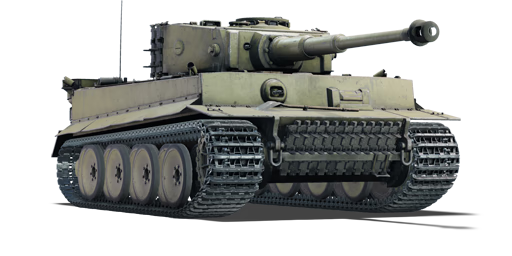
Heavy Tank No.6 (Japan)

From War Thunder Wiki
Jump to: navigation, search
▅Heavy Tank No.6
jp_pzkpfw_vi_ausf_e_tiger.png
GarageImage Heavy Tank No.6 (Japan).jpg
ArtImage Heavy Tank No.6 (Japan).png
▅Heavy Tank No.6
AB RB SB
6.0 6.0 6.0
Show in game
MARKET

Description

The Heavy Tank No.6 is a Japanese-purchased Tiger I meant to be shipped over to Japan by submarine to bolster Japanese tank forces and research material. The transfer was never issued due to the continued increase of Allied naval supremacy, and the Tiger was loaned "back" to the Germans and used in the 101st SS heavy tank battalion in Belgium.

It was introduced along with the initial Japanese Ground Forces tree in Update 1.65 "Way of the Samurai". The Heavy Tank No.6 was initially made available as a pre-order premium pack for the release of the Japanese tree and was discontinued after the 2019 Summer sales. Performance-wise, it is identical to the German Tiger E, but its ammunition selection is the same as the Tiger H1's. The Heavy Tank No. 6 is an early Tiger E, featuring a late Tiger H1 turret on a mid-production Tiger E hull. It still lacks the 80 mm turret ring protection and the improved turret-top armour, but is otherwise identical to the Tiger E.

General info

Survivability and armour

Armourfront / side / back
Hull102 / 82 / 82
Turret100 / 82 / 82
Crew5 people
Visibility112 %
The ideal angling of hull armour on Tiger I for maximum effective armour all-around

One may feel the need to charge head-on into battle, blaring that 88 mm gun as shells bounce off the front armour while the Schachtellaufwerk suspension system runs over the ground; this is a short-lived strategy.

The Tiger I should be played more as a bulky medium tank rather than a heavy tank despite its status, supporting allies from the sideline or from a distance rather than leading directly from the front. This is due to the poor armour arrangement with its "boxy" features, providing no sloping benefits alone. One must remain a distance, exploit the 88 mm long-distance power, and maintain a diamond-shape compound angling to maximize armour thickness against the trailing enemy shells that will inevitably come towards the Tiger's way.

Armour type:

  • Rolled homogeneous armour
  • Cast homogeneous armour (Gun mantlet, Cupola)
Armour Front (Slope angle) Sides Rear (Slope angle) Roof
Hull 102 mm (9°) Front plate
62 mm (80°) Front glacis
102 + 30 mm (25°) Lower glacis
82 mm Top
62 mm Bottom
82 mm (9°) 26 mm
Turret 100 mm Turret front
90 - 200 mm Gun mantlet
82 mm 82 mm 40 mm
Cupola 80 mm 80 mm 80 mm 26 mm

Notes:

  • Commander's cupola is smaller and nicely rounded for better protection compared to Tiger H1.
  • Almost entire frontal lower plate is covered by attached tracks, adding 30 mm of armour.
  • Turret front covered by gun mantlet has variable thickness depending on exact place, ranging from 90 to 200 mm of armour.
  • Lower side hull armour is only 62 mm thick, exploitable when flanking the Tiger, Heavy Tank No. 6, or when facing them angled.
  • Parts of the turret side armour are covered by attached tracks, adding additional 30 mm of armour.

Mobility

Speedforward / back
AB48 / 9 km/h
RB and SB45 / 9 km/h
Number of gears8 forward
4 back
Weight57.3 t
Engine power
AB1 336 hp
RB and SB700 hp
Power-to-weight ratio
AB23.3 hp/t
RB and SB12.2 hp/t
Game Mode Max Speed (km/h) Weight (tons) Engine power (horsepower) Power-to-weight ratio (hp/ton)
Forward Reverse Stock Upgraded Stock Upgraded
Arcade 48 9 57.3 904 1,336 15.78 23.32
Realistic 45 9 619 700 10.8 12.22

Modifications and economy

Repair cost
AB2 437 Sl icon.png
RB2 585 Sl icon.png
SB3 603 Sl icon.png
Crew training10 000 Sl icon.png
Experts320 000 Sl icon.png
Aces800 Ge icon.png
Research Aces1 050 000 Rp icon.png
Reward for battleAB / RB / SB
Talisman.png 2 × 120 / 190 / 210 % Sl icon.png
Talisman.png 2 × 172 / 172 / 172 % Rp icon.png
Modifications
Mobility Protection Firepower
Mods new tank traks.png
Tracks
Mods new tank suspension.png
Suspension
Mods new tank break.png
Brake System
Mods new tank filter.png
Filters
Mods new tank transmission.png
Transmission
Mods new tank engine.png
Engine
Mods tank tool kit.png
Improved Parts
Mods extinguisher.png
Improved FPE
Mods tank reinforcement jp.png
Crew Replenishment
Mods new tank horizontal aiming.png
Horizontal Drive
Mods tank ammo.png
88mm_ger_kwk36_Pzgr_APCBC_ammo_pack
Mods tank cannon.png
Adjustment of Fire
Mods tank ammo.png
88mm_kwk_36_43_HEAT_ammo_pack
Mods new tank vertical aiming.png
Elevation Mechanism

Armaments

Main armament

Ammunition92 rounds
Reloadbasic crew → aces
9.6 → 7.4 s
Vertical guidance-8° / 16°
Main article: KwK36 (88 mm)
88 mm KwK36 Turret rotation speed (°/s) Reloading rate (seconds)
Mode Capacity Vertical Horizontal Stabilizer Stock Upgraded Full Expert Aced Stock Full Expert Aced
Arcade 92 -8°/+16° ±180° N/A 11.3 15.7 19.0 21.1 22.4 9.62 8.50 7.84 7.40
Realistic 8.3 9.8 11.9 13.2 14.0

Ammunition

  • PzGr 39 - The standard shell for all Tiger drivers. It will do incredible damage to any tank shot by it, except SPAA, or any extremely thin armoured vehicles. Heavier tanks like the IS-1, IS-2, or American heavy tanks are able to resist the round at longer ranges, but well placed shots from close range or sides will do the job. All other medium and light tanks will be history as soon as this shell make a contact with them. This shell, however, will almost always over-penetrate all but the most armoured SPAA vehicles, so it is best to use HE or machine gun fire on thin-skinned vehicles.
  • PzGr. - This shell is very useful, it has similar characteristics as PzGr 39, but sacrifices some penetration for about twice as more Explosive Filler, meaning it can overpressure enemies and one shot them. It is recommended to carry these shells and use them regularly, as the penetration is still enough to deal with most targets.
  • Sprgr. 39 - The HE shell is completely ineffective against all but SPAA or the AI artillery on the Kursk and Ash River maps, and the machine gun mounted on the Tiger has proven quite capable of dealing with these. Keep a small supply of this shell on hand if planning to flank the enemy and take out their SPAA or artillery, but avoid them for everything else.
  • Hl.Gr. 39 - On paper the HEAT rounds don't bring anything new to the table, however they can be used as a substitute for the HE shells due to the greater explosive mass and still gives you a fighting chance if you get caught with your pants down.

Penetration statistics
Ammunition Type of
warhead
Penetration @ 0° Angle of Attack (mm)
10 m 100 m 500 m 1,000 m 1,500 m 2,000 m
PzGr 39 APCBC 165 162 151 139 127 117
Pzgr. APCBC 153 151 140 128 116 106
Hl.Gr 39 HEAT 110 110 110 110 110 110
Sprgr. L/4.5 HE 18 18 17 15 14 12
Shell details
Ammunition Type of
warhead
Velocity
(m/s)
Projectile
mass (kg)
Fuse delay
(m)
Fuse sensitivity
(mm)
Explosive mass
(TNT equivalent) (g)
Ricochet
0% 50% 100%
PzGr 39 APCBC 773 10.2 1.2 14 108.8 48° 63° 71°
Pzgr. APCBC 810 9.5 1.2 14 215.04 48° 63° 71°
Hl.Gr 39 HEAT 600 7.64 0 0.3 1,100 62° 69° 73°
Sprgr. L/4.5 HE 820 9 0.2 0.1 698 79° 80° 81°

Ammo racks

Full
ammo
1st
rack empty
2nd
rack empty
3rd
rack empty
4th
rack empty
5th
rack empty
6th
rack empty
7th
rack empty
8th
rack empty
9th
rack empty
10th
rack empty
Visual
discrepancy
92 76 (+16) 60 (+32) 44 (+48) 28 (+64) 24 (+68) 20 (+72) 16 (+76) 12 (+80) (+86) (+92) No
Ammo racks of the Tiger H1 (identical)

Note:

  • Large sides empty: 28 (+64) shells.

Machine guns

Ammunition2 400 rounds
Belt capacity150 rounds
Reloadbasic crew → aces
10.4 → 8.0 s
Fire rate900 shots/min
Main article: MG34 (7.92 mm)
7.92 mm MG34
Mount Capacity (Belt) Fire rate Vertical Horizontal
Coaxial 2,400 (150) 900 - -

Usage in battles

The main role of the Heavy Tank No. 6 was to eliminate enemy tanks at a far range, similar to behaving like a sniping tank, or a Tank Destroyer. Nonetheless the Heavy Tank No. 6 can excel at brawling with other tanks at medium, even possibly against two Panther Tanks to close range and escape undamaged. It's recommended not stay in one place for too long or risk getting outflanked, spotted, or bombed.

The Soviet 85 mm D-5T cannon can easily penetrate you at close range, while you stay nearly invulnerable at long range. The 88 can take out any tank on Rank III at any combat range but may have problems with the IS-1's 120 mm front armour at some ranges. When having to close in a bit it is generally advisable to angle your hull to the sides by about 30°, that keeps away 85 mm shells very well, even at closer ranges. The Heavy Tank No. 6 is still vulnerable to the Su-152s howitzer and its HE shell at any range, whenever encountering this tank, it should be prioritized and eliminated first.

Mobility wise the Heavy Tank No. 6 is still pretty good for a heavy tank, it is much faster than a KV-1 and about equally fast as the IS-1, although the T-34/85 can easily outmanoeuvre all three at close range. Try to use your mobility to keep your distance, even by falling back if necessary as the Heavy Tank No. 6 cannot survive close range engagements due to the slow turret and the vulnerability to the 85 mm guns on soviet tanks.

The Heavy Tank No. 6 has a very bad turret traverse, it is recommended to get the traverse modification as fast as possible. Even then, you will have to turn the tank completely most of the time to quickly engage a target. This, together with very exposed ammo racks on both sides means that facing several enemies at once is almost a certain end to a Heavy Tank No. 6. The best option is to take cover from one tank and fire on the other. Parts research is recommended for new users as if the horizontal aiming drive is damaged, you're basically done if you can't move in time.

As far as ammo is concerned, the default AP For AB it is recommended to use 3-5 rounds of AP Upgrading the tank should mainly be dedicated to turret traverse, hull traverse (as this is needed even with the turret traverse upgrade) and engine upgrades. The Heavy Tank No. 6 88mm has massive destructive power, unlike any other German tank of its rank, all armed with a 75 mm gun (Except the "Dicker Max" and "Nashorn"), the Heavy Tank No. 6 can easily knock out all T-34s with a single shot and still a good number of IS-1s, albeit endangering itself in the process. If it doesn't most of the crew will be wounded and the ammo is likely to explode your tank. The best place to aim with the 88 is either at the gunner's side of the enemy turret, or between the driver and the gunner, usually wounding or knocking out most of the enemy crew at once. From the side, the best spot, as is usually the case, is just below the turret on the hull where the ammo is stored. Your side also has ammo, if you load around 30 shells. It's best to keep 20 shells in AB, as the ammo is stored in the bottom of the tank. (Even then, a T-34-85 or KV-85 can easily ignite that ammo.)

When driving the Heavy Tank No. 6, you should plan ahead of where you're driving. Even with engine and track modifications, the Heavy Tank No. 6 is after all, a heavy tank and a 90 degree or more turn will almost always mean an immediate standstill. Even small adjustments can knock the speed down a bit. Thus, knowing where you're going is of the utmost importance. It has basically the same driving quality of the "Tiger H1". The Heavy Tank No. 6 is best used on the flanks of the current maps, as these are usually more open and allow good use of its armour and excellent gun. The centre of the map would seem more logical, as there are a lot of enemies, but as has already been established, a Heavy Tank No. 6 taking fire from multiple directions won't last long. Going in a flank, taking down the lights and few medium enemy tanks is an easy task for this beast, and thus a flank can be easily secured if you drive carefully. Then, you can work yourself into the enemy sides and rear of the main force in the centre, doing much more damage than if you would have driven straight in because you will set most enemies alight with one good shot to the rear, meaning there'll be little return fire. Unless it's a tank with good horizontal drive traverse such as the Tiger II, you'll pretty much only need to hit him 1-4 times to destroy him (depending on FPE and other factors).

Pros and cons

Pros:

  • The gun mantlet, MG port and driver's port are particularly hard to penetrate due to their complex, varying shape and thickness. Can absorb quite some shells sometimes. The cupola also has a better shape which makes it not so vulnerable
  • Decent cannon with adequate accuracy and a range of shells to choose. Stock shell has great penetration and damage, and can knock out common opponents with a single shot easily (e.g. T-34-85, M4, IS-1, M6A1)
  • Fast heavy tank with its top speed of 45 km/h, meaning it can get to some positions quickly alongside friendly medium tanks
  • The box-like hull shape gives the ability to angling tactic. When angling the hull at around 40° and placing yourself far from the enemies (at least 500 m away) the Heavy Tank No.6 can resist common tanks like the 76 mm Sherman, T-34-85 and M36
  • Good reverse speed and hull traverse allows it to quickly angle for deflecting shells
  • -8° gun depression works well in most hilly terrain

Cons:

  • Weak and unsloped armour protection. If not angling the Heavy Tank No.6 can get destroyed easily by the T-34-85 or 76 mm Sherman. Even if the Heavy Tank No.6 is angling, the IS-2 can still knock it out easily with a single shot
  • No access to APCR meaning it will struggle to penetrate heavy targets frontally. For example the T29, M26, T26E1 and IS-2 (1944)
  • Rather slow acceleration limits its short range manoeuvrability
  • Slow turret traverse makes it hard to respond to flankers quickly. The M18 is very common at this BR
  • Ammo storage at the hull sides are very easy to explode when hit
  • Is a big and tall target, easy to get spotted and shot at
  • S-Mine dischargers on the hull limits gun depression in certain areas

History

Development

The Tiger I heavy tank was arguably the most infamous tank of World War II. The design for this tank began as early as January 1937 when Henschel & Sohn worked on a large "breakthrough" called the Durchbruchwagen that weighed about 30 tons on request by the German military.[1] The request was modified over time for more armour and better gun that increased the weight to 36 tons, but this project was dropped in 1938 in favor of the better prototypes VK 30.01(H) and VK 36.01(H). These new prototypes were the start of the usage of the Schachtellaufwerk wheel arrangements, but these also never passed prototype stages and were both cancelled in 1942.

During the development of the prototypes above, the German invasion of France showed that the Allied tanks such as the Somua, Char B1, and Matilda II were impervious to their current anti-tank weaponry and a need for better armoured and armed tanks were emphasized. So on May 26, 1941, Henschel and Porsche were asked to submit designs for a 45 ton heavy tank that was to be ready for demonstration by June 1942. During their development in June 1941, Germany initiated Operation Barbarossa against the Soviet Union and was shocked by appearance of the T-34 and KV-1 tanks that were invulnerable to all but the most potent anti-tank weapon in German inventory, one of which was the 88 mm FlaK cannon. The potency of the 88 mm cannon against the heavily armoured tanks that the Germans faced had Hitler ordered that the heavy tank design undertaken by Henschel and Porsche to utilize the 88 mm as its main armament instead of a 75 mm cannon.

The designs of the tank was finalized and ready for demonstration on April 20, 1942, Hitler's birthday, and showed the VK 45.01(H) and the VK 45.01(P). The demonstration and subsequent evaluations on the two designs determined that the Henschel variant was superior to the Porsche variant, proving more reliable, more mobile, and more easily produced than the Porsche. This caused the Henschel variant to be adopted as the Panzerkampfwagen VI Tiger and production started in August 1942. The Porsche variant had many chassis produced as Ferdinand Porsche thought the design would win, so the chassis were instead used in the Ferdinand tank destroyer.

Design

What perhaps made the Tiger I so unique in tank development and German doctrine is a change of focus between the three characteristics of the tank; with more emphasis to firepower and armour than to mobility. The Tiger I contained the large 88 mm KwK36 cannon which was very accurate and powerful, being able to penetrate every Allied armour present at its introduction. The armour on the Tiger I was also one of the greatest at the time, with an astounding 102 mm of armour on the front hull armour, 82 mm on the side superstructure and rear, and 120 mm on the gun mantlet. The armour was vertical faced so no sloping benefits were present like on the Panther. All these armour thicknesses proved invulnerable to most Allied anti-tank weaponry at the time, requiring more creative methods in shot placement to disable the tank. The mobility, while taken with less emphasis in the development, was still respectable at the time as the tank weighed about 57 metric tons, about 20 tons more than other country's main tanks, yet is able to keep up a speed of 38 km/h (Maximum speed was 45 km/h, but an engine governor was installed to preserve the engine life).

The tank utilized a torsion-bar suspension system in a Schachtellaufwerk overlapping pattern, making the Tiger one of the first German tank design to use the pattern. While the design gave the Tiger I great flotation due to the use of a wider track for lower ground pressure, it had disadvantages in environment and maintenance. In the Eastern Front, mud and other foreign object could be jammed in between the overlapping wheels, which would freeze in the winter and jam the wheels; the overlapping wheels also were a hassle to change out, in order to replace one wheel in the inside of the suspension, it requires the removal of at least nine other wheels in order to access it. The first 250 Tiger tanks used a Maybach V-12 HL210 engine with 650 hp before switching over to the more powerful Maybach V-12 HL230 engine with 700 hp. The engine proved adequate in propelling the tank, but was still considered underpowered for the tank weight.

The Tiger I, as innovative as it is to tank warfare, was a strain on German war production. The tank was over-engineered, taking much more man-hour and materials for its worth as a war machine. Cost-wise, two Panzer IVs or four StuG IIIs can be built for the cost of one Tiger I. The tank was also expensive to maintain and took lots of fuel to run. These attributed to the low number of only 1,354 Tiger Is produced from 1942 to August 1944.[1]

Japanese interest

During World War 2, General Hiroshi Oshima, the Japanese ambassador in Berlin, visited the Eastern front where he saw the infamous "Tiger" tank in person. In May 1943 Japan made an offer to buy blueprints and/or an example of the vehicle itself. After discussing terms and possible variants it was decided to purchase Pz.Kpfw.VI Ausf E chassis No. 250455. This tank was also equipped with a mantlet that had a reinforced binocular sight. The machine is armed with the powerful 88 mm KwK36 gun, able to penetrate most of the Tiger's targets with ease. [2]

The negotiation for the purchase of a Tiger tank from Germany went on in July 1943. The importation cost of the Tiger ran towards 640,000 marks, about twice the delivery cost to the German army. The offer to buy blueprints, ammunition, and parts were arranged to facilitate domestic production of the tank in the Japanese homeland.[3]

Payment by the Japanese for the Tiger tank came into Henschel on 28 February 1944. To get the Tiger to Japan, the plan was to disassemble the tank to parts and transport it via submarine to Japan, where it would be assembled to a complete model. However, the war situation for the Axis by the time this was ready made it virtually impossible to import across via submarine due to the improving tactics of anti-submarine warfare by the Allies and the landlock of the Allies on German territory. With the importation now deemed unlikely to ever happen, the Japanese simply loaned the Tiger tank to the German army, which they used as part of the 101st SS heavy tank battalion in Belgium. [3]

Media

Skins
Sights

See also

Related development

External links

References

  1. 1.0 1.1 Anthony Tucker-Jones. Images Of War Special: Tiger I & Tiger II Great Britain: Pen & Sword Military, 2013
  2. War Thunder. "Japanese Pre-Order Packs!" War Thunder. N.p., 6 Dec. 2016. Web. 16 Dec. 2016. Website
  3. 3.0 3.1 Sobral, Rita. "Japanese Tiger Importation Plans." Status Report. Blogger.com, 21 Mar. 2015. Web. 16 Dec. 2016. Website


Japan heavy tanks
Type 95  Ro-Go
Germany  ▅Heavy Tank No.6

Japan premium ground vehicles
Light tanks  Ha-Go Commander · Type 16 (FPS)
Medium tanks  Chi-Ha Short Gun · Chi-He (5th Regiment) · Ka-Chi · Chi-Nu II · Type 74 (G) · Type 90B "Fuji"
Heavy tanks  Ro-Go · ▅Heavy Tank No.6
Tank destroyers  Ho-Ri Prototype · Type 75 MLRS