Difference between revisions of "T-III (USSR)"
m (→Pros and cons) (Tag: Visual edit) |
PlanZ_2783 (talk | contribs) m (Changed typos) (Tag: Visual edit) |
||
| (29 intermediate revisions by 11 users not shown) | |||
| Line 1: | Line 1: | ||
| − | + | {{Specs-Card|code=ussr_pzkpfw_III_ausf_J_L42}} | |
| − | |||
| − | |||
| − | |||
| − | |||
| − | {{Specs-Card | ||
| − | |code=ussr_pzkpfw_III_ausf_J_L42 | ||
| − | |||
| − | }} | ||
== Description == | == Description == | ||
| − | <!-- | + | <!--In the description, the first part should be about the history of the creation and combat usage of the vehicle, as well as its key features. In the second part, tell the reader about the ground vehicle in the game. Insert a screenshot of the vehicle, so that if the novice player does not remember the vehicle by name, he will immediately understand what kind of vehicle the article is talking about.--> |
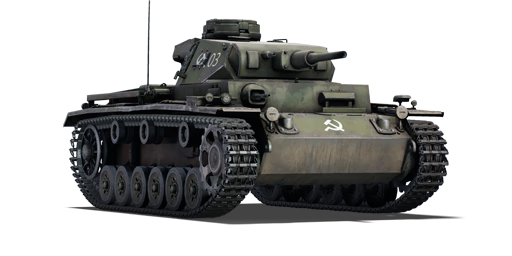
| − | The '''{{Specs|name}}''' | + | The '''{{Specs|name}}''' or the captured German ''Pz.Kpfw.lll'' is a premium rank {{Specs|rank}} Soviet medium tank {{Battle-rating}}. |
== General info == | == General info == | ||
=== Survivability and armour === | === Survivability and armour === | ||
| − | |||
| − | |||
'''Armour type:''' | '''Armour type:''' | ||
| Line 23: | Line 13: | ||
{| class="wikitable" | {| class="wikitable" | ||
| − | ! Armour | + | !Armour |
| + | !Front | ||
| + | !Sides | ||
| + | !Rear | ||
| + | !Roof | ||
|- | |- | ||
| − | | Hull | + | |Hull |
| + | |50 mm (12°) ''Front plate'' | ||
| + | 25 mm (86°), 50 mm (52°) ''Front glacis'' | ||
| + | 50 mm (23-69°) ''Lower glacis'' | ||
| + | |30 mm | ||
| + | |50 mm (14-46°) ''Top'' | ||
| + | 50 mm (10-66°) ''Bottom'' | ||
| + | |15 mm | ||
|- | |- | ||
| − | | Turret | + | |Turret |
| + | |50 mm (10-25°) ''Turret front'' | ||
| + | 50 mm (12-62°) ''Gun mantlet'' | ||
| + | |30 mm (20-25°) | ||
| + | |30 mm (12-15°) | ||
| + | |10 mm | ||
|- | |- | ||
| − | + | !Armour | |
| + | !Sides | ||
| + | !Roof | ||
|- | |- | ||
| + | |Cupola | ||
| + | |50 mm | ||
| + | |10 mm | ||
|} | |} | ||
'''Notes:''' | '''Notes:''' | ||
| Line 36: | Line 47: | ||
* Suspension wheels are 15 mm thick while tracks are 20 mm thick. | * Suspension wheels are 15 mm thick while tracks are 20 mm thick. | ||
| − | With only | + | With only an unangled 50mm armour plate at the front, even some rank I guns can penetrate the T-III's armour. Angling will not really help, as you will expose your even thinner side armour. However, the lower glacis is quite angled, and most small-caliber rounds will bounce off harmlessly. The ammunition is stored in the back of the tank, minimizing the threat of being ammo-racked. |
=== Mobility === | === Mobility === | ||
| − | |||
<!-- ''Write about the mobility of the ground vehicle. Estimate the specific power and manoeuvrability, as well as the maximum speed forwards and backwards.'' --> | <!-- ''Write about the mobility of the ground vehicle. Estimate the specific power and manoeuvrability, as well as the maximum speed forwards and backwards.'' --> | ||
| − | {{tankMobility|abMinHp=465|rbMinHp=265}} | + | {{tankMobility|abMinHp= 465|rbMinHp= 265|<!--AoAweight=(optional) -->}} |
| − | === | + | {| class="wikitable" |
| − | + | ! rowspan="2" |Game Mode | |
| + | ! colspan="2" |Max Speed (km/h) | ||
| + | ! rowspan="2" |Weight (tons) | ||
| + | ! colspan="2" |Engine power (horsepower) | ||
| + | ! colspan="2" |Power-to-weight ratio (hp/ton) | ||
| + | |- | ||
| + | !Forward | ||
| + | !Reverse | ||
| + | !Stock | ||
| + | !Upgraded | ||
| + | !Stock | ||
| + | !Upgraded | ||
| + | |- | ||
| + | !Arcade | ||
| + | |59 | ||
| + | |11 | ||
| + | | rowspan="2" |21.3 | ||
| + | |465 | ||
| + | |572 | ||
| + | |21.83 | ||
| + | |26.85 | ||
| + | |- | ||
| + | !Realistic | ||
| + | |53 | ||
| + | |9 | ||
| + | |265 | ||
| + | |300 | ||
| + | |12.44 | ||
| + | |14.08 | ||
| + | |} | ||
== Armaments == | == Armaments == | ||
| − | + | ==== Main armament ==== | |
| − | === Main armament === | + | ''Main article: '''[[KwK 38 (50 mm)]]''''' |
| − | { | + | {| class="wikitable" |
| − | + | ! colspan="6" |50 mm KwK 38 | |
| − | + | |- | |
| − | + | ! colspan="3" rowspan="1" |Capacity | |
| − | + | ! rowspan="1" |Vertical | |
| + | guidance | ||
| + | ! rowspan="1" |Horizontal | ||
| + | guidance | ||
| + | ! rowspan="1" |Stabilizer | ||
| + | |- | ||
| + | | colspan="3" |99 | ||
| + | | -10°/+20° | ||
| + | |±180° | ||
| + | |N/A | ||
| + | |- | ||
| + | ! colspan="6" |Turret rotation speed (°/s) | ||
| + | |- | ||
| + | !Mode | ||
| + | !Stock | ||
| + | !Upgraded | ||
| + | !Prior + Full crew | ||
| + | !Prior + Expert qualif. | ||
| + | !Prior + Ace qualif. | ||
| + | |- | ||
| + | |Arcade | ||
| + | |5.24 | ||
| + | |7.25 | ||
| + | |8.80 | ||
| + | |9.73 | ||
| + | |10.35 | ||
| + | |- | ||
| + | |Realistic | ||
| + | |3.27 | ||
| + | |3.85 | ||
| + | |4.67 | ||
| + | |5.17 | ||
| + | |5.5 | ||
| + | |- | ||
| + | ! colspan="4" |Reloading rate (seconds) | ||
| + | |- | ||
| + | ! colspan="1" |Stock | ||
| + | ! colspan="1" |Prior + Full crew | ||
| + | ! colspan="1" |Prior + Expert qualif. | ||
| + | ! colspan="1" |Prior + Ace qualif. | ||
| + | |- | ||
| + | |5.20 | ||
| + | |4.60 | ||
| + | |4.24 | ||
| + | |4.00 | ||
| + | |} | ||
| + | {| class="wikitable sortable" | ||
| + | ! colspan="8" |Penetration statistics | ||
|- | |- | ||
| − | ! | + | ! rowspan="2" |Ammunition |
| + | ! rowspan="2" |Type of | ||
| + | warhead | ||
| + | ! colspan="6" |'''Penetration''' in mm '''@ 90°''' | ||
|- | |- | ||
| − | ! | + | !10m |
| − | ! | + | !100m |
| − | ! | + | !500m |
| + | !1000m | ||
| + | !1500m | ||
| + | !2000m | ||
|- | |- | ||
| − | + | |PzGr 39 | |
| − | | | + | |APC |
| + | |71 | ||
| + | |69 | ||
| + | |56 | ||
| + | |44 | ||
| + | |34 | ||
| + | |26 | ||
|- | |- | ||
| − | + | |PzGr 40/1 | |
| − | | | + | |APCR |
| + | |118 | ||
| + | |117 | ||
| + | |84 | ||
| + | |56 | ||
| + | |37 | ||
| + | |25 | ||
|- | |- | ||
| + | |PzGr 40 | ||
| + | |APCR | ||
| + | |132 | ||
| + | |130 | ||
| + | |94 | ||
| + | |63 | ||
| + | |42 | ||
| + | |28 | ||
|} | |} | ||
| − | + | {| class="wikitable sortable" | |
| − | = | + | ! colspan="11" |''Shell details'' |
| − | + | |- | |
| − | + | ! rowspan="2" |Ammunition | |
| − | + | ! rowspan="2" |Type of | |
| − | + | warhead | |
| − | + | ! rowspan="2" |Velocity | |
| − | + | in m/s | |
| − | == | + | ! rowspan="2" |Projectile |
| − | + | Mass in kg | |
| − | + | ! rowspan="2" |Fuse delay | |
| − | + | in m: | |
| + | ! rowspan="2" |Fuse sensitivity | ||
| + | in mm: | ||
| + | ! rowspan="2" |Explosive Mass in g | ||
| + | (TNT equivalent): | ||
| + | ! rowspan="2" |Normalization At 30° | ||
| + | from horizontal: | ||
| + | ! colspan="3" |Ricochet: | ||
| + | |- | ||
| + | !0% | ||
| + | !50% | ||
| + | !100% | ||
|- | |- | ||
| − | + | |PzGr 39 | |
| − | + | |APC | |
| − | + | |685 | |
| − | + | |2.1 | |
| − | + | |1.2 | |
| − | + | |25 | |
| + | |28.9 | ||
| + | | +4° | ||
| + | |48° | ||
| + | |63° | ||
| + | |71° | ||
|- | |- | ||
| − | | | + | |PzGr 40/1 |
| + | |APCR | ||
| + | |1005 | ||
| + | |1.1 | ||
| + | |N/A | ||
| + | |N/A | ||
| + | |N/A | ||
| + | | +1.5° | ||
| + | |66° | ||
| + | |70° | ||
| + | |72° | ||
|- | |- | ||
| + | |PzGr 40 | ||
| + | |APCR | ||
| + | |1050 | ||
| + | |0.92 | ||
| + | |N/A | ||
| + | |N/A | ||
| + | |N/A | ||
| + | | +1.5° | ||
| + | |66° | ||
| + | |70° | ||
| + | |72° | ||
|} | |} | ||
| − | |||
| − | + | === Shell Types === | |
| − | |||
| − | + | * '''PzGr 39''' - Armour Piercing Capped shell - This is your main ammo type, use it whenever you think it has enough penetration to penetrate your target. It deals the most damage because of its explosive filler. | |
| − | + | * '''PzGr 40/1''' - Armour Piercing Composite Rigid shell - This shell should be avoided, as it is inferior in most aspects when compared to the PzGr 40. | |
| − | + | * '''PzGr 40''' - Armour Piercing Composite Rigid shell - this variation of APCR is lighter, slightly faster and offers the best penetration (up to 132mm). Use it against heavily armoured beasts. However, don't expect it to cause any real damage upon penetration, it is even worse than that of PzGr 40/1. It only deals damage to modules/crew straight in its path, due to the fact that it has no explosive filler. | |
| − | |||
| − | {| class="wikitable" | + | === Ammo racks === |
| + | {| class="wikitable sortable" | ||
| + | !Full | ||
| + | ammo | ||
| + | !1st | ||
| + | rack empty | ||
| + | !2nd | ||
| + | rack empty | ||
| + | !3rd | ||
| + | rack empty | ||
| + | !4th | ||
| + | rack empty | ||
| + | !Visual | ||
| + | discrepancy | ||
|- | |- | ||
| − | ! colspan=" | + | |'''99''' |
| + | |75 (+24) | ||
| + | |50 (+49) | ||
| + | |25 (+74) | ||
| + | |1 (+98) | ||
| + | |Yes | ||
| + | |} | ||
| + | |||
| + | === Machine guns === | ||
| + | ''Main article: '''[[MG 34 (7.92 mm)]]''''' | ||
| + | {| class="wikitable" | ||
| + | ! colspan="7" |[[MG 34 (7.92 mm)|7.92 mm MG 34]] | ||
|- | |- | ||
| − | ! | + | ! colspan="7" |Coaxial mount |
| − | |||
| − | |||
| − | |||
| − | |||
|- | |- | ||
| − | | | + | ! colspan="4" rowspan="1" |Capacity (Belt capacity) |
| + | ! rowspan="1" |Fire rate | ||
| + | (shots/minute) | ||
| + | ! rowspan="1" |Vertical | ||
| + | guidance | ||
| + | ! rowspan="1" |Horizontal | ||
| + | guidance | ||
|- | |- | ||
| + | | colspan="4" |4,350 (150) | ||
| + | |900 | ||
| + | |N/A | ||
| + | |N/A | ||
|} | |} | ||
== Usage in battles == | == Usage in battles == | ||
| − | + | Use of this tank is similar to the Pz. III F. While it does have significantly better armour on the front than its predecessor, the higher BR of 2.3 means it faces tougher, more well-armoured opposition in up-tiers to 3.3. The [[T-34 (1940)]] is almost impenetrable, except for some weakspots around the turret and flat-on below the tracks. [[M4A1|M4A1s]] are similar in speed to you, have better sloped frontal armour that you cannot penetrate, more powerful guns, and stabilizers. APCR post-penetration damage is not sufficient enough to be counted upon when you need it the most, plus neither PzGr.40/1 or PzGr.40 can frontally penetrate a Sherman or T-34. The best way to attack these tanks is to flank them with your good mobility, or wait for them to overextend, then shoot at their weaker side armour. Furthermore, the high fuse sensitivity makes many lightly-armoured things with strong guns your worst nightmare, since you'll over-penetrate repeatedly in most cases, allowing easy return fire from the enemy. Enemy SPAAG, in particular, is very dangerous because of your 15 mm turret ring weak pot, enabling them to spray all over you to incapacitate your gunner and loader. | |
| − | |||
=== Pros and cons === | === Pros and cons === | ||
| − | |||
| − | |||
'''Pros:''' | '''Pros:''' | ||
* Accurate and decently powerful gun | * Accurate and decently powerful gun | ||
| − | * | + | * Great gun depression |
* Decent mobility | * Decent mobility | ||
* APCR ammo has very high speed and good penetration, making shooting at long range easier | * APCR ammo has very high speed and good penetration, making shooting at long range easier | ||
| − | * Armour can reliably | + | * Armour is fairly decent, can protect reliably against lower-ranked tanks |
| − | |||
| − | + | Cons: | |
| − | * | + | * Penetration is lacking, as is post-penetration damage against enemies in up-tiers |
| − | * | + | * Awful turret traverse speed |
| − | * Flat | + | * Flat armour with little slope, weak side armour |
| − | * Large commander's cupola | + | * Large and weakly armour commander's cupola, often sticks out above the terrain, drawing the enemies' attention |
| − | * | + | * Has no HE shell |
| + | |||
| + | * | ||
== History == | == History == | ||
| − | <!-- ''Describe the history of the creation and combat usage of the vehicle in more detail than in the introduction. If the historical reference turns out to be too long, take it to a separate article, taking a link to the article about the vehicle and adding a block "/History" (example: <nowiki>https://wiki.warthunder.com/(Vehicle-name)/History</nowiki>) and add a link to it here using the <code>main</code> template. Be sure to reference text and sources by using <code><nowiki>< | + | <!--''Describe the history of the creation and combat usage of the ground vehicle in more detail than in the introduction. If the historical reference turns out to be too long, take it to a separate article, taking a link to the article about the vehicle and adding a block "/ History" (example: <nowiki>https://wiki.warthunder.com/(Vehicle-name)/History</nowiki>) and add a link to it here using the <code>main</code> template. Be sure to reference text and sources by using <code><nowiki><ref></nowiki></code>, as well as adding them at the end of the article. This section may also include the vehicle's dev blog entry (if applicable) and the in-game encyclopedia description (under <code><nowiki>=== In-game description ===</nowiki></code>, also if applicable).''--> |
| − | The {{PAGENAME}} is the | + | The {{PAGENAME}} is the Russian designation for a captured [[Panzer III]], which saw extensive service during the early phases of Operation Barbarossa. After the battle of Moscow, the Russian army got a hold of lots of German equipment and it was subsequently evaluated. The T-III was mostly issued as a command vehicle due to its increased comfort and reliable radio. Often times captured vehicles would be refitted with Soviet parts for logistical reasons. |
| − | + | It saw combat in the battles of Kursk, Leningrad and Stalingrad, earning themselves a great reputation. | |
| − | |||
| − | |||
| − | |||
| − | |||
| − | + | The T-III was operated by the Red Army until late 1943 after which they were dropped out of service in favour of newer Soviet vehicles or newly captured [[T-V (USSR)|Panther]] tanks. | |
| − | |||
| − | + | === In-game description === | |
| + | The designation used for the captured Pz.Kpfw.lll German medium tank in the Red Army arsenal. The tank was an early modification of the Pz.Kpfw.lll Ausf.J that was armed with a short-barrel 50mm KwK.38 L/42. The Ausf.J differed from previous modifications by its enlarged frontal body armor (50 mm) and certain mechanical changes. These tanks were popular with Soviet tank crews due to their excellent scopes, their loadout, and the convenience of the crew. | ||
| − | + | == Media == | |
| + | ''Excellent additions to the article would be video guides, screenshots from the game, and photos.'' | ||
| − | + | == See also == | |
| − | + | ''Links to the articles on the War Thunder Wiki that you think will be useful for the reader, for example:'' | |
| − | |||
| − | |||
* ''reference to the series of the vehicles;'' | * ''reference to the series of the vehicles;'' | ||
| − | * ''links to approximate analogues of other nations and research trees.'' | + | * ''links to approximate analogues of other nations and research trees.'' |
| − | |||
| − | |||
| − | |||
| − | |||
== External links == | == External links == | ||
| Line 174: | Line 339: | ||
* ''topic on the official game forum;'' | * ''topic on the official game forum;'' | ||
| + | * ''encyclopedia page on the tank;'' | ||
* ''other literature.'' | * ''other literature.'' | ||
{{USSR medium tanks}} | {{USSR medium tanks}} | ||
{{USSR premium ground vehicles}} | {{USSR premium ground vehicles}} | ||
Revision as of 03:08, 24 April 2020
Contents
Description
The ▂T-III or the captured German Pz.Kpfw.lll is a premium rank I Soviet medium tank with a battle rating of 2.3 (AB/RB/SB).
General info
Survivability and armour
Armour type:
- Rolled homogeneous armour
- Cast homogeneous armour (Barrel shroud, Cupola)
| Armour | Front | Sides | Rear | Roof |
|---|---|---|---|---|
| Hull | 50 mm (12°) Front plate
25 mm (86°), 50 mm (52°) Front glacis 50 mm (23-69°) Lower glacis |
30 mm | 50 mm (14-46°) Top
50 mm (10-66°) Bottom |
15 mm |
| Turret | 50 mm (10-25°) Turret front
50 mm (12-62°) Gun mantlet |
30 mm (20-25°) | 30 mm (12-15°) | 10 mm |
| Armour | Sides | Roof | ||
| Cupola | 50 mm | 10 mm |
Notes:
- Suspension wheels are 15 mm thick while tracks are 20 mm thick.
With only an unangled 50mm armour plate at the front, even some rank I guns can penetrate the T-III's armour. Angling will not really help, as you will expose your even thinner side armour. However, the lower glacis is quite angled, and most small-caliber rounds will bounce off harmlessly. The ammunition is stored in the back of the tank, minimizing the threat of being ammo-racked.
Mobility
| Game Mode | Max Speed (km/h) | Weight (tons) | Engine power (horsepower) | Power-to-weight ratio (hp/ton) | |||
|---|---|---|---|---|---|---|---|
| Forward | Reverse | Stock | Upgraded | Stock | Upgraded | ||
| Arcade | 60 | 12 | 21.8 | 465 | 572 | 21.33 | 26.24 |
| Realistic | 54 | 10 | 265 | 300 | 12.16 | 13.76 | |
| Game Mode | Max Speed (km/h) | Weight (tons) | Engine power (horsepower) | Power-to-weight ratio (hp/ton) | |||
|---|---|---|---|---|---|---|---|
| Forward | Reverse | Stock | Upgraded | Stock | Upgraded | ||
| Arcade | 59 | 11 | 21.3 | 465 | 572 | 21.83 | 26.85 |
| Realistic | 53 | 9 | 265 | 300 | 12.44 | 14.08 | |
Armaments
Main armament
Main article: KwK 38 (50 mm)
| 50 mm KwK 38 | |||||
|---|---|---|---|---|---|
| Capacity | Vertical
guidance |
Horizontal
guidance |
Stabilizer | ||
| 99 | -10°/+20° | ±180° | N/A | ||
| Turret rotation speed (°/s) | |||||
| Mode | Stock | Upgraded | Prior + Full crew | Prior + Expert qualif. | Prior + Ace qualif. |
| Arcade | 5.24 | 7.25 | 8.80 | 9.73 | 10.35 |
| Realistic | 3.27 | 3.85 | 4.67 | 5.17 | 5.5 |
| Reloading rate (seconds) | |||||
| Stock | Prior + Full crew | Prior + Expert qualif. | Prior + Ace qualif. | ||
| 5.20 | 4.60 | 4.24 | 4.00 | ||
| Penetration statistics | |||||||
|---|---|---|---|---|---|---|---|
| Ammunition | Type of
warhead |
Penetration in mm @ 90° | |||||
| 10m | 100m | 500m | 1000m | 1500m | 2000m | ||
| PzGr 39 | APC | 71 | 69 | 56 | 44 | 34 | 26 |
| PzGr 40/1 | APCR | 118 | 117 | 84 | 56 | 37 | 25 |
| PzGr 40 | APCR | 132 | 130 | 94 | 63 | 42 | 28 |
| Shell details | ||||||||||
|---|---|---|---|---|---|---|---|---|---|---|
| Ammunition | Type of
warhead |
Velocity
in m/s |
Projectile
Mass in kg |
Fuse delay
in m: |
Fuse sensitivity
in mm: |
Explosive Mass in g
(TNT equivalent): |
Normalization At 30°
from horizontal: |
Ricochet: | ||
| 0% | 50% | 100% | ||||||||
| PzGr 39 | APC | 685 | 2.1 | 1.2 | 25 | 28.9 | +4° | 48° | 63° | 71° |
| PzGr 40/1 | APCR | 1005 | 1.1 | N/A | N/A | N/A | +1.5° | 66° | 70° | 72° |
| PzGr 40 | APCR | 1050 | 0.92 | N/A | N/A | N/A | +1.5° | 66° | 70° | 72° |
Shell Types
- PzGr 39 - Armour Piercing Capped shell - This is your main ammo type, use it whenever you think it has enough penetration to penetrate your target. It deals the most damage because of its explosive filler.
- PzGr 40/1 - Armour Piercing Composite Rigid shell - This shell should be avoided, as it is inferior in most aspects when compared to the PzGr 40.
- PzGr 40 - Armour Piercing Composite Rigid shell - this variation of APCR is lighter, slightly faster and offers the best penetration (up to 132mm). Use it against heavily armoured beasts. However, don't expect it to cause any real damage upon penetration, it is even worse than that of PzGr 40/1. It only deals damage to modules/crew straight in its path, due to the fact that it has no explosive filler.
Ammo racks
| Full
ammo |
1st
rack empty |
2nd
rack empty |
3rd
rack empty |
4th
rack empty |
Visual
discrepancy |
|---|---|---|---|---|---|
| 99 | 75 (+24) | 50 (+49) | 25 (+74) | 1 (+98) | Yes |
Machine guns
Main article: MG 34 (7.92 mm)
| 7.92 mm MG 34 | ||||||
|---|---|---|---|---|---|---|
| Coaxial mount | ||||||
| Capacity (Belt capacity) | Fire rate
(shots/minute) |
Vertical
guidance |
Horizontal
guidance | |||
| 4,350 (150) | 900 | N/A | N/A | |||
Usage in battles
Use of this tank is similar to the Pz. III F. While it does have significantly better armour on the front than its predecessor, the higher BR of 2.3 means it faces tougher, more well-armoured opposition in up-tiers to 3.3. The T-34 (1940) is almost impenetrable, except for some weakspots around the turret and flat-on below the tracks. M4A1s are similar in speed to you, have better sloped frontal armour that you cannot penetrate, more powerful guns, and stabilizers. APCR post-penetration damage is not sufficient enough to be counted upon when you need it the most, plus neither PzGr.40/1 or PzGr.40 can frontally penetrate a Sherman or T-34. The best way to attack these tanks is to flank them with your good mobility, or wait for them to overextend, then shoot at their weaker side armour. Furthermore, the high fuse sensitivity makes many lightly-armoured things with strong guns your worst nightmare, since you'll over-penetrate repeatedly in most cases, allowing easy return fire from the enemy. Enemy SPAAG, in particular, is very dangerous because of your 15 mm turret ring weak pot, enabling them to spray all over you to incapacitate your gunner and loader.
Pros and cons
Pros:
- Accurate and decently powerful gun
- Great gun depression
- Decent mobility
- APCR ammo has very high speed and good penetration, making shooting at long range easier
- Armour is fairly decent, can protect reliably against lower-ranked tanks
Cons:
- Penetration is lacking, as is post-penetration damage against enemies in up-tiers
- Awful turret traverse speed
- Flat armour with little slope, weak side armour
- Large and weakly armour commander's cupola, often sticks out above the terrain, drawing the enemies' attention
- Has no HE shell
History
The T-III (USSR) is the Russian designation for a captured Panzer III, which saw extensive service during the early phases of Operation Barbarossa. After the battle of Moscow, the Russian army got a hold of lots of German equipment and it was subsequently evaluated. The T-III was mostly issued as a command vehicle due to its increased comfort and reliable radio. Often times captured vehicles would be refitted with Soviet parts for logistical reasons.
It saw combat in the battles of Kursk, Leningrad and Stalingrad, earning themselves a great reputation.
The T-III was operated by the Red Army until late 1943 after which they were dropped out of service in favour of newer Soviet vehicles or newly captured Panther tanks.
In-game description
The designation used for the captured Pz.Kpfw.lll German medium tank in the Red Army arsenal. The tank was an early modification of the Pz.Kpfw.lll Ausf.J that was armed with a short-barrel 50mm KwK.38 L/42. The Ausf.J differed from previous modifications by its enlarged frontal body armor (50 mm) and certain mechanical changes. These tanks were popular with Soviet tank crews due to their excellent scopes, their loadout, and the convenience of the crew.
Media
Excellent additions to the article would be video guides, screenshots from the game, and photos.
See also
Links to the articles on the War Thunder Wiki that you think will be useful for the reader, for example:
- reference to the series of the vehicles;
- links to approximate analogues of other nations and research trees.
External links
Paste links to sources and external resources, such as:
- topic on the official game forum;
- encyclopedia page on the tank;
- other literature.
| USSR medium tanks | |
|---|---|
| T-28 | T-28 (1938) · T-28 · T-28E |
| T-34-76 | T-34 (Prototype) · T-34 (1940) · T-34 (1941) · T-34 (1st Gv.T.Br.) · T-34 (1942) · T-34E STZ · T-34E |
| T-34-57 | T-34-57 · T-34-57 (1943) |
| T-34-85 | T-34-85 (D-5T) · T-34-85 · T-34-85E |
| T-34-100 | T-34-100 |
| T-44 | T-44 · T-44-100 · T-44-122 |
| T-54 | T-54 (1947) · T-54 (1949) · T-54 (1951) |
| T-55 | TO-55 · T-55A · T-55AM-1 · T-55AMD-1 |
| T-62 | T-62 · T-62M-1 |
| T-64 | Object 435 · T-64A (1971) · T-64B |
| T-72 | T-72A · T-72AV (TURMS-T) · T-72B · T-72B (1989) · T-72B3 · T-72M2 Moderna |
| T-80 | T-80B · T-80U · T-80UD · T-80UK · T-80UM2 · T-80BVM · Object 292 |
| T-90 | Т-90А · T-90M |
| Trophies/Lend-Lease | |
| Germany | ▂T-III · ▂T-V |
| Great Britain | ▂МК-IX "Valentine" |
| USA | ▂M3 Medium · ▂M4A2 |
| USSR premium ground vehicles | |
|---|---|
| Light tanks | BA-11 · RBT-5 · BT-7A (F-32) · T-26 (1st Gv.T.Br.) · T-26E · T-126 · PT-76-57 · 2S38 |
| Medium tanks | T-34 (Prototype) · T-34 (1st Gv.T.Br.) · T-34E · T-34-57 (1943) · T-34-85E · T-34-100 · T-44-122 · TO-55 · T-55AM-1 · T-72AV (TURMS-T) · T-80UD |
| ▂M3 Medium · ▂M4A2 · ▂T-III · ▂T-V · ▂МК-IX "Valentine" | |
| Heavy tanks | SMK · T-35 · ▂MK-II "Matilda" · KV-1E · KV-2 (1940) · KV-2 (ZiS-6) · KV-122 · KV-220 · IS-2 "Revenge" · Object 248 · IS-6 · T-10A |
| Tank destroyers | BM-8-24 · BM-13N · BM-31-12 |
| SU-57 · SU-76D · SU-76M (5th Gv.Kav.Corps) · SU-85A · SU-100Y · SU-122P · Object 120 | |
| SPAA | ▂Phòng không T-34 · ZUT-37 |
