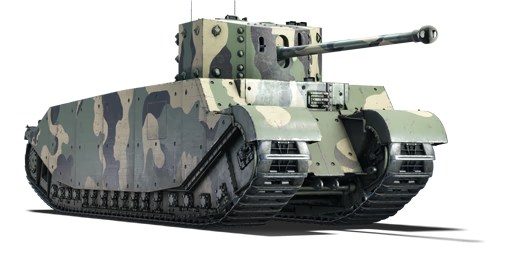
TOG II


Contents
Description
The TOG II is a prototype super-heavy tank designed in 1940 by the Special Vehicle Development Committee a.k.a "The Old Gang", which consisted of the original designers of British tanks during World War I. The tank is a follow-up design of the TOG I, which was designed with the expectation that the next world war would devolve into static trench warfare much like the first. To achieve this, the TOG II has a very long and relatively narrow hull to help it traverse trenches effectively, and at one point even planned to be equipped with sponson turrets to ward off infantry attacks from the sides. As speed was not a priority, the TOG II's top speed was expected to be around 25 km/h, though in reality it could only achieve 13.7 km/h due to its sheer weight.
Unfortunately for the TOG II, as World War II developed into an Europe-wide conflict, it became increasingly clear that trench warfare was not how warfare would be waged during the conflict. With the advent of mobile warfare, the sheer size and lack of speed of the TOG II meant that it was hopelessly obsolete from its inception. In an attempt to keep the project relevant, "The Old Gang" tried mounted various modern and experimental armaments onto the TOG II, with the most notable attempt being the use of the prototype turret of the Challenger tank with a 28-pounder gun. However, this proved fruitless, as the TOG II was fundamentally not designed for mobile warfare, and the project was cancelled in 1943. The sole prototype of the TOG II is currently preserved at the Bovington Tank Museum.
Introduced during Update "Kings of Battle" as the reward for the "Dreams Come True" 11th Anniversary event, the TOG II is a gargantuan "super-heavy" tank designed for a static trench warfare scenario that never came to be. As such, the tank's distinctively long hull sticks out like a sore thumb among the ranks of its contemporaries. Unfortunately for the TOG II, the tank is only really called a "super-heavy" due to its sheer weight of 81 tons (with add-on armour), while its overall armour is mediocre at best. Being designed to climb over trenches and that alone, the tank ends up being quite slow and won't be outrunning anything. Fortunately, the TOG II has a large 28-pounder (94 mm) gun as its ace up its sleeve to make up for its other shortcomings. The gun has high penetration and with the high turret traverse speed the TOG II can effectively threaten tanks well above its BR. The TOG II thus excels at fire support from behind friendly tanks, or slowly advancing towards the enemies with your teammates to cover your weak flanks.
General info
Survivability and armour

While the TOG II's armor may seem sufficient, in reality it is weaker than the armour of the Churchill VII while the tank itself is higher in BR, making it significantly more likely to meet cannons capable of simply going through your armour even when angled. Regardless, the TOG II must be angled to increase its survivability against weaker cannons, as is the norm for British heavy tanks at this tier. Refrain from showing the turret rear or your side hull to enemies, as they are very weak.
The tank is vulnerable to HE of 120 mm calibre and above due to fairly lackluster roof and bottom armour. Sometimes the frontal hull roof will sustain HE shells caught by the gun, but direct turret hit will most likely destroy the vehicle. Even small bombs and rockets can easily destroy the TOG II due to this 'chink in the armour', if they land below or above the tank.
In terms of blatant weak spots, the TOG II is devoid of any major armor deficiencies outside of the turret cheeks, which are 38mm thinner than the middle of the turret face. The engine deck in the back, despite having low armour protection, stops APHE from dealing any real damage to the tank (which does allow a strategy similar to the IS-2 where you drive backwards), though any pure AP may go straight through it. In case the enemy penetrates the armour of the tank, there are 8 crew members to spare and the majority of internal ammo racks can be kept empty, which can artificially increase the survivability of the vehicle.
If player decides to equip the TOG II GWP modification, the tank gains two extra weak spots on the sides in a form of two protruding sponsons on the sides and a grenade launcher with additional ammo racks. The sponsons are made of a weaker cast armour and make angling pointless due to adding plates that actively counteract your attempts to angle the vehicle. The grenade launcher is similar to the one used by the Churchill I , but can only fire smoke shells. Contrary to that on the Maus, as the gun has limited firing angles to create a 'smoke barrier' and the modification adds weakspots to the vehicle, it is undesirable as a whole and generally not recommended that the player use the modification. The machine guns are not functional in the game, and the smoke screens are not worth the weakspots, inability to angle and the extra ammunition it adds to your vehicle.
Armour type:
| Armour | Front (Slope angle) | Sides | Rear | Roof |
|---|---|---|---|---|
| Hull | ___ mm | ___ mm Top ___ mm Bottom |
___ mm | ___ - ___ mm |
| Turret | ___ - ___ mm Turret front ___ mm Gun mantlet |
___ - ___ mm | ___ - ___ mm | ___ - ___ mm |
| Cupola | ___ mm | ___ mm | ___ mm | ___ mm |
Notes:
Mobility
| Game Mode | Max Speed (km/h) | Weight (tons) | Engine power (horsepower) | Power-to-weight ratio (hp/ton) | ||||
|---|---|---|---|---|---|---|---|---|
| Forward | Reverse | Stock | AoA | Stock | Upgraded | Stock | Upgraded | |
| Arcade | 15 | 15 | 72.5 | 5 | 775 | 1,145 | 10.69 | 14.77 |
| Realistic | 15 | 15 | 531 | 600 | 7.32 | 7.74 | ||
As a 72.5 ton behemoth of a tank weighing more than even the M1A1 SEP V2 and Tiger II (H) and only 2.7 tons shy of the Jagdtiger's 75.2 ton weight, the TOG II is slow. The designers of the vehicle (The Old Gang) prioritized crossing trenches without issue, which resulted in a slow tank that could not keep up with the more modern mobility-based wars of World War II - something that very much carries over to the game as well. The tank is extremely long to boot (also a result of the aforementioned trench crossing design considerations), making it quite slow to maneuver around the battlefield. The turning efficiency itself depends on the game mode; in RB, the tank has to stop to turn properly (N gear), or turn on EXACTLY gear 4 (otherwise the engine will choke and stop). In AB, it is possible to use gear 5 to turn around even faster. The tank turns better with its forward gear, but not to a significant degree.
When getting to the battlefield, it is highly recommended to use your Cruise Control (default binds Q and E, tap them to increase/decrease your gears without tapping W/S) binds to keep your fingers off the keyboard for too long. What is also important, however, is knowing the maps well and picking a route at the start of the match that minimizes the time spent turning your hull. This is similar to how other superheavy vehicles in general (the T95 is an exception due to its high turn rate) like the Maus play - if you keep trudging forward, even at your 15km/h max speed, you will surprisingly be getting places not too far off from your teammates. However, turning completely stops your advance to the front lines and often takes 10+ seconds to turn to the direction you want, so minimizing this time is crucial in getting to the battlefield quickly.
A minor thing to note is that the TOG II has a reverse gearbox, meaning it can reverse at the same speed of -15km/h as it can go forwards (15km/h). This coupled with high torque means the tank can reverse out surprisingly quick and also turn somewhat well - things that can definitely come in handy when trying to retreat or make it up a hill at an angle.
Modifications and economy
| Mobility | Protection | Firepower | ||||||||||||||||||||
|---|---|---|---|---|---|---|---|---|---|---|---|---|---|---|---|---|---|---|---|---|---|---|
|
|
|
Armaments
Main armament
The most defining feature of this tank outside of its lackluster mobility and large size is by far its main armament. The 94mm 28-pounder is a monstrous gun with a long barrel, fairly decent ballistics and good penetration. The ammunition selection is by no means generous - with only solid AP and HE being available - but on a very fast swiveling gun with a moderate reload the cannon lets the TOG II engage multiple targets in quick succession. Post-penetration damage on the AP round is also akin to APHE, with high spall and overall fast shell speed, albeit with the caveat that it still isn't a shell with filler and that the round does arc somewhat meaning it isn't a 'point-and-shoot' gun. The shell can generally go through almost all enemies you see at your BR with little issue, so you need not flinch when you see something heavily armored. HE, as always, is an available option against open top vehicles, but isn't advised to be brought in large numbers due to lacking effectiveness against general targets.
| 94 mm 28pdr OQF | Turret rotation speed (°/s) | Reloading rate (seconds) | |||||||||||
|---|---|---|---|---|---|---|---|---|---|---|---|---|---|
| Mode | Capacity | Vertical | Horizontal | Stabilizer | Stock | Upgraded | Full | Expert | Aced | Stock | Full | Expert | Aced |
| Arcade | 68 | -10°/+20° | ±180° | - | 26.7 | 37.0 | 44.9 | 49.6 | 52.8 | 7.80 | 6.90 | 6.36 | 6.00 |
| Realistic | 19.6 | 23.1 | 28.1 | 31.0 | 33.0 | ||||||||
Ammunition
| Penetration statistics | |||||||
|---|---|---|---|---|---|---|---|
| Ammunition | Type of warhead |
Penetration @ 0° Angle of Attack (mm) | |||||
| 10 m | 100 m | 500 m | 1,000 m | 1,500 m | 2,000 m | ||
| Shot Mk.1 | APCBC | 204 | 202 | 192 | 180 | 169 | 159 |
| Shell Mk.1 | HE | 13 | 13 | 13 | 13 | 13 | 13 |
| Shell details | ||||||||||||
|---|---|---|---|---|---|---|---|---|---|---|---|---|
| Ammunition | Type of warhead |
Velocity (m/s) |
Projectile mass (kg) |
Fuse delay (m) |
Fuse sensitivity (mm) |
Explosive mass (TNT equivalent) (g) |
Ricochet | |||||
| 0% | 50% | 100% | ||||||||||
| Shot Mk.1 | APCBC | 792 | 14.5 | - | - | - | 48° | 63° | 71° | |||
| Shell Mk.1 | HE | 792 | 12.7 | 0.4 | 0.5 | 920 | 79° | 80° | 81° | |||
Ammo racks
| Full ammo |
1st rack empty |
2nd rack empty |
3rd rack empty |
4th rack empty |
5th rack empty |
6th rack empty |
Visual discrepancy |
|---|---|---|---|---|---|---|---|
| 68 | __ (+__) | __ (+__) | __ (+__) | __ (+__) | __ (+__) | __ (+__) | __ |
When only 27 shells are taken, every ammo rack but the one under the turret will be empty. Adding more than 45 shells to the vehicle is not recommended, as this can often mean certain death on a single penetrating hit due to the side hull ammo racks being filled up.
Additional armament
This howitzer has the same trajectory as the one of the Churchill I, but can only fire smoke and can only be used by selecting the "fire special weapons" button, meaning it cannot be selected as a secondary weapon. As a result of this shell selection and poor gun angles, the gun is, if equipped at all, a support tool. The most useful application of the weapon is most likely to create a sort of 'smoke wall' like on similar vehicles such as the Maus, letting you cross extended sightlines by smoking up a corridor and passing by before it dissipates.
| 76 mm OQF 3-inch Howitzer Mk I | Turret rotation speed (°/s) | Reloading rate (seconds) | |||||||||||
|---|---|---|---|---|---|---|---|---|---|---|---|---|---|
| Mode | Capacity | Vertical | Horizontal | Stabilizer | Stock | Upgraded | Full | Expert | Aced | Stock | Full | Expert | Aced |
| Arcade | 45 | ±3° | ±4° | - | 12 | 17 | 20 | 23 | 24 | 8.1 | 7.2 | 6.6 | 6.2 |
| Realistic | 8.9 | 11 | 13 | 14 | 15 | ||||||||
Ammunition
| Smoke shell characteristics | ||||||
|---|---|---|---|---|---|---|
| Ammunition | Velocity (m/s) |
Projectile mass (kg) |
Screen radius (m) |
Screen deploy time (s) |
Screen hold time (s) |
Explosive mass (TNT equivalent) (g) |
| 3-inch Smoke | 210 | 3.18 | 9 | 5 | 20 | 8 |
Ammo racks
| Full ammo |
1st rack empty |
2nd rack empty |
3rd rack empty |
4th rack empty |
5th rack empty |
6th rack empty |
Visual discrepancy |
|---|---|---|---|---|---|---|---|
| 45 | __ (+__) | __ (+__) | __ (+__) | __ (+__) | __ (+__) | __ (+__) | __ |
Installation of the smoke launcher adds two more side ammo racks in the very front, which cannot be removed or reduced in ammunition count.
Machine guns
| 7.92 mm BESA | ||||
|---|---|---|---|---|
| Mount | Capacity (Belt) | Fire rate | Vertical | Horizontal |
| Coaxial | 4,950 (225) | 600 | - | - |
Usage in battles
Play style:
The premier 'land battleship' in history and in popular media, the TOG II was a superheavy tank designed to tackle the fortifications and static frontlines of World War 1...that never got to see any of the things in question. It was incredibly long, slow, and frankly for its weight a bit under-armoured, which led to the program being cancelled as it was very clear the TOG wouldn't have fared well in the mobility-heavy battlegrounds that were the Second World War.
The TOG II is an almost one-of-a-kind vehicle with a reputation that precedes itself. Playing in some ways similarly to the Maus, another very well-known superheavy tank, the most important thing to keep in mind is to minimize time spent turning the hull. This may sound quite trivial, but it will overall contribute to getting to the frontlines faster and also be in places you want to be. The tank's top speed of 15 km/h is by no means fast, but if you keep going in a straight line you surprisingly do get places fairly quickly. However, when turning, the tank suffers heavily from its long hull design and underpowered transmission as you may be stuck in place for dozens of seconds trying to face the direction of your choosing. Therefore, pre-planning a vague route you want to advance through that has the least amount of turning possible will help you be noticeably more effective in combat. It also has the added benefit of meaning you won't be autopiloting as much with cruise control, as you have to have a map in your head on when and where you want to turn your tank.
The GWP modification is not recommended as it adds unremovable ammo racks and adds two sponsons, both of which are easily penetrated and make any angling effort completely redundant. Considering the vehicle is almost reliant on its armour to survive, this is a damning change and unless you get unmatched utility from the smoke shells this modification only acts as a hinderance to the vehicle.
It is viable to push forward in reverse akin to IS-2 (Family)s, even when there is no real cover in form of hills, because of the size of the engine and transmission. This means tanks that fire APHE will usually be foiled due to the engine eating the shrapnel instead of your crew compartment. Remember that your turret is still vulnerable in this state, so tanks that can penetrate it frontally will be a top priority. It is also important to note that this maneuver heavily restricts your gun depression - do not under any circumstance try to crest a hill this way as if your engine gets shot out you will either be focused by multiple enemies or die to 3 consecutive engine fires.
Angling the tank somewhat and pushing can also be a viable strategy as well. While the TOG II doesn't boast the most heavily armored hull and turret of its tier, a fair few enemies won't know your weakspots and may thus bounce off the thicker-than-expected front. As your reverse is just as fast as your forwards speed, the vehicle can also get out of sticky situations surprisingly effectively. Also to note is the fairly high penetrating gun, which lets you stick at range and mostly avoid being penetrated in return. This can be beneficial in uptiers when you face heavier caliber guns.
Ammunition:
It is recommended to bring 27 shells, as this will put all your ammunition under your turret crew. The GWP modification as mentioned above should be de-equipped as the ammunition in the sponsons cannot be removed and will still detonate your vehicle on penetration.
Your main round will be the solid shot AP round. Due to its large caliber and fairly high speed / penetration the shell actually can one shot enemies quite often, or at least leave them heavily damaged. HE can be loaded for light targets, but your main ammo will first and foremost be the AP.
Defensive Capabilities:
With a fast turret traverse, it will be quite easy to react to incoming threats. Despite the cramped internals, the tank is quite survivable down to the sheer number of crew inside the tank. Try to avoid driving into any crossfire zones as you can only really angle against a single direction without losing armor effectiveness.
Notable Enemies / Guns:
- Soviet SPGs (Calibers 100 mm and above): Similar designs all around, dangerous guns but generally held back by their long reloads. Regardless of whether they have HE or APHE loaded, you should always treat them as existential threats and either avoid them, ambush them when they look away or focus your fire towards their weakspots. These usually involve the lower transmission casing (immobilizes them and their firing arc) or the flat armor plates next to the gun.
- Vehicles equipped with the US 76 mm (M4A3 (76) W, M18 GMC, M41A1, M4/T26, M36 etc): Fairly dangerous gun at close to medium range, but can also bounce on angles. Most are open top or lightly armored against your gun, so an AP shot followed up by a HE shell will generally be enough. Shermans may require a second AP shell instead of a HE shell, as they're more armored.
- Tiger I: Fairly lethal shell with adequate penetration, but has minimal armor you can shoot center mass at if they're not angled. If it is - try and hit the flatter plate of the two plates presented, to potentially damage the crew in the turret. The regular cupola shot will be fairly ineffective with AP as your shell lacks filler, so try and seize the moment they stop angling to peek out and ruin their day.
- German Long 75mm (Panthers, Panzer IV/70(V)): Very lethal cannon, prioritize these enemies at all costs! At close to medium range, a single hit to the middle of the hull can destroy it, but if you want to be extra cautious you can go for a turret cheek or corner shot to disable the vehicle's ability to return fire if it's a Panther. If it's a Panzer IV/70(V) or its premium counterpart, you can shoot near the lower plate and it will generally spall into the tank's crew compartment.
- French 75 mm (M4A4 (SA50), M4A1 (FL10) etc.): POT-51A and PCOT-51P both have fairly high penetration as well as post-penetration damage. The SA50 can utilize terrain, unlike its American 76, British or Italian Firefly counterparts, so be vigilant if you notice a competent player in one. As it's a Sherman hull, however, a single shot will generally be enough to neutralize it.
- US 90 mm: This cannon when equipped with the proper rounds can be a nightmare to handle. M82 on penetration will knock out large amounts of your crew, but contrary to popular belief this isn't the only shell these guns can fire. M304 and/or M332 APCR rounds at this tier act akin to APDS rounds and can generally handle pretty scary angles and still penetrate, and for vehicles like the M36B2 a HEATFS shell option is available which will eat through your armor.
- German Long 88mm (Jagdpanther G1, Waffentrager, Nashorn etc.): The most dangerous cannon you can see at this tier. Prioritize dealing with these vehicles ahead of every other vehicle you see unless absolutely necessary! While the TOG II no longer faces Tiger IIs, the long 88 is found on a substantial number of German tank destroyers both light and heavy alike. The Waffenträger and Nashorn are lightly armored but the former is low profile and turreted while the latter is mobile; the Jagdpanther is both heavily armored and mobile which is even worse news for you. Avoid Jagdpanthers if possible or get close enough so that your shells can hit the weakspot e.g. the MG port, but volumetric armor may mean your shell may do inconsistent damage as he one shots you back.
Pros and cons
Pros:
- Fairly good survivability and has the option to advance rearwards
- The tank has a reverse gear box, giving it the same speed in both directions
- The AP shell has good penetration and damage for its battle rating
- The turret and track traverse speeds are surprisingly good, with the turret being twice as fast as most contemporaries at the BR
- Has a small town of 8 people inside; Hard to one-shot
- Fast reload
Cons:
- One of the slowest vehicles in the game
- The TOG II GWP modification severely decreases armor effectiveness and makes angling near impossible
- The cannon lacks an APHE round needed for its one-shot potential
- The turret armor is a potential weakspot, meaning being hull-down may not guarantee safety
- Very large profile, easy to spot
- Crew is packed near the front, potentially meaning heavy crew losses when frontally penetrated
- Engine and transmission are easily knocked out
History
Describe the history of the creation and combat usage of the vehicle in more detail than in the introduction. If the historical reference turns out to be too long, take it to a separate article, taking a link to the article about the vehicle and adding a block "/History" (example: https://wiki.warthunder.com/(Vehicle-name)/History) and add a link to it here using the main template. Be sure to reference text and sources by using <ref></ref>, as well as adding them at the end of the article with <references />. This section may also include the vehicle's dev blog entry (if applicable) and the in-game encyclopedia description (under === In-game description ===, also if applicable).
Media
- Videos
See also
External links
Paste links to sources and external resources, such as:
- topic on the official game forum;
- other literature.
| Britain heavy tanks | |
|---|---|
| Matilda | Matilda III · Matilda Hedgehog |
| Churchill | Churchill I · Churchill III · Churchill VII · Churchill Crocodile · Churchill NA75 · Black Prince |
| Post-war | Caernarvon · Conqueror |
| Other | Independent · Excelsior · TOG II |
| Britain premium ground vehicles | |
|---|---|
| Light tanks | A13 Mk I (3rd R.T.R.) · A13 Mk II 1939 · AEC Mk II · Crusader "The Saint" · Rooikat 105 |
| Medium tanks | A.C.I · Grant I · Cromwell V (RP-3) · Sherman IC "Trzyniec" · A.C.IV · Comet I "Iron Duke IV" |
| Centurion Mk.2 · ▄Strv 81 (RB 52) · Centurion Mk.5 AVRE · Centurion Mk.5/1 · ▄Sho't Kal Dalet · Centurion Action X | |
| Vijayanta · Khalid · Challenger DS · Challenger 2 OES | |
| Heavy tanks | Independent · Matilda Hedgehog · Excelsior · TOG II · Churchill Crocodile · Black Prince |
| Tank destroyers | Alecto I · Achilles (65 Rg.) · QF 3.7 Ram |
