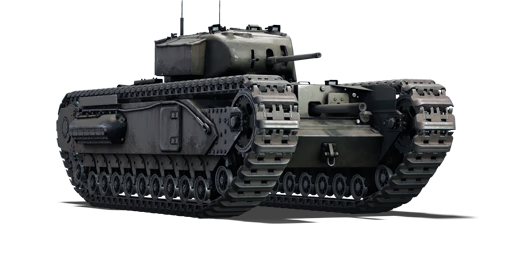
Churchill I

From War Thunder Wiki
Jump to: navigation, search
RANK 4 FRANCE
Somua SM PACK
This page is about the British heavy tank Churchill I. For other variants, see Churchill (Family).
uk_a_22_mk_1_churchill_1941.png
GarageImage Churchill I.jpg
ArtImage Churchill I.png
Churchill I
AB RB SB
3.0 3.3 3.3
Class:
Research:11 000 Specs-Card-Exp.png
Purchase:22 000 Specs-Card-Lion.png
Show in game

Description

The Tank, Infantry, Mk IV, Churchill I (A22) (or just Churchill I) is a rank II British heavy tank with a battle rating of 3.0 (AB) and 3.3 (RB/SB). It was introduced in Update 1.69 "Regia Aeronautica". As the original model of the Churchill infantry tank, it has the substantial frontal armour able to withstand enemy shells.

The Churchill Mk I is one of the more capable heavy tanks at rank II. The tank has excellent frontal armour that can absorb and bounce shots. Tanks such as the Panzer III, T-34, M4 Sherman, and even the dreaded Panzer IV F2 can be blocked if angled. Very few tanks can deal with the Churchill Mk I effectively from the front, such as the M10 GMC or Achilles. Its 2-pounder gun, however, is sub-par in dealing damage for its battle rating. It is of small calibre and has low penetration and damage. Use its very fast reload to make follow-up shots to finish off enemies. Its secondary howitzer is able to fire HE shells, however, due to their inefficiency, it is recommended to use smoke rounds to cover your team's advance or to smoke out enemy positions.

The Churchill Mk I, despite being a heavy tank, is quite fast and can turn just as swiftly via neutral steering. However, a driver must be skilled to utilise this to the tank's advantage, as turning while in forward motion is slower than the neutral steer, which the enemy can take advantage of when flanking. The Churchill's engine is also easily damaged due to its large appearance.

General info

Survivability and armour

Smoke grenades
Creation of a smoke screen in front of the vehicle
Armourfront / side / back
Hull89 / 64 / 51
Turret102 / 89 / 89
Crew5 people
Visibility87 %

The main attribute of the Churchill I is obviously its armour. the 89 to 178 mm of the front hull together with the 63.5 mm of side armour means that this tank performs very well when angled. However overangling can reveal the thinly armoured engine in the back. The very big tracks also aid in protection as they can soak up a lot of shells. However, this leaves you vulnerable to being detracked. Do not let the enemy get to your rear as all tanks at the Churchill I's BR can penetrate it.

The turret of the Churchill I is very well armoured overall, it has 89 mm all around except 114 mm on the front. On the front, there is also a 50 mm thick mantlet plate below the main plate that when combined offers superb frontal protection. The turret front has a couple of small weak spots in the front where the turret MG and sight are placed: the armour is only 50 mm thick and can be penetrated by any opposing tank. Always keep the turret in motion when at close range.

The roof armour of the turret and hull are both very thin and can be easily strafed by aircraft with a calibre of 20 mm or larger. Little can be done, but sticking close to an SPAA vehicle or keeping under trees can help mitigate these risks.

The 5 crew members of the Churchill allow for decent survivability, however, due to the packed crew in the turret, an APHE shell will knock the crew entirely if it goes through. If this happens you'll have to wait for the hull-gunner (presuming they're still alive) to take up the gunner's position.

The abundance of smoke munitions on the vehicle (roof-mounted smoke grenades as well as howitzer-fired smoke rounds) allows for increased survivability in most situations.

Armour type:

  • Rolled homogeneous armour (Hull, Turret)
  • Cast homogeneous armour (Driver viewport, Machine gun area, Gun mantlet)
Armour Front Sides Rear Roof
Hull 89 mm Front plate
89 + 89 mm Front plate (MG Port)
38 mm (63°) Front glacis
76.2 mm (19°) Lower glacis
63.5 mm Overall side armour
76.2 mm Side hatch
38.1 mm Side edge
50.8 mm
25.4 mm (68°) Bottom
15.87 mm
Turret 89 mm Turret front
89 mm (0-30°) Gun mantlet
18 mm (76°) Roof area
76.2 mm 76.2 mm 18 mm

Notes:

  • Suspension wheels are 20 mm thick while tracks are 30 mm thick.
  • Belly armour is 19 mm thick.
  • A 8 mm Structural steel plate separates the engine and crew compartment.
  • 50 mm internal mantlet that can be either a weak spot or an extra layer of armour
  • The 8 mm engine vents on the side of the tank lead directly to the engine and fuel tanks

Mobility

Speedforward / back
AB30 / 3 km/h
RB and SB28 / 3 km/h
Number of gears4 forward
1 back
Weight37.8 t
Engine power
AB668 hp
RB and SB350 hp
Power-to-weight ratio
AB17.7 hp/t
RB and SB9.3 hp/t

As a heavy infantry support tank. the Churchill I is slow and will not be the first to reach the frontline. It has a top speed of 28 km/h (30 km/h in AB) and will reach that top speed fairly quickly due to a good engine and transmission. The Churchill I has a very poor reverse speed (-3 km/h), so it should not be relied on for peaking a hill or corner. The Churchill I can neutral steer allowing for good positioning, however the neutral steering is very slow. Short brakes can be used to pivot the tank much faster (keybinds can be defined in-game in the Controls menu: Controls > Ground vehicles > Short brakes).

Game Mode Max Speed (km/h) Weight (tons) Engine power (horsepower) Power-to-weight ratio (hp/ton)
Forward Reverse Stock Upgraded Stock Upgraded
Arcade 30 3 37.8 452 668 11.96 17.67
Realistic 28 3 310 350 8.2 9.26

Modifications and economy

Repair costBasic → Reference
AB970 → 1 259 Sl icon.png
RB934 → 1 212 Sl icon.png
SB1 245 → 1 616 Sl icon.png
Total cost of modifications10 440 Rp icon.png
13 960 Sl icon.png
Talisman cost750 Ge icon.png
Crew training6 300 Sl icon.png
Experts22 000 Sl icon.png
Aces210 Ge icon.png
Research Aces220 000 Rp icon.png
Reward for battleAB / RB / SB
60 / 80 / 80 % Sl icon.png
124 / 124 / 124 % Rp icon.png
Modifications
Mobility Protection Firepower
Mods new tank traks.png
Tracks
Research:
520 Rp icon.png
Cost:
690 Sl icon.png
90 Ge icon.png
Mods new tank suspension.png
Suspension
Research:
470 Rp icon.png
Cost:
620 Sl icon.png
80 Ge icon.png
Mods new tank break.png
Brake System
Research:
470 Rp icon.png
Cost:
620 Sl icon.png
80 Ge icon.png
Mods new tank filter.png
Filters
Research:
870 Rp icon.png
Cost:
1 200 Sl icon.png
150 Ge icon.png
Mods new tank transmission.png
Transmission
Research:
680 Rp icon.png
Cost:
900 Sl icon.png
115 Ge icon.png
Mods new tank engine.png
Engine
Research:
680 Rp icon.png
Cost:
900 Sl icon.png
115 Ge icon.png
Mods tank tool kit.png
Improved Parts
Research:
520 Rp icon.png
Cost:
690 Sl icon.png
90 Ge icon.png
Mods extinguisher.png
Improved FPE
Research:
470 Rp icon.png
Cost:
620 Sl icon.png
80 Ge icon.png
Mods tank reinforcement uk.png
Crew Replenishment
Research:
870 Rp icon.png
Cost:
1 200 Sl icon.png
150 Ge icon.png
Mods new tank horizontal aiming.png
Horizontal Drive
Research:
520 Rp icon.png
Cost:
690 Sl icon.png
90 Ge icon.png
Mods tank ammo.png
40mm_uk_2pdr_APHV_ammo_pack
Research:
520 Rp icon.png
Cost:
690 Sl icon.png
90 Ge icon.png
Mods tank cannon.png
Adjustment of Fire
Research:
470 Rp icon.png
Cost:
620 Sl icon.png
80 Ge icon.png
Mods tank ammo.png
40mm_uk_2pdr_APHE_ammo_pack
Research:
470 Rp icon.png
Cost:
620 Sl icon.png
80 Ge icon.png
Mods new tank vertical aiming.png
Elevation Mechanism
Research:
870 Rp icon.png
Cost:
1 200 Sl icon.png
150 Ge icon.png
Mods tank ammo.png
40mm_uk_2pdr_APCBC_ammo_pack
Research:
680 Rp icon.png
Cost:
900 Sl icon.png
115 Ge icon.png
Mods tank ammo.png
76mm_britain_howitzer_Smoke_ammo_pack
Research:
680 Rp icon.png
Cost:
900 Sl icon.png
115 Ge icon.png
Mods smoke screen.png
Smoke grenade
Research:
680 Rp icon.png
Cost:
900 Sl icon.png
115 Ge icon.png

Armaments

Main armament

Shoulder stabilizer
Reduces the swing of the gun in one plane while moving
Ammunition150 rounds
Reloadbasic crew → aces
3.6 → 2.8 s
Vertical guidance-15° / 20°
Main article: QF 2-pounder (40 mm)

The 40 mm QF 2-pounder has poor penetration even with its best round at its BR (89 mm point blank). You will still be able to penetrate most light or medium vehicles frontally at close range, but at ranges greater than 500 m the cannon becomes mostly ineffective due to both its lack of penetration and its inaccuracy. From the side, the round will usually go through, even at medium ranges. The 2-pounder's best attribute is its reload speed. Because of this you will in most cases be able to fire 2 rounds in the same times as the enemy can fire only one. It is advised to use the 2-pounder's reload speed to methodically take out key components within the enemy vehicle. This will also be necessary as the only round with explosive filler is the 76mm, and the HE round has terrible penetration. The 2-pounder is equipped with a shoulder stabilizer allowing for stable fire at slow speeds.

The gun has excellent elevation and depression angles as well as a turret with decent traverse speeds, however in a lot of situations the hull may be in the way of the gun, keep this in mind when engaging on uneven or hilly terrain.

40 mm QF 2-pounder Turret rotation speed (°/s) Reloading rate (seconds)
Mode Capacity Vertical Horizontal Stabilizer Stock Upgraded Full Expert Aced Stock Full Expert Aced
Arcade 150 -15°/+20° ±180° Shoulder 19.42 26.88 32.64 36.10 38.40 3.64 3.22 2.97 2.80
Realistic 14.28 16.80 20.40 22.56 24.00

Ammunition

Penetration statistics
Ammunition Type of
warhead
Penetration @ 0° Angle of Attack (mm)
10 m 100 m 500 m 1,000 m 1,500 m 2,000 m
Shot Mk.1 AP/T AP 72 68 52 37 27 19
Shot Mk.IXB APCBC/T APCBC 89 86 77 66 57 50
Shot Mk.1 APHV/T AP 80 75 58 41 30 21
Shell Mk.1 AP/T APHE 66 62 49 36 26 20
Shell details
Ammunition Type of
warhead
Velocity
(m/s)
Projectile
mass (kg)
Fuse delay
(m)
Fuse sensitivity
(mm)
Explosive mass
(TNT equivalent) (g)
Ricochet
0% 50% 100%
Shot Mk.1 AP/T AP 792 1.08 - - - 47° 60° 65°
Shot Mk.IXB APCBC/T APCBC 792 1.24 - - - 48° 63° 71°
Shot Mk.1 APHV/T AP 853 1.08 - - - 47° 60° 65°
Shell Mk.1 AP/T APHE 792 1.08 1.2 9 20.9 47° 60° 65°

Ammo racks

Ammo racks of the Churchill I
Full
ammo
1st
rack empty
2nd
rack empty
3rd
rack empty
4th
rack empty
5th
rack empty
6th
rack empty
7th
rack empty
Visual
discrepancy
150 110 (+40) 80 (+70) 58 (+92) 36 (+114) 26 (+124) 16 (+134) (+149) No

Notes:

  • Racks disappear after you've fired all shells in the rack.
  • Centre & turret empty: 58 (+92) shells.

Optics

Churchill I Optics
Which ones Default magnification Maximum magnification
Main Gun optics x1.85 x3.5
Comparable optics T-34 (1940)

Additional armament

Ammunition58 rounds
Reloadbasic crew → aces
8.1 → 6.3 s
Vertical guidance-5° / 9°
Horizontal guidance-15° / 15°

The hull-mounted 76 mm OQF 3-inch Howitzer Mk I has only 2 types of rounds available to it: HE and smoke. This is due to the fact that it was intended to be used against infantry. In the game, the HE round can be used to overpressure the roof or floor of lightly armoured vehicles and can obliterate open-topped vehicles by hitting them almost anywhere. The smoke round is self-explanatory, and can be used to fire smoke at a greater distances compared to smoke dischargers. The smoke rounds can be used to "smoke out" enemy positions by firing on them with the 76 mm howitzer to force them to move from a good position, or to cover advancing allies from enemy fire.

This weapon also receives aim assist in AB, but to see it the player must select the howitzer as a "primary weapon" which makes regular main weapon inoperable. To return back to the turret cannon it is adviced to use "reset" weapon selection rather than choosing it again, as otherwise it will be impossible to use both weapons at once anymore, which is inconvenient. Due to the extremely low muzzle velocity of the shell the howitzer can fire over tall builings and hills, which allows AB Churchill I to fire almost anywhere. Enemy open topped vehicles must react to the shell coming from the sky (if they even can see it coming) to dodge or they will not survive.

76 mm OQF 3-inch Howitzer Mk I Turret rotation speed (°/s) Reloading rate (seconds)
Mode Capacity Vertical Horizontal Stabilizer Stock Upgraded Full Expert Aced Stock Full Expert Aced
Arcade 58 -5°/+9° ±15° N/A 12.0 17.0 20.0 23.0 24.0 8.1 7.2 6.7 6.3
Realistic 8.9 10.0 13.0 14.0 15.0

Ammunition

Penetration statistics
Ammunition Type of
warhead
Penetration @ 0° Angle of Attack (mm)
10 m 100 m 500 m 1,000 m 1,500 m 2,000 m
3-inch Mark II HE 10 10 10 10 10 10
Shell details
Ammunition Type of
warhead
Velocity
(m/s)
Projectile
mass (kg)
Fuse delay
(m)
Fuse sensitivity
(mm)
Explosive mass
(TNT equivalent) (g)
Ricochet
0% 50% 100%
3-inch Mark II HE 210 6.02 0.2 0.1 606 79° 80° 81°
Smoke shell characteristics
Ammunition Velocity
(m/s)
Projectile
mass (kg)
Screen radius
(m)
Screen deploy
time (s)
Screen hold
time (s)
Explosive mass
(TNT equivalent) (g)
3-inch Smoke 210 3.18 9 5 20 8

Ammo racks

Ammo racks of the Churchill I
Full
ammo
1st
rack empty
2nd
rack empty
3rd
rack empty
4th
rack empty
Visual
discrepancy
58 45 (+13) 31 (+27) 16 (+42) (+57) No

Notes:

  • Racks disappear after you've fired all shells in the rack.
  • Minimal load: 16 (+42) shells.

Machine guns

Ammunition4 950 rounds
Belt capacity225 rounds
Reloadbasic crew → aces
10.4 → 8.0 s
Fire rate600 shots/min
Main article: BESA (7.92 mm)
7.92 mm BESA
Mount Capacity (Belt) Fire rate Vertical Horizontal
Coaxial 4,950 (225) 600 N/A N/A

Usage in battles

This tank can use a playstyle similar to the Matilda or a weaker Churchill III. It is best played up close, to make use of the armour and also gun. Since the tank is rather boxy, it is very good at angling. Unlike the Churchill III, its gun isn't capable of taking on most other tanks of its rank. Its main role in the battlefield is to soak up and take shots, with its thick armour, that can withstand most tanks of its rank. In RB mode you will most likely have the Americans on your team, with the M10s and Shermans providing support for you. Main enemies for this tank would be the M10, the Achilles, and most Panzer IVs and StuGs.

The Churchill has heavy armour, especially when it is angled, but this certainly does not mean that it is invincible. In fact, there are a lot of guns around BR 3.0 that can destroy the Churchill, even at long range.

Germans

  • Almost every RB/SB battle the British will be facing them. By far the most lethal tanks are the Panzer IVs with the long barrel 75 mm. They can penetrate the Churchill Mk I frontally at long range. Later versions of the Panzer IV also have armour which the Churchill's 40 mm will really struggle to penetrate at long range, putting the Churchill at a big disadvantage. The same applies to any vehicle armed with the long barrel 75 mm gun, including the StuG III F/G and Marder III H.
  • The 8,8 cm Flak 37 Sfl. "Flak Truck" is a massive threat. The 88 mm gun will easily penetrate an unangled Churchill, and the explosive mass will knock out all your crew. Your 40 mm is subpar against the Flak Truck as it will have to take each crew member out individually due to the lack of post-penetration damage of the 2-pounder. Luckily, the Churchill Mk I has access to the 76 mm howitzer, which provides well needed explosive firepower. Aim for the ammo box at the back to quickly dispatch the Flak Truck.
  • Watch out for tanks armed with HEAT (such as Panzer III/IVs with the short-barreled 75 mm), as it has up to 100 mm penetration. The StuH 42 G is also dangerous, with a powerful HE round and a high penetration HEAT round. Luckily, these tanks will have to close in to shorter ranges to effectively attack the Churchill Mk I, as their guns have poor ballistics. This means that Churchill's 40 mm gun will be more effective. Also, watch out for the Sd.Kfz.234/2 or Sd.Kfz.234/4. These are vehicles based on the Puma armoured car. The 234/2 has a 50 mm and the 234/4 has a 75 mm gun. Both are excellent flanking vehicles, extremely fast and potent. They will easily outflank the slow Churchill, and destroy you from your less-armoured sides.

Soviets

  • At medium to long range, the ZiS-30 proves to be a real threat. it has a high penetration gun and is great at ambushing. Luckily, it has light armour and can be destroyed easily with the 76 mm howitzer or even with machine guns.
  • Soviet armour is a bigger threat. Tanks like the T-34 are highly resistant to the 2-pdr gun due to their steep sloping armour. The L-11 gun on the T-34 (1940) will struggle to penetrate the Churchill, but the F-34 gun found on post-1940 versions is much more effective. Below 500 m, the F-34 guns can destroy the Churchill with its potent BR-350B APHEBC rounds or APCR rounds (though they do less damage). An even bigger threat is the KV-1 type tanks. A Churchill vs a KV-1 (L-11) can end in a stalemate situation, as both tanks will struggle to penetrate the other frontally. However, later KV-1 models have the ZiS-5 gun, which is pretty much identical to the F-34 gun found on the T-34. There is also the German premium KV-1B which has upgraded armour but a weaker gun, which is a dangerous opponent and quite common despite being a premium vehicle.
  • When fighting the T-34s aim for their turret weak spots or at the sides. On the T-34 (1940) and (1941), aim for the flat spot on their sloped turret cheeks, or shoot below at the shot trap. This will either disable their turret crew or destroy them. When fighting the KV-1 frontally, you cannot do much damage against it unless you manage to get a lucky shot through their turret cheeks. Otherwise, let your teamates distract it, or use smokes, and flank so that you can shoot its less angled 75 mm sides.

Japanese

  • Be careful of the Ho-Ro with its massive howitzer, or the Chi-Nu with its powerful 75 mm gun. However, they don't have much armour and you will be able to destroy both relatively easily.

Pros and cons

Pros:

  • Excellent armour
    • Almost immune to small calibre guns
    • Well armoured sides and a strong mantlet, incredibly hard to dislodge or destroy when properly angled
    • Large suspension sides have side hits more likely to break tracks than penetrate the hull
    • Works well as the spearhead of an assault when capturing a point, absorbing damage
  • Extremely fast-firing 40 mm gun, it will pretty much always get another shot off before the enemy does, making it easy to disable enemy tanks
  • This Churchill can fire APHE shells with some post-penetration damage to finish off crippled tanks
  • The Churchill's size, movement speed and shoulder stabilizer eliminates shake or recoil from the gun, making it easy to fire in any situation
  • 76 mm howitzer can be used to obliterate open topped tanks or smoke out enemy positions at long ranges or even to cover allied retreats
  • Although it is slow, it can move out of the way due to the good acceleration and ability to pivot steer

Cons:

  • 40 mm gun is ineffective against anything with sloped or heavy armour
    • Has difficulty engaging other heavy tanks
  • Shell Mk.1 AP/T with explosive mass has a low penetration of 66 mm at best
  • Up-gunned Panzer IVs (Pz.IV F2, Pz.IV G, etc.) will penetrate flat face with ease
  • Rather poor mobility when compared to other heavy tanks from other nations
    • Will take a lot of time just to reach the combat zone from spawn points
    • Will lose a lot of speed when making a sharp turn in motion
    • Terrible reverse speed
  • Has a frontal 50 mm thick weak spot (machine gun port)
  • Roof armour is very thin, attacks with stronger than usual HE can easily destroy this tank
    • Priority target for planes due to the size and bad speed, can be removed with a single rocket from a good pilot
  • Giant exposed tracks leave the tank incredibly vulnerable to being completely immobilized

History

Development

The General Staff specification A20 was implemented before World War II and was meant to replace the Matilda II and Valentine infantry tanks. The specification was based around the British infantry tank doctrine and with the expectation that the coming war would be based off the World War I trench warfare, thus the tank was needed to travel across unfavourable terrain and able to destroy enemy defenses and infantry obstacles. As speed and heavy firepower was not taken with priority, the vehicle was to have two 2-pounder gun on side sponson mounts with a coaxial machine gun, with another machine gun and smoke dischargers on the front hull, armour was about 60 mm on the turret. Four prototypes were made by June 1940 by Harland and Wolff. The front hull would see an upgrade in armament with a 3-inch howitzer during the prototype stages, the 43 ton tank had a 300 hp Meadows engine from the Covenanter tank and was made the tank underpowered. The A20 project was cancelled with the Battle of France, which saw the emergency evacuation of the British Expeditionary Force from Dunkirk that left a majority of their heavy equipment behind.

The Battle of France proved that the coming World War II was not going to be a stagnant battlefield like the trench warfare from World War I. The entire concept had to be redesigned and was done so by Henry Merrit, the director of Tank Design at Woolwich Arsenal. His new concept, the A22 or Infantry Tank Mark IV Churchill, was given to Vauxhall Motors in June 1940. War Office requested that the A22 be ready to enter production within the year due to growing pressure of a German invasion of Britain. The designs were ready in July 1940 and the first prototypes were made by December of the same year, production soon followed in June 1941. The rushed development was acknowledged in the company to being the cause of many faults and defects in the tank, but the demand by the government was so great that it must be carried out, with the expectation that the issues will be fixed during production. The Churchill tank suffered from an under-powered engine, weak armament, and mechanical issues. The weak armament from a 2-pounder was fixed with the arming of a 6-pounder on the Churchill, but the other issues caused poor performance of the Churchill in the battlefield. In fact, the Churchill production was almost cancelled in favour of the Cromwell due to its issues, but its usage in the Second Battle of El Alamein proved its value and kept it in service.

The Churchill would carry on the rest of the war as one of the most versatile tank design in British service, serving in many specialist roles other than its tank role. Altogether, a total of 7,568 Churchill units produced from 1941 to 1945, with 5,968 as tanks.

Variants

The Churchill, used in a multitude of roles, is made into many different variants. 12 different kinds of tank variants were produced for combat roles, with 11 more variants in specialized roles ranging from armoured personnel carrier, a bridge-layer, mine clearer, a Gun Carrier (3-in), flamethrower tank, and an armoured recovery vehicle.

Combat usage

The Churchill tank was first used in the Dieppe Raid in August 1942. While it was really a test on how an opposed landing would work, the 60 Churchill tanks to support the Canadian units suffered from mechanical issues, and those that did work are not able to penetrate past the sea wall due to impassable defenses. None of the Churchill tanks that landed returned from the beaches and with a 70% casualty rate, the raid's attempt to establish a beachhead was a failure.

The next use of the Churchill was in North Africa during the Second Battle of El Alamein. At this point, the Churchills have been upgraded to the Mk.III variants with 6-pounders as their main armament. The detachment, code named "King Force", help supported the 7th Motor Brigade in their attack. The Churchills were fired upon by many German anti-tank weapons, but none were taken out with only one receiving note worthy damage. "King Force", as a test bed for the feasibility of Churchills operating in the desert environment, was disbanded with the establishment of the 25th Army Tank Brigade with the Churchills to see action in February 1943 in Tunisia. In the German offensive Operation Ochsenkpf, two Churchill Mk.III from the 51st Royal Tank Regiment came across an entire German transport column that they ambushed. The end result was a loss of twelve artillery pieces, 25 wheeled vehicles, two Panzer IIIs and 200 casualties on the German side with no losses for the British. The Churchill also played a key role in the Battle of Longstop Hill, where Churchill tanks in the 48th Royal Tank Regiment faced off with Germany's newest heavy tank Tiger I. Though suffering losses, a lucky 6-pounder shot from the Churchill ended up jamming the Tiger's turret and turret ring that injured the crew, forcing them to abandon the tank. The Tiger tank was captured by the British for intelligence purpose on Germany's armoured forces. The Tiger Tank is named Tiger 131.

After the North African campaign, the Churchill began to see widespread usage in the British army as a support unit for the infantry. The Churchill saw much more operation hours than any other British tank in service. It was at this point that the Churchill Mk.III began a conversion into the 75 mm guns that were used on the American M4 Sherman tanks. These conversions, known as NA75, proved to be more efficient than the Shermans and were used more effectively. Some Churchills were also converted into close support vehicles with 95 mm howitzers as their main armaments. In response to the growing German anti-tank firepower in the later years of World War II, the Churchill tanks were also upgraded in armour by a large degree, though their engines were also upgraded to compensate for the additional weight. The Churchill VII, for example, has armour ranging up to 152 mm thick in the front, in comparison to the Mk.III 89 mm thick front hull. The Churchills also saw service in Europe during Operation Overlord. At the time, it was considered that the Churchill would become severely outdated with the growing tank technology, so an experimental program under specification A43, otherwise known as the Black Prince, to uparmour and upgun the Churchill. While this experimented seem fruitful, the development of more agile tanks with the same level of protection and armament such as the Centurion rendered the project obsolete.

The Churchills were also given out to the Allies to help combat the Axis forces. The Australian Army received a handful of Churchills for testing alongside the M4 Sherman with the Matilda II as the basis, to which proved that the Churchill was superior in jungle warfare. Of the 510 Churchills ordered by the Australians in the war, only 46 arrived in time and were not used in the Pacific War, the rest were cancelled with the end of World War II. The USSR also used the Churchills given by the British as part of the Lend-Lease act. 301 Churchills were sent, but 43 were lost to the sea by German naval forces. Of those that arrived, the Soviets gave the Churchills to the 5th Guards Tank Army in the Battle of Prokhorovka during the Kursk Offensive.

After World War II, the Churchill stuck around in the British Army until the Korean War, where the British sent the Churchill Crocodile Squadron (C squadron of the 7th Royal Tank Regiment) to Korea to fight with the Allied coalition. They fought as gun tanks in battle such as the Third Battle of Seoul. The Churchills were instrumental in some victories and were widely praised by both British and American forces and historians. After the Korean war, the Churchills remains in combat service until 1952, with the specialized bridge-layer variant staying until the 1970s. The Irish Army also received three Churchill tanks in 1948 and another in 1949 as rentals until 1954, where they were purchased after trials with the vehicles. Despite running out of spare parts for the Churchill, the Irish Army took them in and experimented with using different engines to keep them functional, though this ended with a failure and by 1967, only one was still functional. All were retired in 1969 and one was preserved at the Curragh Camp.

Media

Skins
Videos

See also

External links


Vauxhall Motors Limited
Infantry Tanks 
Tank, Infantry, Mk IV, Churchill (A22)  Churchill I · Churchill III · Churchill VII · Churchill Crocodile
Tank, Infantry, Black Prince (A43)  Black Prince
Tank Destroyers  Gun Carrier (3-in)
Captured  ▀Pz.Kpfw. Churchill

Britain heavy tanks
Matilda  Matilda III · Matilda Hedgehog
Churchill  Churchill I · Churchill III · Churchill VII · Churchill Crocodile · Churchill NA75 · Black Prince
Post-war  Caernarvon · Conqueror
Other  Independent · Excelsior · TOG II