Difference between revisions of "Object 248"
(→Main armament) (Tag: Visual edit) |
(→Main armament) (Tag: Visual edit) |
||
| Line 55: | Line 55: | ||
{{Specs-Tank-Weapon|1}} | {{Specs-Tank-Weapon|1}} | ||
<!-- ''Give the reader information about the characteristics of the main gun. Assess its effectiveness in a battle based on the reloading speed, ballistics and the power of shells. Do not forget about the flexibility of the fire, that is how quickly the cannon can be aimed at the target, open fire on it and aim at another enemy. Add a link to the main article on the gun: <code><nowiki>{{main|Name of the weapon}}</nowiki></code>. Describe in general terms the ammunition available for the main gun. Give advice on how to use them and how to fill the ammunition storage.'' --> | <!-- ''Give the reader information about the characteristics of the main gun. Assess its effectiveness in a battle based on the reloading speed, ballistics and the power of shells. Do not forget about the flexibility of the fire, that is how quickly the cannon can be aimed at the target, open fire on it and aim at another enemy. Add a link to the main article on the gun: <code><nowiki>{{main|Name of the weapon}}</nowiki></code>. Describe in general terms the ammunition available for the main gun. Give advice on how to use them and how to fill the ammunition storage.'' --> | ||
| − | {{main|S-34 (100 mm)}}IS-2 players would become best friends with the Object 248's main gun very fast, since it gets rid of the long reload while keeping the excellent one-shot capacity. This 100mm S-34 cannon has a quick reload time of around 10 seconds which is generally fast enough for most situations. The reduced caliber also increases the ammunition capacity to 31 rounds at most, allowing the player to significantly lengthen their battle time without resupplying ammo. The BR-412B APHEBC shell is extremely powerful, with ~210mm penetration at around 400m, and 184mm at 1000m. This level of penetration is adequate to frontally penetrate even the hardest nuts at its battle rating, such as [[Ferdinand]], [[Jagdpanther]], [[Ho-Ri Production|Ho-Ri]], [[M26 (Family)|M26]], etc. More commonly seen and less armoured tanks like [[Panzer V Panther (Family)|Panthers]], M4, [[Cromwell (Family)|Cromwell]], etc are of course even easier to deal with. Upon penetration, the shell's 100g explosive filller will effortlessly knock out most if not all crew inside the target tank. However one slight downside of it is the reduced explosive mass comparing to the 122mm BR-471B's 246g explosives, meaning when shooting spacious vehicles like Jagdtiger, you should attempt to target the centre mass of the crew so the shell explodes as closely to their middle as possible, to guarantee a one-shot kill. | + | {{main|S-34 (100 mm)}}IS-2 players would become best friends with the Object 248's main gun very fast, since it gets rid of the long reload while keeping the excellent one-shot capacity. This 100mm S-34 cannon has a quick reload time of around 10 seconds which is generally fast enough for most situations. The reduced caliber also increases the ammunition capacity to 31 rounds at most, allowing the player to significantly lengthen their battle time without resupplying ammo. The BR-412B APHEBC shell is extremely powerful, with ~210mm penetration at around 400m, and 184mm at 1000m. This level of penetration is adequate to frontally penetrate even the hardest nuts at its battle rating, such as [[Ferdinand]], [[Jagdpanther]], [[Ho-Ri Production|Ho-Ri]], [[M26 (Family)|M26]], etc. More commonly seen and less armoured tanks like [[Panzer V Panther (Family)|Panthers]], M4, [[Cromwell (Family)|Cromwell]], etc are of course even easier to deal with. Upon penetration, the shell's 100g explosive filller will effortlessly knock out most if not all crew inside the target tank. However one slight downside of it is the reduced explosive mass comparing to the 122mm BR-471B's 246g explosives, meaning when shooting spacious vehicles like Jagdtiger, you should attempt to target the centre mass of the crew so the shell explodes as closely to their middle as possible, to guarantee a one-shot kill. The shell also has a slightly higher velocity and flatter trajectory, making it easier to land shots at distant and/or moving targets. |
| + | |||
| + | The main gun aside, other aspects of the Object 248 don't quite compliment the firepower, rather they are drawbacks. Firstly it's the familiar awful gun depression of -3° which completely hinders the Object 248's capacity to fight on uneven surfaces. Even a small bulge on the ground would obstruct the gun from aiming down, so the player is left with way fewer spots in all maps to unleash their firepower. The turret rotatios quite slowly too, at around 10°/s, which is inadequate to quickly change a target. This can be fatal when the Object 248 is being flanked. Lastly, the poor gunsight zoom of 3.5x at max limits the tank from ranged engagements, as it is hard to see a target with low zoom. | ||
{| class="wikitable" style="text-align:center" width="100%" | {| class="wikitable" style="text-align:center" width="100%" | ||
Revision as of 11:35, 26 September 2022


Contents
Description
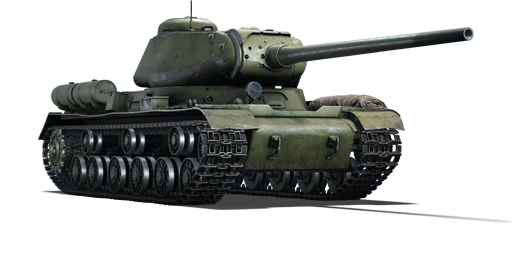
The Object 248 is a premium gift rank IV Soviet heavy tank with a battle rating of 6.7 (AB/RB/SB). It was introduced during Update "Danger Zone" as a reward for Battle Pass: Season VIII, "Field Testing".
General info
Survivability and armour
Describe armour protection. Note the most well protected and key weak areas. Appreciate the layout of modules as well as the number and location of crew members. Is the level of armour protection sufficient, is the placement of modules helpful for survival in combat? If necessary use a visual template to indicate the most secure and weak zones of the armour.
The Object 248 inherits the hull and turret of the IS-1/2. At this battle rating, this level of protection is overall very lacklusture, although the all-round armour is very effective against SPAA and low tier vehicles (eg. M42, Crusader AA). The hull is the same as early IS-1/2 models instead of the 1944 model, meaning the 120mm thick upper front plate (driver's port) will easily be penetrated by almost any tank (eg. Panther G, Jagdpanther, M26, etc). Same applies for the large poorly angled 100mm lower plate. The only places that can resist some shots are the upper glacis and the rounded "shoulders" which are all very well angled. Note that the curved "shoulders" will become unangled when angling the hull, creating another weakspot, so the player must balance the angling very well. The side thickness of the hull ranges from 100-90mm, which is thick enough for some angling tactics against kenetic shells. Even when not angling, hits on the hull side might get absorbed by the track or the gap between the hull's upper edge and the turret's lower edge. However HEAT shells (eg. Type 60, M41) will still easily penetrate the Object 248. The rear hull's 60mm thickness and angling is not enough for it to resist any common guns, however the engine behind it can absorb most if not all penetrations.
The turret is also poorly armoured. It has an all-round thickness of 100mm which may help to bounce some shots with luck. The frontal turret is covered by a large curved gun mantlet which might absorb some shells if they come in contact with the barrel, but that's about it. Well-aimed shots will easily go through the flat parts of the frontal turret or the tall commander's copula.
The post-penetration survivability is also unsatisfactory, given the cramped design style of Soviet tanks. Frontal penetrations of AP shells through the lower front plate, driver's port, or the turret will usually be a guaranteed death as the closedly packed crew of 4 are easily affected by explosion or shrapnel. Penetrations from HEAT are usually not as deadly though can still do critical damage. Side penetrations can very much result the same. Rear penetrations on the hull, as mentioned above, are likely to get blocked by the engine, thus a tactic is to drive the tank backwards and use the engine and radiators as extra armour, at the cost of constantly getting set aflame.
Armour type:
| Armour | Front (Slope angle) | Sides | Rear | Roof |
|---|---|---|---|---|
| Hull | ___ mm | ___ mm Top ___ mm Bottom |
___ mm | ___ - ___ mm |
| Turret | ___ - ___ mm Turret front ___ mm Gun mantlet |
___ - ___ mm | ___ - ___ mm | ___ - ___ mm |
| Cupola | ___ mm | ___ mm | ___ mm | ___ mm |
Notes:
Mobility
| Game Mode | Max Speed (km/h) | Weight (tons) | Engine power (horsepower) | Power-to-weight ratio (hp/ton) | |||
|---|---|---|---|---|---|---|---|
| Forward | Reverse | Stock | Upgraded | Stock | Upgraded | ||
| Arcade | 38 | 15 | 46.5 | 671 | 992 | 14.43 | 21.33 |
| Realistic | 36 | 14 | 460 | 520 | 9.89 | 11.18 | |
Keep your situational awareness high, since the Object 248's poor agility does not let you respond to more agile flankers (eg. M18, T-34-85, Panther) quickly.
Modifications and economy
| Mobility | Protection | Firepower | ||||||||||||||||||||
|---|---|---|---|---|---|---|---|---|---|---|---|---|---|---|---|---|---|---|---|---|---|---|
|
|
|
Armaments
Main armament
The main gun aside, other aspects of the Object 248 don't quite compliment the firepower, rather they are drawbacks. Firstly it's the familiar awful gun depression of -3° which completely hinders the Object 248's capacity to fight on uneven surfaces. Even a small bulge on the ground would obstruct the gun from aiming down, so the player is left with way fewer spots in all maps to unleash their firepower. The turret rotatios quite slowly too, at around 10°/s, which is inadequate to quickly change a target. This can be fatal when the Object 248 is being flanked. Lastly, the poor gunsight zoom of 3.5x at max limits the tank from ranged engagements, as it is hard to see a target with low zoom.
| 100 mm S-34 | Turret rotation speed (°/s) | Reloading rate (seconds) | |||||||||||
|---|---|---|---|---|---|---|---|---|---|---|---|---|---|
| Mode | Capacity | Vertical | Horizontal | Stabilizer | Stock | Upgraded | Full | Expert | Aced | Stock | Full | Expert | Aced |
| Arcade | 31 | -3°/+18° | ±180° | N/A | 11.3 | 15.7 | 19.0 | 21.1 | 22.4 | 11.05 | 9.78 | 9.01 | 8.50 |
| Realistic | 8.3 | 9.8 | 11.9 | 13.2 | 14.0 | ||||||||
Ammunition
| Penetration statistics | |||||||
|---|---|---|---|---|---|---|---|
| Ammunition | Type of warhead |
Penetration @ 0° Angle of Attack (mm) | |||||
| 10 m | 100 m | 500 m | 1,000 m | 1,500 m | 2,000 m | ||
| BR-412B | APHEBC | 218 | 215 | 201 | 184 | 169 | 155 |
| OF-412 | HE | 19 | 19 | 19 | 19 | 19 | 19 |
| Shell details | |||||||||
|---|---|---|---|---|---|---|---|---|---|
| Ammunition | Type of warhead |
Velocity (m/s) |
Projectile mass (kg) |
Fuse delay (m) |
Fuse sensitivity (mm) |
Explosive mass (TNT equivalent) (g) |
Ricochet | ||
| 0% | 50% | 100% | |||||||
| BR-412B | APHEBC | 895 | 15.9 | 1.2 | 19 | 100.1 | 48° | 63° | 71° |
| OF-412 | HE | 900 | 15.6 | 0 | 0.1 | 1,460 | 79° | 80° | 81° |
| Smoke shell characteristics | ||||||
|---|---|---|---|---|---|---|
| Ammunition | Velocity (m/s) |
Projectile mass (kg) |
Screen radius (m) |
Screen deploy time (s) |
Screen hold time (s) |
Explosive mass (TNT equivalent) (g) |
| 3D3 | 880 | 15.6 | 20 | 5 | 25 | 50 |
Ammo racks
| Full ammo |
1st rack empty |
2nd rack empty |
3rd rack empty |
4th rack empty |
5th rack empty |
6th rack empty |
Visual discrepancy |
|---|---|---|---|---|---|---|---|
| 31 | __ (+__) | __ (+__) | __ (+__) | __ (+__) | __ (+__) | __ (+__) | __ |
Machine guns
| 7.62 mm DT | ||||
|---|---|---|---|---|
| Mount | Capacity (Belt) | Fire rate | Vertical | Horizontal |
| Coaxial | 2,331 (63) | 600 | N/A | N/A |
Usage in battles
Describe the tactics of playing in the vehicle, the features of using vehicles in the team and advice on tactics. Refrain from creating a "guide" - do not impose a single point of view but instead give the reader food for thought. Describe the most dangerous enemies and give recommendations on fighting them. If necessary, note the specifics of the game in different modes (AB, RB, SB).
Pros and cons
Pros:
- Rounded frontal hull and turret can sometimes bounce shells
- All-round protection, very useful against SPAA like Ostwind II
- Relatively low and small for a heavy tank
- Fast reverse speed of -16 km/h allows it to pull back into safety quickly
- The 100 mm cannon has lethal penetration & damage: it can frontally penetrate & knock out hard targets like M4A3E2, Jagdpanther, Tiger II, etc.
- The 100 mm cannon has a rapid reload (~10 seconds), boosting its firepower exponentially
- Adequate acceleration & speed on paved road, can keep up with some medium tanks (e.g. Panther) to provide much-needed heavy fire
Cons:
- Weak frontal armour: lower front plate and gun mantlet can be easily penetrated by common foes like M4A3 (76), Chi-Ri, Tiger II, etc.
- Closely sat crew of 4 are very likely to be taken out with a single shot
- Sluggish acceleration in loose muddy terrain, heavily reducing mobility
- Poor gun depression (-3°), limiting its capacity in mountaineous terrains
- Turret rotation of ~10°/s is quite slow, can be fatal when reacting to flankers like M18 and M41
History
Describe the history of the creation and combat usage of the vehicle in more detail than in the introduction. If the historical reference turns out to be too long, take it to a separate article, taking a link to the article about the vehicle and adding a block "/History" (example: https://wiki.warthunder.com/(Vehicle-name)/History) and add a link to it here using the main template. Be sure to reference text and sources by using <ref></ref>, as well as adding them at the end of the article with <references />. This section may also include the vehicle's dev blog entry (if applicable) and the in-game encyclopedia description (under === In-game description ===, also if applicable).
Media
- Skins
- Videos
See also
- Related development
External links
| USSR heavy tanks | |
|---|---|
| KV-1 | KV-1 (L-11) · KV-1 (ZiS-5) · KV-1E · KV-1S |
| KV-2 | KV-2 (1939) · KV-2 (1940) · KV-2 (ZiS-6) |
| Other KVs | KV-85 · KV-122 · KV-220 |
| IS-1/2 | IS-1 · IS-2 · IS-2 (1944) · IS-2 No.321 · IS-2 "Revenge" · Object 248 |
| Other IS tanks | IS-3 · IS-4M · IS-6 · IS-7 |
| T-10 | T-10A · T-10M |
| Multi-turreted | T-35 · SMK |
| Other | Object 279 |
| Lend-Lease | ▂MK-II "Matilda" |
| USSR premium ground vehicles | |
|---|---|
| Light tanks | BA-11 · RBT-5 · BT-7A (F-32) · T-26 (1st Gv.T.Br.) · T-26E · T-126 · PT-76-57 · 2S38 |
| Medium tanks | T-34 (Prototype) · T-34 (1st Gv.T.Br.) · T-34E · T-34-57 (1943) · T-34-85E · T-34-100 · T-44-122 · TO-55 · T-55AM-1 · T-72AV (TURMS-T) · T-80UD |
| ▂M3 Medium · ▂M4A2 · ▂T-III · ▂T-V · ▂МК-IX "Valentine" | |
| Heavy tanks | SMK · T-35 · ▂MK-II "Matilda" · KV-1E · KV-2 (1940) · KV-2 (ZiS-6) · KV-122 · KV-220 · IS-2 "Revenge" · Object 248 · IS-6 · T-10A |
| Tank destroyers | BM-8-24 · BM-13N · BM-31-12 |
| SU-57 · SU-76D · SU-76M (5th Gv.Kav.Corps) · SU-85A · SU-100Y · SU-122P · Object 120 | |
| SPAA | ▂Phòng không T-34 · ZUT-37 |
