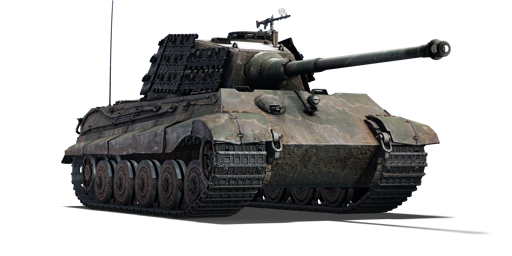
Tiger II (H) Sla.16
| This page is about the German heavy tank Tiger II (H) Sla.16. For other variants, see Tiger II (Family). |
_Sla.16.jpg)
_Sla.16.png)
Contents
Description
The Pz.Kpfw. VI Ausf. B (H) mit Simmering Sla.16 (Sd.Kfz. Index: Sd.Kfz. 182) is a premium gift rank IV German heavy tank with a battle rating of 7.0 (AB) and 6.7 (RB/SB). It was introduced in Update 1.57 "Battle March".
As part of a purchasable bundle, this variant comes with premium bonuses and the experimental installation of a diesel engine, vastly increasing its mobility. But besides that, the Sla.16 works almost exactly like the regular tech-tree version. It fits very well into the 6.7 line-up and because of its enhanced combat capabilities, can be utilised in battle to great effect.
General info
Survivability and armour
The frontal protection of the Tiger II is average with 150 mm sloped armour, while the 185 mm strong flat turret armour can be penetrated by most tanks at its BR and slightly fewer in a down-tier. Still, a large percentage of the tanks encountered in a typical battle will be able to penetrate the turret frontally. Angling this tank can save both driver and radio operator behind the comparatively thick frontal armour, but only them. Since it would be unwise to angle the turret, it's a matter of luck if the battle ends with the original gunner or the radio operator sitting in the gunner seat.
The side and back armour is weak, only 100 mm at its thickest. Some SPAA at rank IV can penetrate back and sides, so it is advised to always face the enemy to not be forced to go back to the hangar. The Sla.16 is slightly more armoured than its non-premium counterpart, with additional 30 mm thick tracks on the sides on the turret.
Mobility
| Game Mode | Max Speed (km/h) | Weight (tons) | Engine power (horsepower) | Power-to-weight ratio (hp/ton) | |||
|---|---|---|---|---|---|---|---|
| Forward | Reverse | Stock | Upgraded | Stock | Upgraded | ||
| Arcade | 45 | 12 | 70 | 968 | 1,431 | 13.83 | 20.44 |
| Realistic | 42 | 12 | 663 | 750 | 9.47 | 10.71 | |
The top speed on-road is around 42-44 km/h, and the reverse speed is surprisingly good at -11 km/h (RB). These speeds combined with neutral steering mean the Tiger II (H) Sla.16 is quite agile despite its heavy tank status. The engine has a lot of horsepower, and climbing hills is surprisingly easy with this variant of the famed King Tiger.
Modifications and economy
| Mobility | Protection | Firepower | ||||||||||||||||||||
|---|---|---|---|---|---|---|---|---|---|---|---|---|---|---|---|---|---|---|---|---|---|---|
|
|
|
Armaments
Main armament
The main gun of this tank is the long-barreled 88 mm KwK43 cannon, which performs astoundingly well for this BR, offering high muzzle velocity with more than enough post-penetration damage. The muzzle velocity of this gun sits at around 1,000 m/s for APCBC and 1,400 m/s for the APCR round, and also has HEAT shells, making it an exceptional sniper and brawler alike. The APCBC stock shell gets a fair amount of explosive filler with a wide knock-out capability upon penetration. This shell excels in ammo-racking enemy tanks, so aim for ammo stowage on the enemy vehicle. The APCR should only really be used for engagements on enemies you cannot punch through with APCBC alone, since it offers significantly higher penetration at the expense of post-penetration damage, making it a very situational round. The same can be applied to the HEAT shell for long-range, as penetration drop-off does not matter on angled armour layouts, but instead offers poorer penetration values.
| 88 mm KwK43 | Turret rotation speed (°/s) | Reloading rate (seconds) | |||||||||||
|---|---|---|---|---|---|---|---|---|---|---|---|---|---|
| Mode | Capacity | Vertical | Horizontal | Stabilizer | Stock | Upgraded | Full | Expert | Aced | Stock | Full | Expert | Aced |
| Arcade | 70 | -8°/+15° | ±180° | N/A | 15.4 | 21.3 | 25.8 | 28.6 | 30.4 | 9.75 | 8.63 | 7.95 | 7.50 |
| Realistic | 11.3 | 13.3 | 16.1 | 17.9 | 19.0 | ||||||||
Ammunition
| Penetration statistics | |||||||
|---|---|---|---|---|---|---|---|
| Ammunition | Type of warhead |
Penetration @ 0° Angle of Attack (mm) | |||||
| 10 m | 100 m | 500 m | 1,000 m | 1,500 m | 2,000 m | ||
| PzGr 39/43 | APCBC | 237 | 234 | 222 | 207 | 193 | 180 |
| PzGr 40/43 | APCR | 279 | 273 | 252 | 227 | 205 | 185 |
| Hl.Gr 39 | HEAT | 110 | 110 | 110 | 110 | 110 | 110 |
| Sprgr.43 | HE | 19 | 19 | 17 | 16 | 14 | 14 |
| Shell details | ||||||||||||
|---|---|---|---|---|---|---|---|---|---|---|---|---|
| Ammunition | Type of warhead |
Velocity (m/s) |
Projectile mass (kg) |
Fuse delay (m) |
Fuse sensitivity (mm) |
Explosive mass (TNT equivalent) (g) |
Ricochet | |||||
| 0% | 50% | 100% | ||||||||||
| PzGr 39/43 | APCBC | 1,000 | 10.16 | 1.2 | 14 | 108.8 | 48° | 63° | 71° | |||
| PzGr 40/43 | APCR | 1,130 | 7.3 | - | - | - | 66° | 70° | 72° | |||
| Hl.Gr 39 | HEAT | 600 | 7.64 | 0 | 0.3 | 1,100 | 62° | 69° | 73° | |||
| Sprgr.43 | HE | 820 | 9.4 | 0.2 | 0.1 | 1,000 | 79° | 80° | 81° | |||
Ammo racks
| Full ammo |
1st rack empty |
2nd rack empty |
3rd rack empty |
4th rack empty |
5th rack empty |
6th rack empty |
7th rack empty |
8th rack empty |
Visual discrepancy |
|---|---|---|---|---|---|---|---|---|---|
| 70 | 65 (+5) | 59 (+11) | 48 (+22) | 37 (+33) | 30 (+40) | 23 (+47) | 12 (+58) | 1 (+69) | No |
.png)
Thanks to the ready rack feature found on this tank, the ammo racks found in the back of the turret will always be full of ammo, making it the prime target for enemy tankers who are looking to detonate your ammo rack. Even solid shots like APCR and APDS that commonly pierce your front turret can make their way to the rear of the turret, potentially hitting the ready racks and can cause a critical hit to become a deadly one.
Notes:
- Recommended ammo load is 23 (+47) to keep the hull empty and both ready racks full.
- Racks 7 and 8 are ready racks, and take priority in being filled at the beginning of the battle, racks are then filled 6 through 1 in that order.
- Full reload speed will be realized as long as ammo exists in either ready rack. If both ready racks are empty, a penalty to reload speed will occur.
- Simply not firing the main gun when it is loaded will load ammo from racks 1-6 into 8 then 7, as long as there is ammo in racks 1-6. Firing the main gun will interrupt the loading of the ready racks.
Machine guns
| 7.92 mm MG34 | ||||
|---|---|---|---|---|
| Mount | Capacity (Belt) | Fire rate | Vertical | Horizontal |
| Coaxial | 3,000 (150) | 900 | N/A | N/A |
| Pintle | 2,000 (150) | 900 | -10°/+25° | -55°/+160° |
Usage in battles
Considering most of the players who use this vehicle will be using it in RB/SB, this section will be directed to them. The Tiger II can be used both as a brawler and a sniper. With its excellent 88 mm KwK43 gun and reliable armour layout, the Tiger II can take a fair few shots before getting knocked out. Try not to let your flanks become exposed if playing in urban maps especially. On open maps, you should stick to towns or hills and remain hull down to utilize your thick turret cheeks well. Aim for noticeable weak spots on enemies, ie. lower glacis shots or ammo rack shots will more often than not result in a reliable way to destroy them. The gun has a solid rate of fire, not too slow, so you can follow up with a return shot fairly quickly.
One common mistake many new Tiger II players make is assuming they can waltz down a road towards the enemy thinking they are invincible and will completely dominate them. In reality, they will either die immediately or get 1-2 kills before dying. Instead, try to maintain situational awareness and carefully advance towards the capture zone. Also, constantly make sure you aren't getting flanked. Light tanks especially can be quite annoying when playing the Tiger II so always make sure nobody can get to your side and destroy you.
You will adapt over time and learn where the weak spots of most opposing vehicles. At times, this tank will act more as a support tank when considering the typical opponents will more than likely have stabilizers and sufficient suspension dampening, putting you at a disadvantage if you can't train your gun onto the target first. American heavy tanks such as the T29, T34, T32 and M103 will sometimes give you trouble. The trick to dealing with these tough, heavily armoured foes is to aim for the lower glacis and more specifically towards the left/right of the lower glacis to avoid possible ricochets. When engaging these vehicles, if you are not confident in being able to penetrate on your first shot, try and shoot the gun barrel to prevent your foes from firing back at you. If you mess up the shot and the enemy can shoot you, use the Tiger II Sla.16's good reverse speed and pull out until you have reloaded.
It is best used at mid to long ranges, where its' small weak spots are hardest to hit. It can, however, be put to work on the front lines, protecting medium tanks and tank destroyers - just be aware of your limited mobility, and ensure you have options should you get advanced upon by multiple enemies.
When used as a sniper, it is best that you find a position with a good overview of the battlefield. Keep your tank positioned directly towards the enemy and keep an eye out for any medium tanks trying to flank you (Tiger II has great frontal armour, do not be afraid to use it. However, keep in mind that the lower plate offers less protection and penetrations can easily cause fires due to the positioning of mechanical parts). It is best that you find cover behind a solid object and slightly rotate your vehicle e.g.: rotate your tank about 10-15 degrees from the enemy (your turret too). Positioning, combined with distance, can easily give you effective armour greater than 300 mm. When "sniping" it is best to wait for the enemy to expose their weak points, fire a steady, accurate shot and retreat to a safe position. Wait for your reload to be completed and slowly show your frontal plate (most of the players will engage even though the chances of penetration are low); once the enemy has fired, you can take your time and engage the tank while they reload.
Using the Tiger II to advance and to support the front line can be rather tricky. While this tank offers great firepower and superior frontal armour, you'll notice that it is hard to fight in urban areas. In situations like this, you will quickly realize that the high weight and sheer size of the tank can cause major problems. Almost any tank that is faster will easily outmanoeuvre the Tiger II and destroy it. To avoid this, it is best to stay in the back (not too far from your team), keeping your tank positioned at an angle and using "peek-a-boo" techniques. You should always look for a position that can protect you during the assault of small tanks, such as "U" shaped buildings where you can easily retreat and protect your weak points.
Counter-tactics

A Tiger II is a formidable enemy when it's used correctly by its operator, but it's by no means indestructible under any conditions.
The first thing you want to do is deny the Tiger II of the advantage of its gun by getting as close as possible while keeping clear of its cannon (the closer you get, the better the penetration values for you and the Tiger II) most Tiger II operators will avoid getting flanked at all costs so you might find yourself forced to face one from the front. The biggest weak spot is the lower frontal hull plate, its slopped but only 100 mm thick and behind it lies the transmission that likes to catch fires and create nasty shrapnel when destroyed, the shrapnel will fly inwards and if your shell is large enough they will take out the entire crew. However, this shot will most likely only leave the Tiger II unable to move for a minute and make his operator quite angry (at you) while his gun remains perfectly operational and before you have a chance to reload you will most likely receive a very accurate shot from an irritated Tiger II operator.
The lower frontal plate is a good place to hit but it should be a second option, with this tank, you need to disable that gun as soon as possible, the turret is a very reliable target at close range, even with HEAT ammo you should be able to deliver a shot that will disable its firing capability for long enough for you to reload and shoot again. Using your best AP round for this is recommended since the frontal turret has a fairly thick (but flat) plate if nothing else works try APCR.
Using high calibre HE rounds is also effective. The cupola is probably the best place to hit with a HE shell since the explosion will deflect into the thin upper plate and destroy everything inside. It is not easy to hit, but if you manage to hit the cupola it's very unlikely it survives.
The Tiger II is very vulnerable to "Circling attacks", that means, running around it in circles and harass it with side shots. Its turret can turn quite fast (especially in arcade mode) but most medium tanks are fast enough to outrun it.
If you somehow manage to see an enemy Tiger II from the side, try to land a shot in the middle of the hull, near of the turret (not on the turret, the upper part of the hull), there's a good chance there will be ammo there, and if there isn't, you will either knock out the tank by taking out many crew members or cripple it heavily
Pros and cons
Pros:
- Armed with the powerful 88 mm KwK43 cannon
- The default APCBC round has very high shell velocity, penetration, and damage potential at all ranges
- Optics have magnification levels of 2.5x-5.0x. Really good for close range target acquisition and long range sniping
- 22 shells in the first stage ammo rack, giving this tank an impressive 7.5 seconds reload rate when equipped with an ace crew
- Front armour excels against most kinetic shells, though is lacking against APDS or HEAT shells that may be encountered
- Enemy shells that penetrate the lower plate will likely have all of its damage absorbed by the transmission
- Same small turret as the Tiger II H, but has 30 mm of track armour covering the entire exterior of the turret sides
- Turret front is a small target, and the gun mantlet is large, offering ~340 mm of protection, and angled to an extent that can bounce most rounds
- Armed with 12-rounds, semi-automatic smoke grenade launcher
- Thanks to its diesel engine, this tank has better acceleration and hill-climbing speed than the standard Tiger II (H)
- Though a heavy tank, it is a very fast and highly manoeuvrable when running at full power
- Decent reverse speed. Shoot and scoot tactics are easy to perform
Cons:
- While being a small target, most enemy tanks can penetrate the weakly armoured turret front
- All 22 rounds in the first stage ammo rack are located in the back of the turret. Shells entering the back of the turret will likely lead to an ammo rack explosion
- Both of the upper hull sides are lined with ammo. Any shells penetrating these areas almost always mean certain death
- The APCR shells are lacklustre and inferior to most of the contemporary US APCR rounds
- Terrible HEAT and HE shells. Load only a handful of HE shells for really soft targets
- Though the transmission will routinely eat enemy shells, that doesn't change the fact that the tank can still be immobilized from both front and rear shots
- Still a heavy tank, most mediums will have no problems catching up/flanking the tank if the player is not paying attention
- The roof mounted MG34 has a high rate of fire, but still only fires 8 mm bullets. Critically damaging enemy planes is unlikely
- The Tiger II (H) Sla.16 can frequently face tanks with guns capable of penetrating the armour easily, such as the M-51 with its 400 mm penetrating HEAT shells
History
The Sla.16 diesel engine developed by Simmering-Graz-Pauker from Vienna. With a power output of around 750 hp, it was considerably more powerful than Maybach engine used by the Tiger I, Tiger II, and Panther tanks that had 690 hp. The Sla.16 was also proposed as the power unit for the infamous super-heavy Maus tank. According to various of sources such as Military Engineer and Amazing Porsche and Volkswagen Story, the engines were tested with positive results. The recommendation was that these diesel engines were to be attached to the heavy tanks and tank destroyers currently in production for increased efficiency of the vehicles. A diesel engine was mounted onto a Tiger II as a prototype built by Nibelungen Werke and went through testing, though results have not been found from this test. Further proposals also wanted the engine to be mounted in the Panther and Jagdtiger vehicles for increased power, but the war's constraint on supplies and Nazi Germany's capitulation resulted in the cancellation of these programs.
Media
- Skins
- Sights
- Videos
See also
External links
| Germany heavy tanks | |
|---|---|
| Tiger 1 (Henschel) | Tiger H1 · Tiger E · ␠Tiger |
| Tiger 1 (Porsche) | VK 45.01 (P) · Pz.Bef.Wg.VI P |
| Tiger 2 | Tiger II (P) · Tiger II (H) · Tiger II (H) Sla.16 · Tiger II (10.5 cm Kw.K) |
| Super heavy tanks | Maus · E-100 |
| Trophies | |
| Great Britain | ▀Pz.Kpfw. Churchill |
| USSR | ▀KV-IB · ▀KW I C 756 (r) · ▀KW II 754 (r) |
| Germany premium ground vehicles | |
|---|---|
| Light tanks | Pz.II C (DAK) · Pz.Sfl.Ic · Pz.Sp.Wg.P204(f) KwK · Sd.Kfz. 140/1 · Sd.Kfz.234/1 · Ru 251 · SPz 12-3 LGS · TAM 2IP |
| Medium tanks | Nb.Fz. · Pz.III N · Pz.Bef.Wg.IV J · ▀M4 748 (a) · ▀T 34 747 (r) · Ersatz M10 |
| mKPz M47 G · Turm III · Leopard A1A1 (L/44) · Leopard 2 (PzBtl 123) · Leopard 2A4M | |
| Heavy tanks | ▀Pz.Kpfw. Churchill · ▀KV-IB · ▀KW I C 756 (r) · ▀KW II 754 (r) |
| VK 45.01 (P) · ␠Tiger · Pz.Bef.Wg.VI P · Tiger II (H) Sla.16 | |
| Tank destroyers | Sd.Kfz.234/3 · Sd.Kfz.234/4 · Sd.Kfz.251/10 · Sd.Kfz.251/22 · 15 cm Pz.W.42 |
| Brummbär · Panzer IV/70(A) · VFW · Bfw. Jagdpanther G1 · Elefant · 38 cm Sturmmörser | |
