Brummbar

From War Thunder Wiki
Jump to: navigation, search
Rank 6 USA
F-5C Pack
Brummbär
germ_sturmpanzer_iv_brummbar.png
GarageImage Brummbar.jpg
ArtImage Brummbar.png
Brummbär
Purchase:2 980 Specs-Card-Eagle.png
Show in game

Description

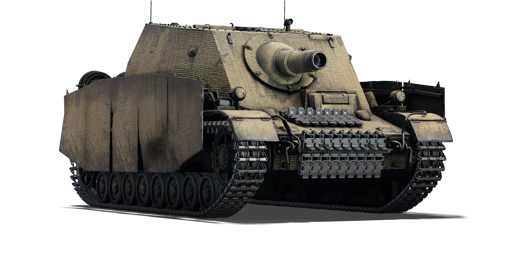
Seeing a need to create a new direct-fire infantry support self-propelled gun for the infantry, Alkett developed a self-propelled artillery piece based on the chassis of the Panzer IV medium tank in service. The vehicle became known as the Sturmpanzer IV, though it would become known more popularly by the nickname Brummbär (German: "Grouch") that the Allied intelligence assigned to it. With 300 units manufactured between March 1943 to May 1945, the Sturmpanzer IV saw its first use at the Battle of Kursk and was present at most major combat operations afterwards, proving to be an extremely effective tool for neutralizing fortified positions, enemy troops, and armored vehicles.

Introduced in Update 1.61 "Road to Glory", the Brummbär's main strength lies in its 150 mm cannon, akin to that found on the KV-2 (1939). Due to its long reload and decent armour, this machine is suited to ambushes or supported urban combat. Its ~100 mm frontal armour is a force to be reckoned with (being about the same as a Tiger I's). However, its sides are weak (as any Panzer IV is) and its rear is as well. Its gun has a lot of drop (it is very low velocity), so "sniping" at ranges over ~750 m will basically be indirect fire. This is why this vehicle should stick to short-range attacks. Due to the potential of all of its shells, it is almost guaranteed a one-hit knock-out, assuming the shell hits relatively on-target.

General info

Survivability and armour

Armourfront / side / back
Hull100 / 40 / 20
Turret100 / 50 / 80
Crew5 people
Visibility99 %

The armour protection of the Brummbär is one of its main advantages. The bulky fighting compartment occupies most of its frontal silhouette, and its gently sloped 100 mm armour plate gives an effective thickness of ~125 mm which makes it immune to all light tanks' cannons and most medium tanks' cannons at its tier (e.g. M24, Cromwell I, T-34 1942). Most players, not knowing the locations of the Brummbär's weak spots, will naturally shoot at this huge attention-grabbing armour plate. The tapering plates joining the front and the sides are 60 mm, giving an effective thickness of ~100 mm when looking from the front, which is also able to neglect most tanks' ammunition.

However, one frontal weak spot is the 20 mm upper glacis. Although well angled it can still be penetrated due to the insufficient thickness, especially when the shell has good overmatching characteristics (e.g. USSR 76 mm/85 mm, US 75 mm). Thus, the Brummbär's frontal protection is great, but with some flaws.

The side and rear armour range from 20 to 50 mm, which is not enough to stop any rounds without significant angling. They can only stop HE shells, rifle-calibre bullets, or some autocannon shells.

The post-penetration survivability of the Brummbär is quite bad. Similar to the StuG series tank destroyers, the Brummbär has 3 crew members sitting tightly in a column at the right side of the fighting compartment (when looking at its front), and 2 on the left. This means that a frontal penetrating shot through the right side can take out 3 men if the shell is solid, or even all 5 crw members if it is explosive. Frontal penetration through the hull can destroy the transmission, leaving the tank immobile. It may also hurt the driver.

Armour type:

  • Rolled homogeneous armour
  • Cast homogeneous armour (Gun mantlet)
Armour Front Sides Rear Roof
Hull 20 mm (74°) Front glacis
50 + 50 mm (12°) Joint plate
30 + 30 mm (57°) Lower glacis
20 + 5 mm 20 mm (11-12°) 10 mm
Superstructure 100 mm (39°)
250 mm Gun mantlet
60 mm (21°) Front-to-Side joint plate
50 mm (15°) Sides
30 mm (29°) 20 mm

Notes:

  • Suspension wheels are 15 mm thick while tracks are 20 mm thick.
  • Belly armour is 10 mm thick.

Mobility

Speedforward / back
AB44 / 8 km/h
RB and SB40 / 7 km/h
Number of gears6 forward
1 back
Weight27.8 t
Engine power
AB572 hp
RB and SB300 hp
Power-to-weight ratio
AB20.6 hp/t
RB and SB10.8 hp/t

The mobility of the Brummbär is overall inferior. The forward speed on average is ~20 km/h on dirt road and ~15 km/h on worse offroad conditions. It can only reach a maximum speed of ~30 km/h on well-paved flat roads, which is not a common infrastructure on most maps. The acceleration is also very slow especially when offroad. This low speed significantly limits the Brummbär's positioning ability, and it will always arrive at a position later than most teammates.

The hull traverse is quite bad too. The tank will need a short forward/backward acceleration before turning on the tracks. This is worsened on loose terrain like sand and snow, meaning the Brummbär not only cannot change direction quickly, but will also easily get circled and not be able to respond in time. The reverse speed of -7 km/h is not fast enough to retreat the Brummbär from danger, but luckily its strong frontal armour might compensate it.

Game Mode Max Speed (km/h) Weight (tons) Engine power (horsepower) Power-to-weight ratio (hp/ton)
Forward Reverse Stock Upgraded Stock Upgraded
Arcade 44 8 27.8 426 572 15.32 20.58
Realistic 40 7 265 300 9.53 10.79

Modifications and economy

Repair cost
AB1 461 Sl icon.png
RB1 695 Sl icon.png
SB2 190 Sl icon.png
Crew training10 000 Sl icon.png
Experts250 000 Sl icon.png
Aces630 Ge icon.png
Research Aces870 000 Rp icon.png
Reward for battleAB / RB / SB
Talisman.png 2 × 110 / 160 / 210 % Sl icon.png
Talisman.png 2 × 160 / 160 / 160 % Rp icon.png
Modifications
Mobility Protection Firepower
Mods new tank traks.png
Tracks
Mods new tank traks.png
Ostketten
Mods new tank suspension.png
Suspension
Mods new tank break.png
Brake System
Mods new tank filter.png
Filters
Mods new tank transmission.png
Transmission
Mods new tank engine.png
Engine
Mods tank tool kit.png
Improved Parts
Mods extinguisher.png
Improved FPE
Mods tank reinforcement ger.png
Crew Replenishment
Mods new tank horizontal aiming.png
Horizontal Drive
Mods tank cannon.png
Adjustment of Fire
Mods new tank vertical aiming.png
Elevation Mechanism

Armaments

Main armament

Ammunition38 rounds
Reloadbasic crew → aces
22.4 → 17.2 s
Vertical guidance-8° / 30°
Horizontal guidance-15° / 15°

The Brummbär's 150 mm howitzer is a deadly weapon thanks to its explosive shells. The gun has a usable vertical traverse of -8°/+30°, and a good horizontal traverse of ±15°, meaning that if you position yourself correctly you don't need to move the entire tank a lot. The gun rotates at an average speed of ~12°/s, which is adequate to target medium and heavy vehicles. Against fast-moving vehicles, this targeting speed is generally not enough to keep up with them especially if they are up close.

The reload speed is approximately 20 seconds, which is reasonable for its calibre and power, though still quite slow comparing to other guns. Thus the Brummbär should stay behind cover during the reload, and aim carefully to make every shot count.

The gunsight zoom is not particularly good, and combined with the slow muzzle velocity and extremely curved trajectory it makes long range shooting very hard even for experienced players.

150 mm Stu.H 43 L/12 Turret rotation speed (°/s) Reloading rate (seconds)
Mode Capacity Vertical Horizontal Stabilizer Stock Upgraded Full Expert Aced Stock Full Expert Aced
Arcade 38 -8°/+30° ±15° N/A 13.2 18.3 22.2 24.6 26.1 22.36 19.78 18.23 17.20
Realistic 8.9 10.5 12.8 14.1 15.0

Ammunition

The 150 mm howitzer offers 2 ammunition types, a HE shell and a HEAT shell.

  • I.Gr.38; HE: recommended primary shell choice. this HE packs 8.6 kg of explosives, one of the most explosive shell in game, which is extremely fatal against all tanks. It can knock out all light, medium tanks and SPAAs with a single shot, and most heavy tanks and tank destroyers, or even modern MBTs if hit properly. Its shrapnel can also cripple or destroy thinly armoured/unarmoured vehicles when exploding nearby. However, if there are no thin armour around the hit point, it will most likely cause zero damage.
  • I.Gr.39 HI/A; HEAT: secondary choice, recommended to only bring less than 5 rounds. It has an impressive 185 mm penetration, but the fact that most tanks the Brummbär faces have less than 100 mm of armour makes this shell an overkill. However if you plan to bring this tank to a higher BR, it might become handy. It will be able to penetrate tanks like M4A3E2, M6A1, Churchill VII easily. But the nature of HEAT gives it a small post-penetration damage, and only the things directly in its path will be affected. This requires you to accurately hit exactly what you want to disable. This HEAT also has a slightly less curved trajectory than the HE, as well as a slightly faster velocity.

Penetration statistics
Ammunition Type of
warhead
Penetration @ 0° Angle of Attack (mm)
10 m 100 m 500 m 1,000 m 1,500 m 2,000 m
I.Gr.38 HE 61 61 61 61 61 61
I.Gr.39 HI/A HEAT 185 185 185 185 185 185
Shell details
Ammunition Type of
warhead
Velocity
(m/s)
Projectile
mass (kg)
Fuse delay
(m)
Fuse sensitivity
(mm)
Explosive mass
(TNT equivalent) (kg)
Ricochet
0% 50% 100%
I.Gr.38 HE 240 38 0 0.1 8.6 79° 80° 81°
I.Gr.39 HI/A HEAT 280 24.58 0.05 0.1 5.32 62° 69° 73°

Ammo racks

Ammo racks of the Brummbar
Full
ammo
Ammo
part
1st
rack empty
2nd
rack empty
3rd
rack empty
Visual
discrepancy
38 Projectiles
Propellants
27 (+11)
31 (+7)
14 (+24)
(+37)
(+37)
 
No

Usage in battles

If in a large, open map, move with as much teammates as possible since the Brummbär will not be able to fire at enemies from long range due to the nature of the gun. Stay a bit behind your teammates if you can to better protect yourself when providing fire support. If little to no teammates are in your area, find yourself a place that offers a cover and overwatches a key enemy area and avoid being in the open at all costs, since the Brummbär can only face enemies from its front, while an open space means countless threat directions. The tapering armour plates joining the frontal fighting compartment and the sides are only 60 mm thick, meaning any shell hitting it at an angle will very likely penetrate.

Urban combat is probably where this vehicle does best, as its armour can bounce many shots if it peeks around corners properly. The short ideal range (0-600 m) of the gun makes short range urban combat its friend. This coupled with lots of cover for the long reload makes any city the best place to play this tank. Find a street/pathway with buildings at the sides so your flanks are covered. The place should also overwatch an area where enemies can appear. This way you only need to worry about enemies from one direction, which is your front, allowing you to concentrate on fighting. You can also present your sturdy frontal armour towards the threat confidently. When conducted well, the Brummbär can be a fortress that blockades the advancement of multiple enemy tanks through a key street (e.g. the rightmost street in Advance to the Rhine), which is very beneficial in leading to a victory or delaying a defeat. However it is best to fight alongisde teammates, as being alone can very much result in you getting swarmed and flanked. The Brummbär's slow reload does not allow it to fight multiple enemies at once.

If you need to reposition under enemy fire, do not turn the tank to the side too much unless all enemies are unable to fire when you turn. This is to avoid your thin side getting penetrated. Instead, turn no more than 10° each time to slowly "wriggle" towards the new place. This ensures that your frontal armour is always facing the front even when moving sideways.

Be wary of fast-moving vehicles, as, they are harder to hit with the slow, heavy gun, and especially since the Brummbär does not have a turret, they will flank easily. In addition, heavy SPAA will ruin the Brummbär's day if they get to even the side armour, being relatively thin for its rank. Regardless, most guns of the rank can penetrate the Brummbär frontally from medium ranges, so be careful. Always beware of multiple/squad enemies, as the Brummbär cannot engage them all at once. Sometimes, if they don't see the vehicle, it's better to just let them go and avoid exposing the Brummbär.

Whenever you arrive at a fighting spot it is good to range-find the areas where enemies might appear prior to them actually showing up, and memorise the ranges. This way you can fire as soon as an enemy appears instead of wasting another 10 seconds which is beneficial given the unfriendly trajectory, velocity, and slow reload.

Enemies worth noting:

  • SU-85: this USSR tank destroyer carries a long 85 mm gun capable of frontally penetrating the Brummbär, which is very rare at this BR. The 85 mm shell can enter through the well angled 20 mm upper glacis using its great overmatching ability and one-shot all the crew, or through the frontal hull and knock out the transmission. The SU-85 also has a low silhouette making it rather hard to spot. Luckily, the SU-85 has an average armour protection that becomes nonexistent in front of the Brummbär's 150 mm HE. Hitting it anywhere can result in its crew being knocked out by overpressur, just avoid hitting the tracks, the gun mantlet, and the driver's hatch.
  • KV-2: similar to the Brummbär, the KV-2 also has a large-calibre 152 mm howitzer as its main weapon. Its HE shell, although inferior in terms of explosive mass, can still destroy the Brummbär with overpressure if hit on the thin upper glacis, the top, or the side, so you must avoid getting hit by it. The KV-2's turret rotates extremely slowly meaning its agility as a turreted tank is not a lot better than the turretless Brummbär. However it requires accurate hits to be destroyed, since it has good armour against HE on the hull and turret (75 mm). To trigger an overpressure, the Brummbär must land a hit near the bottom-most area of the turret, so the blast will travel down through the hull roof into the crew compartment. Hitting the middle of an armour plate will very likely result in no damage at all.
  • Sherman Firefly, M4A4 (SA50): these Sherman variants can appear fragile in front of your 150 mm gun, but they will give a strong bite in return. They are armed with long barrel 75/76 mm anti-tank guns with over 190 mm of penetration, which is more than enough to frontally penetrate the Brummbär even from 800 m away. Also, despite firing solid shots, their ammo can cause quite a bit of shrapnel due to their good calibres. Against them, do not expect your armour to hold up anymore. Try your best to fire first and finish them off to avoid getting hit.

Against the Brummbär:

  • Light tanks & SPAA: players of light vehicles can very much feel powerless in front of a Brummbär, and that is perfectly normal. Because in order to feel the joy of getting a kill, you must not stand in front of it, instead utilise your superior manoeuvrability to get behind or flank it, where the Brummbär's armour plates are thin. An average light tank like M24 should be confident to flank it as the Brummbär has very poor acceleration and hull traverse, preventing it from keeping its howitzer on target. The closer you are, the easier it is to circle it, and the harder it is for the Brummbär to keep up with you. As for SPAA, because of the slightly worsened mobility of most SPAAs comparing to light tanks you must pick the time to flank carefully. Once at its side, if your SPAA has low penetration (e.g. M16 MGMC), target the lower part of the hull that has sideskirts attached, it is only 25 mm thick. If you have over 50 mm penetration (e.g. CCKW 353 AA), the fighting compartment's side (50 mm) can also be penetrated. The rear (20-30 mm) is an easy target for any SPAA. If a frontal engagement is a must, SPAAs can also destroy the Brummbär's tracks and then the short, thick gun barrel.
  • Medium tanks: compared to light tanks, medium tanks have upgraded firepower, thicker armour, and worsened mobility. Only the upgraded firepower is useful against a Brummbär, as your armour will still be useless when hit by a large-calibre HE. Again, rely on your speed to get to the Brummbär's side or rear. Now because of your better gun, the tapered armour between its frontal fighting compartment and the sides are also an option since they are only 60 mm thick. As a result medium tanks like T-34 (1942) and M4 will be able to knock a Brummbär out at a slight angle from the front, without doing a full flanking manoeuvre. However you are now slower, so be decisive in your actions to avoid getting hit.
  • Heavy tanks: perhaps heavy tanks are the most challenging vehicles to use when fighting a Brummbär, because its 150 mm HE can ignore all armour regardless of the thickness, making your armour useless dead weight. You also have a subpar mobility that might not be any better than the Brummbär's, making it harder to flank. Plus, most heavy tanks at this tier are only equipped with medium tank level cannons (e.g. Churchill III, KV-1) meaning you cannot enjoy the luxury of destroying it frontally. As such, in a head-on fight, it is safer to either target its tracks and gun barrel, or to straight up avoid engaging it. Be patient and peek out when the Brummbär is distracted and exposes its weak spots. In the meanwhile, don't forget to pin it out on the minimap.
  • Tank destroyers: having a powerful anti-tank cannon can be the biggest assurance when facing a heavily armoured vehicle like the Brummbär. As a tank destroyer, you should have no problem penetrating the Brummbär's frontal armour. However lots of tank destroyers are thinly armoured (e.g. ASU-57, Archer, Breda 501) which means that the Brummbär doesn't even need a direct hit to injure or knock out your crew with shrapnel. Other tank destroyers have some armour (e.g. SU-85, Gun Carrier (3-in)), but will still get destroyed easily. Therefore, with strong firepower yet low survivability, tank destroyers can be more adaptable in terms of positioning as they can penetrate the Brummbär anywhere, but they must conceal themselves until the Brummbär appears. Be quick and accurate on the aim to shoot first, before the Brummbär fires.

Pros and cons

Pros:

  • 100 mm frontal armour stops the shells of most tanks (e.g. T-34 1943, M4A2, Cromwell), granting high protection
  • 15 cm gun can knock out most tanks with overpressure with a single shot
  • Fear factor: intimidates the enemy and delays their actions with the deadly 15cm howitzer
  • Curved trajectory allows shell-lobbing over covers

Cons:

  • Thin side armour with ammo stored behind lowers post-penetration survivability
  • Very slow traveling rounds with curvy trajectory, hitting moving targets at range can be extremely difficult.
  • Optic only provides aiming marks up to 800 m, aiming past that is either in 3rd person view or guestimations
  • Poor mobility, greatly limiting its positioning speed
  • Is a big target
  • Frontal 20 mm plate, though extremely sloped, can still get overmatched by Sherman 75 mm and Soviet 57 and 76 mm guns
  • No machine gun to help clear obstacles

History

Development

The Sturmpanzer is a development of the Wehrmacht on the needed for a heavy assault gun to provide direct fire support for the infantry in urban areas. It took a Panzer IV chassis, turned it into a casemate structure, and added a 15 cm StuH 43 howitzer (derived from the 15 cm sIG 33) onto the vehicle. The official names were "Sturmpanzer", "Sturmpanzer 43", or the "Sturmpanzer IV", however it was not known as the Brummbär by the Germans as that name was actually coined by the Allied forces. The Wehrmacht accepted it in 1943 and about 300 units were built from 1943 to 1945.

Design

The Sturmpanzer was heavily armoured and equipped with a gun capable of leveling buildings. The 15 cm howitzer has 38 two-piece rounds available in storage, though rate of fire is low due to the heavy weight of each shell, the HE shell weighing around 38 kg (84 lb.) alone. Though its armour ensures great survivability, the heavy weight of the design stressed the chassis and breakdowns were frequent on the transmission and suspension.

The Sturmpanzer underwent four different designs during its production life, mostly fixing problems experienced with the preceding models. The first series were produced from April to December 1943 with 52 from Ausf. G chassis and 8 from Ausf. E and Ausf. F chassis. The second series of vehicles began in December 1943 using the Ausf. H chassis until March 1944 with improvements to the driver's compartment, internal ventilation, and steel-rimmed road wheels. The third series of vehicles lasted from March to June 1944 with to the driver's optic and a lighter 15 cm StuH 43/1 howitzer as the armament. The fourth and last series from June 1944 to March 1945 featured the chassis and engine of the Ausf. J model, it had a redesigned gun collar, a reduction in overall height, and a ball mount for an MG34 in the front casemate structure.

Combat usage

The Sturmpanzer was equipped in four independent battalions in the course of the war in the Sturmpanzer-Abteilung 216, 217, 218, and 219. The first to receive the Sturmpanzers was the 216th in April 1943 with about 45 vehicles split into three companies with 14 each and 3 in the battalion headquarters. They saw use in the Battle of Kursk in Operation Citadel and was assigned to the Panzerjäger Regiment 656 in the 9th Army of Army Group Center. It stayed in play all the way to December 1943, assisting German soldiers in attacking and withdrawing from the Russian front. The battalion was transferred in February 1944 to counter the Allied invasion of Italy. Though intended to attack the Allies at the beachhead, the operation failed and the battalion was stationed there all the way until Germany's surrender. The 217th was made in April 1944 and was stationed in Normandy in early June 1944. They did not see use early in the Battle of Normandy as the Allies and the French Resistance sabotaged the rail network to France and the Sturmpanzers, forced to drive to France, broke down en route. They did see combat at Caen in August 1944 however, but withdrew to recuperate after suffering major casualties. The 217th also saw combat in the Battle of the Bulge, before retreating due to losses and continued withdrawing until captured in the Ruhr Pocket in April 1945.

The 218th started as the Sturmpanzer-Kompanie z.b.V. 218 and was raised in August 1944. It stayed in the Eastern Front and saw combat in the Warsaw Uprising. It continued fighting until it was wiped out in East Prussia in April 1945. A similar unit known as the Sturmpanzer-Kompanie z.b.V. 2./218 was made alongside the 218th, though not much is known except that it went to form the actual Sturmpanzer-Abteilung 218 in January 1945. Though expected to be equipped with 45 Sturmpanzers, it ended up with StuG IIIs instead. The 219th was made in September 1944. In October 1944, it only had 10 Sturmpanzers when Operation Panzerfaust was launched and Germany enters Hungary. It arrived on October 19th when it was no longer needed and was sent to Slovakia for further training and equipping before returning to Hungary to relieve the German troops at Budapest. It stayed until forced to retreat by the Soviets before either being wiped out or surrendering.

Today, four Sturmpanzers are known to have survived in intact conditions. Each one is in France, Germany, Russia, and the United States.

Media

Skins
Videos

See also

Vehicles equipped with the same chassis
Vehicles equipped with the same ammunition
Other vehicles of similar configuration and role

External links


Germany tank destroyers
Pz. I Derivatives  Panzerjäger I
Pz. II Derivatives  15cm sIG 33 B Sfl
Pz. 38(t) Derivatives  Marder III · Marder III H · Jagdpanzer 38(t)
Pz. III Derivatives  StuG III A · StuG III F · StuG III G · StuH 42 G
Pz. IV Derivatives  Jagdpanzer IV · Panzer IV/70(A) · Panzer IV/70(V) · Dicker Max · Nashorn · Brummbär · VFW
Pz. V Derivatives  Jagdpanther G1 · Bfw. Jagdpanther G1
Pz. VI Derivatives  Sturer Emil · Elefant · Ferdinand · 38 cm Sturmmörser · Jagdtiger
Wheeled/Half-track  8,8 cm Flak 37 Sfl. · Sd.Kfz.251/9 · Sd.Kfz.251/10 · Sd.Kfz.251/22 · Sd.Kfz.234/3 · Sd.Kfz.234/4 · 15 cm Pz.W.42
ATGM Carrier  RakJPz 2 · RakJPz 2 (HOT) · Wiesel 1A2
Other  Waffenträger · M109G · JPz 4-5 · Raketenautomat · VT1-2

Germany premium ground vehicles
Light tanks  Pz.II C (DAK) · Pz.Sfl.Ic · Pz.Sp.Wg.P204(f) KwK · Sd.Kfz. 140/1 · Sd.Kfz.234/1 · Ru 251 · SPz 12-3 LGS · TAM 2IP
Medium tanks  Nb.Fz. · Pz.III N · Pz.Bef.Wg.IV J · ▀M4 748 (a) · ▀T 34 747 (r) · Ersatz M10
  mKPz M47 G · Turm III · Leopard A1A1 (L/44) · Leopard 2 (PzBtl 123)
Heavy tanks  ▀Pz.Kpfw. Churchill · ▀KV-IB · ▀KW I C 756 (r) · ▀KW II 754 (r)
  VK 45.01 (P) · ␠Tiger · Pz.Bef.Wg.VI P · Tiger II (H) Sla.16
Tank destroyers  Sd.Kfz.234/3 · Sd.Kfz.234/4 · Sd.Kfz.251/10 · Sd.Kfz.251/22 · 15 cm Pz.W.42
  Brummbär · Panzer IV/70(A) · VFW · Bfw. Jagdpanther G1 · Elefant · 38 cm Sturmmörser