Harrier GR.7
| This page is about the British strike aircraft Harrier GR.7. For other versions, see Harrier (Family). |
Contents
Description
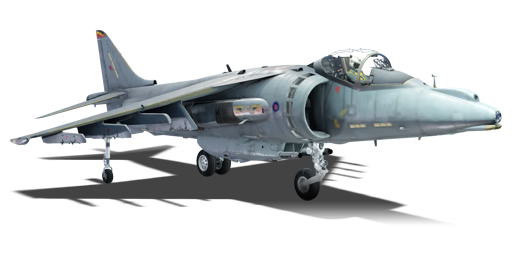
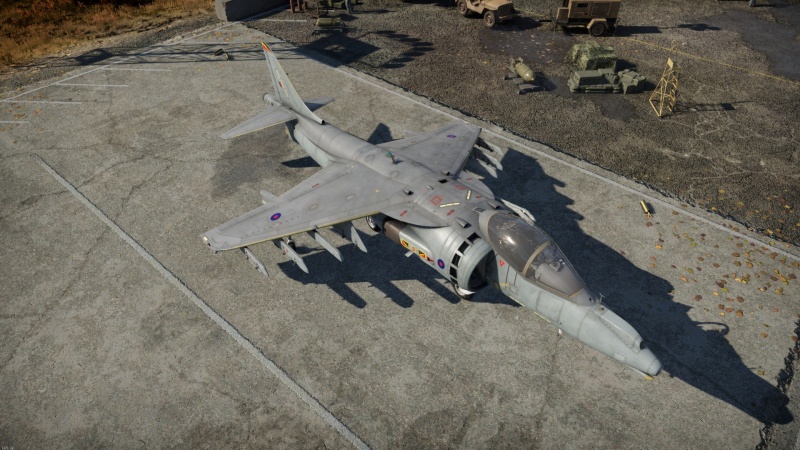
The Harrier GR.7 indelibly shaped the Royal Air Force from its inception in the late 1980s through its operational tenure until the mid-2000s. This iconic aircraft played a pivotal role during historic events such as the Gulf War in the early 1990s, where its unique vertical and short takeoff and landing (V/STOL) capability enabled rapid deployment from makeshift airfields in the desert theatre. The GR.7's versatile armament, including precision-guided munitions, showcased its adaptability during NATO's intervention in the Kosovo conflict in the late 1990s, as it executed surgical strikes and ground attack missions with exceptional accuracy. Its service extended into the early 2000s, proving crucial in coalition operations in Afghanistan, where its sophisticated targeting systems facilitated precise close air support in challenging terrain. The Harrier GR.7's historical significance stems not only from its operational versatility from previous platforms but also from its embodiment of the RAF's commitment to innovative tactics and strategic air power projection.
The Harrier GR.7 was introduced in Update "Drone Age". This versatile aircraft assumes the role of a multi-role fighter, effortlessly engaging ground and air targets across a spectrum of scenarios. Its versatile armament offers a pragmatic solution to an array of targets, from fortified ground positions to swift-moving airborne adversaries. Unseen and underestimated, the Harrier GR.7 becomes a potent ground adversary, launching precision strikes from a safe distance, particularly disquieting for unsuspecting SPAA units. Designed to appeal to pilots who appreciate multifunctional capabilities and diverse weapon options, the Harrier GR.7 thrives on the patient and the skillful, revealing a landscape where challenge and accomplishment intermingle, ultimately rewarding adept aviators with impactful results.
General info
Flight performance
| Characteristics | Max speed (km/h at 0 m - sea level) |
Max altitude (metres) |
Turn time (seconds) |
Rate of climb (metres/second) |
Take-off run (metres) | |||
|---|---|---|---|---|---|---|---|---|
| AB | RB | AB | RB | AB | RB | |||
| Stock | 1,116 | 1,110 | 12192 | 30.4 | 30.9 | 70.8 | 70.8 | 550 |
| Upgraded | 1,133 | 1,125 | 29.6 | 30.0 | 111.4 | 90.0 | ||
Details
| Features | |||||
|---|---|---|---|---|---|
| Combat flaps | Take-off flaps | Landing flaps | Air brakes | Arrestor gear | Drogue chute |
| X | ✓ | ✓ | ✓ | X | X |
| Limits | ||||||
|---|---|---|---|---|---|---|
| Wings (km/h) | Gear (km/h) | Flaps (km/h) | Max Static G | |||
| Combat | Take-off | Landing | + | - | ||
| 1,137 | 648 | N/A | 829 | 556 | ~15 | ~5 |
| Optimal velocities (km/h) | |||
|---|---|---|---|
| Ailerons | Rudder | Elevators | Radiator |
| < 648 | < 950 | < 790 | N/A |
Engine performance
| Engine | Aircraft mass | |||||||
|---|---|---|---|---|---|---|---|---|
| Engine name | Number | Basic mass | Wing loading (full fuel) | |||||
| Rolls-Royce Pegasus Mk.105 | 1 | 6,057 kg | 453 kg/m2 | |||||
| Engine characteristics | Mass with fuel (no weapons load) | Max Gross Weight | ||||||
| Weight (each) | Type | 14m fuel | 20m fuel | 30m fuel | 45m fuel | 49m fuel | ||
| 1,710 kg | Vectored-thrust low-bypass turbofan | 7,113 kg | 7,467 kg | 8,173 kg | 9,230 kg | 9,577 kg | 14,567 kg | |
| Maximum engine thrust @ 0 m (RB/SB) | Thrust to weight ratio @ 0 m (WEP) | |||||||
| Condition | 100% | WEP | 14m fuel | 20m fuel | 30m fuel | 45m fuel | 49m fuel | MGW |
| Stationary | 9,198 kgf | 9,945 kgf | 1.40 | 1.33 | 1.22 | 1.08 | 1.04 | 0.68 |
| Optimal | 9,198 kgf (0 km/h) |
9,945 kgf (0 km/h) |
1.40 | 1.33 | 1.22 | 1.08 | 1.04 | 0.68 |
Survivability and armour
With its agile and adaptable nature, this aircraft excels in evasive manoeuvres, allowing it to swiftly navigate through volatile airspaces and evade incoming threats. Its advanced glass MFD/HUD cockpit and access to RWR enhance situational awareness, enabling pilots to make informed decisions in the heat of battle. The Harrier GR.7 stands fortified with an arsenal of defensive measures. Its automatic Engine Fire Suppression (EFS), coupled with the 700 countermeasures constitutes a formidable shield against hostile missiles. While the Harrier GR.7 may lack armour plating, the GR.7's low-profile silhouette further augments its safety measures, reducing its radar cross-section and making it a more elusive target in the chaotic theater of aerial combat, where agility becomes its most potent form of defense. The Harrier GR.7's open cockpit design offers pilots an exceptional vantage point, granting unobstructed visibility that enhances situational awareness during flight. This clear line of sight empowers pilots to quickly scan the surrounding airspace and terrain, allowing them to detect potential threats and opportunities with ease. Complementing this inherent advantage, the aircraft's HUD further amplifies situational awareness by seamlessly integrating critical flight data and targeting information directly into the pilot's field of view. This real-time data projection eliminates the need to divert attention to cockpit instruments, enabling pilots to maintain focus on the external environment. The combination of the open cockpit layout and the HUD's intuitive display contributes to the Harrier GR.7's heightened safety and operational effectiveness, enabling pilots to respond swiftly and decisively to changing circumstances.
Modifications and economy
A prudent approach would be to focus on obtaining additional countermeasures and air-to-air missiles as promptly as possible. This strategic choice gains even more significance considering the Harrier GR.7's provision of 4 x AIM-9M missiles and an impressive stockpile of 700 countermeasures. This advantageous combination not only offers a heightened capacity to effectively neutralize incoming missile hazards but also affords the aircraft a formidable offensive potential. With this array of resources at your disposal, the Harrier GR.7 can seamlessly navigate the complex dynamics of aerial combat, ensuring a robust defense against missile threats while equipping you with a sufficiently potent arsenal to engage and dispatch enemy aircraft with a commendable level of efficiency.
Armaments
| Ballistic Computer | ||||
|---|---|---|---|---|
| CCIP (Guns) | CCIP (Rockets) | CCIP (Bombs) | CCRP (Bombs) | EEGS |
| |
|
|
|
|
Offensive armament
The Harrier GR.7 is armed with:
- 60 x countermeasures
Suspended armament
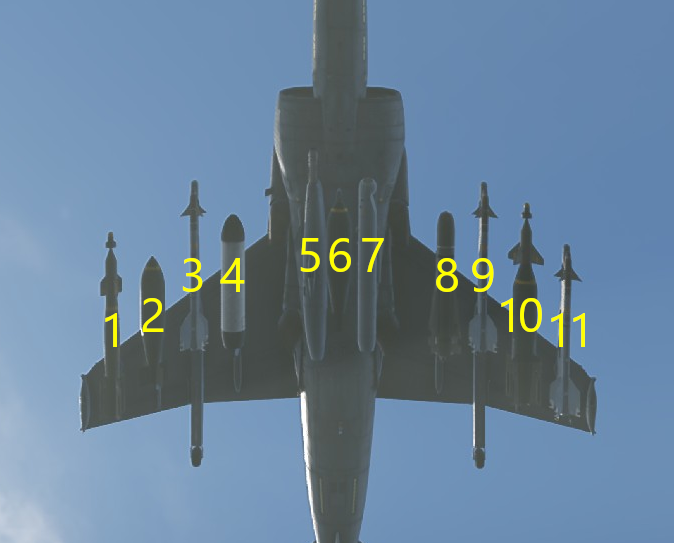
The Harrier GR.7 can be outfitted with the following ordnance:
| 1 | 2 | 3 | 4 | 5 | 6 | 7 | 8 | 9 | 10 | 11 | ||
|---|---|---|---|---|---|---|---|---|---|---|---|---|
| 25 mm ADEN 25 cannons (100 rpg) | 1 | 1 | ||||||||||
| 540 lb Mk.M2 bombs | 1 | 1 | 1 | 1 | 1 | 1 | 1 | |||||
| 540 lb H.E. M.C. Mk.1 No.118 bombs | 1 | 1 | 1 | 1 | 1 | 1 | 1 | |||||
| 1,000 lb H.E. M.C. Mk.13 bombs | 1 | 1 | 1 | 1 | 1 | |||||||
| 1,000 lb H.E. M.C. Mk.13 No.117 bombs | 1 | 1 | 1 | 1 | 1 | |||||||
| 277 kg GBU-12 Paveway II bombs | 1* | 1* | 1* | 1* | 1* | 1* | ||||||
| 546 kg Mk.13 bombs | 1* | 1* | 1* | 1* | ||||||||
| 2,000 lb GBU-24 Paveway III bombs | 1* | 1* | ||||||||||
| CRV7 M247 rockets | 19 | 19 | 19 | 19 | 19 | 19 | ||||||
| SNEB type 23 rockets | 18 | 18 | 18 | 18 | 18 | 18 | ||||||
| AGM-65D missiles | 1 | 1 | 1 | 1 | ||||||||
| AGM-65G missiles | 1 | 1 | 1 | 1 | ||||||||
| AIM-9L Sidewinder missiles | 1† | 1† | 1† | 1† | ||||||||
| AIM-9M Sidewinder missiles | 1† | 1† | 1† | 1† | ||||||||
| Countermeasures | 160† | 160† | 160† | 160† | ||||||||
| TIALD targeting pod | 1* | |||||||||||
| Maximum permissible weight imbalance: 1,400 kg | ||||||||||||
| * The TIALD targeting pod must be carried when equipping guided bombs †AIM-9L Sidewinder missiles can be carried in conjunction with countermeasure pods on the same hardpoint | ||||||||||||
| Default weapon presets | |
|---|---|
| |
Usage in battles
As a fighter:
The Harrier is a subsonic fighter fighting against a mostly supersonic opposition. However, as a weapons platform, it has access to some features that make it able to compete:
You can carry up to 4 AIM-9M missiles that are all-aspect, feature a seeker shut-off IRCCM, have a maximum overload of 30 G, and a maximum launch range of 18 km. In realistic terms, that means that if you have an altitude advantage of 1-2 km over someone running away from you you are still able to lock them and fire at a distance of up to 5-6 km and the missile still has a good chance of reaching them. The AIM-9Ms are almost impossible to dodge from side and rear aspects due to its IRCCM. However, you should avoid firing them in a frontal aspect as just a few flares will be able to decoy them.
You will receive access to 60 countermeasures with the first countermeasure modification and with the second you unlock the option to carry 160 countermeasures on each of the Sidewinder pylons, totalling 4 x 160 + 60 = 700 countermeasures. It is highly recommended to run them mixed (both flares and chaff). This allows you to use the periodic countermeasures dispense function when you are in situations where your situational awareness will be limited, to prevent a missile from hitting the plane.
You also receive an RWR, which is a useful tool for roughly finding the location of enemies and warning you when you are locked on radar.
At the beginning of the match, you can climb to the side along the same flight path as the rest of your team. Try keeping a speed of above 800 km/h while climbing to maybe 5,000 to 7,000 m altitude. However, this playstyle leaves you open to some BVR misses being fired by enemies like the F-14. If you pick up a warning on your RWR and see a semi-active or active radar-guided missile, you will want to fly perpendicularly to the source of the enemy radar whilst deploying chaff.
The general playstyle would be to wait for the proper opportunity to target vulnerable opponents. You are not the plane that will carry the match, you are a support aircraft. Almost all matches inevitably turn into a furball fight where enemies and allies will be located in a tight area. You can dive down from above on them and fire your AIM-9Ms on unsuspecting targets. Be careful not to fire your missiles when allies are very close to the enemy, as you can easily hit a teammate by mistake.
Another playstyle is to fly close to the ground, either along hills or other terrain. This allows you to approach from the side and engage from the side aspect, where the AIM-9Ms are almost un-flareable. Flying close to the ground also leaves you less vulnerable to BVR missiles, although not immune.
When surrounded by enemies, turn on the automatic countermeasure dispenser and focus on the enemies' positions and who you can target and to where you can disengage. Try to avoid turning with enemies as even with the VTOL controls you will probably be outmatched. A turnfight should be your last resort.
When in combined battles (ground realistic battles):
The Harrier GR.7 has an excellent selection of air-to-ground munitions available for use for ground attack which can be configured using the Weapon loadout customization menu.
TIALD
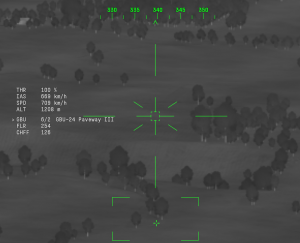
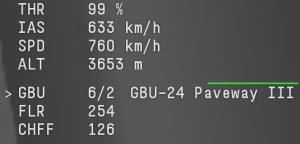
The TIALD (Thermal Imaging Airborne Laser Designator) has access to thermal vision making target acquisition an easy task. While in use, it acts very similarly to helicopter gunner sights for modern helicopters, utilizing almost the exact same functions. Range is not displayed in the HUD as seen in helicopters. However, this is not a crucial aspect of accurate bombing as the range is fully dependent on the aircraft's attitude (altitude, speed, angle of attack, etc.). If the user is familiar with helicopter HUD, you will be familiar with the indicators to the left of the reticle.
These indicators signal the following: THR (throttle), IAS (indicated air speed), SPD (speed at sea level), ALT (altitude). These indicators will stay fixed to the sight regardless of the loadout. The lower indicators will vary according to the loadout carried at the time, in this case: GBU (GBU-24 Paveway III (2,000 lb) guided bombs) FLR (amount of flares remaining) and CHFF (amount of chaff remaining). The TIALD has a double functionality, not only working as the laser designator for GBUs but can work as an additional scouting tool for better situational awareness, both for air-to-ground and air-to-air. Functionalities of the TIALD will be explained further below.
Something to keep in mind is that while the TIALD pod can look backwards it cannot look directly downwards, this means that if you have the pod locked to a target and you fly directly over the target, the pod can lose its lock on the target when it hits the downwards limit. If you allow this to happen, it is likely the bomb will miss the target before you are able to get the targeting pod pointed at it again. In order to avoid this, you can fly slightly off to the side of your target (rather than passing straight over it) so that the pod can keep pointed at the target by swivelling sideways, rather than straight down like it would have to if you flew directly over it.
AGM-65D
The AGM-65D air-to-ground missile, when working in conjunction with the TIALD targeting pod, can be an effective combination for knocking out enemy tanks from far away. It is recommended to also bring a couple of AIM-9L missiles for self-defence against enemy fighters. As the AGM-65D utilises thermal imaging for guidance, you should have no problem spotting enemy vehicles in day or night battles.
To successfully use this weapon in ground battles, you will first need to stay well away from the battlefield and begin climbing in order to bring yourself above the view of enemy SPAA radar. Once an altitude of 5,000 - 6,000 m is reached, begin heading towards the battlefield while maintaining a shallow climb. Once you have positioned yourself near or over the battlefield, you can use your TIALD targeting pod to search for enemy vehicles and watch for friendly scout markers. After acquiring a lock on an enemy position, point the nose of the aircraft roughly in the direction of the enemy vehicle and then press your "fire air-to-ground missile" key once to activate the missile seeker and once more to fire the missile. As the AGM-65D is a fire-and-forget weapon, you do not need to maintain lock for the duration of the missile's flight and can immediately begin searching for new targets. It is advised to try to target enemy SPAA first as even though they cannot see you on radar (provided you are still far above them), they can still manually look up and try to find you once they notice you eliminating their teammates in the battle log.
Pros and cons
Pros:
- It has a very large count of countermeasures (700 with four BOL rails equipped, 380 with two BOL rails equipped)
- Can carry up to four very effective AIM-9M Sidewinder missiles
- Dedicated missile pylons ensure you can always carry at least two AIM-9Ms without sacrificing any ground attack ordnance
- Has built-in target tracker and FLIR even without targeting pod
- Has pilot night vision
- ADEN 25 cannons have very high rate of fire and velocity
- Access to a very diverse range of ground attack ordnance including 610 lb, 1,200 lb and 2,000 lb laser-guided bombs and AGM-65D/G Mavericks
- Can carry six laser-guided bombs at the same time
- TIALD pod (which has far better zoom and resolution than the missile seeker) can be used to lock anti-ground weapons
- It is very hard to rip the wings due to excessive speed or G overload, thanks to the very high G overload limit and the wing rip speed being above what the aircraft can typically achieve
- CR7V M247 rockets are very effective at destroying SPAAs from range due to very high speed and explosive mass being much better than SNEB rockets
- Advanced RWR with IFF and PD detection
Cons:
- The exceptional rate of fire and low ammo count of the gun pods gives you very limited trigger time before running out of ammo
- 25 mm belts have no tracer rounds, making it hard to learn the unique ballistics of the ADEN cannon
- No radar
- Lower top speed than first-generation Harriers
- Subsonic
- Engine overheats if used at 100% or WEP for extended periods of time (90-95% throttle is safe, depending on map temperature)
- RWR lacks target name detection and can only detect target type
History
The Hawker Siddeley Harrier was the first V/STOL fixed-wing jet aircraft to enter military service, and it was very successful not only domestically, but in the foreign market, with immense international interest in the project.
One such nation was the United States of America, who bought the rights to domestically manufacture and cooperate on the design of the aircraft. The contract was granted to McDonnell Douglas and British Aerospace (the conglomerate successor to Hawker Siddeley), and eventually developed a successor aircraft, the AV-8B Harrier II. This design proved extremely capable in US tests, and so the British Ministry of Defence sought to adopt an iteration of this redesign.
The contract defaulted on British Aerospace and McDonnell Douglas due to their extensive experience with the programme, and by 1990, it began to enter service with the Royal Air Force and the Fleet Air Arm.
Originally designated "GR.5", later upgrades led to designations "GR.7" and "GR.9".
McDonnell Douglas was later merged into Boeing, and British Aerospace was merged with Marconi Electronic Systems to form BAE Systems, who continued to manufacture the Harrier II until it was retired from service in 2011 due to budget constraints. It saw service in the Gulf War, Operation Deliberate Force, Operation Allied Force, the Iraq War (2003-2011) and the War in Afghanistan (2001-2020).
Media
- Skins
- Videos
See also
- Similar aircraft
External links
| British Aerospace plc | |
|---|---|
| Strike Aircraft | Harrier GR.7 · Sea Harrier FRS.1 (e) · Sea Harrier FRS.1 · Sea Harrier FA 2 |
| See also | British Aircraft Corporation · Hawker Aircraft Limited |
| Britain jet aircraft | |
|---|---|
| Blackburn | Buccaneer S.1 · Buccaneer S.2 · Buccaneer S.2B |
| British Aerospace | Harrier GR.7 · Sea Harrier FRS.1 (e) · Sea Harrier FRS.1 · Sea Harrier FA 2 |
| British Aircraft Corporation | Strikemaster Mk.88 |
| English Electric | Canberra B Mk 2 · Canberra B (I) Mk 6 · Lightning F.6 · Lightning F.53 |
| Gloster | Meteor F Mk 3 · Sea Meteor F Mk 3 · Meteor F Mk 4 G.41F · Meteor F Mk 4 G.41G · Meteor F Mk 8 G.41K · Meteor F Mk.8 Reaper |
| Javelin F.(A.W.) Mk.9 | |
| de Havilland | Vampire F.B.5 · Venom FB.4 · Sea Venom FAW 20 · Sea Vixen F.A.W. Mk.2 |
| Hawker | Sea Hawk FGA.6 · Hunter F.1 · Hunter F.6 · Hunter FGA.9 · Harrier GR.1 · Harrier GR.3 |
| Panavia | Tornado GR.1 · Tornado F.3 · Tornado F.3 Late |
| SEPECAT | Jaguar GR.1 · Jaguar GR.1A · Jaguar IS |
| Supermarine | Attacker FB 1 · Attacker FB.2 · Scimitar F Mk.1 · Swift F.1 · Swift F.7 |
| Foreign | Phantom FG.1 (USA) · Phantom FGR.2 (USA) · F-4J(UK) Phantom II (USA) |
| South Africa | ▄JAS39C |
| India | ▄MiG-21 Bison |


