Difference between revisions of "F3D-1"
Jareel_Skaj (talk | contribs) m (typo) |
Viper6404123 (talk | contribs) (History of the F3D) (Tag: Visual edit) |
||
| (45 intermediate revisions by 21 users not shown) | |||
| Line 1: | Line 1: | ||
{{Specs-Card | {{Specs-Card | ||
|code=f3d_1 | |code=f3d_1 | ||
| − | + | |cockpit=380016/1304870 | |
| − | |cockpit= | ||
}} | }} | ||
== Description == | == Description == | ||
<!-- ''In the description, the first part should be about the history of and the creation and combat usage of the aircraft, as well as its key features. In the second part, tell the reader about the aircraft in the game. Insert a screenshot of the vehicle, so that if the novice player does not remember the vehicle by name, he will immediately understand what kind of vehicle the article is talking about.'' --> | <!-- ''In the description, the first part should be about the history of and the creation and combat usage of the aircraft, as well as its key features. In the second part, tell the reader about the aircraft in the game. Insert a screenshot of the vehicle, so that if the novice player does not remember the vehicle by name, he will immediately understand what kind of vehicle the article is talking about.'' --> | ||
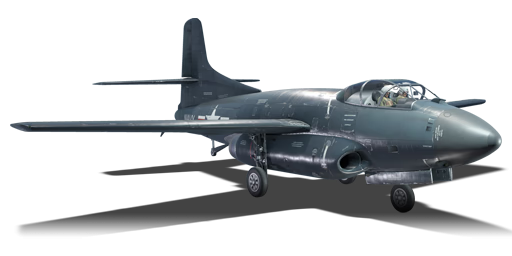
| − | + | [[File:GarageImage_{{PAGENAME}}.jpg|420px|thumb|left]] | |
| − | + | {{break}} | |
| − | + | The '''{{Specs|name}}''' is a rank {{Specs|rank}} American naval jet fighter {{Battle-rating}}. It was introduced in [[Update 1.75 "La Résistance"]]. | |
| − | |||
== General info == | == General info == | ||
| − | === Flight | + | === Flight Performance === |
| − | + | Describe how the aircraft behaves in the air. Speed, manoeuvrability, acceleration and allowable loads - these are the most important characteristics of the vehicle. | |
| − | |||
| − | {| class="wikitable" style="text-align:center" | + | {| class="wikitable" style="text-align:center" |
| − | ! | + | |- |
| + | ! colspan="8" | Characteristics | ||
| + | |- | ||
| + | ! colspan="8" | ''Stock'' | ||
| + | |- | ||
! colspan="2" | Max Speed<br>(km/h at 1,524 m) | ! colspan="2" | Max Speed<br>(km/h at 1,524 m) | ||
| − | ! rowspan="2" | Max altitude<br>( | + | ! rowspan="2" | Max altitude<br>(meters) |
! colspan="2" | Turn time<br>(seconds) | ! colspan="2" | Turn time<br>(seconds) | ||
| − | ! colspan="2" | Rate of climb<br>( | + | ! colspan="2" | Rate of climb<br>(meters/second) |
| − | ! rowspan="2" | Take-off run<br>( | + | ! rowspan="2" | Take-off run<br>(meters) |
| + | |- | ||
| + | ! AB | ||
| + | ! RB | ||
| + | ! AB | ||
| + | ! RB | ||
| + | ! AB | ||
| + | ! RB | ||
| + | |- | ||
| + | |810||786|| {{Specs|ceiling}} ||31.3||32.0||14.7||13.7||700 | ||
| + | |- | ||
| + | ! colspan="8" | ''Upgraded'' | ||
|- | |- | ||
| − | ! | + | ! colspan="2" | Max Speed<br>(km/h at 1,524 m) |
| + | ! rowspan="2" | Max altitude (meters) | ||
| + | ! colspan="2" | Turn time (seconds) | ||
| + | ! colspan="2" | Rate of climb<br>(meters/second) | ||
| + | ! rowspan="2" | Take-off run (meters) | ||
|- | |- | ||
| − | ! | + | ! AB |
| − | + | ! RB | |
| + | ! AB | ||
| + | ! RB | ||
| + | ! AB | ||
| + | ! RB | ||
|- | |- | ||
| − | + | |868||846|| {{Specs|ceiling}} ||28.8||30.0||23.3||18.8||700 | |
| − | | 868 || 846 || 28.8 || 30.0 || 23.3 || 18.8 | ||
|- | |- | ||
|} | |} | ||
| − | ==== Details ==== | + | ====Details==== |
| − | {| class="wikitable" style="text-align:center | + | {| class="wikitable" style="text-align:center" |
|- | |- | ||
| − | ! colspan=" | + | ! colspan="5" | Features |
|- | |- | ||
| − | ! Combat | + | ! Combat flap |
| + | ! Take-off flap | ||
| + | ! Landing flap | ||
| + | ! Air brakes | ||
| + | ! Arrestor gear | ||
|- | |- | ||
| − | | ✓ || ✓ || ✓ || ✓ || ✓ | + | | ✓ || ✓ || ✓ || ✓ || ✓ <!-- ✓ --> |
|- | |- | ||
|} | |} | ||
| − | {| class="wikitable" style="text-align:center | + | {| class="wikitable" style="text-align:center" |
|- | |- | ||
| − | ! colspan=" | + | ! colspan="5" | Limits |
|- | |- | ||
| − | ! rowspan="2" | | + | ! rowspan="2" | Wing-break speed<br>(km/h) |
| − | ! rowspan="2" | Gear (km/h) | + | ! rowspan="2" | Gear limit<br>(km/h) |
| − | ! | + | ! rowspan="2" | Combat flap<br> (km/h) |
! colspan="2" | Max Static G | ! colspan="2" | Max Static G | ||
|- | |- | ||
| − | + | ! + | |
| + | ! - | ||
|- | |- | ||
| − | | {{Specs| | + | | {{Specs|разрушение|конструкции}} || {{Specs|разрушение|шасси}} || 460 || ~?? || ~? |
|- | |- | ||
|} | |} | ||
| Line 63: | Line 87: | ||
{| class="wikitable" style="text-align:center" | {| class="wikitable" style="text-align:center" | ||
|- | |- | ||
| − | ! colspan="4" | Optimal velocities | + | ! colspan="4" | Optimal velocities |
|- | |- | ||
| − | ! Ailerons | + | ! Ailerons<br>(km/h) |
| + | ! Rudder<br>(km/h) | ||
| + | ! Elevators<br>(km/h) | ||
| + | ! Radiator<br>(km/h) | ||
|- | |- | ||
| − | | < 620 || < 650 || < 620 || | + | | < 620 || < 650 || < 620 || No radiator |
|- | |- | ||
|} | |} | ||
| − | |||
{| class="wikitable" style="text-align:center" | {| class="wikitable" style="text-align:center" | ||
|- | |- | ||
| − | ! colspan="3" | | + | ! colspan="3" | Compressor (RB/SB) |
| − | |||
|- | |- | ||
| − | ! | + | ! colspan="3" | Setting 1 |
| − | |||
|- | |- | ||
| − | + | ! Optimal altitude | |
| − | + | ! 100% Engine power | |
| + | ! WEP Engine power | ||
|- | |- | ||
| − | + | | 0 m || 1470 kgf || No WEP | |
| − | |||
|- | |- | ||
| − | ! | + | <!--! colspan="3" | Setting 2 |
| − | |||
|- | |- | ||
| − | + | ! Optimal altitude | |
| − | + | ! 100% Engine power | |
| + | ! WEP Engine power | ||
|- | |- | ||
| − | + | | ?,??? m || ?,??? hp || ?,??? hp | |
| − | |||
|- | |- | ||
| − | ! | + | ! colspan="3" | Setting 3 |
| − | |||
|- | |- | ||
| − | + | ! Optimal altitude | |
| − | + | ! 100% Engine power | |
| − | + | ! WEP Engine power | |
| − | |||
| − | |||
|- | |- | ||
| + | | ?,??? m || ?,??? hp || ?,??? hp | ||
| + | |- --> | ||
|} | |} | ||
=== Survivability and armour === | === Survivability and armour === | ||
| − | + | <!-- Examine the survivability of the aircraft. Note how vulnerable the structure is and how secure the pilot is, whether the fuel tanks are armoured, etc. Describe the armour, if there is any, and also mention the vulnerability of other critical aircraft systems. --> | |
| − | <!-- | ||
* 38 mm Bulletproof glass in cockpit front. | * 38 mm Bulletproof glass in cockpit front. | ||
* 5 mm Steel plates in the nose. | * 5 mm Steel plates in the nose. | ||
* 3 mm Steel boxes in the tail. | * 3 mm Steel boxes in the tail. | ||
| − | |||
| − | |||
| − | |||
== Armaments == | == Armaments == | ||
| − | |||
=== Offensive armament === | === Offensive armament === | ||
| − | |||
<!-- ''Describe the offensive armament of the aircraft, if any. Describe how effective the cannons and machine guns are in a battle, and also what belts or drums are better to use. If there is no offensive weaponry, delete this subsection.'' --> | <!-- ''Describe the offensive armament of the aircraft, if any. Describe how effective the cannons and machine guns are in a battle, and also what belts or drums are better to use. If there is no offensive weaponry, delete this subsection.'' --> | ||
| − | {{main|M3 (20 mm)}} | + | {{main|AN/M3 (20 mm)}} |
The '''''{{PAGENAME}}''''' is armed with: | The '''''{{PAGENAME}}''''' is armed with: | ||
| − | * 4 | + | * 4 х 20 mm AN/M3 cannons, chin-mounted (200 rpg = 800 total) |
=== Suspended armament === | === Suspended armament === | ||
| − | |||
<!-- ''Describe the aircraft's suspended armament: additional cannons under the wings, bombs, rockets and torpedoes. This section is especially important for bombers and attackers. If there is no suspended weaponry remove this subsection.'' --> | <!-- ''Describe the aircraft's suspended armament: additional cannons under the wings, bombs, rockets and torpedoes. This section is especially important for bombers and attackers. If there is no suspended weaponry remove this subsection.'' --> | ||
| − | {{main|AN-M64A1 (500 lb)|AN-M65A1 (1,000 lb)|AN-M66A2 (2,000 lb) | + | {{main|AN-M64A1 (500 lb)|Tiny Tim|AN-M65A1 (1,000 lb)|AN-M66A2 (2,000 lb)}} |
The '''''{{PAGENAME}}''''' can be outfitted with the following ordnance: | The '''''{{PAGENAME}}''''' can be outfitted with the following ordnance: | ||
| − | + | * 2 х 500 lb AN-M64A1 bombs (1,000 lb total) | |
| − | * 2 | + | * 2 х Tiny Tim rockets |
| − | * 2 | + | * 2 х 1000 lb AN-M65A1 bombs (2,000 lb total) |
| − | * 2 | + | * 2 х 2000 lb AN-M66A2 bombs (4,000 lb total) |
| − | * 2 | ||
== Usage in battles == | == Usage in battles == | ||
| − | <!-- | + | <!-- Describe the tactics of playing in an aircraft, the features of using vehicles in a team and advice on tactics. Refrain from creating a "guide" - do not impose a single point of view, but instead, give the reader food for thought. Examine the most dangerous enemies and give recommendations on fighting them. If necessary, note the specifics of the game in different modes (AB, RB, SB). --> |
| + | The main thing to take into account when using the F3D-1 is that it is not made to combat other planes. It has four great cannons, but you will rarely be able to get them on target unless you are fighting lower rank vehicles or you manage to take an enemy aircraft by surprise. It is unsuited to the complexities of high-rank jet combat, having a poor climb rate, below average top speed and mediocre manoeuvrability. Instead, this plane works best as a ground pounder, working closely with fighters to keep it safe from harm. In other words, your team needs to have air superiority in order for you to be effective. Your cannons are effective against light vehicles and vehicle top armour. The 2000 lb bombs are powerful enough to destroy any target, allowing you to pinpoint dug in vehicles and end their game quickly. You also have access to Tiny Tim Rockets, which have extremely high penetration and post penetration damage. After dropping your payload and strafing targets, you can quickly return to base and rearm. | ||
| − | + | It is best not to linger over a combat zone, as your presence will attract the attention of players, who may spawn in fighters or SPAA and try to shoot you down. In higher rank matches, SPAA will jump at the chance to shoot down a slow, lumbering jet like you. Instead, it is best to quickly pinpoint a target, destroy it and then return to base. Keep on doing this as many times as you can. Fly low and around the edge of the map in order to avoid any anti-aircraft guns, observing the map and looking out for any potential targets. If you attract any unwanted attention from an enemy aircraft, your first point of call should be to call for help. It can save you a lot of hassle if a friendly SPAA or fighter can take out the enemy plane. If not you will need to analyse your enemy and work out if you have any advantages over it. If it is a high-rank plane like a Mig 15 or Sabre, your options are pretty limited. Your chances mostly depend on your skill to outwit your opponent, or their skill to outwit you. | |
| − | |||
| − | |||
| − | |||
| − | |||
| − | |||
| − | It is best not to linger over a combat zone, as | ||
===Radars=== | ===Radars=== | ||
| Line 173: | Line 182: | ||
|- | |- | ||
| 4,000 m || 150 m || ±60° || ±60° | | 4,000 m || 150 m || ±60° || ±60° | ||
| + | |- | ||
| + | |} | ||
| + | |||
| + | ===Modules=== | ||
| + | {| class="wikitable" | ||
| + | ! colspan="1" | Tier | ||
| + | ! colspan="2" | Flight performance | ||
| + | ! colspan="1" | Survivability | ||
| + | ! colspan="2" | Weaponry | ||
| + | |- | ||
| + | | I | ||
| + | | Fuselage Repair | ||
| + | | Compressor | ||
| + | | | ||
| + | | Offensive 20 mm | ||
| + | | SBC mk.I | ||
| + | |- | ||
| + | | II | ||
| + | | New boosters | ||
| + | | | ||
| + | | Airframe | ||
| + | | | ||
| + | | LFRC mk.12 | ||
| + | |- | ||
| + | | III | ||
| + | | Wings Repair | ||
| + | | Engine | ||
| + | | | ||
| + | | New 20 mm Cannons | ||
| + | | MBC mk.I | ||
| + | |- | ||
| + | | IV | ||
| + | | G-Suit | ||
| + | | | ||
| + | | Cover | ||
| + | | | ||
| + | | LBC mk.I | ||
|- | |- | ||
|} | |} | ||
=== Pros and cons === | === Pros and cons === | ||
| − | <!-- | + | <!--Summarize and briefly evaluate the vehicle in terms of its characteristics and combat effectiveness. Mark its pros and cons in the bulleted list. Try not to use more than 6 points for each of the characteristics. Avoid using categorical definitions such as "bad", "good" and the like - use substitutions with softer forms such as "inadequate" and "effective".--> |
'''Pros:''' | '''Pros:''' | ||
* Is equipped with the [[AN/APS-21]] target detection radar and [[AN/APG-26]] target tracking radar, with the best target detection range in the game | * Is equipped with the [[AN/APS-21]] target detection radar and [[AN/APG-26]] target tracking radar, with the best target detection range in the game | ||
| − | * | + | * Possesses target tracking radar with favourable matchmaking characteristics |
| − | * Decent | + | * Decent Bombload |
| − | * Can turn better than some other jets | + | * Can turn better than some other jets |
| − | * Can make it back to base on only one engine (you should be able to maintain ~400 | + | * Good cannons |
| + | * Has a tail wheel so you cannot strike tail on takeoff or landing | ||
| + | * Can make it back to base on only one engine (you should be able to maintain ~400 kph in level flight) | ||
* Engines mounted close to the centre line of aircraft means loss of an engine has less impact on controllability | * Engines mounted close to the centre line of aircraft means loss of an engine has less impact on controllability | ||
| − | |||
'''Cons:''' | '''Cons:''' | ||
| − | + | ||
| − | + | * Not at all fast enough to compete with top rank fighters | |
| − | * Not | ||
| − | |||
* Poor climb rate makes it impractical to engage bombers | * Poor climb rate makes it impractical to engage bombers | ||
== History == | == History == | ||
| − | + | The F3D-1 ‘Skyknight’ first appeared over the skies of North Korea as the world's first Carrier based jet nightfighter. While it did see some action it was noty the Marines. After Korea, the F3D was used in testing the then new Air to Air Missiles (AAM) such as the AAM-N-2 Sparrow I. It was also used in testing new F3D’s for futur that effective downing only six MiG-15. It was however, the most successful naval jet fighter of the war. While it was used by the Navy, the most ‘Skyknights’ were deployed be wars such as the next war in Vietnam. The ‘Skyknight’ was the only Korean War fighter to serve and see combat in the Vietnam War. Just before fighting in the Vietnam War, its designation was changed from the F3D to the F-10. F-10s were used as electronic warfare and jamming aircraft against the newest threat, the SA-2 Guideline Surface to Air Missile. It was used as an EF-10 because of its enlarges fuselage design for it to carry advanced radar systems. In 1969 though, all US Navy F-10’s were retired and used for testing on the new avionics systems that were implemented into the F-14 Tomcats. The Marines used their F-10’s until May of 1970. | |
| − | |||
| − | |||
| − | |||
| − | |||
| − | |||
| − | |||
| − | |||
| − | |||
| − | In 1969 though, all US Navy F- | ||
== Media == | == Media == | ||
| − | + | ''Excellent additions to the article would be video guides, screenshots from the game, and photos.'' | |
| − | |||
| − | |||
| − | |||
| − | |||
| − | |||
| − | |||
| − | |||
== See also == | == See also == | ||
| Line 225: | Line 254: | ||
== External links == | == External links == | ||
| − | + | ''Paste links to sources and external resources, such as:'' | |
| + | |||
* ''topic on the official game forum;'' | * ''topic on the official game forum;'' | ||
| − | * ''other literature.'' | + | * ''encyclopedia page on the aircraft;'' |
| − | + | * ''other literature.'' | |
| − | |||
| − | |||
| − | |||
| − | |||
| − | |||
| − | |||
| − | |||
| − | |||
| − | |||
| − | |||
| − | |||
| − | |||
| − | |||
| − | |||
| − | |||
| − | |||
{{USA jet aircraft}} | {{USA jet aircraft}} | ||
Revision as of 02:03, 12 July 2019
Contents
Description

The F3D-1 is a rank V American naval jet fighter
with a battle rating of 7.7 (AB) and 7.0 (RB/SB). It was introduced in Update 1.75 "La Résistance".
General info
Flight Performance
Describe how the aircraft behaves in the air. Speed, manoeuvrability, acceleration and allowable loads - these are the most important characteristics of the vehicle.
| Characteristics | |||||||
|---|---|---|---|---|---|---|---|
| Stock | |||||||
| Max Speed (km/h at 1,524 m) |
Max altitude (meters) |
Turn time (seconds) |
Rate of climb (meters/second) |
Take-off run (meters) | |||
| AB | RB | AB | RB | AB | RB | ||
| 810 | 786 | 10668 | 31.3 | 32.0 | 14.7 | 13.7 | 700 |
| Upgraded | |||||||
| Max Speed (km/h at 1,524 m) |
Max altitude (meters) | Turn time (seconds) | Rate of climb (meters/second) |
Take-off run (meters) | |||
| AB | RB | AB | RB | AB | RB | ||
| 868 | 846 | 10668 | 28.8 | 30.0 | 23.3 | 18.8 | 700 |
Details
| Features | ||||
|---|---|---|---|---|
| Combat flap | Take-off flap | Landing flap | Air brakes | Arrestor gear |
| ✓ | ✓ | ✓ | ✓ | ✓ |
| Limits | ||||
|---|---|---|---|---|
| Wing-break speed (km/h) |
Gear limit (km/h) |
Combat flap (km/h) |
Max Static G | |
| + | - | |||
| 932 | 314 | 460 | ~?? | ~? |
| Optimal velocities | |||
|---|---|---|---|
| Ailerons (km/h) |
Rudder (km/h) |
Elevators (km/h) |
Radiator (km/h) |
| < 620 | < 650 | < 620 | No radiator |
| Compressor (RB/SB) | ||
|---|---|---|
| Setting 1 | ||
| Optimal altitude | 100% Engine power | WEP Engine power |
| 0 m | 1470 kgf | No WEP |
Survivability and armour
- 38 mm Bulletproof glass in cockpit front.
- 5 mm Steel plates in the nose.
- 3 mm Steel boxes in the tail.
Armaments
Offensive armament
The F3D-1 is armed with:
- 4 х 20 mm AN/M3 cannons, chin-mounted (200 rpg = 800 total)
Suspended armament
The F3D-1 can be outfitted with the following ordnance:
- 2 х 500 lb AN-M64A1 bombs (1,000 lb total)
- 2 х Tiny Tim rockets
- 2 х 1000 lb AN-M65A1 bombs (2,000 lb total)
- 2 х 2000 lb AN-M66A2 bombs (4,000 lb total)
Usage in battles
The main thing to take into account when using the F3D-1 is that it is not made to combat other planes. It has four great cannons, but you will rarely be able to get them on target unless you are fighting lower rank vehicles or you manage to take an enemy aircraft by surprise. It is unsuited to the complexities of high-rank jet combat, having a poor climb rate, below average top speed and mediocre manoeuvrability. Instead, this plane works best as a ground pounder, working closely with fighters to keep it safe from harm. In other words, your team needs to have air superiority in order for you to be effective. Your cannons are effective against light vehicles and vehicle top armour. The 2000 lb bombs are powerful enough to destroy any target, allowing you to pinpoint dug in vehicles and end their game quickly. You also have access to Tiny Tim Rockets, which have extremely high penetration and post penetration damage. After dropping your payload and strafing targets, you can quickly return to base and rearm.
It is best not to linger over a combat zone, as your presence will attract the attention of players, who may spawn in fighters or SPAA and try to shoot you down. In higher rank matches, SPAA will jump at the chance to shoot down a slow, lumbering jet like you. Instead, it is best to quickly pinpoint a target, destroy it and then return to base. Keep on doing this as many times as you can. Fly low and around the edge of the map in order to avoid any anti-aircraft guns, observing the map and looking out for any potential targets. If you attract any unwanted attention from an enemy aircraft, your first point of call should be to call for help. It can save you a lot of hassle if a friendly SPAA or fighter can take out the enemy plane. If not you will need to analyse your enemy and work out if you have any advantages over it. If it is a high-rank plane like a Mig 15 or Sabre, your options are pretty limited. Your chances mostly depend on your skill to outwit your opponent, or their skill to outwit you.
Radars
The F3D-1 is equipped with an AN/APS-21 search radar, as well as an AN/APG-26 target tracking radar. Both radars are located in the nose of the aircraft.
| AN/APS-21 - Target Detection Radar | |||
|---|---|---|---|
| Maximum Detection Range |
Guaranteed Detection Range |
Max Azimuth Scan Angle |
Max Elevation Scan Angle |
| 45,000 m | 28,000 m | ±85° | ±16° |
| AN/APG-26 - Target Tracking Radar | |||
| Maximum Tracking Range |
Minimum Tracking Range |
Azimuth Tracking Angle |
Elevation Tracking Angle |
| 4,000 m | 150 m | ±60° | ±60° |
Modules
| Tier | Flight performance | Survivability | Weaponry | ||
|---|---|---|---|---|---|
| I | Fuselage Repair | Compressor | Offensive 20 mm | SBC mk.I | |
| II | New boosters | Airframe | LFRC mk.12 | ||
| III | Wings Repair | Engine | New 20 mm Cannons | MBC mk.I | |
| IV | G-Suit | Cover | LBC mk.I | ||
Pros and cons
Pros:
- Is equipped with the AN/APS-21 target detection radar and AN/APG-26 target tracking radar, with the best target detection range in the game
- Possesses target tracking radar with favourable matchmaking characteristics
- Decent Bombload
- Can turn better than some other jets
- Good cannons
- Has a tail wheel so you cannot strike tail on takeoff or landing
- Can make it back to base on only one engine (you should be able to maintain ~400 kph in level flight)
- Engines mounted close to the centre line of aircraft means loss of an engine has less impact on controllability
Cons:
- Not at all fast enough to compete with top rank fighters
- Poor climb rate makes it impractical to engage bombers
History
The F3D-1 ‘Skyknight’ first appeared over the skies of North Korea as the world's first Carrier based jet nightfighter. While it did see some action it was noty the Marines. After Korea, the F3D was used in testing the then new Air to Air Missiles (AAM) such as the AAM-N-2 Sparrow I. It was also used in testing new F3D’s for futur that effective downing only six MiG-15. It was however, the most successful naval jet fighter of the war. While it was used by the Navy, the most ‘Skyknights’ were deployed be wars such as the next war in Vietnam. The ‘Skyknight’ was the only Korean War fighter to serve and see combat in the Vietnam War. Just before fighting in the Vietnam War, its designation was changed from the F3D to the F-10. F-10s were used as electronic warfare and jamming aircraft against the newest threat, the SA-2 Guideline Surface to Air Missile. It was used as an EF-10 because of its enlarges fuselage design for it to carry advanced radar systems. In 1969 though, all US Navy F-10’s were retired and used for testing on the new avionics systems that were implemented into the F-14 Tomcats. The Marines used their F-10’s until May of 1970.
Media
Excellent additions to the article would be video guides, screenshots from the game, and photos.
See also
Links to the articles on the War Thunder Wiki that you think will be useful for the reader, for example:
- reference to the series of the aircraft;
- links to approximate analogues of other nations and research trees.
External links
Paste links to sources and external resources, such as:
- topic on the official game forum;
- encyclopedia page on the aircraft;
- other literature.
| USA jet aircraft | |
|---|---|
| Fighters | |
| F-4 | F-4C Phantom II · F-4E Phantom II · F-4J Phantom II · F-4S Phantom II |
| F-5 | F-5A · F-5C · F-5E · F-20A |
| F-8 | F8U-2 · F-8E |
| F-80 | F-80A-5 · F-80C-10 |
| F-84 | F-84B-26 · F-84F · F-84G-21-RE |
| F-86 | F-86A-5 · F-86F-25 · F-86F-2 · F-86F-35 |
| F-89 | F-89B · F-89D |
| F-100 | F-100D |
| F-104 | F-104A · F-104C |
| F-14 | F-14A Early · F-14B |
| F-15 | F-15A |
| F-16 | F-16A · F-16A ADF · F-16C |
| F9F | F9F-2 · F9F-5 · F9F-8 |
| Other | P-59A · F2H-2 · F3D-1 · F3H-2 · F4D-1 · F11F-1 |
| Strike Aircraft | |
| FJ-4 | FJ-4B · FJ-4B VMF-232 |
| A-4 | A-4B · A-4E Early |
| A-6 | A-6E TRAM |
| A-7 | A-7D · A-7E · A-7K |
| AV-8 | AV-8A · AV-8C |
| A-10 | A-10A · A-10A Late |
| B-57 | B-57A · B-57B |
| F-105 | F-105D |
| F-111 | F-111A |
