Difference between revisions of "T-69 II G"
Colok76286 (talk | contribs) (→Modules: Added missing modules + added premium banner) |
CLOSE_RANGE (talk | contribs) (Fleshed out most of the article. Will take care of the ammo racks later. I don't have info on the crew skills.) |
||
| Line 6: | Line 6: | ||
{{Break}} | {{Break}} | ||
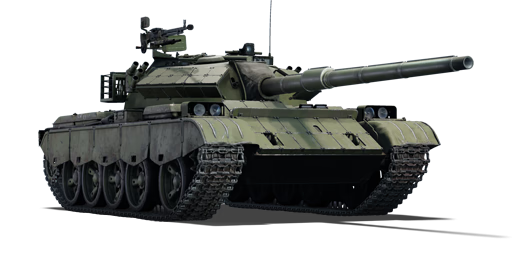
The '''{{Specs|name}}''' is a premium gift rank {{Specs|rank}} Chinese medium tank {{Battle-rating}}. It was introduced in [[Update "Starfighters"]]. | The '''{{Specs|name}}''' is a premium gift rank {{Specs|rank}} Chinese medium tank {{Battle-rating}}. It was introduced in [[Update "Starfighters"]]. | ||
| + | |||
| + | An improved derivative of the [[Type 69]], the T-69 II G is one of many Chinese tanks hailing from the lineage of the original [[Type 59]], itself a version of the Soviet T-54. The vehicle represented in War Thunder is an early version of the II G as initially exported to Bangladesh. While this one lacks the more well-known upgrades (e.g. thermal sights, 850 hp engine) later applied to it in Bangladeshi service, it still has a few tricks up its sleeve and makes a good accompaniment to the similar [[ZTZ59D1]]. | ||
== General info == | == General info == | ||
=== Survivability and armour === | === Survivability and armour === | ||
<!-- ''Describe armour protection. Note the most well protected and key weak areas. Appreciate the layout of modules as well as the number and location of crew members. Is the level of armour protection sufficient, is the placement of modules helpful for survival in combat? If necessary use a visual template to indicate the most secure and weak zones of the armour.'' --> | <!-- ''Describe armour protection. Note the most well protected and key weak areas. Appreciate the layout of modules as well as the number and location of crew members. Is the level of armour protection sufficient, is the placement of modules helpful for survival in combat? If necessary use a visual template to indicate the most secure and weak zones of the armour.'' --> | ||
| − | + | ||
| + | The armor layout of the T-69 II G is very similar to the [[ZTZ59D1]]. The base armor underneath the ERA is exactly the same as the original [[T-54 (1951)]]. The turret ERA setup is identical to the 59D1, but the hull ERA setup differs. The coverage is better, no longer having gaps around the tow cable attachment points, but there is no longer any notable kinetic protection. These differences are relatively minor and unlikely to cause significant changes in gameplay. | ||
| + | |||
| + | Post-penetration survivability is still not great, but the ammo rack next to the driver at least features wet storage like the [[Type 69]]. The tank is cramped and penetrating hits are likely to take out more than one crew member. When the turret is pointed forwards, the driver, gunner, and commander are all lined up and can be knocked out by a single penetrating hull shot. | ||
| + | |||
| + | '''Armour type:''' | ||
| + | |||
| + | * Rolled homogeneous armour (Hull, Turret roof) | ||
| + | * Cast homogeneous armour (Turret, Gun mantlet) | ||
{| class="wikitable" | {| class="wikitable" | ||
| + | !Armour | ||
| + | !Front | ||
| + | !Sides | ||
| + | !Rear | ||
| + | !Roof | ||
|- | |- | ||
| − | + | |Hull | |
| − | | | + | |100 mm (60°) ''Front glacis'' <br>100 mm (54°) ''Lower glacis'' |
| − | | | + | |80 mm |
| − | | | + | |45 mm (16°) ''Upper'' <br>30 mm (72°) ''Lower'' |
| − | + | |30 mm ''Front''<br>20 mm ''Back'' | |
| − | |||
| − | | | ||
|- | |- | ||
| + | |Turret | ||
| + | |160 mm (14-39°) ''Turret front'' <br>200 mm (4-78°) ''Gun mantlet'' | ||
| + | |115 mm (45-50°) ''Upper''<br>155 mm (10-30°) ''Lower'' | ||
| + | |65 mm (9-35°) | ||
| + | |30 mm | ||
|} | |} | ||
| − | '''Notes:''' | + | '''Notes:''' |
| − | + | ||
| + | * Suspensions wheels and tracks are 20 mm thick | ||
=== Mobility === | === Mobility === | ||
<!-- ''Write about the mobility of the ground vehicle. Estimate the specific power and manoeuvrability, as well as the maximum speed forwards and backwards.'' --> | <!-- ''Write about the mobility of the ground vehicle. Estimate the specific power and manoeuvrability, as well as the maximum speed forwards and backwards.'' --> | ||
| − | + | ||
| + | The T-69 II G retains the same 580 horsepower engine as the Type 69. Surprisingly, the upgrades only added a half ton of weight, so the overall mobility is more or less identical and an improvement over the sluggish ZTZ59D1 in terms of power-to-weight. The reverse speed of -7 km/h is still poor and the tank cannot turn in place, so mobility is not a strong suit of this tank. It can still arrive at the battlefield reasonably quickly, but other speedy 8.7 tanks like the [[Leopard A1A1]] will arrive first. | ||
{{tankMobility}} | {{tankMobility}} | ||
| Line 36: | Line 56: | ||
=== Main armament === | === Main armament === | ||
<!-- ''Give the reader information about the characteristics of the main gun. Assess its effectiveness in a battle based on the reloading speed, ballistics and the power of shells. Do not forget about the flexibility of the fire, that is how quickly the cannon can be aimed at the target, open fire on it and aim at another enemy. Add a link to the main article on the gun: <code><nowiki>{{main|Name of the weapon}}</nowiki></code>. Describe in general terms the ammunition available for the main gun. Give advice on how to use them and how to fill the ammunition storage.'' --> | <!-- ''Give the reader information about the characteristics of the main gun. Assess its effectiveness in a battle based on the reloading speed, ballistics and the power of shells. Do not forget about the flexibility of the fire, that is how quickly the cannon can be aimed at the target, open fire on it and aim at another enemy. Add a link to the main article on the gun: <code><nowiki>{{main|Name of the weapon}}</nowiki></code>. Describe in general terms the ammunition available for the main gun. Give advice on how to use them and how to fill the ammunition storage.'' --> | ||
| − | + | ||
{{main|ZPL94 (105 mm)}} | {{main|ZPL94 (105 mm)}} | ||
| Line 48: | Line 68: | ||
|- | |- | ||
! ''Arcade'' | ! ''Arcade'' | ||
| − | | rowspan="2" | 44 || rowspan="2" | -4°/+18° || rowspan="2" | ±180° || rowspan="2" | Two-plane || | + | | rowspan="2" | 44 || rowspan="2" | -4°/+18° || rowspan="2" | ±180° || rowspan="2" | Two-plane || 19.00 || __.__ || __.__ || __.__ || __.__ || rowspan="2" | 9.7 || rowspan="2" | _.__ || rowspan="2" | _.__ || rowspan="2" | 7.5 |
|- | |- | ||
! ''Realistic'' | ! ''Realistic'' | ||
| − | | | + | | 11.90 || __.__ || __.__ || __.__ || 20.00 |
|- | |- | ||
|} | |} | ||
| Line 65: | Line 85: | ||
! 10 m !! 100 m !! 500 m !! 1,000 m !! 1,500 m !! 2,000 m | ! 10 m !! 100 m !! 500 m !! 1,000 m !! 1,500 m !! 2,000 m | ||
|- | |- | ||
| − | | Type-83 APDS || APFSDS || | + | | Type-83 APDS || APFSDS || 351 || 349 || 343 || 336 || 328 || 321 |
|- | |- | ||
| − | | DTB-1 || HE-VT || | + | | DTB-1 || HE-VT || 21 || 21 || 21 || 21 || 21 || 21 |
|- | |- | ||
| − | | Type-83 HEAT || HEATFS || | + | | Type-83 HEAT || HEATFS || 400 || 400 || 400 || 400 || 400 || 400 |
|- | |- | ||
| − | | Type-83 HESH || HESH || | + | | Type-83 HESH || HESH || 127 || 127 || 127 || 127 || 127 || 127 |
|- | |- | ||
|} | |} | ||
| Line 88: | Line 108: | ||
! 0% !! 50% !! 100% | ! 0% !! 50% !! 100% | ||
|- | |- | ||
| − | | Type-83 APDS || APFSDS || | + | | Type-83 APDS || APFSDS || 1500 || 3.79 || N/A || N/A || N/A || 78° || 80° || 81° |
|- | |- | ||
| − | | DTB-1 || HE-VT || | + | | DTB-1 || HE-VT || 825 || 16.2 || N/A || 0.1 || 1.66 || 79° || 80° || 81° |
|- | |- | ||
| − | | Type-83 HEAT || HEATFS || | + | | Type-83 HEAT || HEATFS || 1200 || 11.00 || N/A || 0.1 || 1.27 || 65° || 72° || 77° |
|- | |- | ||
| − | | Type-83 HESH || HESH || | + | | Type-83 HESH || HESH || 750 || 15.0 || 0.4 || 0.1 || 4.31 || 73° || 77° || 80° |
|- | |- | ||
|} | |} | ||
| + | |||
| + | The ZPL94 cannon is an upgraded version of the Type 83 cannon used by the ZTZ59D1, featuring a noticeably longer barrel. This improves the muzzle velocity of its ammunition, and the APFSDS penetration is increased slightly as a result. Unusually, it also has a faster reload than the 59D1's cannon by about 1 second, which is a welcome improvement. | ||
| + | |||
| + | The APFSDS round should be the primary choice of ammunition (if ammo costs are not a concern) as it has the highest muzzle velocity and is the most reliable. The HEAT-FS round may have more penetration on paper, but quite a few contemporary tanks have spaced, reactive, or even composite armor that can lessen its effectiveness or stop it entirely. Even against plain steel armor, the extra penetration compared to the APFSDS round is often overkill. It can also be prematurely detonated by bushes and fences. The HESH round has destructive after-penetration effects at the cost of awful ballistics and low penetration, in addition to being soundly countered by the aforementioned special armor types. The HEAT-FS and HESH rounds are capable of causing hull-breaks on lightly armored targets due to their explosive content. | ||
| + | |||
| + | New to the Chinese arsenal is the DTB-1 HE-VT round. It has a proximity fuse against air targets, similar to the M830A1 round available to the [[M1A2 Abrams]]. The fuse only activates after 500 meters of travel distance and has a trigger radius of 15 meters. Since the T-69 II G does not have particularly good gun handling and the 825 m/s muzzle velocity is rather low, the DTB-1 is best used against enemy helicopters as opposed to jet aircraft. Note that instant kills are rare even against unarmored helicopters and it has little to no utility against armored ground targets. That said, it is still an explosive round, so in a pinch it can be fired at SPAAs and wheeled light tanks to hull-break them. Oddly enough, it has a harder time hull-breaking targets than the HEAT-FS round despite having more explosive mass. | ||
==== [[Ammo racks]] ==== | ==== [[Ammo racks]] ==== | ||
| Line 117: | Line 143: | ||
=== Machine guns === | === Machine guns === | ||
<!-- ''Offensive and anti-aircraft machine guns not only allow you to fight some aircraft but also are effective against lightly armoured vehicles. Evaluate machine guns and give recommendations on its use.'' --> | <!-- ''Offensive and anti-aircraft machine guns not only allow you to fight some aircraft but also are effective against lightly armoured vehicles. Evaluate machine guns and give recommendations on its use.'' --> | ||
| − | + | ||
{{main|DShK (12.7 mm)|SGMT (7.62 mm)}} | {{main|DShK (12.7 mm)|SGMT (7.62 mm)}} | ||
| − | {| class="wikitable" style="text-align:center" | + | {| class="wikitable" style="text-align:center" |
| + | |- | ||
| + | ! colspan="7" | [[DShK (12.7 mm)|12.7 mm DShK]] | ||
|- | |- | ||
| − | ! colspan=" | + | ! colspan="7" | ''Pintle mount'' |
|- | |- | ||
| − | ! | + | ! colspan="4" rowspan="1" style="width:5em" |Capacity (Belt capacity) |
| + | ! rowspan="1" | Fire rate <br> (shots/minute) | ||
| + | ! rowspan="1" | Vertical <br> guidance | ||
| + | ! rowspan="1" | Horizontal <br> guidance | ||
|- | |- | ||
| − | | | | + | | colspan="4" | 250 (50) || 600 || -10°/+60° || ±180° |
|- | |- | ||
|} | |} | ||
| − | {| class="wikitable" style="text-align:center" | + | {| class="wikitable" style="text-align:center" |
| + | |- | ||
| + | ! colspan="7" | [[SGMT (7.62 mm)|7.62 mm SGMT]] | ||
|- | |- | ||
| − | ! colspan=" | + | ! colspan="7" | ''Coaxial mount'' |
|- | |- | ||
| − | ! | + | ! colspan="4" rowspan="1" style="width:5em" |Capacity (Belt capacity) |
| + | ! rowspan="1" | Fire rate <br> (shots/minute) | ||
| + | ! rowspan="1" | Vertical <br> guidance | ||
| + | ! rowspan="1" | Horizontal <br> guidance | ||
|- | |- | ||
| − | | | | + | | colspan="4" | 3,500 (250) || 600 || N/A || N/A |
|- | |- | ||
|} | |} | ||
| Line 141: | Line 177: | ||
== Usage in battles == | == Usage in battles == | ||
<!-- ''Describe the tactics of playing in the vehicle, the features of using vehicles in the team and advice on tactics. Refrain from creating a "guide" - do not impose a single point of view but instead give the reader food for thought. Describe the most dangerous enemies and give recommendations on fighting them. If necessary, note the specifics of the game in different modes (AB, RB, SB).'' --> | <!-- ''Describe the tactics of playing in the vehicle, the features of using vehicles in the team and advice on tactics. Refrain from creating a "guide" - do not impose a single point of view but instead give the reader food for thought. Describe the most dangerous enemies and give recommendations on fighting them. If necessary, note the specifics of the game in different modes (AB, RB, SB).'' --> | ||
| − | + | ||
| + | The T-69 II G is best played as a midfielder. It is better for close to medium range combat than the ZTZ59D1, since the mobility is noticeably better and the turret rotation speed is literally twice as good (20 deg/s max vs. 10 deg/s max). Rushing headfirst into combat is still not optimal since it lags behind in these two parameters compared to Leopards, AMX-30s, or Type 74s. On the other hand, the lack of a thermal sight makes long distance sniping more difficult than with the 59D1. | ||
| + | |||
| + | Since there are contemporary thermal-equipped tanks available in the Chinese tree (the [[M60A3 TTS (China)|M60A3 TTS]] and ZTZ59D1), the T-69 II G is a good choice for a first spawn. It fares better in aggressive combat than these two tanks, which tends to happen in the earlier stages of the battle. Allow speedy teammates to rush first and draw some fire, then locate opponents and deliver some powerful APFSDS to them. In the event that the T-69 is the fastest tank on the team, go for caps and keep a careful eye for enemies that might already be there or arrive shortly. Otherwise, the T-69 is a fairly rounded tank, so there are not many special strategies for it in particular. Always be on the lookout for speedy tanks like the [[Radkampfwagen 90]], which may pop out of nowhere with little warning. If the T-69 is destroyed, the M60A3 and ZTZ59D1 are good choices to switch to laid-back sniping. Be cautious when using this tank in night battles; there are enough thermal-equipped tanks at its rank that getting sniped from across the map by hidden enemies is a common occurrence, and the T-69 cannot really take a hit. | ||
| + | |||
| + | Since the T-69 is a premium tank, HE-VT rounds are available from the start and don't need to be unlocked. Look out for helicopters; players spawning in helicopters at the start of the game are mostly limited to unguided rockets for anti-tank usage. The T-69's ERA can eat up a few glancing rockets and a lucky hit from a HE-VT shell can cripple a helicopter, though multiple hits are typically required to finish the job. Do not expect to survive ATGMs, and if one is fired at the T-69, try to destroy it with machine guns. Get used to the ballistics of the round and try to place it as close as possible to the target. If the round is triggered at the edge of the proximity fuse radius, it may not do any damage at all. It also helps to stay a bit behind the front lines and/or take advantage of hills since the gun elevation angles on this tank are not the greatest. Lastly, remember that this tank has a heavy machine gun, which will do good supplemental damage against lightly armored helicopters. | ||
=== Modules === | === Modules === | ||
| Line 188: | Line 229: | ||
=== Pros and cons === | === Pros and cons === | ||
<!-- ''Summarise and briefly evaluate the vehicle in terms of its characteristics and combat effectiveness. Mark its pros and cons in a bulleted list. Try not to use more than 6 points for each of the characteristics. Avoid using categorical definitions such as "bad", "good" and the like - use substitutions with softer forms such as "inadequate" and "effective".'' --> | <!-- ''Summarise and briefly evaluate the vehicle in terms of its characteristics and combat effectiveness. Mark its pros and cons in a bulleted list. Try not to use more than 6 points for each of the characteristics. Avoid using categorical definitions such as "bad", "good" and the like - use substitutions with softer forms such as "inadequate" and "effective".'' --> | ||
| − | |||
'''Pros:''' | '''Pros:''' | ||
| − | * | + | * Long-barreled ZPL94 cannon leads to higher muzzle velocity and APFSDS penetration |
| + | * Proximity fused HE shell is nice against helicopters | ||
| + | * Faster reload and better gun handling than comparable USSR or PRC tanks | ||
| + | * ERA offers good protection against chemical rounds | ||
'''Cons:''' | '''Cons:''' | ||
| − | * | + | * Does not have thermal sights, only passive night vision |
| + | * Armor is not worth much against APFSDS | ||
| + | * Not particularly mobile | ||
| + | * Reload is still slower compared to western MBTs | ||
| + | * Poor gun depression | ||
== History == | == History == | ||
<!-- ''Describe the history of the creation and combat usage of the vehicle in more detail than in the introduction. If the historical reference turns out to be too long, take it to a separate article, taking a link to the article about the vehicle and adding a block "/History" (example: <nowiki>https://wiki.warthunder.com/(Vehicle-name)/History</nowiki>) and add a link to it here using the <code>main</code> template. Be sure to reference text and sources by using <code><nowiki><ref></ref></nowiki></code>, as well as adding them at the end of the article with <code><nowiki><references /></nowiki></code>. This section may also include the vehicle's dev blog entry (if applicable) and the in-game encyclopedia description (under <code><nowiki>=== In-game description ===</nowiki></code>, also if applicable).'' --> | <!-- ''Describe the history of the creation and combat usage of the vehicle in more detail than in the introduction. If the historical reference turns out to be too long, take it to a separate article, taking a link to the article about the vehicle and adding a block "/History" (example: <nowiki>https://wiki.warthunder.com/(Vehicle-name)/History</nowiki>) and add a link to it here using the <code>main</code> template. Be sure to reference text and sources by using <code><nowiki><ref></ref></nowiki></code>, as well as adding them at the end of the article with <code><nowiki><references /></nowiki></code>. This section may also include the vehicle's dev blog entry (if applicable) and the in-game encyclopedia description (under <code><nowiki>=== In-game description ===</nowiki></code>, also if applicable).'' --> | ||
| − | + | ||
| + | The [[Type 69]] was intended as an improved version of the [[Type 59]]. It featured a more powerful engine, two-plane stabilizer, night vision systems, and a 100 mm smoothbore gun, and production vehicles benefited from some technology reverse-engineered from [[T-62 545 (China)|a captured Soviet T-62]]. However, the Chinese military was not very satisfied with the initial Type 69 variants and only used them in small numbers. | ||
| + | |||
| + | The Type 69-II variant was ready by 1982. The main improvements were to the fire control system. The original Type 69 100 mm smoothbore gun, which was found to be rather underwhelming, was replaced with the Type 59's 100 mm cannon while retaining the stabilizer. Other differences included turret storage racks and side skirts. While the 69-II did not find much domestic use either, it was a success on the export market, being used extensively by Iraq, Pakistan, and other customers. | ||
| + | |||
| + | The Type 69-IIG was an export variant for Bangladesh. While background information about it is rather sparse, it featured a 105 mm ZPL94 cannon and a new gunner's sight that combined the day/night viewing modes and laser rangefinder. After entering Bangladeshi service, it was upgraded with a wide variety of new features, including third generation ERA protection, thermal imaging sights, gun-launched ATGM capability, and a much more powerful 850 hp engine. It continues to serve in the Bangladesh Army to the present day alongside several other Chinese export tanks, including the Type 59 and VT-1/Al-Khalid. | ||
== Media == | == Media == | ||
Revision as of 20:04, 12 June 2020
Contents
Description

The Medium Tank T-69 II G is a premium gift rank VI Chinese medium tank
with a battle rating of 9.0 (AB/RB/SB). It was introduced in Update "Starfighters".
An improved derivative of the Type 69, the T-69 II G is one of many Chinese tanks hailing from the lineage of the original Type 59, itself a version of the Soviet T-54. The vehicle represented in War Thunder is an early version of the II G as initially exported to Bangladesh. While this one lacks the more well-known upgrades (e.g. thermal sights, 850 hp engine) later applied to it in Bangladeshi service, it still has a few tricks up its sleeve and makes a good accompaniment to the similar ZTZ59D1.
General info
Survivability and armour
The armor layout of the T-69 II G is very similar to the ZTZ59D1. The base armor underneath the ERA is exactly the same as the original T-54 (1951). The turret ERA setup is identical to the 59D1, but the hull ERA setup differs. The coverage is better, no longer having gaps around the tow cable attachment points, but there is no longer any notable kinetic protection. These differences are relatively minor and unlikely to cause significant changes in gameplay.
Post-penetration survivability is still not great, but the ammo rack next to the driver at least features wet storage like the Type 69. The tank is cramped and penetrating hits are likely to take out more than one crew member. When the turret is pointed forwards, the driver, gunner, and commander are all lined up and can be knocked out by a single penetrating hull shot.
Armour type:
- Rolled homogeneous armour (Hull, Turret roof)
- Cast homogeneous armour (Turret, Gun mantlet)
| Armour | Front | Sides | Rear | Roof |
|---|---|---|---|---|
| Hull | 100 mm (60°) Front glacis 100 mm (54°) Lower glacis |
80 mm | 45 mm (16°) Upper 30 mm (72°) Lower |
30 mm Front 20 mm Back |
| Turret | 160 mm (14-39°) Turret front 200 mm (4-78°) Gun mantlet |
115 mm (45-50°) Upper 155 mm (10-30°) Lower |
65 mm (9-35°) | 30 mm |
Notes:
- Suspensions wheels and tracks are 20 mm thick
Mobility
The T-69 II G retains the same 580 horsepower engine as the Type 69. Surprisingly, the upgrades only added a half ton of weight, so the overall mobility is more or less identical and an improvement over the sluggish ZTZ59D1 in terms of power-to-weight. The reverse speed of -7 km/h is still poor and the tank cannot turn in place, so mobility is not a strong suit of this tank. It can still arrive at the battlefield reasonably quickly, but other speedy 8.7 tanks like the Leopard A1A1 will arrive first.
| Game Mode | Max Speed (km/h) | Weight (tons) | Engine power (horsepower) | Power-to-weight ratio (hp/ton) | |||
|---|---|---|---|---|---|---|---|
| Forward | Reverse | Stock | Upgraded | Stock | Upgraded | ||
| Arcade | 56 | 9 | 37 | _,___ | 1,107 | __.__ | 29.92 |
| Realistic | 51 | 8 | _,___ | 580 | __.__ | 15.68 | |
Armaments
Main armament
| 105 mm ZPL94 | Turret rotation speed (°/s) | Reloading rate (seconds) | |||||||||||
|---|---|---|---|---|---|---|---|---|---|---|---|---|---|
| Mode | Capacity | Vertical | Horizontal | Stabilizer | Stock | Upgraded | Full | Expert | Aced | Stock | Full | Expert | Aced |
| Arcade | 44 | -4°/+18° | ±180° | Two-plane | 19.00 | __.__ | __.__ | __.__ | __.__ | 9.7 | _.__ | _.__ | 7.5 |
| Realistic | 11.90 | __.__ | __.__ | __.__ | 20.00 | ||||||||
Ammunition
| Penetration statistics | |||||||
|---|---|---|---|---|---|---|---|
| Ammunition | Type of warhead |
Penetration @ 0° Angle of Attack (mm) | |||||
| 10 m | 100 m | 500 m | 1,000 m | 1,500 m | 2,000 m | ||
| Type-83 APDS | APFSDS | 351 | 349 | 343 | 336 | 328 | 321 |
| DTB-1 | HE-VT | 21 | 21 | 21 | 21 | 21 | 21 |
| Type-83 HEAT | HEATFS | 400 | 400 | 400 | 400 | 400 | 400 |
| Type-83 HESH | HESH | 127 | 127 | 127 | 127 | 127 | 127 |
| Shell details | |||||||||
|---|---|---|---|---|---|---|---|---|---|
| Ammunition | Type of warhead |
Velocity (m/s) |
Projectile Mass (kg) |
Fuse delay (m) |
Fuse sensitivity (mm) |
Explosive Mass (TNT equivalent) (g) |
Ricochet | ||
| 0% | 50% | 100% | |||||||
| Type-83 APDS | APFSDS | 1500 | 3.79 | N/A | N/A | N/A | 78° | 80° | 81° |
| DTB-1 | HE-VT | 825 | 16.2 | N/A | 0.1 | 1.66 | 79° | 80° | 81° |
| Type-83 HEAT | HEATFS | 1200 | 11.00 | N/A | 0.1 | 1.27 | 65° | 72° | 77° |
| Type-83 HESH | HESH | 750 | 15.0 | 0.4 | 0.1 | 4.31 | 73° | 77° | 80° |
The ZPL94 cannon is an upgraded version of the Type 83 cannon used by the ZTZ59D1, featuring a noticeably longer barrel. This improves the muzzle velocity of its ammunition, and the APFSDS penetration is increased slightly as a result. Unusually, it also has a faster reload than the 59D1's cannon by about 1 second, which is a welcome improvement.
The APFSDS round should be the primary choice of ammunition (if ammo costs are not a concern) as it has the highest muzzle velocity and is the most reliable. The HEAT-FS round may have more penetration on paper, but quite a few contemporary tanks have spaced, reactive, or even composite armor that can lessen its effectiveness or stop it entirely. Even against plain steel armor, the extra penetration compared to the APFSDS round is often overkill. It can also be prematurely detonated by bushes and fences. The HESH round has destructive after-penetration effects at the cost of awful ballistics and low penetration, in addition to being soundly countered by the aforementioned special armor types. The HEAT-FS and HESH rounds are capable of causing hull-breaks on lightly armored targets due to their explosive content.
New to the Chinese arsenal is the DTB-1 HE-VT round. It has a proximity fuse against air targets, similar to the M830A1 round available to the M1A2 Abrams. The fuse only activates after 500 meters of travel distance and has a trigger radius of 15 meters. Since the T-69 II G does not have particularly good gun handling and the 825 m/s muzzle velocity is rather low, the DTB-1 is best used against enemy helicopters as opposed to jet aircraft. Note that instant kills are rare even against unarmored helicopters and it has little to no utility against armored ground targets. That said, it is still an explosive round, so in a pinch it can be fired at SPAAs and wheeled light tanks to hull-break them. Oddly enough, it has a harder time hull-breaking targets than the HEAT-FS round despite having more explosive mass.
Ammo racks
| Full ammo |
1st rack empty |
2nd rack empty |
3rd rack empty |
4th rack empty |
5th rack empty |
6th rack empty |
Visual discrepancy |
|---|---|---|---|---|---|---|---|
| 44 | __ (+__) | __ (+__) | __ (+__) | __ (+__) | __ (+__) | __ (+__) | __ |
Machine guns
| 12.7 mm DShK | ||||||
|---|---|---|---|---|---|---|
| Pintle mount | ||||||
| Capacity (Belt capacity) | Fire rate (shots/minute) |
Vertical guidance |
Horizontal guidance | |||
| 250 (50) | 600 | -10°/+60° | ±180° | |||
| 7.62 mm SGMT | ||||||
|---|---|---|---|---|---|---|
| Coaxial mount | ||||||
| Capacity (Belt capacity) | Fire rate (shots/minute) |
Vertical guidance |
Horizontal guidance | |||
| 3,500 (250) | 600 | N/A | N/A | |||
Usage in battles
The T-69 II G is best played as a midfielder. It is better for close to medium range combat than the ZTZ59D1, since the mobility is noticeably better and the turret rotation speed is literally twice as good (20 deg/s max vs. 10 deg/s max). Rushing headfirst into combat is still not optimal since it lags behind in these two parameters compared to Leopards, AMX-30s, or Type 74s. On the other hand, the lack of a thermal sight makes long distance sniping more difficult than with the 59D1.
Since there are contemporary thermal-equipped tanks available in the Chinese tree (the M60A3 TTS and ZTZ59D1), the T-69 II G is a good choice for a first spawn. It fares better in aggressive combat than these two tanks, which tends to happen in the earlier stages of the battle. Allow speedy teammates to rush first and draw some fire, then locate opponents and deliver some powerful APFSDS to them. In the event that the T-69 is the fastest tank on the team, go for caps and keep a careful eye for enemies that might already be there or arrive shortly. Otherwise, the T-69 is a fairly rounded tank, so there are not many special strategies for it in particular. Always be on the lookout for speedy tanks like the Radkampfwagen 90, which may pop out of nowhere with little warning. If the T-69 is destroyed, the M60A3 and ZTZ59D1 are good choices to switch to laid-back sniping. Be cautious when using this tank in night battles; there are enough thermal-equipped tanks at its rank that getting sniped from across the map by hidden enemies is a common occurrence, and the T-69 cannot really take a hit.
Since the T-69 is a premium tank, HE-VT rounds are available from the start and don't need to be unlocked. Look out for helicopters; players spawning in helicopters at the start of the game are mostly limited to unguided rockets for anti-tank usage. The T-69's ERA can eat up a few glancing rockets and a lucky hit from a HE-VT shell can cripple a helicopter, though multiple hits are typically required to finish the job. Do not expect to survive ATGMs, and if one is fired at the T-69, try to destroy it with machine guns. Get used to the ballistics of the round and try to place it as close as possible to the target. If the round is triggered at the edge of the proximity fuse radius, it may not do any damage at all. It also helps to stay a bit behind the front lines and/or take advantage of hills since the gun elevation angles on this tank are not the greatest. Lastly, remember that this tank has a heavy machine gun, which will do good supplemental damage against lightly armored helicopters.
Modules
| Tier | Mobility | Protection | Firepower | |||
|---|---|---|---|---|---|---|
| I | Tracks | Parts | Horizontal Drive | Type-83 HESH | ||
| II | Suspension | Brake System | FPE | Adjustment of Fire | DTB-1 | Laser rangefinder |
| III | Filters | Crew Replenishment | Elevation Mechanism | Smoke grenade | NVD | |
| IV | Transmission | Engine | ESS | Artillery Support | Type-83 APDS | |
| This is a premium vehicle: all modifications are unlocked on purchase | ||||||
Pros and cons
Pros:
- Long-barreled ZPL94 cannon leads to higher muzzle velocity and APFSDS penetration
- Proximity fused HE shell is nice against helicopters
- Faster reload and better gun handling than comparable USSR or PRC tanks
- ERA offers good protection against chemical rounds
Cons:
- Does not have thermal sights, only passive night vision
- Armor is not worth much against APFSDS
- Not particularly mobile
- Reload is still slower compared to western MBTs
- Poor gun depression
History
The Type 69 was intended as an improved version of the Type 59. It featured a more powerful engine, two-plane stabilizer, night vision systems, and a 100 mm smoothbore gun, and production vehicles benefited from some technology reverse-engineered from a captured Soviet T-62. However, the Chinese military was not very satisfied with the initial Type 69 variants and only used them in small numbers.
The Type 69-II variant was ready by 1982. The main improvements were to the fire control system. The original Type 69 100 mm smoothbore gun, which was found to be rather underwhelming, was replaced with the Type 59's 100 mm cannon while retaining the stabilizer. Other differences included turret storage racks and side skirts. While the 69-II did not find much domestic use either, it was a success on the export market, being used extensively by Iraq, Pakistan, and other customers.
The Type 69-IIG was an export variant for Bangladesh. While background information about it is rather sparse, it featured a 105 mm ZPL94 cannon and a new gunner's sight that combined the day/night viewing modes and laser rangefinder. After entering Bangladeshi service, it was upgraded with a wide variety of new features, including third generation ERA protection, thermal imaging sights, gun-launched ATGM capability, and a much more powerful 850 hp engine. It continues to serve in the Bangladesh Army to the present day alongside several other Chinese export tanks, including the Type 59 and VT-1/Al-Khalid.
Media
Excellent additions to the article would be video guides, screenshots from the game, and photos.
See also
Links to the articles on the War Thunder Wiki that you think will be useful for the reader, for example:
- reference to the series of the vehicles;
- links to approximate analogues of other nations and research trees.
External links
| China medium tanks | |
|---|---|
| ZTZ59 | Type 59 · ZTZ59A · ZTZ59D1 |
| ZTZ69 | Type 69 · Type 69-IIa · T-69 II G |
| ZTZ88/96 | ZTZ88A · ZTZ88B |
| ZTZ96 · ZTZ96A · ZTZ96A (P) | |
| ZTZ99 | ZTZ99-II · ZTZ99-III |
| ZTZ99A | ZTZ99A · WZ1001(E) LCT |
| Export series | MBT2000 · VT-4A1 |
| ROC | CM11 |
| Other | Т-34-85 Gai · Object 122MT "MC" |
| Japan | ␗Chi-Ha · ␗Chi-Ha Kai |
| USA | ␗M4A4 · ␗M4A4 (1st PTG) · ␗M4A1 (75) W · ␗M48A1 · ␗M60A3 TTS |
| USSR | ␗T-34 (1943) · ␗Т-34-85 (S-53) · T-34-85 No.215 · Т-62 №545 |
| China premium ground vehicles | |
|---|---|
| Light tanks | T-26 No.531 · ␗M3A3 (1st PTG) · ␗M41A3 · M64 · WMA301 |
| Medium tanks | ␗M4A4 (1st PTG) · T-34-85 No.215 · Т-62 №545 · ZTZ59A · Type 69-IIa · T-69 II G · ZTZ96A (P) |
| Heavy tanks | IS-2 No.402 |
