T-69 II G

From War Thunder Wiki
Jump to: navigation, search
Rank VI | Premium | Golden Eagles
Challenger DS Pack
T-69 II G
cn_type_69_2g.png
GarageImage T-69 II G.jpg
T-69 II G WebsiteImage 1.jpg
StoreImage T-69 II G 002.jpg
StoreImage T-69 II G 004.jpg
T-69 II G
AB RB SB
9.0 9.0 9.0
Purchase:9 090 Specs-Card-Eagle.png
Show in game

Description

The Medium Tank T-69 II G is a Bangladeshi upgrade to their fleet of T-69 tanks (Type 69-IIM, industry code WZ121H), most likely inspired by the modifications performed by Pakistan as the Type 69-IIMA (WZ121K); these tanks underwent upgrades sometime between 2007 and 2009 with a new long-barrel 105 mm cannon, ERA packages on both the UFP and turret and likely FCS upgrades, especially for the optics. The tank was first seen in 2009 during the BDR mutiny. The upgrade served as an economic alternative to extend the service life of the Type 69 tanks. Later these tanks supported the newly bought MBT2000 tanks before T-59G Dujoy (Invincible; দুর্জয়) or VT-5 joined the army.

It was introduced in Update "Starfighters" as a premium pack in the Gaijin store. It was removed from sale after the 2022 May sale. The T-69 II G has since been briefly made available for purchase in-game with Golden Eagles Ge icon.png for the 2022 and 2023 Chinese "People's Liberation Army Day" mini-events.

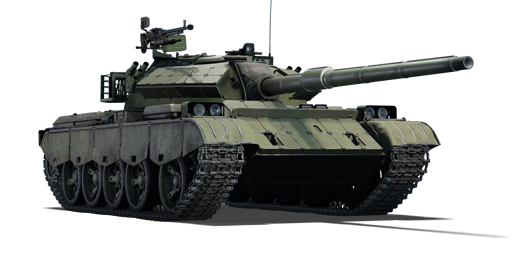
T-69 II G is an improved derivative of the Type 69, it is one of many Chinese tanks hailing from the lineage of the original Type 59, itself a version of the Soviet T-54. It has a few tricks up its sleeve and makes a good companion to the similar ZTZ59D1; while the kinetic protection or the mobility are not the best among other medium tanks/MBTs, the ERA packages will often save the tank from lower-tier chemical shells (HEATFS, missiles) while the high-velocity main cannon makes sure to make an impact on enemy targets. Players should be extra careful not to field the tank at the beginning of battle, as well as make sure to disable the enemy with the first shot, due to its inferior reload rate and reaction time.

General info

Survivability and armour

ERA
Effective action against the cumulative ammunition
Smoke grenades
Creation of a smoke screen in front of the vehicle
ESS
Creation of a smoke screen in the direction of movement of the vehicle
Armourfront / side / back
Hull100 / 80 / 45
Turret200 / 155 / 65
Crew4 people
Visibility85 %

The armour layout of the T-69 II G is very similar to the ZTZ59D1. The base armour underneath the ERA is exactly the same as the original T-54 (1951). The turret ERA setup is identical to the 59D1, but the hull ERA setup differs. The coverage is much better, no longer having huge gaps around the tow cable attachment points, but there is no longer any notable kinetic protection, so APDS and APFSDS rounds will go through unimpeded. Seeing as how the ZTZ59D1 requires a healthy dose of luck for its hull ERA to function at all, the T-69 II G's more consistent chemical protection can be considered a reasonable sidegrade.

Post-penetration survivability is still not great, but the ammo rack next to the driver at least features wet storage like the Type 69. The tank is cramped and penetrating hits are likely to take out more than one crew member. When the turret is pointed forwards, the driver, gunner, and commander are all lined up and can be knocked out by a single penetrating hull shot.

Sometimes, if you are lucky, you will survive a penetrating shot that knocked out your gunner / driver, and your fate depends on whether if you can fight back/retreat before the enemy loads the second shell. If your crew cannot replace the dead gunner / driver on time, a split second late and you will certainly get destroyed by the next shell. Therefore it is recommended to max out the "Agility" skill on every crew, it might save your life one day.

Armour type:

  • Rolled homogeneous armour (Hull, Turret roof)
  • Cast homogeneous armour (Turret, Gun mantlet)
Armour Front (Slope angle) Sides Rear Roof
Hull 100 mm (60°) Front glacis
100 mm (54°) Lower glacis
80 mm 45 mm (16°) Upper
30 mm (72°) Lower
30 mm Front
20 mm Back
Turret 160 mm (14-39°) Turret front
200 mm (4-78°) Gun mantlet
115 mm (45-50°) Upper
155 mm (10-30°) Lower
65 mm (9-35°) 30 mm

Notes:

  • Suspensions wheels and tracks are 20 mm thick

Mobility

Speedforward / back
AB56 / 9 km/h
RB and SB51 / 8 km/h
Number of gears5 forward
1 back
Weight37.0 t
Engine power
AB1 107 hp
RB and SB580 hp
Power-to-weight ratio
AB29.9 hp/t
RB and SB15.7 hp/t
Game Mode Max Speed (km/h) Weight (tons) Engine power (horsepower) Power-to-weight ratio (hp/ton)
Forward Reverse Stock Upgraded Stock Upgraded
Arcade 56 9 37 899 1,107 24.3 29.92
Realistic 51 8 513 580 13.86 15.68

The T-69 II G retains the same 580 horsepower engine as the Type 69. Surprisingly, the upgrades only added a half ton of weight, so the overall mobility is more or less identical and an improvement over the sluggish ZTZ59D1 in terms of power-to-weight. The reverse speed of -7 km/h is still poor and the tank cannot turn in place, so mobility is not a strong suit of this tank. It can still arrive at the battlefield reasonably quickly, but other speedy 8.7 tanks like the Leopard A1A1 will arrive first.

Modifications and economy

Repair cost
AB3 149 Sl icon.png
RB3 362 Sl icon.png
SB4 100 Sl icon.png
Crew training10 000 Sl icon.png
Experts1 010 000 Sl icon.png
Aces2 100 Ge icon.png
Research Aces2 020 000 Rp icon.png
Reward for battleAB / RB / SB
Talisman.png 2 × 150 / 210 / 250 % Sl icon.png
Talisman.png 2 × 226 / 226 / 226 % Rp icon.png
Modifications
Mobility Protection Firepower
Mods new tank traks.png
Tracks
Mods new tank suspension.png
Suspension
Mods new tank break.png
Brake System
Mods new tank filter.png
Filters
Mods new tank transmission.png
Transmission
Mods new tank engine.png
Engine
Mods tank tool kit.png
Improved Parts
Mods extinguisher.png
Improved FPE
Mods tank reinforcement cn.png
Crew Replenishment
Mods engine smoke screen system.png
ESS
Mods new tank horizontal aiming.png
Horizontal Drive
Mods tank ammo.png
105mm_TYPE83_HESH_ammo_pack
Mods night vision device.png
NVD
Mods tank cannon.png
Adjustment of Fire
Mods tank ammo.png
105mm_china_HE_VT_ammo_pack
Mods tank laser rangefinder.png
Laser rangefinder
Mods new tank vertical aiming.png
Elevation Mechanism
Mods tank ammo.png
105mm_china_APDS_FS_ammo_pack
Mods smoke screen.png
Smoke grenade
Mods art support.png
Artillery Support

Armaments

Laser rangefinder
Reduces the error and increases the maximum measurable distance of the rangefinder
Night vision device
Improves visibility by enhancing natural light or active illumination.

Main armament

Two-plane stabilizer
Reduces the swing of the gun in two planes while moving
Ammunition44 rounds
First-order19 rounds
Reloadbasic crew → aces
9.7 → 7.5 s
Vertical guidance-4° / 18°
Main article: ZPL94 (105 mm)

The ZPL94 cannon is an upgraded version of the Type 83 cannon used by the ZTZ59D1, featuring a noticeably longer barrel. This improves the muzzle velocity of its ammunition, and the APFSDS penetration is increased slightly as a result. Unusually, it also has a faster reload than the 59D1's cannon by about 1 second, which is a welcome improvement.

The T-69 II G's optics are a fixed 6x zoom with a 12 degree field of view. This is a comfortable setting for medium range engagements, but players used to the typical 3.5-7.5x zoom and 21-10 degree FOV of the Type 59 family may find it less convenient for close quarters.

The -4° gun depression might look too poor, but due to the low height of the vehicle it is actually enough for quite some not-so-hilly terrains. On gentle hills the T-69 can peek over safely, exposing only the turret for hull down, for example certain spots in Jungle and Frozen Pass. However, this gun depression is still not great in very hilly maps like Karelia, forcing the player to ditch the hull down tactic.

105 mm ZPL94 Turret rotation speed (°/s) Reloading rate (seconds)
Mode Capacity Vertical Horizontal Stabilizer Stock Upgraded Full Expert Aced Stock Full Expert Aced
Arcade 44 -4°/+18° ±180° Two-plane 19.0 26.4 32.0 35.4 37.6 9.75 8.63 7.95 7.50
Realistic 11.9 14.0 17.0 18.8 20.0

Ammunition

The APFSDS round should be the primary choice of ammunition (if ammo costs are not a concern) as it has the highest muzzle velocity and is the most reliable. The HEATFS round may have more penetration on paper, but quite a few contemporary tanks have spaced, reactive, or even composite armour that can lessen its effectiveness or stop it entirely. Even against plain steel armour, the extra penetration compared to the APFSDS round is often overkill. It can also be prematurely detonated by bushes and fences. The HESH round has destructive post-penetration effects at the cost of awful ballistics and low penetration, in addition to being soundly countered by the aforementioned special armour types. The HEATFS and HESH rounds are capable of causing overpressure damage to lightly armoured targets due to their explosive content.

New to the Chinese arsenal is the DTB-1 HE-VT round. It has a proximity fuse against air targets, similar to the WZ305's DKY-1 HE-VT rounds. The fuse only activates after 500 m of travel distance and has a trigger radius of 15 m. Since the T-69 II G does not have particularly good gun handling and the 825 m/s muzzle velocity is rather low, DTB-1 is best used against enemy helicopters as opposed to jet aircraft. It is ineffective against armoured ground targets because it only has 1.66 kg of TNT equivalent. In an emergency it can be fired at SPAAs and other lightly armoured vehicles in hopes of knocking them out with overpressure.

Penetration statistics
Ammunition Type of
warhead
Penetration @ 0° Angle of Attack (mm)
10 m 100 m 500 m 1,000 m 1,500 m 2,000 m
Type-83 HEAT HEATFS 400 400 400 400 400 400
DTB-1 HE-VT* 23 23 22 21 21 21
Type-83 HESH HESH 127 127 127 127 127 127
Type-83 APDS APFSDS 351 349 343 336 328 321
Shell details
Ammunition Type of
warhead
Velocity
(m/s)
Projectile
mass (kg)
Fuse delay
(m)
Fuse sensitivity
(mm)
Explosive mass
(TNT equivalent) (kg)
Ricochet
0% 50% 100%
Type-83 HEAT HEATFS 1,200 11 0.05 0.1 1.27 65° 72° 77°
Type-83 HESH HESH 750 11.2 0.1 4 4.31 73° 77° 80°
Type-83 APDS APFSDS 1,500 4.2 - - - 78° 80° 81°
Proximity-fused shell details
Ammunition Type of
warhead
Velocity
(m/s)
Projectile
mass (kg)
Fuse delay
(m)
Fuse sensitivity
(mm)
Arming
distance (m)
Trigger
radius (m)
Explosive mass
(TNT equivalent) (kg)
Ricochet
0% 50% 100%
DTB-1 HE-VT* 825 16.2 0.2 0.1 500 15 1.66 79° 80° 81°

Ammo racks

Ammo racks of the T-69 II G
Full
ammo
1st
rack empty
2nd
rack empty
3rd
rack empty
4th
rack empty
5th
rack empty
6th
rack empty
Visual
discrepancy
44 42 (+2) 38 (+6) 34 (+10) 22 (+22) 20 (+24) (+43) No

Notes:

  • Ammo rack #5 is located in the left of the fighting compartment, opposite of ammo rack #3.

As mentioned before, the T-69 II G's ammo storage is not very tidy. Taking 38 rounds or less will empty the turret, which prevents turret penetrations from being fatal. Taking 20 rounds or less will empty the fighting compartment, leaving up to 19 rounds in the first-stage "wet" ammo rack (#6 in the diagram) next to the driver and 1 inside of the gun. This is the safest configuration, but emptying the fighting compartment completely is less of a concern since hull penetrations will typically cause a lot of damage to the T-69 regardless due to its cramped nature. Still, do not take more ammunition than necessary.

Machine guns

12.7 mm Type 54 machine gun
Ammunition500 rounds
Belt capacity50 rounds
Reloadbasic crew → aces
10.4 → 8.0 s
Fire rate600 shots/min
Vertical guidance-4° / 82°
7.62 mm Type 59 machine gun (coaxial)
Ammunition3 000 rounds
Belt capacity250 rounds
Reloadbasic crew → aces
10.4 → 8.0 s
Fire rate600 shots/min

The T-69 features two MGs: one roof-mounted 12.7 mm heavy MG, and a 7.62 mm coaxial MG. The 12.7 mm MG, with its maximum penetration of around 30 mm, can do quite well against poorly armoured vehicles such as the R3 T20 / T106, and the AUBL 74. It can also damage or even destroy the opponent's gun barrel or track with around 5 seconds of continuous fire. Against low-flying aircraft it can easily get you some critical hits with the correct lead. However its magazine empties very quickly and it does not carry enough ammo for prolonged MG fire comparing to the infamous M2HB.

The 7.62 mm, on the other hand, can only damage fully exposed crew which are not commonly seen at this BR, or clear up light obstacles. Its low penetration greatly limits its usage in battles.

12.7 mm Type 54
Mount Capacity (Belt) Fire rate Vertical Horizontal
Pintle 500 (50) 600 -4°/+82° ±180°
7.62 mm Type 59
Mount Capacity (Belt) Fire rate Vertical Horizontal
Coaxial 3,000 (250) 600 - -

Usage in battles

The T-69 II G is best played as a midfielder. It is better for close to medium range combat than the ZTZ59D1, since the mobility is noticeably better and the turret rotation speed is literally twice as good (20 deg/s max vs. 10 deg/s max). Rushing headfirst into combat is still not optimal since it lags behind in these two parameters compared to Leopards, AMX-30s, or Type 74s. On the other hand, the lack of a thermal sight makes long distance sniping more difficult than with the 59D1.

Since there are contemporary thermal-equipped tanks available in the Chinese tree (the M60A3 TTS and ZTZ59D1), the T-69 II G is a good choice for a first spawn. It fares better in aggressive combat than these two tanks, which tends to happen in the earlier stages of the battle. At the start of a match, for safety reasons, follow behind speedy teammates when rushing a cap point and let them draw some fire, then locate the opponents and deliver some powerful APFSDS to them. The reason to do so is because there are always faster opponents (e.g. Type 74G, KPz-70, Leopard I, etc) who do not cap the point first, rather they set up ambush next to a point and target whoever is coming, for example in complex maps like Cargo Port or Sweden. If you lead the rush, you will be their first victim. In the event that the T-69 is the fastest tank on the team, go for caps and keep a careful eye for enemies that might already be there or arrive shortly. Otherwise, the T-69 is a fairly rounded tank, so there are not many special strategies for it in particular. Always be on the lookout for speedy tanks like the Radkampfwagen 90, which may pop out of nowhere with little warning. If the T-69 is destroyed, the M60A3 and ZTZ59D1 are good choices to switch to laid-back sniping.

Although the T-69 performs very poorly in night battles, it might still get some kills if you are willing to try. It is equipped with a night vision device which somewhat helps your vision. In a large, flat and open map, find a smooth crater to stay within so you only need to expose your turret. Then be patient, use the binoculars and scan the battlefield. A night battle with such maps usually result in the two teams sniping & flanking each other from across the map (1.5-2.5 km apart), so if you stay hidden you will not likely to get spotted/shot at by thermal-equipped tanks (e.g. Leopard A1A1 (L/44), Type 74G). Sniping is a safer option, as the T-69 does not have the mobility or good optics to flank effectively. With the help of your night vision device, projectiles should be fairly visible. Track where your teammates' shells land, that is usually where the enemies hide. You will see a sudden flash of the muzzle as an enemy fires, find out the range of the muzzle flash with your laser rangefinder, carefully adjust your aim and fire. The T-69's APFSDS retains an impressive penetration of 300+ mm over 2 km which is enough to frontally penetrate any tank you will face. Constantly pay attention to any markers on the screen and minimap, to minimise the possibility of getting flanked. Do not poke out and shoot if you must expose your entire tank, as that will make yourself a noticeable white patch for a thermal optic. However, regardless of how careful you play, getting sniped from across the map by hidden enemies is still a common occurrence, and the T-69 cannot really take a hit, though the ERA might save you from HEAT-FS/missile once or twice.

Since the T-69 is a premium tank, HE-VT rounds are available from the start and don't need to be unlocked. Look out for helicopters; players spawning in helicopters at the start of the game are mostly limited to unguided rockets for anti-tank usage. The T-69's ERA can eat up a few glancing rockets and a lucky hit from a HE-VT shell can cripple a helicopter, though another hit might be required to finish the job. Use the laser rangefinder to get an accurate distance measurement and remember that the fuse does not work under 500 m. Do not expect to survive ATGMs, and if one is fired at the T-69, try to destroy it with machine guns. Get used to the ballistics of the round and try to place it as close as possible to the target. If the round is triggered at the edge of the proximity fuse radius, it may not do any damage at all. It also helps to stay a bit behind the front lines and/or take advantage of hills since the gun elevation angles on this tank are not the greatest. Lastly, remember that this tank has a heavy machine gun, which will do good supplemental damage against lightly armoured helicopters.

Against the T-69 II G:

Wheeled/light tank: vehicles such as Radkampfwagen 90 and CV 90105 have superior top speed especially on road. You can easily get to the flank of the entire enemy team and shoot the side of the T-69. If you are equipped with thermal optics then this will be even easier, as non-thermal-capable tanks such as T-69 II G will usually be less aware of your location. In a close encounter, you can circle around the T-69 as it has poor hull traverse rate and rather slow turret traverse speed, meaning it might not be able to keep up with you. If your vehicle fires HEAT as its primary shell, avoid the frontal hull and turret cheeks where ERA blocks are present.

Medium/main battle tank: It is easy to destroy a T-69 with a medium tank or a main battle tank like XM-1 and Leopard A1A1 L/44, however care must be taken as the T-69 can also easily destroy you with its powerful APFSDS. Shoot at its fighting compartment or the hull below the turret for an instant kill, as that can knock out the entire turret crew. If the T-69 faces you frontally, aim for the right side of the hull. The shell will take out the driver, gunner and commander all together.

Heavy tank: late war heavy tanks in a cold war/modern battlefield will feel outclassed, as their sturdy armour and punchy cannon that they were proud of are simply inferior in front of HEAT, APFSDS, spaced/composite armour, etc. Even the mightiest heavies like the Maus and M103 are just moving punchbags for modern technology. Therefore, when dealing with a T-69, do not poke out unless it is distracted. Its APFSDS can easily penetrate you frontally. But you can pierce through its frontal armour easily too, and given that late-war heavy tanks are usually using explosive-packed shells, you will knock out T-69s with a single shot more often than your MBT teammates who use APFSDS shells.

SPAA: almost no SPAA at this BR can frontally penetrate the T-69, but they are generally armed with fast-firing autocannons (e.g. M163, Gepard), allowing them to quickly trash the T-69's components like the roof MG, tracks, or gun barrel. With these modules destroyed by you, your teammates get the chance to finish the T-69 off effortlessly. One exception is the Falcon with its high-penetrating shells, it can penetrate the sides of the T-69. It is also a good idea to sabotage its ERA blocks on the turret cheeks and upper frontal plate, so it is easy to kill for your teammates whose primary ammunition is HEAT/ATGMs. Do not forget to drop an artillery strike on an immobilised T-69 if you can.

Pros and cons

Pros:

  • Long-barreled ZPL94 cannon leads to higher muzzle velocity and APFSDS penetration
  • Proximity fused HE shell is nice against helicopters
  • Faster reload and better gun handling than comparable USSR or PRC tanks
  • ERA offers good protection against chemical rounds that are commonly used by tanks like M551
  • Nice and broad vision through the gunsight gives good situational awareness even when sniping
  • Offers a range of different shells for different purposes: APFSDS, HE-VT, HEAT and HESH

Cons:

  • Does not have thermal sights, only passive night vision
  • Armour is not worth much against APFSDS
  • Turret ERA does not cover the front (coaxial MG port & gunsight port), offering close to no chemical protection to the front
  • Not particularly mobile; reverse speed in particular is quite slow
  • Reload is still slower compared to western MBTs
  • Poor gun depression greatly limits its capacity in hilly terrain.
  • ERA only offers one-time protection, and upon getting hit, lots of ERA will get destroyed, not just one

History

The Type 69 was intended as an improved version of the Type 59. It featured a more powerful engine, two-plane stabilizer, night vision systems, and a 100 mm smoothbore gun, and production vehicles benefited from some technology reverse-engineered from a captured Soviet T-62. However, the Chinese military was not very satisfied with the initial Type 69 variants and only used them in small numbers.

The Type 69-II variant was ready by 1982. The main improvements were to the fire control system. The original Type 69 100 mm smoothbore gun, which was found to be rather underwhelming, was replaced with the Type 59's 100 mm cannon while retaining the stabilizer. Other differences included turret storage racks and side skirts. While the 69-II did not find much domestic use either, it was a success on the export market, being used extensively by Iraq, Pakistan, and other customers.

The Type 69-IIG was an export variant for Bangladesh. While background information about it is rather sparse, it featured a 105 mm ZPL94 cannon and a new gunner's sight that combined the day/night viewing modes and laser rangefinder. After entering Bangladeshi service, it was upgraded with a wide variety of new features, including third generation ERA protection, thermal imaging sights, gun-launched ATGM capability, and a much more powerful 850 hp engine. It continues to serve in the Bangladesh Army to the present day alongside several other Chinese export tanks, including the Type 59 and VT-1/Al-Khalid.

Devblog

In 1975, China and Bangladesh established diplomatic relations and maintained a close relationship since. In 1989, Bangladesh purchased a large number of older Chinese Type 69-IIM tanks, which immediately entered service with the armed forces of Bangladesh.

Some time after their introduction to service with Bangladesh, the Chinese Type-69-IIMs underwent a major modernization program initiated by the Bangladeshi army with the support of Chinese companies. As a result, the vehicles received ERA protection, a modified domestic version of the well-known L7 105 mm cannon as well as an upgraded fire control system among other changes.

These upgraded vehicles became known under the designation 'Type 69-IIG' and the first units entered service in the mid 2000s. The Type 69-IIGs were first deployed in action as part of a response to an uprising which took place in Bangladesh's capital - Dhaka - in 2009. The vehicle has been in service with the armed forces of Bangladesh ever since and continues to serve to this day.

Media

Skins
Images
Videos

See also

External links


China North Industries Corporation - NORINCO 中国兵器工业集团有限公司
Light Tanks/IFV 
WZ501  ZBD86
WZ131  ▂Type 62 · Type 62
WZ211  Type 63 · ZTS63
WZ502  ZBD04A
Main Battle Tanks 
WZ120  Type 59 · ZTZ59A · ZTZ59D1
WZ121  Type 69 · Type 69-IIa** · T-69 II G**
WZ122  ZTZ88B · ZTZ88A · ZTZ96 · ZTZ96A · ZTZ96A (P)
WZ123  ZTZ99-II · ZTZ99-III
WZ1001  WZ1001(E) LCT · ZTZ99A
Export MBT  MBT2000** · VT-4A1**
Tank Destroyers  AFT09 · PTL02 · WMA301** · PTZ89 · ZLT11
SPH  PLZ83
SPAA  ZSD63/PG87* · WZ305** · PGZ09 · PGZ04A
  *Field modifications
  **Export vehicles

China medium tanks
ZTZ59  Type 59 · ZTZ59A · ZTZ59D1
ZTZ69  Type 69 · Type 69-IIa · T-69 II G
ZTZ88/96  ZTZ88A · ZTZ88B
  ZTZ96 · ZTZ96A · ZTZ96A (P)
ZTZ99  ZTZ99-II · ZTZ99-III
ZTZ99A  ZTZ99A · WZ1001(E) LCT
Export series  MBT2000 · VT-4A1
ROC  CM11
Other  Т-34-85 Gai · Object 122MT "MC"
Japan  ␗Chi-Ha · ␗Chi-Ha Kai
USA  ␗M4A4 · ␗M4A4 (1st PTG) · ␗M4A1 (75) W · ␗M48A1 · ␗M60A3 TTS
USSR  ␗T-34 (1943) · ␗Т-34-85 (S-53) · T-34-85 No.215 · Т-62 №545

China premium ground vehicles
Light tanks  T-26 No.531 · ␗M3A3 (1st PTG) · ␗M41A3 · M64 · WMA301
Medium tanks  ␗M4A4 (1st PTG) · T-34-85 No.215 · Т-62 №545 · ZTZ59A · Type 69-IIa · T-69 II G · ZTZ96A (P)
Heavy tanks  IS-2 No.402