Difference between revisions of "G5N1"
(Updated page template) |
|||
| Line 2: | Line 2: | ||
== Description == | == Description == | ||
| − | <!--''In the description, the first part | + | <!-- ''In the description, the first part should be about the history of and the creation and combat usage of the aircraft, as well as its key features. In the second part, tell the reader about the aircraft in the game. Insert a screenshot of the vehicle, so that if the novice player does not remember the vehicle by name, he will immediately understand what kind of vehicle the article is talking about.'' --> |
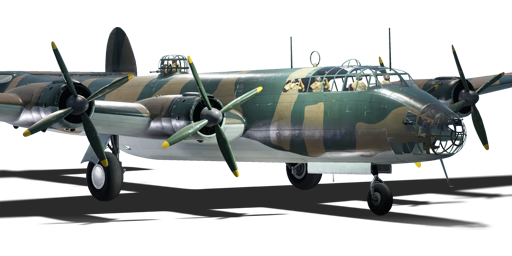
| + | [[File:GarageImage_{{PAGENAME}}.jpg|420px|thumb|left]] | ||
| + | {{Break}} | ||
| + | The '''{{Specs|name}}''' is a rank {{Specs|rank}} Japanese bomber {{Battle-rating}}. It was introduced in [[Update 1.29]]. | ||
| − | + | The G5N1 serves as one of Japan's true heavy bombers. Featuring a massive airframe and four Mitsubishi MK4B Kasei-12 fourteen-cylinder air-cooled engines, the G5N1 is easily one of the hardest planes to manoeuvre in War Thunder. It makes up for this with its massive 3,200 kg payload. Since this aircraft is so large and cumbersome, its only true purpose is destroying heavy targets. In Realistic battles, the tactics depend entirely on the map. Maps like Midway and New Guinea feature enemy airfields, which should be the main target. Other maps like Saipan have no airfields or mini base targets, so you will be forced to improvise. Since the G5N1 can carry a payload of 3,200 kg, it is possible to destroy multiple aircraft carriers. Target these instead of attempting to destroy smaller targets like tanks or pillboxes. Attacking the carriers can be a futile effort because to successfully bomb multiple carriers one needs to fly very low, thus exposing the bomber to enemy anti-aircraft fire. Try to come in on an attack run fast, because the enemy fleet will easily pick you off if traveling slowly. | |
| − | |||
| − | The ' | ||
| − | |||
== General info == | == General info == | ||
| − | === Flight | + | === Flight performance === |
| − | + | ''Describe how the aircraft behaves in the air. Speed, manoeuvrability, acceleration and allowable loads - these are the most important characteristics of the vehicle.'' | |
| − | {| class="wikitable" style="text-align:center" | + | |
| − | + | {| class="wikitable" style="text-align:center" width="70%" | |
| − | + | ! rowspan="2" | Characteristics | |
| − | |||
| − | ! | ||
| − | |||
! colspan="2" | Max Speed<br>(km/h at 7,620 m) | ! colspan="2" | Max Speed<br>(km/h at 7,620 m) | ||
| − | ! rowspan="2" | Max altitude<br>( | + | ! rowspan="2" | Max altitude<br>(metres) |
! colspan="2" | Turn time<br>(seconds) | ! colspan="2" | Turn time<br>(seconds) | ||
| − | ! colspan="2" | Rate of climb<br>( | + | ! colspan="2" | Rate of climb<br>(metres/second) |
| − | ! rowspan="2" |Take-off run<br>( | + | ! rowspan="2" | Take-off run<br>(metres) |
|- | |- | ||
| − | ! AB | + | ! AB !! RB !! AB !! RB !! AB !! RB |
| − | ! RB | ||
| − | ! AB | ||
| − | ! RB | ||
| − | ! AB | ||
| − | ! RB | ||
|- | |- | ||
| − | | | + | ! Stock |
| + | | 495 || 485 || rowspan="2" | {{Specs|ceiling}} || 25.2 || 25.9 || 4.8 || 4.8 || rowspan="2" | 489 | ||
|- | |- | ||
| − | ! | + | ! Upgraded |
| − | + | | 538 || 512 || 23.5 || 24.4 || 12.9 || 7.2 | |
| − | |||
| − | |||
| − | |||
| − | |||
| − | |||
| − | |||
| − | |||
| − | |||
| − | |||
| − | |||
| − | |||
| − | |||
| − | |||
| − | | 538 || 512 | ||
|- | |- | ||
|} | |} | ||
| − | ====Details==== | + | ==== Details ==== |
| − | {| class="wikitable" style="text-align:center" | + | {| class="wikitable" style="text-align:center" width="50%" |
|- | |- | ||
! colspan="5" | Features | ! colspan="5" | Features | ||
|- | |- | ||
| − | ! Combat | + | ! Combat flaps !! Take-off flaps !! Landing flaps !! Air brakes !! Arrestor gear |
| − | ! Take-off | ||
| − | ! Landing | ||
| − | ! Air brakes | ||
| − | ! Arrestor gear | ||
|- | |- | ||
| ✓ || ✓ || ✓ || X || X <!-- ✓ --> | | ✓ || ✓ || ✓ || X || X <!-- ✓ --> | ||
| Line 67: | Line 42: | ||
|} | |} | ||
| − | {| class="wikitable" style="text-align:center" | + | {| class="wikitable" style="text-align:center" width="50%" |
|- | |- | ||
| − | ! colspan=" | + | ! colspan="7" | Limits |
|- | |- | ||
| − | ! rowspan="2" | | + | ! rowspan="2" | Wings (km/h) |
| − | ! rowspan="2" | Gear | + | ! rowspan="2" | Gear (km/h) |
| − | ! | + | ! colspan="3" | Flaps (km/h) |
! colspan="2" | Max Static G | ! colspan="2" | Max Static G | ||
|- | |- | ||
| − | ! + | + | ! Combat !! Take-off !! Landing !! + !! - |
| − | ! - | ||
|- | |- | ||
| − | | {{Specs| | + | | {{Specs|destruction|body}} || {{Specs|destruction|gear}} || 380 || 380 || 230 || ~4 || ~3 |
|- | |- | ||
|} | |} | ||
| Line 85: | Line 59: | ||
{| class="wikitable" style="text-align:center" | {| class="wikitable" style="text-align:center" | ||
|- | |- | ||
| − | ! colspan="4" | Optimal velocities | + | ! colspan="4" | Optimal velocities (km/h) |
|- | |- | ||
| − | ! Ailerons | + | ! Ailerons !! Rudder !! Elevators !! Radiator |
| − | ! Rudder | ||
| − | ! Elevators | ||
| − | ! Radiator | ||
|- | |- | ||
| − | | < 300 || < 180 || < 270 || > | + | | < 300 || < 180 || < 270 || > 335 |
|- | |- | ||
|} | |} | ||
| Line 106: | Line 77: | ||
! WEP Engine power | ! WEP Engine power | ||
|- | |- | ||
| − | | 145 m || 6,978 hp || 7,777 hp | + | | 145 m || 6,978 hp || 7,777 hp |
|- | |- | ||
! colspan="3" | Setting 2 | ! colspan="3" | Setting 2 | ||
| Line 114: | Line 85: | ||
! WEP Engine power | ! WEP Engine power | ||
|- | |- | ||
| − | | 4,394 m || 6,394 hp || 7,127 hp | + | | 4,394 m || 6,394 hp || 7,127 hp |
|- | |- | ||
| − | |||
| − | |||
| − | |||
| − | |||
| − | |||
| − | |||
| − | |||
| − | |||
|} | |} | ||
=== Survivability and armour === | === Survivability and armour === | ||
| − | <!--''Examine the survivability of the aircraft. Note how vulnerable the structure is and how secure the pilot is, whether the fuel tanks are armoured. Describe the armour, if there is any, also mention the vulnerability of other critical aircraft systems.''--> | + | <!-- ''Examine the survivability of the aircraft. Note how vulnerable the structure is and how secure the pilot is, whether the fuel tanks are armoured, etc. Describe the armour, if there is any, and also mention the vulnerability of other critical aircraft systems.'' --> |
* Pilot's seat, 13 mm of steel protection | * Pilot's seat, 13 mm of steel protection | ||
* Copilot's seat, 13 mm of steel protection | * Copilot's seat, 13 mm of steel protection | ||
== Armaments == | == Armaments == | ||
| − | |||
| − | |||
| − | |||
| − | |||
| − | |||
| − | |||
| − | |||
| − | |||
=== Suspended armament === | === Suspended armament === | ||
| − | <!--''Describe the aircraft's suspended armament: additional cannons under the wings, bombs, rockets and torpedoes. This section is especially important for bombers and attackers. If there is no suspended weaponry remove this subsection.''--> | + | <!-- ''Describe the aircraft's suspended armament: additional cannons under the wings, bombs, rockets and torpedoes. This section is especially important for bombers and attackers. If there is no suspended weaponry remove this subsection.'' --> |
| − | + | {{main|Navy Type 97 Number 6 (60 kg)|Navy Type Number 25 Model 2 (250 kg)|Navy Type Number 80 Model 1 (800 kg)}} | |
The '''''{{PAGENAME}}''''' can be outfitted with the following ordnance: | The '''''{{PAGENAME}}''''' can be outfitted with the following ordnance: | ||
| − | * 24 x 60 kg Navy Type 97 Number 6 | + | * 24 x 60 kg Navy Type 97 Number 6 bombs (1,440 kg total) |
* 12 x 250 kg Navy Type Number 25 Model 2 bombs (3,000 kg total) | * 12 x 250 kg Navy Type Number 25 Model 2 bombs (3,000 kg total) | ||
* 4 x 800 kg Navy Type Number 80 Model 1 bombs (3,200 kg total) | * 4 x 800 kg Navy Type Number 80 Model 1 bombs (3,200 kg total) | ||
=== Defensive armament === | === Defensive armament === | ||
| − | <!--''Defensive armament with turret machine guns or cannons, crewed by gunners. Examine the number of gunners and what belts or drums are better to use. If defensive weaponry is not available, remove this subsection.''--> | + | <!-- ''Defensive armament with turret machine guns or cannons, crewed by gunners. Examine the number of gunners and what belts or drums are better to use. If defensive weaponry is not available, remove this subsection.'' --> |
| − | {{main|Type 99 Model 1 | + | {{main|Type 99 Model 1 (20 mm)|Type 97 navy (7.7 mm)}} |
The '''''{{PAGENAME}}''''' is defended by: | The '''''{{PAGENAME}}''''' is defended by: | ||
| − | * 1 x 20 mm Type 99 | + | * 1 x 20 mm Type 99 Model 1 cannon, dorsal turret (540 rpg) |
| − | * 1 x 20 mm Type 99 | + | * 1 x 20 mm Type 99 Model 1 cannon, tail turret (360 rpg) |
| − | |||
* 1 x 7.7 mm Type 97 machine gun, nose turret (679 rpg) | * 1 x 7.7 mm Type 97 machine gun, nose turret (679 rpg) | ||
| − | * 1 x 7.7 mm Type 97 machine gun, ventral turret (679 rpg) | + | * 1 x 7.7 mm Type 97 machine gun, 2 x cheek turrets (697 rpg) |
| − | * 1 x 7.7 mm Type 97 machine gun, 2 x beam turrets (582 rpg | + | * 1 x 7.7 mm Type 97 machine gun, ventral turret (679 rpg) |
| + | * 1 x 7.7 mm Type 97 machine gun, 2 x beam turrets (582 rpg) | ||
| − | == Usage in | + | == Usage in battles == |
| − | <!--''Describe the tactics of playing in | + | <!-- ''Describe the tactics of playing in the aircraft, the features of using aircraft in a team and advice on tactics. Refrain from creating a "guide" - do not impose a single point of view, but instead, give the reader food for thought. Examine the most dangerous enemies and give recommendations on fighting them. If necessary, note the specifics of the game in different modes (AB, RB, SB).'' --> |
If the "14 in mod 35" module isn't researched, the other two bomb options can still be viable. The 24 x 60 kg bomb option can be useful on the map New Guinea because the enemy team has several cargo ships and light cruisers. Both are soft targets, and with 24 bombs it is straightforward to destroy all of them. The map Zhengzhou features dozens of light and heavy pillboxes which are also easy targets for the G5N1. The 12 x 250 kg bomb option works the best here. It is also possible to use the 60 kg bombs but requires a direct hit to destroy a light pillbox. The benefit of the 250 kg bombs is the bomber can destroy pillboxes without direct hits and may occasionally destroy a nearby AAA or artillery piece. In arcade battles, the 4 x 800 kg bomb option is the best for destroying mini bases and the enemy airfield. Utilise the different bomb options depending on what your target is. For light targets like pillboxes and tanks use either the 60 kg or 250 kg bombs, and for heavy targets like bases and airfields use 800 kg bombs. | If the "14 in mod 35" module isn't researched, the other two bomb options can still be viable. The 24 x 60 kg bomb option can be useful on the map New Guinea because the enemy team has several cargo ships and light cruisers. Both are soft targets, and with 24 bombs it is straightforward to destroy all of them. The map Zhengzhou features dozens of light and heavy pillboxes which are also easy targets for the G5N1. The 12 x 250 kg bomb option works the best here. It is also possible to use the 60 kg bombs but requires a direct hit to destroy a light pillbox. The benefit of the 250 kg bombs is the bomber can destroy pillboxes without direct hits and may occasionally destroy a nearby AAA or artillery piece. In arcade battles, the 4 x 800 kg bomb option is the best for destroying mini bases and the enemy airfield. Utilise the different bomb options depending on what your target is. For light targets like pillboxes and tanks use either the 60 kg or 250 kg bombs, and for heavy targets like bases and airfields use 800 kg bombs. | ||
| Line 171: | Line 126: | ||
As with any bomber, if you're caught alone or off guard, you are as good as dead. Also, having a fighter escort will boost RP gains drastically. Fighter escorts enable this for all game modes. Generally, try to destroy as many targets as possible without wasting bombs. Use the G5N's strengths and attack the most significant target possible, whether that be a mini base, carrier, or air base. Team up with other players and fly in a formation. Flying with others will help defensively as well as offensively since you'll be able to obliterate your target. | As with any bomber, if you're caught alone or off guard, you are as good as dead. Also, having a fighter escort will boost RP gains drastically. Fighter escorts enable this for all game modes. Generally, try to destroy as many targets as possible without wasting bombs. Use the G5N's strengths and attack the most significant target possible, whether that be a mini base, carrier, or air base. Team up with other players and fly in a formation. Flying with others will help defensively as well as offensively since you'll be able to obliterate your target. | ||
| − | In countering a {{PAGENAME}}, one of the best ways to attack is to attack from the front in a head-on attack. A frontal assault may kill both pilots due to lack of protection to shield them from a head-on attack. | + | In countering a {{PAGENAME}}, one of the best ways to attack is to attack from the front in a head-on attack. A frontal assault may kill both pilots due to lack of protection to shield them from a head-on attack. |
| − | ===Manual Engine Control=== | + | === Manual Engine Control === |
{| class="wikitable" style="text-align:center" | {| class="wikitable" style="text-align:center" | ||
|- | |- | ||
! colspan="7" | MEC elements | ! colspan="7" | MEC elements | ||
|- | |- | ||
| − | ! rowspan="2" |Mixer | + | ! rowspan="2" | Mixer |
| − | ! rowspan="2" |Pitch | + | ! rowspan="2" | Pitch |
| − | ! colspan="3" |Radiator | + | ! colspan="3" | Radiator |
| − | ! rowspan="2" |Supercharger | + | ! rowspan="2" | Supercharger |
| − | ! rowspan="2" |Turbocharger | + | ! rowspan="2" | Turbocharger |
|- | |- | ||
| − | ! Oil | + | ! Oil !! Water !! Type |
| − | ! Water | ||
| − | ! Type | ||
|- | |- | ||
| − | + | | Not controllable || Controllable<br>Auto control available || Controllable<br>Not auto controlled || Controllable<br>Not auto controlled || Separate || Controllable<br>2 gears || Not controllable | |
|- | |- | ||
|} | |} | ||
| − | ===Modules=== | + | === Modules === |
{| class="wikitable" | {| class="wikitable" | ||
| − | ! | + | ! Tier |
| − | !colspan = "2"| Flight performance | + | ! colspan="2" | Flight performance |
| − | ! | + | ! Survivability |
| − | !colspan = "2"| Weaponry | + | ! colspan="2" | Weaponry |
|- | |- | ||
| I | | I | ||
| − | | Fuselage | + | | Fuselage repair |
| Radiator | | Radiator | ||
| − | | | + | | |
| Turret 7 mm | | Turret 7 mm | ||
| 14 in (mod35) | | 14 in (mod35) | ||
|- | |- | ||
| II | | II | ||
| − | | | + | | |
| Compressor | | Compressor | ||
| Airframe | | Airframe | ||
| − | | New 7 mm MGs ( | + | | New 7 mm MGs (turret) |
| − | | | + | | |
|- | |- | ||
| III | | III | ||
| − | | Wings | + | | Wings repair |
| Engine | | Engine | ||
| − | | | + | | |
| Turret 20 mm | | Turret 20 mm | ||
| − | | | + | | |
|- | |- | ||
| IV | | IV | ||
| − | | | + | | |
| − | | Engine | + | | Engine injection |
| Cover | | Cover | ||
| − | | New 20 mm | + | | New 20 mm cannons (turret) |
| − | | | + | | |
|- | |- | ||
|} | |} | ||
| − | * Unlike other heavy bombers, the G5N1 can research all of its bomb options right from the start. Unlock all weapons modifications as they will generally improve research point gains as well as survivability. | + | |
| + | * Unlike other heavy bombers, the G5N1 can research all of its bomb options right from the start. Unlock all weapons modifications as they will generally improve research point gains as well as survivability. | ||
| + | |||
=== Pros and cons === | === Pros and cons === | ||
| − | <!--''Summarise and briefly evaluate the vehicle in terms of its characteristics and combat effectiveness. Mark its pros and cons in the bulleted list. | + | <!-- ''Summarise and briefly evaluate the vehicle in terms of its characteristics and combat effectiveness. Mark its pros and cons in the bulleted list. Try not to use more than 6 points for each of the characteristics. Avoid using categorical definitions such as "bad", "good" and the like - use substitutions with softer forms such as "inadequate" and "effective".'' --> |
'''Pros:''' | '''Pros:''' | ||
| Line 246: | Line 201: | ||
== History == | == History == | ||
| − | <!--''Describe the history of the creation and combat usage of the aircraft in more detail than in the introduction. If the historical reference turns out to be too | + | <!-- ''Describe the history of the creation and combat usage of the aircraft in more detail than in the introduction. If the historical reference turns out to be too long, take it to a separate article, taking a link to the article about the vehicle and adding a block "/History" (example: <nowiki>https://wiki.warthunder.com/(Vehicle-name)/History</nowiki>) and add a link to it here using the <code>main</code> template. Be sure to reference text and sources by using <code><nowiki><ref></ref></nowiki></code>, as well as adding them at the end of the article with <code><nowiki><references /></nowiki></code>. This section may also include the vehicle's dev blog entry (if applicable) and the in-game encyclopedia description (under <code><nowiki>=== In-game description ===</nowiki></code>, also if applicable).'' --> |
This aircraft was designed off of the Douglas DC-4E. It was Japan's first take on a four-engine heavy bomber design, and the DC-4E was first shipped to Japan's Nippon Koku K.K. aircraft corporation. After that, it was sent in secret to the Nakajima Aircraft Company for inspection. Having only six prototypes built, the G5N Shinzan saw no combat. The Assuming this aircraft to be a bomber, the Allies utilised the name "Liz". | This aircraft was designed off of the Douglas DC-4E. It was Japan's first take on a four-engine heavy bomber design, and the DC-4E was first shipped to Japan's Nippon Koku K.K. aircraft corporation. After that, it was sent in secret to the Nakajima Aircraft Company for inspection. Having only six prototypes built, the G5N Shinzan saw no combat. The Assuming this aircraft to be a bomber, the Allies utilised the name "Liz". | ||
=== In-game description === | === In-game description === | ||
| − | + | Nakajima G5N1 "Shinzan" experimental four-engine, long-range, land-based bomber (Allied reporting name: Liz), Navy 13-Shi specification | |
An all-metal, seven-seat cantilever monoplane with retractable nose landing gear. | An all-metal, seven-seat cantilever monoplane with retractable nose landing gear. | ||
| Line 259: | Line 214: | ||
A G5N1 prototype, which became the first four-engine aircraft in the Japanese Navy, got off the ground in April 1941. The plane created by the Japanese designers retained the wing, the powerplant, and the landing gear of its American prototype, but it had a new fuselage with a glazed nose and a bomb bay, as well as a new twin-fin tail. The G5N1 was the first aircraft created in Japan to have a nosewheel. | A G5N1 prototype, which became the first four-engine aircraft in the Japanese Navy, got off the ground in April 1941. The plane created by the Japanese designers retained the wing, the powerplant, and the landing gear of its American prototype, but it had a new fuselage with a glazed nose and a bomb bay, as well as a new twin-fin tail. The G5N1 was the first aircraft created in Japan to have a nosewheel. | ||
| + | |||
The G5N1 bomber had four Mitsubishi MK4B Kasei-12 fourteen-cylinder air-cooled engines, with a maximum takeoff power of 1,530 hp and Sumitomo/Hamilton four-bladed, fixed-pitch metal propellers. | The G5N1 bomber had four Mitsubishi MK4B Kasei-12 fourteen-cylinder air-cooled engines, with a maximum takeoff power of 1,530 hp and Sumitomo/Hamilton four-bladed, fixed-pitch metal propellers. | ||
The G5N1 bomber's defensive armament consisted of two 20 mm Type 99 Model 1 (Oerlikon FF) magazine-fed cannons: one in a rear turret, and one in an upper turret, capable of 360-degree fire and electrically driven. The cannon in the upper turret had 12 drum magazines with 45 rounds each for a total of 540 shots, and the rear one had 8 drum magazines with 45 rounds each for a total of 360 shots. | The G5N1 bomber's defensive armament consisted of two 20 mm Type 99 Model 1 (Oerlikon FF) magazine-fed cannons: one in a rear turret, and one in an upper turret, capable of 360-degree fire and electrically driven. The cannon in the upper turret had 12 drum magazines with 45 rounds each for a total of 540 shots, and the rear one had 8 drum magazines with 45 rounds each for a total of 360 shots. | ||
| + | |||
Four 7.7 mm Type 97 (Lewis) magazine-fed machine guns were mounted in a nose, a ventral, and two side turrets. The machine guns in the nose and the ventral mounts had 7 pan magazines with 97 rounds each for a total of 679 shots, and those in the side mounts had 6 pan magazines with 97 rounds each for a total of 582 shots. | Four 7.7 mm Type 97 (Lewis) magazine-fed machine guns were mounted in a nose, a ventral, and two side turrets. The machine guns in the nose and the ventral mounts had 7 pan magazines with 97 rounds each for a total of 679 shots, and those in the side mounts had 6 pan magazines with 97 rounds each for a total of 582 shots. | ||
The G5N1 bomber's combat load was only carried internally. Bombs ranging from 60 kg to 1,500 kg, in various combinations, could be suspended in the bomb bay positioned along the whole length of the centre wing section. The maximum bomb capacity was 4,000 kg. | The G5N1 bomber's combat load was only carried internally. Bombs ranging from 60 kg to 1,500 kg, in various combinations, could be suspended in the bomb bay positioned along the whole length of the centre wing section. The maximum bomb capacity was 4,000 kg. | ||
| − | A total of 4 G5N1 prototypes were built. | + | A total of 4 G5N1 prototypes were built. |
| − | |||
| − | |||
== Media == | == Media == | ||
| − | '' | + | ''Excellent additions to the article would be video guides, screenshots from the game, and photos.'' |
| − | == | + | == See also == |
| − | ''Links to the articles on the War Thunder Wiki that you think will be useful for the reader, for example | + | ''Links to the articles on the War Thunder Wiki that you think will be useful for the reader, for example:'' |
* ''reference to the series of the aircraft;'' | * ''reference to the series of the aircraft;'' | ||
* ''links to approximate analogues of other nations and research trees.'' | * ''links to approximate analogues of other nations and research trees.'' | ||
| − | |||
| − | == | + | == External links == |
''Paste links to sources and external resources, such as:'' | ''Paste links to sources and external resources, such as:'' | ||
* ''topic on the official game forum;'' | * ''topic on the official game forum;'' | ||
| − | * ''page on aircraft | + | * ''encyclopedia page on the aircraft;'' |
* ''other literature.'' | * ''other literature.'' | ||
{{AirManufacturer Nakajima}} | {{AirManufacturer Nakajima}} | ||
{{Japan bombers}} | {{Japan bombers}} | ||
Revision as of 11:49, 18 June 2020
Contents
Description

The G5N1 Shinzan is a rank III Japanese bomber
with a battle rating of 4.0 (AB), 4.3 (RB), and 5.3 (SB). It was introduced in Update 1.29.
The G5N1 serves as one of Japan's true heavy bombers. Featuring a massive airframe and four Mitsubishi MK4B Kasei-12 fourteen-cylinder air-cooled engines, the G5N1 is easily one of the hardest planes to manoeuvre in War Thunder. It makes up for this with its massive 3,200 kg payload. Since this aircraft is so large and cumbersome, its only true purpose is destroying heavy targets. In Realistic battles, the tactics depend entirely on the map. Maps like Midway and New Guinea feature enemy airfields, which should be the main target. Other maps like Saipan have no airfields or mini base targets, so you will be forced to improvise. Since the G5N1 can carry a payload of 3,200 kg, it is possible to destroy multiple aircraft carriers. Target these instead of attempting to destroy smaller targets like tanks or pillboxes. Attacking the carriers can be a futile effort because to successfully bomb multiple carriers one needs to fly very low, thus exposing the bomber to enemy anti-aircraft fire. Try to come in on an attack run fast, because the enemy fleet will easily pick you off if traveling slowly.
General info
Flight performance
Describe how the aircraft behaves in the air. Speed, manoeuvrability, acceleration and allowable loads - these are the most important characteristics of the vehicle.
| Characteristics | Max Speed (km/h at 7,620 m) |
Max altitude (metres) |
Turn time (seconds) |
Rate of climb (metres/second) |
Take-off run (metres) | |||
|---|---|---|---|---|---|---|---|---|
| AB | RB | AB | RB | AB | RB | |||
| Stock | 495 | 485 | 11156 | 25.2 | 25.9 | 4.8 | 4.8 | 489 |
| Upgraded | 538 | 512 | 23.5 | 24.4 | 12.9 | 7.2 | ||
Details
| Features | ||||
|---|---|---|---|---|
| Combat flaps | Take-off flaps | Landing flaps | Air brakes | Arrestor gear |
| ✓ | ✓ | ✓ | X | X |
| Limits | ||||||
|---|---|---|---|---|---|---|
| Wings (km/h) | Gear (km/h) | Flaps (km/h) | Max Static G | |||
| Combat | Take-off | Landing | + | - | ||
| 520 | 280 | 380 | 380 | 230 | ~4 | ~3 |
| Optimal velocities (km/h) | |||
|---|---|---|---|
| Ailerons | Rudder | Elevators | Radiator |
| < 300 | < 180 | < 270 | > 335 |
| Compressor (RB/SB) | ||
|---|---|---|
| Setting 1 | ||
| Optimal altitude | 100% Engine power | WEP Engine power |
| 145 m | 6,978 hp | 7,777 hp |
| Setting 2 | ||
| Optimal altitude | 100% Engine power | WEP Engine power |
| 4,394 m | 6,394 hp | 7,127 hp |
Survivability and armour
- Pilot's seat, 13 mm of steel protection
- Copilot's seat, 13 mm of steel protection
Armaments
Suspended armament
The G5N1 can be outfitted with the following ordnance:
- 24 x 60 kg Navy Type 97 Number 6 bombs (1,440 kg total)
- 12 x 250 kg Navy Type Number 25 Model 2 bombs (3,000 kg total)
- 4 x 800 kg Navy Type Number 80 Model 1 bombs (3,200 kg total)
Defensive armament
The G5N1 is defended by:
- 1 x 20 mm Type 99 Model 1 cannon, dorsal turret (540 rpg)
- 1 x 20 mm Type 99 Model 1 cannon, tail turret (360 rpg)
- 1 x 7.7 mm Type 97 machine gun, nose turret (679 rpg)
- 1 x 7.7 mm Type 97 machine gun, 2 x cheek turrets (697 rpg)
- 1 x 7.7 mm Type 97 machine gun, ventral turret (679 rpg)
- 1 x 7.7 mm Type 97 machine gun, 2 x beam turrets (582 rpg)
Usage in battles
If the "14 in mod 35" module isn't researched, the other two bomb options can still be viable. The 24 x 60 kg bomb option can be useful on the map New Guinea because the enemy team has several cargo ships and light cruisers. Both are soft targets, and with 24 bombs it is straightforward to destroy all of them. The map Zhengzhou features dozens of light and heavy pillboxes which are also easy targets for the G5N1. The 12 x 250 kg bomb option works the best here. It is also possible to use the 60 kg bombs but requires a direct hit to destroy a light pillbox. The benefit of the 250 kg bombs is the bomber can destroy pillboxes without direct hits and may occasionally destroy a nearby AAA or artillery piece. In arcade battles, the 4 x 800 kg bomb option is the best for destroying mini bases and the enemy airfield. Utilise the different bomb options depending on what your target is. For light targets like pillboxes and tanks use either the 60 kg or 250 kg bombs, and for heavy targets like bases and airfields use 800 kg bombs.
The G5N's downfalls are what makes this aircraft very hard to use. It is incredibly difficult to turn within both arcade and realistic battles. The poor turn-rate hinders the ability to drop your payload, thus making the G5N1 more efficient bombing from high altitudes. However, you will never be the only one high in the sky. This aircraft is incredibly vulnerable to all types of enemy fire both because of its sheer size and its standard defensive armament consisting of 20 mm cannons and 7.7 mm machine guns. The 20 mm cannon on the tail of this aircraft is virtually useless as it is unable to rotate left or right. If there is an enemy directly behind your plane it is possible to hit him with it but very difficult. Thus, the G5N1 must rely on a second 20 mm cannon in the dorsal position along with a host of 7.7 mm machine guns. Try to drop altitude to position the enemy in your dorsal gunner's range. Your best option to shake an enemy off of your tail is a teammate coming to help.
As with any bomber, if you're caught alone or off guard, you are as good as dead. Also, having a fighter escort will boost RP gains drastically. Fighter escorts enable this for all game modes. Generally, try to destroy as many targets as possible without wasting bombs. Use the G5N's strengths and attack the most significant target possible, whether that be a mini base, carrier, or air base. Team up with other players and fly in a formation. Flying with others will help defensively as well as offensively since you'll be able to obliterate your target.
In countering a G5N1, one of the best ways to attack is to attack from the front in a head-on attack. A frontal assault may kill both pilots due to lack of protection to shield them from a head-on attack.
Manual Engine Control
| MEC elements | ||||||
|---|---|---|---|---|---|---|
| Mixer | Pitch | Radiator | Supercharger | Turbocharger | ||
| Oil | Water | Type | ||||
| Not controllable | Controllable Auto control available |
Controllable Not auto controlled |
Controllable Not auto controlled |
Separate | Controllable 2 gears |
Not controllable |
Modules
| Tier | Flight performance | Survivability | Weaponry | ||
|---|---|---|---|---|---|
| I | Fuselage repair | Radiator | Turret 7 mm | 14 in (mod35) | |
| II | Compressor | Airframe | New 7 mm MGs (turret) | ||
| III | Wings repair | Engine | Turret 20 mm | ||
| IV | Engine injection | Cover | New 20 mm cannons (turret) | ||
- Unlike other heavy bombers, the G5N1 can research all of its bomb options right from the start. Unlock all weapons modifications as they will generally improve research point gains as well as survivability.
Pros and cons
Pros:
- Impressive 3200 kg total bomb load
- Two pilots who sit far apart
Cons:
- Massive airframe
- Inability to manoeuvre whatsoever
- Poor defensive armament
- Slow speed
- Long turn time
- Lack of armour protection (only on pilot seats)
- Prone to fuel and engine fires
History
This aircraft was designed off of the Douglas DC-4E. It was Japan's first take on a four-engine heavy bomber design, and the DC-4E was first shipped to Japan's Nippon Koku K.K. aircraft corporation. After that, it was sent in secret to the Nakajima Aircraft Company for inspection. Having only six prototypes built, the G5N Shinzan saw no combat. The Assuming this aircraft to be a bomber, the Allies utilised the name "Liz".
In-game description
Nakajima G5N1 "Shinzan" experimental four-engine, long-range, land-based bomber (Allied reporting name: Liz), Navy 13-Shi specification
An all-metal, seven-seat cantilever monoplane with retractable nose landing gear.
It was designed in 1939-41 in the design bureau of Nakajima Aircraft Company, following the Imperial Japanese Navy's 13-Shi specification. The specification called for a long-range bomber with a flight range of about 3,000-3,500 nautical miles.
Since the Japanese aircraft designers at that point lacked experience creating a heavy four-engine aircraft, like the new bomber would be, it was decided to take a foreign design as the basis of the plane, to achieve the required characteristics. For this purpose, the Nippon Koku K.K. airline purchased the sole model of the American Douglas DC-4E airliner that was given in 1939 to the Nakajima Company after arriving in Japan, without making this knowledge public, to create the long-range bomber on its basis.
A G5N1 prototype, which became the first four-engine aircraft in the Japanese Navy, got off the ground in April 1941. The plane created by the Japanese designers retained the wing, the powerplant, and the landing gear of its American prototype, but it had a new fuselage with a glazed nose and a bomb bay, as well as a new twin-fin tail. The G5N1 was the first aircraft created in Japan to have a nosewheel.
The G5N1 bomber had four Mitsubishi MK4B Kasei-12 fourteen-cylinder air-cooled engines, with a maximum takeoff power of 1,530 hp and Sumitomo/Hamilton four-bladed, fixed-pitch metal propellers.
The G5N1 bomber's defensive armament consisted of two 20 mm Type 99 Model 1 (Oerlikon FF) magazine-fed cannons: one in a rear turret, and one in an upper turret, capable of 360-degree fire and electrically driven. The cannon in the upper turret had 12 drum magazines with 45 rounds each for a total of 540 shots, and the rear one had 8 drum magazines with 45 rounds each for a total of 360 shots.
Four 7.7 mm Type 97 (Lewis) magazine-fed machine guns were mounted in a nose, a ventral, and two side turrets. The machine guns in the nose and the ventral mounts had 7 pan magazines with 97 rounds each for a total of 679 shots, and those in the side mounts had 6 pan magazines with 97 rounds each for a total of 582 shots.
The G5N1 bomber's combat load was only carried internally. Bombs ranging from 60 kg to 1,500 kg, in various combinations, could be suspended in the bomb bay positioned along the whole length of the centre wing section. The maximum bomb capacity was 4,000 kg.
A total of 4 G5N1 prototypes were built.
Media
Excellent additions to the article would be video guides, screenshots from the game, and photos.
See also
Links to the articles on the War Thunder Wiki that you think will be useful for the reader, for example:
- reference to the series of the aircraft;
- links to approximate analogues of other nations and research trees.
External links
Paste links to sources and external resources, such as:
- topic on the official game forum;
- encyclopedia page on the aircraft;
- other literature.
| Nakajima Aircraft Company (中島飛行機株式会社 ) | |
|---|---|
| Fighters | Ki-27 otsu · Ki-27 otsu Tachiarai |
| Ki-43-I · Ki-43-II · Ki-43-III otsu | |
| Ki-44-I · Ki-44-I 34 · Ki-44-II otsu · Ki-44-II hei | |
| Ki-84 ko · Ki-84 otsu · Ki-84 hei | |
| Ki-87 | |
| Hydroplanes | A6M2-N* |
| Interceptors | J1N1 · J5N1 |
| Bombers | B5N2 |
| B6N1 Model 11 · B6N2 Model 12 · B6N2a Model 12Ko | |
| G5N1 · G8N1 | |
| Ki-49-I · Ki-49-IIa · Ki-49-IIb · Ki-49-IIb/L | |
| Recon | E8N2 |
| Jet Fighters | Kikka |
| Captured | ␗Ki-27 otsu · ▃Ki-43-II · ␗Ki-43-III ko · ␗Ki-44-II hei · ␗Ki-84 ko |
| *Refit of the Mitsubishi A6M2 mod. 11 | |
| See also | Fuji Heavy Industries (1957-2017) |
| Japan bombers | |
|---|---|
| Navy | |
| Carrier-based attack bomber | |
| B5N | B5N2 |
| B6N | B6N1 · B6N2 · B6N2a |
| B7A | B7A2 · B7A2 (Homare 23) |
| Carrier-based dive bomber | |
| D3A | D3A1 |
| D4Y | D4Y1 · D4Y2 · D4Y3 Ko |
| Shipboard Observation seaplane | |
| F1M | F1M2 |
| Land-based Attack bomber | |
| G4M | G4M1 |
| G5N | G5N1 |
| G8N | G8N1 |
| Flying boat | |
| H6K | H6K4 |
| H8K | H8K2 · H8K3 |
| Land-based Bomber | |
| P1Y | P1Y1 |
| Army | |
| Light | Ki-32 |
| Ki-48-II otsu | |
| Heavy | Ki-21-Ia · Ki-21-I hei |
| Ki-49-I · Ki-49-IIa · Ki-49-IIb · Ki-49-IIb/L | |
| Ki-67-I Ko · Ki-67-I otsu | |
| Other countries | ▅B-17E |
