Ki-67-I otsu

From War Thunder Wiki
Jump to: navigation, search
Rank VI USA | Premium | Golden Eagles
A-10A Thunderbolt (Early)
This page is about the Japanese bomber Ki-67-I otsu. For the other version, see Ki-67-I Ko.
Ki-67-I otsu
ki_67_1_otsu.png
GarageImage Ki-67-I otsu.jpg
ArtImage Ki-67-I otsu.png
Ki-67-I otsu
Research:20 000 Specs-Card-Exp.png
Purchase:135 000 Specs-Card-Lion.png
Show in game

Description

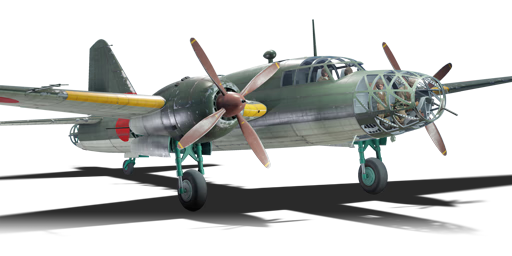
The Ki-67-I otsu, designated as Type 4 Heavy Bomber Model 1B (四式重爆撃機甲), was the later main production variant of the Ki-67 with enhanced rear defensive firepower, which was designed to replace the Ki-49 and to be suitable for possible operations over the Manchurian-Siberia border. It was designed to be one of the most survivable and damage-resistant Japanese aircraft of the war, with self-sealing fuel tanks, armour and it was also highly manoeuvrable and capable of dive-bombing attacks. It entered service in October 1944 and was used in various roles, including conventional bombing and anti-shipping. With the Ki-67 being a very capable medium bomber platform, it was remodeled and modified for other special purposes, with projects ranging from simple bomb-role upgrades, interceptor (Ki-109), bomber escort, etc.. However, due to Allied bombing raids and production delays, only 767 Ki-67s were built before the end of the war.

Introduced in Update 1.67 "Assault", the Ki-67 otsu excels in many roles in which other Japanese bombers fail to live up to. This is one of the most formidable medium bombers out there, as it is fast, has great defensive capabilities, can mount a wide array of bombs and torpedoes, and has really good survivability. The Ki-67 otsu has a wide variety of roles, but its main role is actually a frontline bomber, as it can destroy pillboxes and other high value ground units. Its payload isn't optimal to target bases alone, so it is advisable to target individual ground targets. The Ki-67 otsu differs from the previous model, the Ki-67 Ko, in rear of the aircraft. The Ki-67 otsu has a double tail gun configuration, giving it more defensive capabilities.

Nicknames
  • Japanese Nickname: 飛龍 (Hiryū, "Flying Dragon")
  • IJA Pilot Abbreviation: Yon-Jū (四重)  · Roku-Nana (6-7)
  • Allied reporting name: Peggy

General info

Flight performance

Max speed
at 5 150 m502 km/h
Turn time30 s
Max altitude9 300 m
Engine2 х Mitsubishi Ha-104
TypeRadial
Cooling systemAir
Take-off weight14 t
Ki-67 in flight

The flight performance of this plane is extremely smooth. The Ki-67 can turn really well for a bomber. It has a high rip speed of around 650 km/h. It has excellent acceleration and speed as well, so it can outrun some pursuing fighters. The Ki-67 otsu performs identically to the Ki-67 ko. It is also important to note that this aircraft is equipped with radial engines, which won't overheat under the WEP setting.

Characteristics Max Speed
(km/h at 5,150 m)
Max altitude
(metres)
Turn time
(seconds)
Rate of climb
(metres/second)
Take-off run
(metres)
AB RB AB RB AB RB
Stock 483 466 9300 31.0 31.8 10.0 10.0 650
Upgraded 528 502 29.0 30.0 16.0 12.5

Details

Ki-67 dropping bombs
Features
Combat flaps Take-off flaps Landing flaps Air brakes Arrestor gear
X X
Limits
Wings (km/h) Gear (km/h) Flaps (km/h) Max Static G
Combat Take-off Landing + -
650 300 427 398 250 ~5 ~1
Optimal velocities (km/h)
Ailerons Rudder Elevators Radiator
< 360 < 360 < 360 > 313

Survivability and armour

Crew8 people
Speed of destruction
Structural650 km/h
Gear300 km/h
Ki-67s in formation
  • 70 mm Bulletproof glass - Armoured windscreen
  • 12.7 mm steel plate in the nose - protecting pilots
  • 15.8 mm steel plate pilot seat
  • 15.8 mm steel plate in mid fuselage - protecting dorsal gunner
  • 7.9 mm steel plate in tail (belly only)
  • Self sealing fuel tanks (in wings and mid fuselage)

The Ki-67 is one of the most sturdy Japanese aircraft in War Thunder. It has self sealing fuel tanks. It can take lots of punishment from .50 calibre rounds. However, when facing aircraft with cannons, it will quickly fall prey to HE rounds unless you take immediate evasive action.

Modifications and economy

Repair costBasic → Reference
AB1 541 → 1 961 Sl icon.png
RB3 996 → 5 086 Sl icon.png
SB6 954 → 8 852 Sl icon.png
Total cost of modifications34 700 Rp icon.png
67 700 Sl icon.png
Talisman cost1 300 Ge icon.png
Crew training39 000 Sl icon.png
Experts135 000 Sl icon.png
Aces700 Ge icon.png
Research Aces390 000 Rp icon.png
Reward for battleAB / RB / SB
90 / 220 / 430 % Sl icon.png
154 / 154 / 154 % Rp icon.png
Modifications
Flight performance Survivability Weaponry
Mods aerodinamic fuse.png
Fuselage repair
Research:
1 700 Rp icon.png
Cost:
3 300 Sl icon.png
165 Ge icon.png
Mods radiator.png
Radiator
Research:
1 700 Rp icon.png
Cost:
3 300 Sl icon.png
165 Ge icon.png
Mods compressor.png
Compressor
Research:
1 900 Rp icon.png
Cost:
3 700 Sl icon.png
185 Ge icon.png
Mods aerodinamic wing.png
Wings repair
Research:
2 200 Rp icon.png
Cost:
4 300 Sl icon.png
220 Ge icon.png
Mods new engine.png
Engine
Research:
2 200 Rp icon.png
Cost:
4 300 Sl icon.png
220 Ge icon.png
Mods metanol.png
Engine injection
Research:
2 300 Rp icon.png
Cost:
4 500 Sl icon.png
230 Ge icon.png
Mods armor frame.png
Airframe
Research:
1 900 Rp icon.png
Cost:
3 700 Sl icon.png
185 Ge icon.png
Mods armor cover.png
Cover
Research:
2 300 Rp icon.png
Cost:
4 500 Sl icon.png
230 Ge icon.png
Mods ammo.png
safat12_turret_belt_pack
Research:
1 700 Rp icon.png
Cost:
3 300 Sl icon.png
165 Ge icon.png
Mod arrow 0.png
Mods pilon bomb.png
10 in (mod24)
Research:
1 700 Rp icon.png
Cost:
3 300 Sl icon.png
165 Ge icon.png
Mod arrow 0.png
Mods turret gun.png
ho103_turret_new_gun
Research:
1 900 Rp icon.png
Cost:
3 700 Sl icon.png
185 Ge icon.png
Mods pilon torpedo.png
17 3/4 in (mod45)
Research:
1 900 Rp icon.png
Cost:
3 700 Sl icon.png
185 Ge icon.png
Mod arrow 0.png
Mods ammo.png
ho5_turret_belt_pack
Research:
2 200 Rp icon.png
Cost:
4 300 Sl icon.png
220 Ge icon.png
Mod arrow 0.png
Mods pilon bomb.png
12 in (mod30)
Research:
2 200 Rp icon.png
Cost:
4 300 Sl icon.png
220 Ge icon.png
Mod arrow 0.png
Mods weapon.png
ho5_turret_new_gun
Research:
2 300 Rp icon.png
Cost:
4 500 Sl icon.png
230 Ge icon.png
Mods pilon bomb.png
14 in (mod30)
Research:
2 300 Rp icon.png
Cost:
4 500 Sl icon.png
230 Ge icon.png
Mods pilon bomb.png
14 in (mod35)
Research:
2 300 Rp icon.png
Cost:
4 500 Sl icon.png
230 Ge icon.png

Armaments

Suspended armament

List of setups (6)
Setup 115 x 50 kg Army Type 94 GPHE bomb
Setup 28 x 100 kg Army Type 94 GPHE bomb
Setup 33 x 250 kg Army Type 92 GPHE bomb
Setup 41 x Type 91 Model 3 torpedo (850 kg)
Setup 51 x 500 kg Army Type 92 GPHE bomb
Setup 61 x 800 kg Number 80 Mod. 1 bomb
Ki67 running away from a pursuing P-51

The Ki-67-I otsu can be outfitted with the following ordnance:

  • 15 x 50 kg Army Type 94 GPHE bombs (750 kg total)
  • 8 x 100 kg Army Type 94 GPHE bombs (800 kg total)
  • 3 x 250 kg Army Type 92 GPHE bombs (750 kg total)
  • 1 x 500 kg Army Type 92 GPHE bomb (500 kg total)
  • 1 x 800 kg Number 80 Mod. 1 (800 kg total)
  • 1 x 850 kg Type 91 Model 3 torpedo

Defensive armament

Turret20 mm Ho-5 cannon
Ammunition700 rounds
Fire rate949 shots/min
Turret12.7 mm Ho-104 machine gun
Ammunition550 rounds
Fire rate900 shots/min
2 х Turret12.7 mm Ho-104 machine gun
Ammunition500 rounds
Fire rate900 shots/min
Turret2 x 12.7 mm Ho-104 machine gun
Ammunition1200 rounds
Fire rate900 shots/min

The Ki-67-I otsu is defended by:

  • 1 x 20 mm Ho-5 cannon, dorsal turret (700 rpg)
  • 1 x 12.7 mm Ho-104 machine gun, nose turret (550 rpg)
  • 1 x 12.7 mm Ho-104 machine gun, 2 x beam turrets (500 rpg)
  • 2 x 12.7 mm Ho-104 machine guns, tail turret (700 rpg + 500 rpg = 1,200 total)

Usage in battles

The Ki-67's bomb bay

The Ki-67 can be used in air arcade battles to an excellent extent. In Arcade Battles, it can use its bombs to effectively destroy many ground units, playing an important role in ticket count. To start, take the eight 100 kg bombs and dive to the deck. Stay away from the main group of fighters, as it is advisable to stay on the outside of the map to avoid fighter confrontation. Next, bomb any ground targets you see. Tanks and pillboxes can only be destroyed with direct hits, so use the manoeuvrability of this bomber to drop your bombs with precision. Do not drop bombs on bases, as your payload is not as big as that of heavy bombers.

Ki-67's top gunner

In Air RB, the Ki-67 otsu does well in the ground attack role, but due to limited bombs, you'll need to make frequent trips back to the base. The strategy here is to target pillboxes and medium tanks with the 250 kg bombs. Remember to set a three to two second fuse on those bombs. To start, you'll need to head in for an attack run as fast as possible. Dive towards the ground targets and line up with the pillboxes. After dropping your four bombs, immediately return to the base, as enemy fighters will be closing in on you. Staying low is critical, as other fighters that dive in on you can be dragged lower to allow for allied interception. However, on certain Pacific maps, you'll need to take torpedoes. To effectively destroy the ships, you'll need to chose a target. At the start of the battle, note if your allies have equipped torpedoes. If no allies are present, head for the destroyers. They take one torpedo to kill. If multiple allies with torpedoes are present, communicate with your team to target the carriers. They are the most rewarding target to kill.

Enemies worth noting
  • P-47 - The P-47 will be a major threat to this plane, as it is practically immune to your defensive guns. It will unleash eight fifty calls on your aircraft and make short work of you. To deal with this plane, turn. You can out-turn the P-47 and it will most likely disengage.
  • Fw 190 - Same strategy as the P-47. You need to turn and evade the Mine-shells, while shooting at it.
  • SM.91 - The SM.91 is an opponent worth fearing as its six 20 mm cannons with the legendary German Minengeschoß rounds (mineshells) will easily tear through your plane. To avoid the SM.91 try climbing to a suitable altitude and gaining speed early on, as the SM.91's acceleration at high speeds is mediocre with it having a top speed of 585 km/h. Out-turning the SM.91 is also an option as its large design makes turning quite slow, with a turn time of up to 21 seconds.

Manual Engine Control

MEC elements
Mixer Pitch Radiator Supercharger Turbocharger
Oil Water Type
Controllable Controllable
Not auto controlled
Not controllable
Not auto controlled
Controllable
Not auto controlled
Combined Controllable
2 gears
Not controllable

The Ki-67 is equipped with two powerful radial engines. They also come with a two-stage supercharger. The propeller pitch should be used at 90%-100% when on WEP. Lower the propeller pitch to 90% when at high speeds. The radiators can be kept at 10-20%, and the supercharger can be activated at 3.5 km (11k ft), and the mixture can be set to the following at each specific altitude:

  • Sea Level: 100%-110% Mixture
  • 3,000 feet (914 m): 92% Mixture
  • 6,000 feet (1,828 m): 84% Mixture
  • 10,000 feet (3,048 m): 70% Mixture
  • 15,000 feet (4,572 m): 60% Mixture

Pros and cons

Ki-67 underside

Pros:

  • Regular Japanese torpedo as option
    • Torpedo has the highest drop speed in the game at 350 mph (580 km/h) and is one of the most feared torpedoes in Naval Battles
  • Good armour protection for pilot
  • Decent turn time for a bomber
  • Decent climb rate for a bomber

Cons:

  • Regular Japanese army bomber ordnance
    • Max weight of 800 kg (8 x 100 kg or 800 kg bomb)
  • Big target for naval battles
    • Japanese aerial torpedoes have the shortest range of all aerial torpedoes
  • Poor armour protection for back gunners

History

Ki-67 top rotary turret fires

Describe the history of the creation and combat usage of the aircraft in more detail than in the introduction. If the historical reference turns out to be too long, take it to a separate article, taking a link to the article about the vehicle and adding a block "/History" (example: https://wiki.warthunder.com/(Vehicle-name)/History) and add a link to it here using the main template. Be sure to reference text and sources by using <ref></ref>, as well as adding them at the end of the article with <references />. This section may also include the vehicle's dev blog entry (if applicable) and the in-game encyclopedia description (under === In-game description ===, also if applicable).

Media

Ki67-side-turret.png
Skins
Videos

See also

External links


Mitsubishi Company (三菱商会)
Fighters  A5M4 · Hagiri's A5M4
  A6M2 mod. 11 · A6M2 · A6M3 · A6M3 mod. 22 · A6M3 mod. 22Ko · A6M5 · A6M5 Ko · A6M5 otsu · A6M5 Hei · A6M6c
  A7M1 (NK9H) · A7M2
  J2M2 · J2M3 · J2M4 Kai · J2M5 · J2M5 (30 mm)
Hydroplanes  F1M2
Interceptors  Ki-83 · Ki-109
Bombers  G4M1
  Ki-21-Ia · Ki-21-I hei · Ki-67-I Ko · Ki-67-I otsu
Jet Fighters  Ki-200
Captured  ▃A6M2 · ␗A6M2
See also  Mitsubishi Heavy Industries, Ltd. (Post-War)

Japan bombers
Navy 
Carrier-based attack bomber 
B5N  B5N2
B6N  B6N1 · B6N2 · B6N2a
B7A  B7A2 · B7A2 (Homare 23)
Carrier-based dive bomber 
D3A  D3A1
D4Y  D4Y1 · D4Y2 · D4Y3 Ko
Shipboard Observation seaplane 
F1M  F1M2
Land-based Attack bomber 
G4M  G4M1
G5N  G5N1
G8N  G8N1
Flying boat 
H6K  H6K4
H8K  H8K2 · H8K3
Land-based Bomber 
P1Y  P1Y1
Army 
Light  Ki-32
  Ki-48-II otsu
Heavy  Ki-21-Ia · Ki-21-I hei
  Ki-49-I · Ki-49-IIa · Ki-49-IIb · Ki-49-IIb/L
  Ki-67-I Ko · Ki-67-I otsu
Other countries  ▅B-17E