Difference between revisions of "Ju 87 R-2"
Colok76286 (talk | contribs) (→Media: Added Shooting Range episode) |
(Updated page template) |
||
| Line 2: | Line 2: | ||
{{About | {{About | ||
| about = German dive bomber '''{{PAGENAME}}''' | | about = German dive bomber '''{{PAGENAME}}''' | ||
| − | | usage = other | + | | usage = other variants |
| link = Ju 87 (Family) | | link = Ju 87 (Family) | ||
}} | }} | ||
== Description == | == Description == | ||
| − | <!--''In the description, the first part | + | <!-- ''In the description, the first part should be about the history of and the creation and combat usage of the aircraft, as well as its key features. In the second part, tell the reader about the aircraft in the game. Insert a screenshot of the vehicle, so that if the novice player does not remember the vehicle by name, he will immediately understand what kind of vehicle the article is talking about.'' --> |
| − | |||
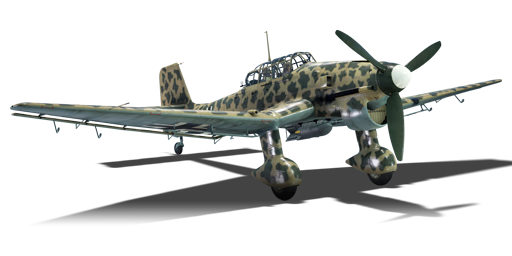
[[File:GarageImage_Ju87R2.jpg|420px|thumb|left]] | [[File:GarageImage_Ju87R2.jpg|420px|thumb|left]] | ||
| − | {{ | + | {{Break}} |
| − | The '''{{Specs|name}}''' is a rank {{Specs|rank}} German | + | The '''{{Specs|name}}''' is a rank {{Specs|rank}} German bomber {{Battle-rating}}. It has been in the game since the start of the Open Beta Test prior to Update 1.27. |
The main use of this plane is precision strikes on hard targets such as tanks and pillboxes, as well as providing ground support in ground battles. This is largely due to its spectacular dive-bombing accuracy and powerful payload. To preform an effective dive with this plane, at an altitude of at least 1,400 m, place your target at the bend in your wings, roll your upside-down and dive at an angle of 60-90 degrees, aiming your cross-hairs at or slightly in front of the target (leading with their speed). Drop throttle to 0% and deploy airbrakes (h key by default); you should keep a steady speed of 400 km/h. Release your bomb at 300 m from the target and you should score a direct, or near hit. | The main use of this plane is precision strikes on hard targets such as tanks and pillboxes, as well as providing ground support in ground battles. This is largely due to its spectacular dive-bombing accuracy and powerful payload. To preform an effective dive with this plane, at an altitude of at least 1,400 m, place your target at the bend in your wings, roll your upside-down and dive at an angle of 60-90 degrees, aiming your cross-hairs at or slightly in front of the target (leading with their speed). Drop throttle to 0% and deploy airbrakes (h key by default); you should keep a steady speed of 400 km/h. Release your bomb at 300 m from the target and you should score a direct, or near hit. | ||
| + | |||
== General info == | == General info == | ||
| − | === Flight | + | === Flight performance === |
| − | + | ''Describe how the aircraft behaves in the air. Speed, manoeuvrability, acceleration and allowable loads - these are the most important characteristics of the vehicle.'' | |
| − | {| class="wikitable" style="text-align:center" | + | |
| − | + | {| class="wikitable" style="text-align:center" width="70%" | |
| − | + | ! rowspan="2" | Characteristics | |
| − | |||
| − | ! | ||
| − | |||
! colspan="2" | Max Speed<br>(km/h at 4,100 m) | ! colspan="2" | Max Speed<br>(km/h at 4,100 m) | ||
| − | ! rowspan="2" | Max altitude<br>( | + | ! rowspan="2" | Max altitude<br>(metres) |
! colspan="2" | Turn time<br>(seconds) | ! colspan="2" | Turn time<br>(seconds) | ||
| − | ! colspan="2" | Rate of climb<br>( | + | ! colspan="2" | Rate of climb<br>(metres/second) |
| − | ! rowspan="2" |Take-off run<br>( | + | ! rowspan="2" | Take-off run<br>(metres) |
|- | |- | ||
| − | ! AB | + | ! AB !! RB !! AB !! RB !! AB !! RB |
| − | ! RB | ||
| − | ! AB | ||
| − | ! RB | ||
| − | ! AB | ||
| − | ! RB | ||
|- | |- | ||
| − | | | + | ! Stock |
| + | | 366 || 356 || rowspan="2" | {{Specs|ceiling}} || 28.1 || 29.1 || 6.5 || 6.5 || rowspan="2" | 434 | ||
|- | |- | ||
| − | ! | + | ! Upgraded |
| − | + | | ___ || ___ || __._ || __._ || __._ || __._ | |
| − | |||
| − | |||
| − | |||
| − | |||
| − | |||
| − | | | ||
| − | |||
| − | |||
| − | |||
| − | |||
| − | |||
| − | |||
| − | |||
| − | |||
|- | |- | ||
|} | |} | ||
| − | ====Details==== | + | ==== Details ==== |
| − | {| class="wikitable" style="text-align:center" | + | {| class="wikitable" style="text-align:center" width="50%" |
|- | |- | ||
! colspan="5" | Features | ! colspan="5" | Features | ||
|- | |- | ||
| − | ! Combat | + | ! Combat flaps !! Take-off flaps !! Landing flaps !! Air brakes !! Arrestor gear |
| − | ! Take-off | ||
| − | ! Landing | ||
| − | ! Air brakes | ||
| − | ! Arrestor gear | ||
|- | |- | ||
| X || ✓ || ✓ || ✓ || X <!-- ✓ --> | | X || ✓ || ✓ || ✓ || X <!-- ✓ --> | ||
| Line 72: | Line 47: | ||
|} | |} | ||
| − | {| class="wikitable" style="text-align:center" | + | {| class="wikitable" style="text-align:center" width="50%" |
|- | |- | ||
| − | ! colspan=" | + | ! colspan="7" | Limits |
|- | |- | ||
| − | ! rowspan="2" | | + | ! rowspan="2" | Wings (km/h) |
| − | ! rowspan="2" | Gear | + | ! rowspan="2" | Gear (km/h) |
| − | ! | + | ! colspan="3" | Flaps (km/h) |
! colspan="2" | Max Static G | ! colspan="2" | Max Static G | ||
|- | |- | ||
| − | ! + | + | ! Combat !! Take-off !! Landing !! + !! - |
| − | ! - | ||
|- | |- | ||
| − | | | + | | {{Specs|destruction|body}} || {{Specs|destruction|gear}} || N/A || 520 || 320 || ~15 || ~6 |
|- | |- | ||
|} | |} | ||
| Line 90: | Line 64: | ||
{| class="wikitable" style="text-align:center" | {| class="wikitable" style="text-align:center" | ||
|- | |- | ||
| − | ! colspan="4" | Optimal velocities | + | ! colspan="4" | Optimal velocities (km/h) |
|- | |- | ||
| − | ! Ailerons | + | ! Ailerons !! Rudder !! Elevators !! Radiator |
| − | ! Rudder | ||
| − | ! Elevators | ||
| − | ! Radiator | ||
|- | |- | ||
| − | | < 250 || < 350 || < 350 || > | + | | < 250 || < 350 || < 350 || > 280 |
|- | |- | ||
|} | |} | ||
| Line 111: | Line 82: | ||
! WEP Engine power | ! WEP Engine power | ||
|- | |- | ||
| − | | 3,700 m || 930 hp || 1,200 hp | + | | 3,700 m || 930 hp || 1,200 hp |
|- | |- | ||
| − | |||
| − | |||
| − | |||
| − | |||
| − | |||
| − | |||
| − | |||
| − | |||
| − | |||
| − | |||
| − | |||
| − | |||
| − | |||
| − | |||
| − | |||
| − | |||
|} | |} | ||
=== Survivability and armour === | === Survivability and armour === | ||
| − | <!--''Examine the survivability of the aircraft. Note how vulnerable the structure is and how secure the pilot is, whether the fuel tanks are armoured. Describe the armour, if there is any, also mention the vulnerability of other critical aircraft systems.''--> | + | <!-- ''Examine the survivability of the aircraft. Note how vulnerable the structure is and how secure the pilot is, whether the fuel tanks are armoured, etc. Describe the armour, if there is any, and also mention the vulnerability of other critical aircraft systems.'' --> |
* 8 mm Steel - behind the pilot | * 8 mm Steel - behind the pilot | ||
| Line 142: | Line 97: | ||
== Armaments == | == Armaments == | ||
=== Offensive armament === | === Offensive armament === | ||
| − | <!--''Describe the offensive armament of the aircraft, if any. Describe how effective the cannons and machine guns are in a battle, and also what belts or drums are better to use. If there is no offensive weaponry, delete this subsection.''--> | + | <!-- ''Describe the offensive armament of the aircraft, if any. Describe how effective the cannons and machine guns are in a battle, and also what belts or drums are better to use. If there is no offensive weaponry, delete this subsection.'' --> |
{{main|MG 17 (7.92 mm)}} | {{main|MG 17 (7.92 mm)}} | ||
| Line 150: | Line 105: | ||
=== Suspended armament === | === Suspended armament === | ||
| − | <!--''Describe the aircraft's suspended armament: additional cannons under the wings, bombs, rockets and torpedoes. This section is especially important for bombers and attackers. If there is no suspended weaponry remove this subsection.''--> | + | <!-- ''Describe the aircraft's suspended armament: additional cannons under the wings, bombs, rockets and torpedoes. This section is especially important for bombers and attackers. If there is no suspended weaponry remove this subsection.'' --> |
| − | {{main|SC250JA (250 kg)| | + | {{main|SC250JA (250 kg)|SC500K (500 kg)|SC1000L2 (1,000 kg)}} |
| − | The '''''{{PAGENAME}}''''' can | + | The '''''{{PAGENAME}}''''' can be outfitted with the following ordnance: |
* 1 x 250 kg SC250JA bomb (250 kg total) | * 1 x 250 kg SC250JA bomb (250 kg total) | ||
| − | * 1 x 500 kg | + | * 1 x 500 kg SC500K bomb (500 kg total) |
| − | * 1 x 1,000 kg | + | * 1 x 1,000 kg SC1000L2 bomb (1,000 kg total) |
=== Defensive armament === | === Defensive armament === | ||
| − | <!--''Defensive armament with turret machine guns or cannons, crewed by gunners. Examine the number of gunners and what belts or drums are better to use. If defensive weaponry is not available remove this subsection.''--> | + | <!-- ''Defensive armament with turret machine guns or cannons, crewed by gunners. Examine the number of gunners and what belts or drums are better to use. If defensive weaponry is not available, remove this subsection.'' --> |
{{main|MG 15 (7.92 mm)}} | {{main|MG 15 (7.92 mm)}} | ||
| Line 167: | Line 122: | ||
* 1 x 7.92 mm MG 15 machine gun, dorsal turret (900 rpg) | * 1 x 7.92 mm MG 15 machine gun, dorsal turret (900 rpg) | ||
| − | == Usage in | + | == Usage in battles == |
| − | <!--''Describe the tactics of playing in | + | <!-- ''Describe the tactics of playing in the aircraft, the features of using aircraft in a team and advice on tactics. Refrain from creating a "guide" - do not impose a single point of view, but instead, give the reader food for thought. Examine the most dangerous enemies and give recommendations on fighting them. If necessary, note the specifics of the game in different modes (AB, RB, SB).'' --> |
[[File:BomberImage_Ju87R2 desert camo.jpg|thumbnail|right|[[Ju 87 R-2|Ju 87R-2]] with desert camouflage.]] | [[File:BomberImage_Ju87R2 desert camo.jpg|thumbnail|right|[[Ju 87 R-2|Ju 87R-2]] with desert camouflage.]] | ||
In Arcade Battles you should concentrate on killing tanks and pillboxes first (if any) with your bombs, and use your offensive machine guns to kill soft targets like armoured cars, artillery, howitzers and AA. In this mode, you won't need your air brakes since you can't break your wings and it's easy to pull up from a fast dive attack, and its recommended that you keep as much of your speed up from the dives so you are harder to intercept by enemy aircraft. Another viable option on maps with light vehicles is to stay at altitude, dive, | In Arcade Battles you should concentrate on killing tanks and pillboxes first (if any) with your bombs, and use your offensive machine guns to kill soft targets like armoured cars, artillery, howitzers and AA. In this mode, you won't need your air brakes since you can't break your wings and it's easy to pull up from a fast dive attack, and its recommended that you keep as much of your speed up from the dives so you are harder to intercept by enemy aircraft. Another viable option on maps with light vehicles is to stay at altitude, dive, | ||
| − | drop your 1000 kg bomb, and climb again, circling until you get another bomb. This work most effectively on maps with groups of armoured cars that are clustered, bot in a line. | + | drop your 1000 kg bomb, and climb again, circling until you get another bomb. This work most effectively on maps with groups of armoured cars that are clustered, bot in a line. |
| − | In Realistic Battles, you should keep your altitude, and look for tank columns to attack. Once you've chosen which tank column you wish to attack(I recommend some ground targets as far from the battlefield or enemy airfield as possible, so you are less likely to be intercepted) . Once you are right over your intended target, set your throttle to 0% and point your nose at the at the tank you want to destroy (since you have no bombsight, there will not be a bomb-drop indicator like in Arcade, and you will have to guess where the bombs will drop) once you are nearing your target, you will have to deploy your air-brakes or you won't be able to pull up at high speeds. (you can tell when you are reaching a high speed with the sounds that the air and wings make) Once you drop your bomb(s) point your nose up to pull up. At this point you may or may not have killed your intended target, but it is OK if you didn't you will get better at it with more practice, but you still have your offensive armament to kill soft targets like AA or you can engage enemy fighters that are nearby (which is very likely). | + | In Realistic Battles, you should keep your altitude, and look for tank columns to attack. Once you've chosen which tank column you wish to attack(I recommend some ground targets as far from the battlefield or enemy airfield as possible, so you are less likely to be intercepted) . Once you are right over your intended target, set your throttle to 0% and point your nose at the at the tank you want to destroy (since you have no bombsight, there will not be a bomb-drop indicator like in Arcade, and you will have to guess where the bombs will drop) once you are nearing your target, you will have to deploy your air-brakes or you won't be able to pull up at high speeds. (you can tell when you are reaching a high speed with the sounds that the air and wings make) Once you drop your bomb(s) point your nose up to pull up. At this point you may or may not have killed your intended target, but it is OK if you didn't you will get better at it with more practice, but you still have your offensive armament to kill soft targets like AA or you can engage enemy fighters that are nearby (which is very likely). |
Dogfighting the RB with Ju87 is a very difficult task if the enemy knows your advantages and disadvantages and uses them to his advantage. I recommend that you avoid doing head-on attacks a much as possible, for you don't have the armament to risk it. I also recommend that you stay low and slow in a combat situation with enemy aircraft(because bad control ability at high speeds ) and try to get the enemy to engage in a turn fight. If he falls for your turn fight, you should end up on his 6 o'clock in 3-5 turns on most enemies, it really depends on if its a British, American or Russian plane, British being generally the better turn fighter. If he doesn't fall for your turn fight, you are most likely going to go down...this plane is not a fighter plane. | Dogfighting the RB with Ju87 is a very difficult task if the enemy knows your advantages and disadvantages and uses them to his advantage. I recommend that you avoid doing head-on attacks a much as possible, for you don't have the armament to risk it. I also recommend that you stay low and slow in a combat situation with enemy aircraft(because bad control ability at high speeds ) and try to get the enemy to engage in a turn fight. If he falls for your turn fight, you should end up on his 6 o'clock in 3-5 turns on most enemies, it really depends on if its a British, American or Russian plane, British being generally the better turn fighter. If he doesn't fall for your turn fight, you are most likely going to go down...this plane is not a fighter plane. | ||
| Line 196: | Line 151: | ||
* Turn Time: -2 sec | * Turn Time: -2 sec | ||
| − | ===Manual Engine Control=== | + | === Manual Engine Control === |
{| class="wikitable" style="text-align:center" | {| class="wikitable" style="text-align:center" | ||
|- | |- | ||
! colspan="7" | MEC elements | ! colspan="7" | MEC elements | ||
|- | |- | ||
| − | ! rowspan="2" |Mixer | + | ! rowspan="2" | Mixer |
| − | ! rowspan="2" |Pitch | + | ! rowspan="2" | Pitch |
| − | ! colspan="3" |Radiator | + | ! colspan="3" | Radiator |
| − | ! rowspan="2" |Supercharger | + | ! rowspan="2" | Supercharger |
| − | ! rowspan="2" |Turbocharger | + | ! rowspan="2" | Turbocharger |
|- | |- | ||
| − | ! Oil | + | ! Oil !! Water !! Type |
| − | ! Water | ||
| − | ! Type | ||
|- | |- | ||
| − | | | + | | Not controllable || Controllable<br>Not auto controlled || Controllable<br>Not auto controlled || Controllable<br>Not auto controlled || Separate || Not controllable<br>1 gear || Not controllable |
|- | |- | ||
|} | |} | ||
| − | ===Modules=== | + | === Modules === |
{| class="wikitable" | {| class="wikitable" | ||
! Tier | ! Tier | ||
| − | ! Flight performance | + | ! colspan="2" | Flight performance |
! Survivability | ! Survivability | ||
! Weaponry | ! Weaponry | ||
|- | |- | ||
| I | | I | ||
| − | | Fuselage | + | | Fuselage repair |
| − | | | + | | Radiator |
| + | | | ||
| Offensive 7 mm | | Offensive 7 mm | ||
|- | |- | ||
| II | | II | ||
| + | | | ||
| Compressor | | Compressor | ||
| Airframe | | Airframe | ||
| Line 233: | Line 188: | ||
|- | |- | ||
| III | | III | ||
| − | | | + | | Wings repair |
| − | | | + | | Engine |
| + | | | ||
| Turret 7 mm | | Turret 7 mm | ||
|- | |- | ||
| IV | | IV | ||
| − | | Engine | + | | |
| + | | Engine injection | ||
| Cover | | Cover | ||
| New 7 mm MGs (turret) | | New 7 mm MGs (turret) | ||
| Line 244: | Line 201: | ||
|} | |} | ||
| − | In this aircraft, all the bomb loads are | + | In this aircraft, all the bomb loads are equippable from the start, with no need to research any pylon modules. So, it is advisable to acquire either 500 kg bombs or 1,000 kg bombs from the start. However, before using the 1,000 kg bomb it is best to research modules that influence climb rate heavily, particularly engine upgrades. Without these, the larger bomb degrades performance too heavily. The gun upgrades are less needed, as this aircraft does not rely too much on their damage output. |
=== Pros and cons === | === Pros and cons === | ||
| − | <!--'' | + | <!-- ''Summarise and briefly evaluate the vehicle in terms of its characteristics and combat effectiveness. Mark its pros and cons in the bulleted list. Try not to use more than 6 points for each of the characteristics. Avoid using categorical definitions such as "bad", "good" and the like - use substitutions with softer forms such as "inadequate" and "effective".'' --> |
'''Pros:''' | '''Pros:''' | ||
| Line 266: | Line 223: | ||
== History == | == History == | ||
| − | + | ''Describe the history of the creation and combat usage of the aircraft in more detail than in the introduction. If the historical reference turns out to be too long, take it to a separate article, taking a link to the article about the vehicle and adding a block "/History" (example: <nowiki>https://wiki.warthunder.com/(Vehicle-name)/History</nowiki>) and add a link to it here using the <code>main</code> template. Be sure to reference text and sources by using <code><nowiki><ref></ref></nowiki></code>, as well as adding them at the end of the article with <code><nowiki><references /></nowiki></code>. This section may also include the vehicle's dev blog entry (if applicable) and the in-game encyclopedia description (under <code><nowiki>=== In-game description ===</nowiki></code>, also if applicable).'' | |
| − | |||
| − | |||
| − | |||
| − | |||
| − | |||
| − | |||
| − | |||
=== In-game description === | === In-game description === | ||
| − | + | The single-engine two-seater Junkers Ju-87 Stuka dive bomber was plagued with low speed and maneuverability and was extremely vulnerable without fighter support, but due to its high accuracy and a number of unusual design choices, it became one of the most famous of the Luftwaffe's aircraft. | |
| − | Even though the S-87 had such outdated technology as fixed landing gear, its design included new automatic air brakes which allowed the plane to escape a dive even if the pilot lost consciousness. An unusual decision was to install sirens, filling the vicinity with a deafening roar to strike fear into the | + | Even though the S-87 had such outdated technology as fixed landing gear, its design included new automatic air brakes which allowed the plane to escape a dive even if the pilot lost consciousness. An unusual decision was to install sirens, filling the vicinity with a deafening roar to strike fear into the enemy's heart. |
| − | The Ju 87R-2 was a modification of the Ju 87B-2 and was manufactured during the same period of time. The Ju 87R-2 (Reichweite, | + | The Ju 87R-2 was a modification of the Ju 87B-2 and was manufactured during the same period of time. The Ju 87R-2 (Reichweite, "long-range") had increased range due to the installation of two additional 150-liter wing fuel tanks and two disposable 150-liter fuel tanks under its wings, instead of the usual four 50-kg bombs. Like the B-2, the R-2's engine had a capacity of 1,200 horsepower, and its bomb load was reduced to one 250-kg bomb. |
| − | 5,752 | + | 5,752 "Stukas" were constructed, 616 of which were Ju 87R-2s. |
== Media == | == Media == | ||
| − | <!--Excellent additions to the article would be video guides, screenshots from the game, and photos.--> | + | <!-- ''Excellent additions to the article would be video guides, screenshots from the game, and photos.'' --> |
{{Youtube-gallery|owYlJZ4LgyA|'''The Shooting Range #36''' - ''Pages of History'' section at 06:02 discusses the Ju 87 Stuka.}} | {{Youtube-gallery|owYlJZ4LgyA|'''The Shooting Range #36''' - ''Pages of History'' section at 06:02 discusses the Ju 87 Stuka.}} | ||
| − | == | + | == See also == |
| − | ''Links to the articles on the War Thunder Wiki that you think will be useful for the reader, for example | + | ''Links to the articles on the War Thunder Wiki that you think will be useful for the reader, for example:'' |
| − | |||
* ''reference to the series of the aircraft;'' | * ''reference to the series of the aircraft;'' | ||
* ''links to approximate analogues of other nations and research trees.'' | * ''links to approximate analogues of other nations and research trees.'' | ||
| − | |||
| − | == | + | == External links == |
''Paste links to sources and external resources, such as:'' | ''Paste links to sources and external resources, such as:'' | ||
| − | |||
* ''topic on the official game forum;'' | * ''topic on the official game forum;'' | ||
| − | * ''page on aircraft | + | * ''encyclopedia page on the aircraft;'' |
* ''other literature.'' | * ''other literature.'' | ||
{{AirManufacturer Junkers}} | {{AirManufacturer Junkers}} | ||
{{Germany bombers}} | {{Germany bombers}} | ||
Revision as of 10:11, 28 July 2020
Contents
| This page is about the German dive bomber Ju 87 R-2. For other variants, see Ju 87 (Family). |
Description

The Ju 87 R-2 is a rank I German bomber
with a battle rating of 1.3 (AB/RB/SB). It has been in the game since the start of the Open Beta Test prior to Update 1.27.
The main use of this plane is precision strikes on hard targets such as tanks and pillboxes, as well as providing ground support in ground battles. This is largely due to its spectacular dive-bombing accuracy and powerful payload. To preform an effective dive with this plane, at an altitude of at least 1,400 m, place your target at the bend in your wings, roll your upside-down and dive at an angle of 60-90 degrees, aiming your cross-hairs at or slightly in front of the target (leading with their speed). Drop throttle to 0% and deploy airbrakes (h key by default); you should keep a steady speed of 400 km/h. Release your bomb at 300 m from the target and you should score a direct, or near hit.
General info
Flight performance
Describe how the aircraft behaves in the air. Speed, manoeuvrability, acceleration and allowable loads - these are the most important characteristics of the vehicle.
| Characteristics | Max Speed (km/h at 4,100 m) |
Max altitude (metres) |
Turn time (seconds) |
Rate of climb (metres/second) |
Take-off run (metres) | |||
|---|---|---|---|---|---|---|---|---|
| AB | RB | AB | RB | AB | RB | |||
| Stock | 366 | 356 | 7000 | 28.1 | 29.1 | 6.5 | 6.5 | 434 |
| Upgraded | ___ | ___ | __._ | __._ | __._ | __._ | ||
Details
| Features | ||||
|---|---|---|---|---|
| Combat flaps | Take-off flaps | Landing flaps | Air brakes | Arrestor gear |
| X | ✓ | ✓ | ✓ | X |
| Limits | ||||||
|---|---|---|---|---|---|---|
| Wings (km/h) | Gear (km/h) | Flaps (km/h) | Max Static G | |||
| Combat | Take-off | Landing | + | - | ||
| 680 | 680 | N/A | 520 | 320 | ~15 | ~6 |
| Optimal velocities (km/h) | |||
|---|---|---|---|
| Ailerons | Rudder | Elevators | Radiator |
| < 250 | < 350 | < 350 | > 280 |
| Compressor (RB/SB) | ||
|---|---|---|
| Setting 1 | ||
| Optimal altitude | 100% Engine power | WEP Engine power |
| 3,700 m | 930 hp | 1,200 hp |
Survivability and armour
- 8 mm Steel - behind the pilot
- 5 mm Steel - behind the rear gunner
- No armour glazing
- Critical components located in front of aircraft (fuel, pilot, engine, controls)
- More fuel tanks located in wings near fuselage
Armaments
Offensive armament
The Ju 87 R-2 is armed with:
- 2 x 7.92 mm MG 17 machine guns, wing-mounted (500 rpg = 1,000 total)
Suspended armament
The Ju 87 R-2 can be outfitted with the following ordnance:
- 1 x 250 kg SC250JA bomb (250 kg total)
- 1 x 500 kg SC500K bomb (500 kg total)
- 1 x 1,000 kg SC1000L2 bomb (1,000 kg total)
Defensive armament
The Ju 87 R-2 is defended by:
- 1 x 7.92 mm MG 15 machine gun, dorsal turret (900 rpg)
Usage in battles

In Arcade Battles you should concentrate on killing tanks and pillboxes first (if any) with your bombs, and use your offensive machine guns to kill soft targets like armoured cars, artillery, howitzers and AA. In this mode, you won't need your air brakes since you can't break your wings and it's easy to pull up from a fast dive attack, and its recommended that you keep as much of your speed up from the dives so you are harder to intercept by enemy aircraft. Another viable option on maps with light vehicles is to stay at altitude, dive, drop your 1000 kg bomb, and climb again, circling until you get another bomb. This work most effectively on maps with groups of armoured cars that are clustered, bot in a line.
In Realistic Battles, you should keep your altitude, and look for tank columns to attack. Once you've chosen which tank column you wish to attack(I recommend some ground targets as far from the battlefield or enemy airfield as possible, so you are less likely to be intercepted) . Once you are right over your intended target, set your throttle to 0% and point your nose at the at the tank you want to destroy (since you have no bombsight, there will not be a bomb-drop indicator like in Arcade, and you will have to guess where the bombs will drop) once you are nearing your target, you will have to deploy your air-brakes or you won't be able to pull up at high speeds. (you can tell when you are reaching a high speed with the sounds that the air and wings make) Once you drop your bomb(s) point your nose up to pull up. At this point you may or may not have killed your intended target, but it is OK if you didn't you will get better at it with more practice, but you still have your offensive armament to kill soft targets like AA or you can engage enemy fighters that are nearby (which is very likely).
Dogfighting the RB with Ju87 is a very difficult task if the enemy knows your advantages and disadvantages and uses them to his advantage. I recommend that you avoid doing head-on attacks a much as possible, for you don't have the armament to risk it. I also recommend that you stay low and slow in a combat situation with enemy aircraft(because bad control ability at high speeds ) and try to get the enemy to engage in a turn fight. If he falls for your turn fight, you should end up on his 6 o'clock in 3-5 turns on most enemies, it really depends on if its a British, American or Russian plane, British being generally the better turn fighter. If he doesn't fall for your turn fight, you are most likely going to go down...this plane is not a fighter plane.
When returning to base landing and takeoff is simple, and use of the air brakes will help if you came in to fast to land. But you may be coming back on a dead or damaged engine (The Ju87s engine is prone to damage and overheat)and it would help if you find the nearest friendly airfield and get there as soon as possible.
Because of their low speed, permanent landing gear and reasonable durability, all the Ju 87 are quite good for capturing airfields in the Airfield Domination mode.
In ground RBs, the Ju 87 R-2 has a great advantage: the large 1,000 kg bomb. Almost all enemy tanks at a similiar BR won't survive such an explosion, or they will have critical damages for sure. Remember to set the time fuse at 3 seconds: if longer the enemy may escape, if shorter your plane might be damaged by the explosion as well. Follow all the instructions you have for RBs, and return to the airfield asap because with the slow speed, the Ju 87 is a perfect target for AA vehicles.
IGD (Intentional Gear Destruction)
Due to the high parasite drag imposed by fixed landing gear spats, the planes top speed and performance are hindered. No Stuka's landing gear is retractable. For maximum performance of the plane, one can destroy the gear by touching them to a body of water (not rough, but flat and calm). To do this, swoop low, and reduce airspeed to around 210 km/h (160 mph). Next, slowly near the water at an angle of attack of 10 degrees or more. Once you hear a snap, or see the gear come off, pull up immediately to avoid breaking the engine.
- Effects on performance due to IGD
Effects have been tested numerous times, but may vary based on payload, fuel, aircraft damage, etc.
- Airspeed: +50 km/h (30 mph) to max speed.
- Drag coefficient: -10-20% (numbers not exact)
- Weight: Negligible
- Turn Time: -2 sec
Manual Engine Control
| MEC elements | ||||||
|---|---|---|---|---|---|---|
| Mixer | Pitch | Radiator | Supercharger | Turbocharger | ||
| Oil | Water | Type | ||||
| Not controllable | Controllable Not auto controlled |
Controllable Not auto controlled |
Controllable Not auto controlled |
Separate | Not controllable 1 gear |
Not controllable |
Modules
| Tier | Flight performance | Survivability | Weaponry | |
|---|---|---|---|---|
| I | Fuselage repair | Radiator | Offensive 7 mm | |
| II | Compressor | Airframe | New 7 mm MGs | |
| III | Wings repair | Engine | Turret 7 mm | |
| IV | Engine injection | Cover | New 7 mm MGs (turret) | |
In this aircraft, all the bomb loads are equippable from the start, with no need to research any pylon modules. So, it is advisable to acquire either 500 kg bombs or 1,000 kg bombs from the start. However, before using the 1,000 kg bomb it is best to research modules that influence climb rate heavily, particularly engine upgrades. Without these, the larger bomb degrades performance too heavily. The gun upgrades are less needed, as this aircraft does not rely too much on their damage output.
Pros and cons
Pros:
- Forward-firing guns
- Airbrake
- Customizable armament presets
- Significant maximum bomb load
- High maximum dive speed for its tier
Cons:
- Slow speed
- Poor rate of climb
- Bad energy retention
- Poor performance while equipped with 1,000 kg bomb
- Can mount only one bomb (of any kind that is available on this plane), unlike the B version.
History
Describe the history of the creation and combat usage of the aircraft in more detail than in the introduction. If the historical reference turns out to be too long, take it to a separate article, taking a link to the article about the vehicle and adding a block "/History" (example: https://wiki.warthunder.com/(Vehicle-name)/History) and add a link to it here using the main template. Be sure to reference text and sources by using <ref></ref>, as well as adding them at the end of the article with <references />. This section may also include the vehicle's dev blog entry (if applicable) and the in-game encyclopedia description (under === In-game description ===, also if applicable).
In-game description
The single-engine two-seater Junkers Ju-87 Stuka dive bomber was plagued with low speed and maneuverability and was extremely vulnerable without fighter support, but due to its high accuracy and a number of unusual design choices, it became one of the most famous of the Luftwaffe's aircraft.
Even though the S-87 had such outdated technology as fixed landing gear, its design included new automatic air brakes which allowed the plane to escape a dive even if the pilot lost consciousness. An unusual decision was to install sirens, filling the vicinity with a deafening roar to strike fear into the enemy's heart.
The Ju 87R-2 was a modification of the Ju 87B-2 and was manufactured during the same period of time. The Ju 87R-2 (Reichweite, "long-range") had increased range due to the installation of two additional 150-liter wing fuel tanks and two disposable 150-liter fuel tanks under its wings, instead of the usual four 50-kg bombs. Like the B-2, the R-2's engine had a capacity of 1,200 horsepower, and its bomb load was reduced to one 250-kg bomb.
5,752 "Stukas" were constructed, 616 of which were Ju 87R-2s.
Media
See also
Links to the articles on the War Thunder Wiki that you think will be useful for the reader, for example:
- reference to the series of the aircraft;
- links to approximate analogues of other nations and research trees.
External links
Paste links to sources and external resources, such as:
- topic on the official game forum;
- encyclopedia page on the aircraft;
- other literature.
| Junkers Aircraft and Motor Works (Junkers Flugzeug- und Motorenwerke Aktiengesellschaft) | |
|---|---|
| Fighters | Ju 88 C-6 · Ju 388 J |
| Strike Aircraft | |
| Ju 87 | Ju 87 G-1 · Ju 87 G-2 |
| Bombers | Ju 88 A-1 · Ju 88 A-4 · Ju 188 A-2 · Ju 288 C |
| Ju 87 | Ju 87 B-2 · Ju 87 D-3 · Ju 87 D-5 · Ju 87 R-2 · Ju 87 R-2 Libya |
| Export | ▄Ju 87 D-3 · ▄Ju 87 R-2 · ▄Ju 88 A-4 |
| Germany bombers | |
|---|---|
| Arado | Ar 196 A-3 |
| Blohm & Voss | BV 138 C-1 · BV 238 |
| Dornier | Do 17 E-1 · Do 17 Z-2 · Do 217 E-2 · Do 217 E-4 · Do 217 K-1 · Do 217 M-1 |
| Focke-Wulf | Fw 189 A-1 · Fw 200 C-1 |
| Henschel | Hs 123 A-1 |
| Heinkel | He 111 H-3 · He 111 H-6 · He 111 H-16 · He 115 C-1 · He 177 A-5 |
| Junkers | Ju 87 B-2 · Ju 87 R-2 · Ju 87 R-2 Libya · Ju 87 D-3 · Ju 87 D-5 · Ju 88 A-1 · Ju 88 A-4 · Ju 188 A-2 · Ju 288 C |
| Messerschmitt | Me 264 |
| Savoia-Marchetti | ▀S.M.79 serie 1 · ▀S.M.79 B · ▀S.M.79 serie 4 · ▀S.M.79 serie 8 |
| ▀S.M.79 AS · ▀S.M.79 bis/N · ▀S.M.79 bis/T.M | |
| Trophies | ▀Wellington Mk Ic |
