He 177 A-5

From War Thunder Wiki
Jump to: navigation, search
Rank VI USA | Premium | Golden Eagles
A-10A Thunderbolt (Early)
he-177a-5.png
GarageImage He 177 A-5.jpg
ArtImage He 177 A-5.png
He 177 A-5
Research:71 000 Specs-Card-Exp.png
Purchase:210 000 Specs-Card-Lion.png
Show in game

Description

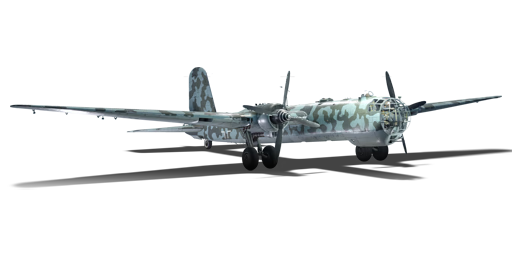
The He 177 has its origins well before World War 2 even began with the German Air Ministry's Bomber A specifications. Heinkel took up the task of building a long-range bomber that could hit a top speed of 571 km/h (355 mph) and a range of over 1,000 miles (1,609 kilometres). In addition, it also needed to be able to carry up to 4,400 lb (1,995 kg) of bombs. This was far above any bomber at the time and almost impossible to achieve. Although plans began in the mid-1930s, the final design and production wouldn't come to fruition until well into the war. Around 1,000 He 177 "Greif" (Griffon in German) bombers were built. It was far too late in the war to have any noticeable impact and was still plagued with issues. Most notoriously its tendency to catch fire during flights due to poor engine cooling system.

The He 177 A-5 was introduced in Update 1.77 "Advancing Storm" as an addition from the revenue share program, created by Daniil "Joy_Division__" Zaytsev. Although it may look like a twin-engine bomber, the Greif actually has four engines, two mounted on one shaft spinning one propeller. Unfortunately, this makes the engines prone to overheating and players should be wary of prolonged high-power usage. The Greif has a very high structural speed limit of 683 km/h (424 mph), which helps it dive quickly to bases if needed. Being a long-range bomber, the He 177 is also quite heavily defended; six turrets are mounted all over the aircraft which provide excellent firing angles. Although the He 177 struggled in real life, it's a relatively decent bomber in-game that can defend itself and significantly damage enemy bases.

General info

Flight performance

Max speed
at 6 500 m555 km/h
Turn time31 s
Max altitude10 000 m
Engine2 х Daimler-Benz DB-610
TypeInline
Cooling systemWater
Take-off weight31 t

Powered by two DB 610 coupled engines, the He 177 A-5 features great overall flight performance due to the sleek and more aerodynamic design compared to conventional four-engine heavy bombers. The plane can turn and bank around with relative ease, and has great flatline speed and climb rate for its size. Being designed to be capable of dive bombing, the He 177 A-5 can also perform these tasks quite well despite the size. This allows it to deliver precision strike at an enemy, an ability that other heavy bombers would struggle to perform otherwise.

However, the He 177 A-5's greatest asset in the form of engines is also its greatest downfall. In real life, the DB 610 is infamous for its tendency to catch fire during the flight, owning due to its cramped nacelles rendering the cooling system ineffective. While this self-immolation tendency were fortunately not reflected in-game, the DB 610's notoriously poor cooling system will cause the engine to quickly overheat while on WEP or having its coolant leaked via damage, thus causing the engine to be damaged if left unattended. The engines are also somewhat underpowered compared to the plane's weight. This means if one engine is knocked out, the plane will be unable to stay airborne and forcing the pilot to either land or crash. The engines also struggled to lift off the plane while it has low speed, thus complicated the take off and landing procedure, especially while carrying heavy payload.

Characteristics Max Speed
(km/h at 6,500 m)
Max altitude
(metres)
Turn time
(seconds)
Rate of climb
(metres/second)
Take-off run
(metres)
AB RB AB RB AB RB
Stock 531 518 10000 32.2 33.4 5.9 5.9 1,600
Upgraded 582 555 29.8 31.0 10.5 8.0

Details

Features
Combat flaps Take-off flaps Landing flaps Air brakes Arrestor gear
X X
Limits
Wings (km/h) Gear (km/h) Flaps (km/h) Max Static G
Combat Take-off Landing + -
683 260 431 406 280 ~4 ~1
Optimal velocities (km/h)
Ailerons Rudder Elevators Radiator
< 300 < 310 < 360 > 715

Survivability and armour

He 177's armour profile
Crew6 people
Speed of destruction
Structural0 km/h
Gear260 km/h
  • 9 mm Steel plates in pilot's seat
  • 7 mm Steel plate under the entire cockpit
  • 9 mm Steel plate in front of the front dorsal gunner
  • 7 mm Steel plates on cockpit roof around front dorsal gunner
  • 7 mm Steel plates around rear dorsal gunner
  • 7 mm Steel box in front of the rear dorsal gunner
  • 57 mm Bulletproof glass in front of tail gunner
  • 9 mm Steel plates around the bottom and front of tail gunner
  • Self-sealing fuel tanks (2 in frontal fuselage, 2 in central fuselage, 2 in each wing)

Modifications and economy

Repair costBasic → Reference
AB3 113 → 4 295 Sl icon.png
RB8 385 → 11 571 Sl icon.png
SB16 664 → 22 996 Sl icon.png
Total cost of modifications61 300 Rp icon.png
102 300 Sl icon.png
Talisman cost1 800 Ge icon.png
Crew training61 000 Sl icon.png
Experts210 000 Sl icon.png
Aces1 200 Ge icon.png
Research Aces570 000 Rp icon.png
Reward for battleAB / RB / SB
100 / 210 / 570 % Sl icon.png
178 / 178 / 178 % Rp icon.png
Modifications
Flight performance Survivability Weaponry
Mods aerodinamic fuse.png
Fuselage repair
Research:
2 000 Rp icon.png
Cost:
3 300 Sl icon.png
195 Ge icon.png
Mods radiator.png
Radiator
Research:
2 000 Rp icon.png
Cost:
3 300 Sl icon.png
195 Ge icon.png
Mods armor frame.png
Airframe
Research:
2 800 Rp icon.png
Cost:
4 700 Sl icon.png
270 Ge icon.png
Mods compressor.png
Compressor
Research:
2 800 Rp icon.png
Cost:
4 700 Sl icon.png
270 Ge icon.png
Mods aerodinamic wing.png
Wings repair
Research:
3 100 Rp icon.png
Cost:
5 200 Sl icon.png
300 Ge icon.png
Mods new engine.png
Engine
Research:
3 100 Rp icon.png
Cost:
5 200 Sl icon.png
300 Ge icon.png
Mods armor cover.png
Cover
Research:
3 300 Rp icon.png
Cost:
5 500 Sl icon.png
320 Ge icon.png
Mods metanol.png
Engine injection
Research:
3 300 Rp icon.png
Cost:
5 500 Sl icon.png
320 Ge icon.png
Mods engine extinguisher.png
EFS
Research:
3 300 Rp icon.png
Cost:
5 500 Sl icon.png
320 Ge icon.png
Mods ammo.png
mg_turret_belt_pack
Research:
2 000 Rp icon.png
Cost:
3 300 Sl icon.png
195 Ge icon.png
Mod arrow 0.png
Mods pilon bomb.png
SC 250
Research:
2 000 Rp icon.png
Cost:
3 300 Sl icon.png
195 Ge icon.png
Mod arrow 0.png
Mods ammo.png
mg15120_turret_belt_pack
Research:
2 000 Rp icon.png
Cost:
3 300 Sl icon.png
195 Ge icon.png
Mod arrow 1.png
Mods napalm fire bomb.png
Flamm C 250
Research:
2 000 Rp icon.png
Cost:
3 300 Sl icon.png
195 Ge icon.png
Mod arrow 0.png
Mods turret gun.png
mg81_turret_new_gun
Research:
2 800 Rp icon.png
Cost:
4 700 Sl icon.png
270 Ge icon.png
Mods pilon bomb.png
SC 500
Research:
2 800 Rp icon.png
Cost:
4 700 Sl icon.png
270 Ge icon.png
Mod arrow 0.png
Mods napalm fire bomb.png
Flamm C 500
Research:
2 800 Rp icon.png
Cost:
4 700 Sl icon.png
270 Ge icon.png
Mods ammo.png
mg131_turret_belt_pack
Research:
3 100 Rp icon.png
Cost:
5 200 Sl icon.png
300 Ge icon.png
Mod arrow 0.png
Mods pilon bomb.png
SC 1000
Research:
3 100 Rp icon.png
Cost:
5 200 Sl icon.png
300 Ge icon.png
Mod arrow 0.png
Mods turret gun.png
mg15120_turret_new_gun
Research:
3 100 Rp icon.png
Cost:
5 200 Sl icon.png
300 Ge icon.png
Mods turret gun.png
mg131_turret_new_gun
Research:
3 300 Rp icon.png
Cost:
5 500 Sl icon.png
320 Ge icon.png
Mods pilon bomb.png
SC 1800
Research:
3 300 Rp icon.png
Cost:
5 500 Sl icon.png
320 Ge icon.png
Mod arrow right 0.png
Mods pilon bomb.png
FX 1400
Research:
3 300 Rp icon.png
Cost:
5 500 Sl icon.png
320 Ge icon.png

Armaments

Suspended armament

List of setups (13)
Setup 148 x 50 kg SC50JA bomb
Setup 212 x 250 kg SC250JA bomb
Setup 36 x 500 kg SC500K bomb
Setup 44 x 1000 kg SC1000L2 bomb
Setup 52 x 1800 kg SC1800B bomb
Setup 62 x 1800 kg SC1800B bomb
6 x 500 kg SC500K bomb
Setup 73 x PC 1400 X (Fritz X)
Setup 812 x Flam C 250 incendiary bomb
Setup 96 x Flam C 500 incendiary bomb
Setup 106 x 500 kg PC500 armor-piercing bomb
Setup 114 x 1000 kg PC1000 armor-piercing bomb
Setup 122 x 1600 kg PC1600 armor-piercing bomb
Setup 132 x 1600 kg PC1600 armor-piercing bomb
6 x 500 kg PC500 armor-piercing bomb

The He 177 A-5 can be outfitted with the following ordnance:

  • 48 x 50 kg SC50JA bombs (2,400 kg total)
  • 12 x 250 kg SC250JA bombs (3,000 kg total)
  • 6 x 500 kg SC500K bombs (3,000 kg total)
  • 4 x 1,000 kg SC1000L2 bombs (4,000 kg total)
  • 2 x 1,800 kg SC1800B bombs (3,600 kg total)
  • 2 x 1,800 kg SC1800B bombs + 6 x 500 kg SC500K bombs (6,600 kg total)
  • 3 x 1,400 kg PC 1400 X (Fritz X) bombs (4,200 kg total)
  • 12 x Flam C 250 incendiary bombs
  • 6 x Flam C 500 incendiary bombs
  • 6 x 500 kg PC500 bombs (3,000 kg total)
  • 4 x 1,000 kg PC1000 bombs (4,000 kg total)
  • 2 x 1,600 kg PC1600 bombs (3,200 kg total)
  • 2 x 1,600 kg PC1600 bombs + 6 x 500 kg PC500 bombs (6,200 kg total)

The stock payload of the He 177 A-5 consists of 48 x 50 kg bombs. While small in size, it is surprisingly effective, as 24 of these can destroy a single base in RB and two in total. Given that the plane's heaviest payload is also capable of destroying two bases while being almost three times heavier, the stock payload are actually more efficient against bases weight-to-damage ratio-wise. Because of this, it is recommended to use the stock payload against bases rather than "heavier" ones, as it will has much less effect on the plane's controllability, especially when compared to the "top" payload.

While less efficient, the He 177 A-5's heavier payload still has its own purposes. The top payload of the He 177 A-5 consists of 2 x 1,800 kg bombs and 6 x 500 kg bombs, both are effective against ground targets in mixed battles, especially when combined with the plane's surprisingly decent dive characteristic. The He 177 A-5 also has an access to three "Fritz X" guided glide bombs for precision strike at high altitudes.

Defensive armament

Turret20 mm MG 151 cannon
Ammunition300 rounds
Fire rate750 shots/min
Turret20 mm MG 151 cannon
Ammunition800 rounds
Fire rate750 shots/min
2 х Turret13 mm MG 131 machine gun
Ammunition1000 rounds
Fire rate900 shots/min
Turret2 x 13 mm MG 131 machine gun
Ammunition2000 rounds
Fire rate900 shots/min
Turret7.92 mm MG 81 machine gun
Ammunition1000 rounds
Fire rate1597 shots/min

The He 177 A-5 is defended by:

  • 1 x 20 mm MG 151 cannon, chin turret (300 rpg)
  • 1 x 20 mm MG 151 cannon, tail turret (800 rpg)
  • 2 x 13 mm MG 131 machine gun, front dorsal turret (1,000 rpg = 2,000 rpg)
  • 1 x 13 mm MG 131 machine gun, rear dorsal turret (1,000 rpg)
  • 1 x 13 mm MG 131 machine gun, ventral turret (1,000 rpg)
  • 1 x 7.92 mm MG 81 machine gun, nose turret (1,000 rpg)

The He 177 A-5 has a well-armed defensive armaments, with particular focus on the rear of the aircraft, as five 13 mm machine guns and a single 20 mm autocannon can be directed at a chasing enemy. The guns are relatively easy to aim and pack quite a punch, especially since the 20 mm turret has an access to the minengeschoß shell.

However, the He 177 A-5's defense still has quite a large blindspot. Due to the lack of waist and fully traversable ventral turret, the plane is especially vulnerable from attacks from the side or low diagonal angle. The plane's glazed nose will also leaves the pilot vulnerable from head-ons attack despite the front has an access to another 20 mm autocannon. As such, always face your six at the enemy whenever possible.

Usage in battles

He-177 flying in War Thunder

Strategic bombing

Combining the speed and handling of the Do 217 and the immense payload of the Lancaster along with defensive armament approaching that of the American bombers, the He 177 Greif is an outstanding heavy bomber. Its maximum payload of 2 x 1,800 kg and 6 x 500 kg bombs is easily the best of its contemporaries when it comes to demolishing bases in AB and airfields in RB/SB. Other payloads are quite useful depending on the bombing objectives in RB/SB: 6 x 500 kg against bases (3 per base), 4 x 1,000 kg and 2 x 1,800 kg for aircraft carriers and airfields.

The He 177 bears some similarities to the Do 217 series. It has an exceptionally high dive speed for a heavy bomber and is capable of reaching up to 700 km/h in a dive. It is, however, more manoeuvrable at high speeds, one has to be careful not to overload the wings. The two engines (which are really two V12 DB 605 engines coupled together to drive one four-bladed propeller, making them essentially 24 cylinder engines) are very powerful, but at the same time more vulnerable to damage.

The defensive armament of the Greif is very good by German standards, consisting primarily of 13 mm MG 131 heavy machine guns, completed with 2 MG 151/20 cannons, one in front and one in tail turret. The large tail fin prevents the dorsal turrets from firing directly to the rear, leaving only the MG 151/20, however.

Tactical bombing

The He 177 is the second and final aircraft of the German tech-tree to have access to the PC 1400 X Fritz X radio-guided bomb. Compared to the He 111 H-6, the He 177 can carry three individual drop Fritz X compared to a single one. The access to guided munitions make this the first actual high-altitude tactical bomber (tactical bombing is aerial bombing aimed at targets of immediate military value such as combatants) as it can strike moving targets with pin-point accuracy even from high altitude. In other words, the Fritz X offers the pilot a wide variety of possible engagements.

Climbing and bombing

The He 177 A-5 will spawn at 4.5 km as a long-range bomber and as such, it's much easier to get out of the reach of interceptors. Do some side climbing, reach 5,000 m after game start (speed will decrease to 250 km/h, but still fine) and continue with a 5-degree climb. Remember, this aircraft is not a dive bomber and should not be treated as such.

In order to side climb efficiently, the ETC 1000/I module and engine modules should be prioritised. After these upgrades, 4 x 1,000 kg bombs will become available to be equipped, which can be used to destroy up to 4 bases (no external wing-carried bombs here). Begin climbing once spawned, and go for the nearest base after reaching >6,000 m altitude. Be careful of enemy interceptors which may snake their way up to your altitude, because you are really vulnerable at low speeds, hence the recommendation to side-climb. Side-climbing will help pilot have enough time to reach high altitudes, and lay in a bombing run.

Flight and engagement paths

There are multiple rules which should be followed when flying the He 177 in order to prevent and counter a wide variety of threats. The first rule is stay out of Line of Sight (LOS). This is one of the most basic rules for any aircraft, but especially due to the size of the He 177, it is crucial as it is easier to spot a 2-engine bomber at distances than a single-prop aircraft. The He 177 is far from being the easiest plane to conceal, but due to its camouflage, it can become invisible to eye sight if whoever is the threat falls in the trap. Do not rely on the camouflage to conceal you most of the time, it depends on the LOS azimuth, distance and enemy pilot's awareness. The blue colour is reliable on both sea and land environments (specially in winter maps) although it is not recommended to rely on it in Realistic or Arcade battles as, once the aircraft is detected, a marker will appear on the He 177 revealing the position. Depending on the situation and gamemode, there are multiple environmental hiding places which can make the He 177 have a safe flight to the target zone. This can be divided into optical hiding and technological hiding, both of which are to be complimented by each other. The pilot must not focus on just one or the other, both have to be done at the same time in order to achieve the best survivability in game.

Optical hiding

Hide the aircraft from enemy LOS. This could be by taking a "grass-cutting" flight path (flying as close to the ground as possible), flying behind any sort of environmental obstructions (mountains, inside canyons, inside river banks, etc), or a really high altitude flight. Due to the air spawn capabilities, flight ceiling, cruising speed and battle rating, the He 177 has a much better survivability at high altitudes, mainly for the fact it lacks manoeuvrability and agility due to having a massive wingspan but having very capable and powerful defensive capabilities.

Technological hiding

Another concern is hiding yourself against all sorts of airborne and surface-based detection systems. While these systems are relatively uncommon at the battle rating, there are various platforms that have search radar.

  • Ground based radars
If using the He 177 in higher-rank Ground Realistic/Simulator battles, players may encounter radar SPAA with powerful search/tracking radar systems. In this case, take the He 177 as a strategic bomber to destroy targets from high altitudes using the powerful Fritz-X (see Fritz-X combat), staying out of range of their armaments and/or radar.
  • Naval based radars
In naval battles, it is somewhat common to encounter search/track radars. The He 177 will start encountering vessels such as the HMS Tiger, SKR-7, Spokoinyy, MPK Pr.12412, Bezuprechny, etc. All of these vessels are able to detect and effectively destroy the He 177 at a decent range. However, these chances will be reduced if the pilot flies at high altitude (preferably past 4 km). The main advantage of this is that it reduces the AAA accuracy. Now, the drawbacks from flying higher are not as significant compared to when trying to evade ground based radars and wanting to engage.

Fritz X sight reticle and guidance

Fritz X bomb sight similarities with default bomb sight.

As with other bombers, the bomb sights are the main aiming tool for delivering ordnance in Air Realistic and Simulator battles. Depending on the speed of the aircraft, flight attitude and altitude, the bomb sight may look different. Note that the bomb sight while using Fritz X varies from the standard bomb sight; it includes a new reticle indicating the guidance of the bomb.

Fritz X guidance reticle

First, make sure to set your guidance keybinds to the most comfortable keybinds, it is Alt + WASD by default.

Dropping bombs with standard bomb sights is easy: wait for the target to be on the crosshair, compensate if the target is moving, then drop. While this is true for the Fritz X, the story somewhat changes. Hitting moving targets with the Fritz X is much easier than with unguided bombs. However, it should be noted that the white box marks the limit of where the bomb can be guided and when the bomb hits the ground. The box is actually an overlapping cross, as the bomb falls down and gets closer to the ground, the box will start to close and overlap with the crosshair forming a cross as well, it should be noted that, as the box closes, the guidance area is reduced. After it has successfully hit the ground, the reticle will change to the default bombing reticle (as seen in the GIFs).

Fritz X combat

The Fritz X is a powerful bomb with a somewhat awkward mass (1,570 kg), but this does not affect the performance. The Fritz X is very good at what it does, but some aspects must be taken into consideration before fighting with it. First of all, the Fritz X is a guided glide bomb, it does not have any rocket propulsion or similar system. The "rocket" like smoke is given by a flare used to guide the bomb. Second, the Fritz X speed is dependent on the carrier's initial speed. If the He 177 is flying at 400 km/h then the bomb will have 400 km/h as its initial speed and gradually increase speed as it falls down. Third, the range of the bomb depends on the altitude of the carrier.

Against cruisers or battleships
Fritz X vs Cruiser

There is nothing more pleasing than watching the Fritz X hitting a ship followed by smoke, a fireball, and the powerful explosion sound it generates. Given the fact that cruisers and battleships are very dangerous due to their superb anti-air capabilities, you cannot hit them everywhere. If you want to maximize the effectiveness of the Fritz X, make sure to aim at the right spots. The first spot is the centre of mass. This is preferable over targeting the turrets which may initiate an ammo explosion, as the Fritz X is not a kinetic penetration-based bomb, it solely relies on penetrating by the explosive power. Cruiser decks might not be heavily armoured, but a cruiser has many decks, meaning the bomb will lose penetration and explosive power as it moves down. Usually the turrets will be destroyed with the ammo elevators. Situationally, the ammo racks will be lit on fire but there will be no critical/fatal damage to the ship's integrity. Whereas aiming at the COM does three main things: destroys exhaust funnels, damages or destroys engines and destroys two or more crew compartments, drastically reducing the ship's remaining crew complement. This number can vary depending on exactly where the bomb hits, but it will often take at least 40% of the crew. The same applies to battleships. However, most battleships tend to have secondary or tertiary ammo racks around the COM of the ship, meaning a COM hit will cause even more damage proportionally than was seen against the cruiser. As expected, you are not able to one-shot a battleship or cruiser with the Fritz X. However, you can cripple them with similar effect as a battleship armour-piercing salvo or even higher with just a single bomb. The second spot is below the waterline, below the waterline explosions tend to do significant damage, but in this case, a COM hit will do much more.

Fritz vs Destroyer
Against sub-chasers or destroyers

As expected, a bomb with an explosive mass of 320 kg is more than likely to cause fatal damage to this type of ship. However, while lightly armoured vessels tend to be destroyed with a single shot by nearly all types of hits, reasonably armoured destroyers tend to take one or more bombs if they are not aimed properly. To ensure a one-shot for any of these vessel types, aim for the turrets instead of the centre of mass. When it comes to destroyers, the number of decks is significantly reduced as well as the armour. The explosive penetration will have no efforts in hitting the ammo racks whatsoever and causing major flooding, significant crew loss, and an ammo explosion followed by scorching fires.

Manual Engine Control

MEC elements
Mixer Pitch Radiator Supercharger Turbocharger
Oil Water Type
Not controllable Controllable
Auto control available
Controllable
Auto control available
Controllable
Auto control available
Separate Not controllable
1 gear
Not controllable

Pros and cons

Pros:

  • Huge payload options, including three Fritz-X guided bombs
  • Heavy defensive weaponry with accurate 13 mm and 20 mm turrets
  • Fairly durable airframe capable of taking considerable amount of punishments
  • Good climb rate for a heavy bomber
  • Dual engine aerodynamic, make it quite manoeuvrable for a heavy bomber
  • Capable of dive bombings, unlike other heavy bombers

Cons:

  • Vulnerable to frontal and side engagements due to glazed nose and lack of coverage
  • Huge fuel and cooling oil tanks can be easily damaged and set on fire
  • Engines overheat very quickly when activating WEP and when the cooling system is empty
  • Very hard to take off and land, especially with heavy bombloads
  • Incapable of flying with one engine only, will keep losing altitude and eventually will have to land or crash

History

Development of the He 177 began in 1936 as part of the Bomber A specifications issued by the German Air Ministry (RLM). The specifications called for a long-range, high-speed bomber with a payload of 1,000 kg. Despite the very demanding specifications, Heinkel began working on a mockup which was submitted for review in late 1937, with an order for 12 experimental machines following shortly after in early 1939. However, throughout its development, the He 177 suffered from a range of problems, some of which weren't even fixed before further development stopped. For example, one of the requirements (which was soon rejected, since it was impossible to implement) from the Air Ministry was the ability to bomb from a dive, that's why the engineers had to make various workarounds to provide the required flight technical characteristics. To reduce aerodynamic drag and to ensure flight range, two DB 601 engines were installed in pairs on one gondola and worked with a common shaft which rotated one four-bladed propeller. Thanks to this it was possible to create the aircraft using a two-engined scheme. But for this reason, the vehicle suffered from severe engine overheating issues and more often than not experienced mid-flight engine failures and frequent fires. In the process of fine-tuning the aircraft, the weight was significantly increased, so it became necessary to install a massive frame which could not be hidden - a relatively thin wing or tightly packed nacelles wouldn't fit. As a result, each frame was divided into two racks, each with a single wheel that could be retracted into the wing on opposite sides of the nacelle.

By 1944, development of the He 177 was considered finished, but by that time, the fortune of war had already turned on Germany and the need for a complex strategic bomber had faded. Nonetheless, over 1,000 He 177s were produced across several variants, with most machines seeing action on the Eastern front. However, despite being made in large numbers, the aircraft ultimately failed to make a difference in the war's outcome as its design maturity came too late, although some of the built vehicles were also used after war's end.

- From Devblog

The He 177 also attacked Allied shipping. In 1943, the Greif was planned to utilize the Hs 239, a glider bomb that could be controlled by a crewman via radio. The Hs 239 had a 1,100 lb (498 kg) warhead along with a motor that would burn for about 12 seconds. Two Hs 239s could be mounted with one under each wing although it could allegedly carry a third one under the fuselage. The first attack against merchant shipping occurred in late 1943 against convoy SL 139 and MKS 30. Many of the early attacks against one of the ships in the convoy were unsuccessful due to the failures of the Hs 239. The He 177 was also not free from problems. One captain reported a He 177 catching on fire for seemingly no reason (most likely due to the overheating issue) and a couple Greif's never made it back. All in all, the attack was a major disappointment, only slightly remedied by the loss of two merchant ships.

A second attack was launched only a few days later and reliability issues struck again. 21 Greifs initially took off but one had to quickly land after a crankshaft failure. After finding convoy KMF 26, the 20 Greifs prepared for battle only to find enemy Spitfires and P-39s. One hit was scored on a troop carrier however this battle ultimately led to the loss of 12 He 177s, either by enemy aircraft fire, reliability issues, and/or the weather. The He 177 struggled against anti-shipping and measures had to be taken to reduce loss rates. Sorties were flown during the night to decrease the loss rate although this also meant a decrease in effectiveness.

Media

Skins
Videos

See also

Links to the articles on the War Thunder Wiki that you think will be useful for the reader, for example:

  • reference to the series of the aircraft;
  • links to approximate analogues of other nations and research trees.

External links


Heinkel Aircraft Company (Heinkel Flugzeugwerke)
Fighters  He 51 A-1 · He 51 B-1 · He 51 B-2/H · He 51 C-1 · He 51 C-1/L
  He 100 D-1
  He 112 A-0 · He 112 B-0 · He 112 V-5
Jet fighters  He 162 A-1 · He 162 A-2
Twin-engine fighters  He 219 A-7
Bombers  He 111 H-3 · He 111 H-6 · He 111 H-16
  He 115 C-1
  He 177 A-5
Export  He 112 B-1/U2(Hungary) · He 112 B-1/U2(Romania) · He 112 B-2/U2 · A7He1
  T 2

Germany bombers
Arado  Ar 196 A-3
Blohm & Voss  BV 138 C-1 · BV 238
Dornier  Do 17 E-1 · Do 17 Z-2 · Do 217 E-2 · Do 217 E-4 · Do 217 K-1 · Do 217 M-1
Focke-Wulf  Fw 189 A-1 · Fw 200 C-1
Henschel  Hs 123 A-1
Heinkel  He 111 H-3 · He 111 H-6 · He 111 H-16 · He 115 C-1 · He 177 A-5
Junkers  Ju 87 B-2 · Ju 87 R-2 · Ju 87 R-2 Libya · Ju 87 D-3 · Ju 87 D-5 · Ju 88 A-1 · Ju 88 A-4 · Ju 188 A-2 · Ju 288 C
Messerschmitt  Me 264
Savoia-Marchetti  ▀S.M.79 serie 1 · ▀S.M.79 B · ▀S.M.79 serie 4 · ▀S.M.79 serie 8
  ▀S.M.79 AS · ▀S.M.79 bis/N · ▀S.M.79 bis/T.M
Trophies  ▀Wellington Mk Ic