
Aviation
He 111 H-6
II
Rank
AB
2.7
RB
2.7
SB
2.7
Battle rating

Germany
Research country
Bomber
Main role
11,000

Research
22,000

Purchase
General information
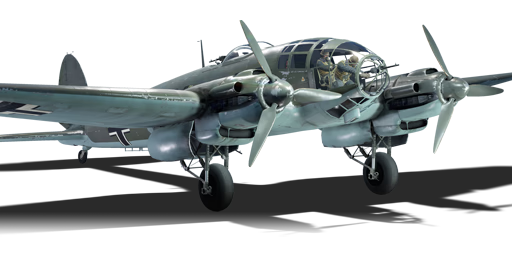
The He 111 H-6 is a German bomber. It has been in the game since the start of the Open Beta Test prior to Update 1.27.
A medium bomber which is surprisingly versatile as it can carry over 30 small bombs or up to 2 x 1,000 kg and a 250 kg, which are capable of destroying a base. It can also carry a Fritz X guided bomb. This plane rips easily and should not be used to dive bomb as previous German bombers have. Its gunners are underpowered and should not be trusted to defend against fighters. It is best to avoid contact with fighters, as while fast firing, the guns are very inaccurate.
Camouflages
Flight performance
Max speed
at 5,700 m
430397451412 km/h
Rate of Climb
4.62.182.1 m/s
Turn time
3233.731.133 s
Max altitude
8,500 m
Takeoff Run
510 m
Landing
flaps
flaps
Take-off
flaps
flaps
Combat
flaps
flaps
Air
brake
brake
General characteristics
Crew
5 persons
Engine
Length
16.4 m
Wingspan
22.6 m
Wing Loading
123 kg/m²
Weight:
Base weight
7.627.857.437.81 t
Fuel in main tanks
3 t (4h 42m)
Limits:
Max Speed Limit (IAS)
480 km/h
Mach Number Limit
0.6 M
G limit
≈ -3/4 G
Flap Speed Limit (IAS)
L / T / C
260 / 379 / 402 km/h
Gear Speed Limit (IAS)
350 km/h
Defensive armament
Turret — 7.92 mm MG 17 machine gun
Ammunition
1,000 rounds
Fire rate
1,150 shots/min
One-second Burst Mass
0.2 kg
| Belt | Belt filling | Armor penetration (mm) at a distance: | |||||
|---|---|---|---|---|---|---|---|
| 10 m | 100 m | 500 m | 1000 m | 1500 m | 2000 m | ||
| AP-T/Ball/Ball/AP-I/AI | 9 | 8 | 6 | 3 | 0 | 0 | |
| AP/AP/AP/AP-T | 13 | 12 | 7 | 3 | 2 | 0 | |
| AP-I/AP-T/AP-I/AP-T | 9 | 8 | 6 | 3 | 0 | 0 | |
6 × Turret — 7.92 mm MG 15 machine gun
Ammunition
5,375 rounds
Fire rate
1,000 shots/min
One-second Burst Mass
0.17 kg
| Belt | Belt filling | Armor penetration (mm) at a distance: | |||||
|---|---|---|---|---|---|---|---|
| 10 m | 100 m | 500 m | 1000 m | 1500 m | 2000 m | ||
| AP-T/Ball/Ball/AP-I/AI | 9 | 8 | 6 | 3 | 0 | 0 | |
| AP/AP/AP/AP-T | 13 | 12 | 7 | 3 | 2 | 0 | |
| AP-I/AP-T/AP-I/AP-T | 9 | 8 | 6 | 3 | 0 | 0 | |
Suspended armament
Setup 1
32 × 50 kg SC50JA bomb
Setup 2
8 × 250 kg SC250JA bomb
Setup 3
8 × Flam C 250 incendiary bomb
Setup 4
2 × 1000 kg SC1000L2 bomb
Setup 5
2 × 1000 kg PC1000 armor-piercing bomb
Setup 6
250 kg SC250JA bomb
2 × 1000 kg SC1000L2 bomb
2 × 1000 kg SC1000L2 bomb
Setup 7
2 × F5W torpedo
Setup 8
PC 1400 X (Fritz X)
Economy
Repair cost
Basic → Reference
AB
911 → 1,140
RB
1,463 → 1,830
SB
2,256 → 2,822
Crew training
6,300
Experts
22,000
Aces
250 
Research Aces
220,000
Reward multiplier
AB / RB / SB
60 / 130 / 240 %
124 %
Total cost of modifications
10,340
13,740
Talisman cost
750
Research order:
Flight performance | |
|---|---|
Survivability |
|---|
Weaponry | ||
|---|---|---|
Rating by players
You must play more than 3 battles for the last week and more than 10 battles in a vehicle to rate it.
Like:
29
Flight performance:
Not enough ratings
Survivability:
Not enough ratings
Aerial combat:
Not enough ratings
Ground attack:
Not enough ratings
Balance:
Not enough ratings
Features & Facts
This space is currently empty
Do you know any interesting vehicle features?
Loading...

No articles about this vehicle yet
Become the first author and get rewards!
Write a guide, tell about interesting historical facts, make a tutorial or simply an interesting post.
No more content