TOG II


Contents
Description
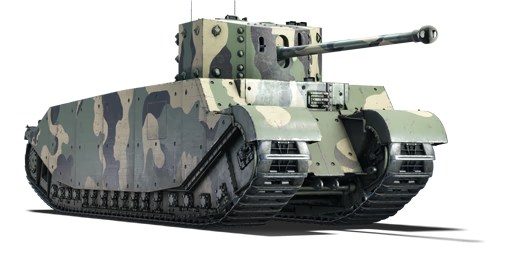
The TOG II is a prototype super-heavy tank designed in 1940 and developed by the Special Vehicle Development Committee a.k.a "The Old Gang", which consists of the original designer of British tanks during World War I. The tank is a follow-up design of the TOG I, which was designed in an expectation that the next world war would devolve into a static trench warfare much like the first. To achieve this, the TOG II has a very long and relatively narrow hull to help it crossing the trench, and at one point even planned to be equipped with sponson turrets to ward off infantry attacks from the sides. As speed is not a priority, the TOG II's top speed was expected to be around 25 km/h, though in reality it could only achieve 13.7 km/h due to its sheer weight.
Unfortunately for the TOG II, as the World War II went on, the trench warfare scenario has never materialized. With the advent of mobile warfare, the sheer size and lack of speed of the TOG II means it is hopelessly obsolete right from the start. In an attempt to keep the project relevant, "The Old Gang" has mounted various modern and experimental armaments onto the TOG II, with the most notable one being the use of the prototype turret of the Challenger tank with 28-pounder gun. However, these were proved fruitless, as the TOG II was the right tank developed for the wrong war, and the project was cancelled in 1943. The sole prototype of the TOG II was preserved at the Bovington Museum.
Introduced during Update "Kings of Battle" as the reward for the "Dreams Come True" 11th Anniversary event. The TOG II is a gargantuan "super-heavy" tank designed for a trench warfare scenario that never materialized. As such, the tank's distinctively long hull stuck out like a sore thumb among the ranks of its contemporaries. Unfortunately for the TOG II, the tank could only be called a "super-heavy" due to its sheer weight of 81 tons (with add-on armour), while its overall armour is mediocre at best. Being designed specifically to climb over trenches, the tank is also awfully slow and would not be able to outrun anything. Fortunately, the TOG II has a large 28-pounder (94 mm) gun as its ace up its sleeves. The gun has very high penetration for its BR and would certainly threaten even the more advanced tanks at higher BR. The TOG II is thus excel at fire support behind friendly tanks, or slowly push towards the targets with someone to cover your weak flanks.
General info
Survivability and armour

Now while the TOG II's armor may seem sufficient, in reality it is weaker than the armour of Churchill VII while the tank itself is much higher in BR and much more likely to meet cannons capable of simply bypassing it (nearly all of them can in an uptier). It must be angled to increase survivability against weaker cannons as per usual for the British heavy tanks. Refrain from showing the turret back to enemies, as it is very weak.
The tank is vulnerable to HE of 120 mm calibre and above due to a lackluster roof and bottom armour. Sometimes frontal hull roof will sustain HE shells caught by the gun, but direct turret hit will definitely implode it. Even small bombs and rockets can easily destroy TOG II due to this.
In terms of blatant weak spots, the baseline TOG II is nearly devoid of any besides the turret cheeks, which are 38mm thinner than the middle of the turret face. The engine deck in the back, despite having low armour protection, does not allow APHE to deal any real damage to the tank (allowing to use it as main armour instead), though any pure AP will go straight through it. In case enemy penetrates the armour, there are 8 crew members to spare and the majority of bad ammo racks can be removed without making the tank useless, so only APHE and HE penetrations would really matter in short term.
If player decides to equip the TOG II GWP modification, than tank gains two extra weak spots on the sides in a form of the two protruding sponsons on the sides and a grenade launcher with additional ammo racks. The sponsons are made of a weaker cast armour and make angling pointless due to not mirroring the hull angle. They also make the tank highly vulnerable to APHE from behind, as it is possible to penetrate them with low calibre APHE, unlike with the engine deck or the turret. The grenade launcher is similar to the one used by Churchill I , but can only fire smoke, which it has a lot more of than most tanks.
It is highly recommended to keep the GWP modification uninstalled if you are planning to get close to enemies, since the machine guns are not functional in the game and smoke screens with additional hazards in form of irremovable frontal ammo racks do not really increase the chance of surviving in a close quarters encounter. Having smoke launcher installed just to make sure that nobody shoots the tank in "the back" (front) while fighting backwards makes sense, but due to how in-game controls function, it will require the player to turn the turret away from the "front" for a brief moment to fire it, which might backfire spectacularly.
Armour type:
| Armour | Front (Slope angle) | Sides | Rear | Roof |
|---|---|---|---|---|
| Hull | ___ mm | ___ mm Top ___ mm Bottom |
___ mm | ___ - ___ mm |
| Turret | ___ - ___ mm Turret front ___ mm Gun mantlet |
___ - ___ mm | ___ - ___ mm | ___ - ___ mm |
| Cupola | ___ mm | ___ mm | ___ mm | ___ mm |
Notes:
Mobility
| Game Mode | Max Speed (km/h) | Weight (tons) | Engine power (horsepower) | Power-to-weight ratio (hp/ton) | ||||
|---|---|---|---|---|---|---|---|---|
| Forward | Reverse | Stock | AoA | Stock | Upgraded | Stock | Upgraded | |
| Arcade | 15 | 15 | 72.5 | 5 | 775 | 1,145 | 10.69 | 14.77 |
| Realistic | 15 | 15 | 531 | 600 | 7.32 | 7.74 | ||
The tank is titanic in both size and mass and is thus very slow, being even slower than other heavy tanks of the British. Fortunately, it drives up to 15 km/h in any direction. Binding "cruise control" (both forward and backwards) key is recommended to protect player's sanity, as travel times may reach several minutes.
The turning efficiency depends on game mode. In RB, the tank has to stop to turn properly (N gear), or turn on EXACTLY gear 4 (otherwise the engine will choke and stop). In AB, it is possible to use gear 5 to turn around even faster. The tank turns better with its forward gear, but not to a significant degree.
Modifications and economy
| Mobility | Protection | Firepower | ||||||||||||||||||||
|---|---|---|---|---|---|---|---|---|---|---|---|---|---|---|---|---|---|---|---|---|---|---|
|
|
|
Armaments
Main armament
The main feature of this tank is the gun, which can compete with the gun of later available Charioteer Mk VII. Although it is only able to fire AP and HE, its penetration values are nothing to scoff at, and the mass of AP it fires is 14.5 kg, which means that any tank it penetrates is going to become a pancake. It will also penetrate engines, so it will win most direct 1-on-1 encounters with anything it can penetrate at all. For maximum damage, it is recommended to fire AP in the middle of the hull of enemy tanks. In an uptier, or if that is not possible at all, the gun breech or ammo racks are always a valid target.
The shallow arc of the shells allow the tank to fire over hills at 700 m range, which can be abused to obliterate enemy SPGs and camping tanks through binocular use. For open topped SPG, HE can and should be loaded, as per usual.
| 94 mm 28pdr OQF | Turret rotation speed (°/s) | Reloading rate (seconds) | |||||||||||
|---|---|---|---|---|---|---|---|---|---|---|---|---|---|
| Mode | Capacity | Vertical | Horizontal | Stabilizer | Stock | Upgraded | Full | Expert | Aced | Stock | Full | Expert | Aced |
| Arcade | 68 | -10°/+20° | ±180° | - | 26.7 | 37.0 | 44.9 | 49.6 | 52.8 | 7.80 | 6.90 | 6.36 | 6.00 |
| Realistic | 19.6 | 23.1 | 28.1 | 31.0 | 33.0 | ||||||||
Ammunition
| Penetration statistics | |||||||
|---|---|---|---|---|---|---|---|
| Ammunition | Type of warhead |
Penetration @ 0° Angle of Attack (mm) | |||||
| 10 m | 100 m | 500 m | 1,000 m | 1,500 m | 2,000 m | ||
| Shot Mk.1 | APCBC | 204 | 202 | 192 | 180 | 169 | 159 |
| Shell Mk.1 | HE | 13 | 13 | 13 | 13 | 13 | 13 |
| Shell details | ||||||||||||
|---|---|---|---|---|---|---|---|---|---|---|---|---|
| Ammunition | Type of warhead |
Velocity (m/s) |
Projectile mass (kg) |
Fuse delay (m) |
Fuse sensitivity (mm) |
Explosive mass (TNT equivalent) (g) |
Ricochet | |||||
| 0% | 50% | 100% | ||||||||||
| Shot Mk.1 | APCBC | 792 | 14.5 | - | - | - | 48° | 63° | 71° | |||
| Shell Mk.1 | HE | 792 | 12.7 | 0.4 | 0.5 | 920 | 79° | 80° | 81° | |||
Ammo racks
| Full ammo |
1st rack empty |
2nd rack empty |
3rd rack empty |
4th rack empty |
5th rack empty |
6th rack empty |
Visual discrepancy |
|---|---|---|---|---|---|---|---|
| 68 | __ (+__) | __ (+__) | __ (+__) | __ (+__) | __ (+__) | __ (+__) | __ |
When only 27 shells are taken, every ammo rack but the turret floor one disappear (one shell goes into cannon). Next 18 shells add the back ammo racks, 9 for the right and then 9 for the left. Any more shells, and the middle vertical ammo rack will be loaded, which is an extreme detriment to the tank defences, should the hull be exposed, therefore taking more than 45 shells is bad and can rarely be justified.
Additional armament
This howitzer has the same trajectory as the one of the Churchill I, but can only fire smoke and can only be used by "fire special weapon" button, thus cannot be selected as a secondary weapon. Due to this, its use as a weapon is nonexistent. It still can be fired far away to annoy enemy snipers, if necessary.
| 76 mm OQF 3-inch Howitzer Mk I | Turret rotation speed (°/s) | Reloading rate (seconds) | |||||||||||
|---|---|---|---|---|---|---|---|---|---|---|---|---|---|
| Mode | Capacity | Vertical | Horizontal | Stabilizer | Stock | Upgraded | Full | Expert | Aced | Stock | Full | Expert | Aced |
| Arcade | 45 | ±3° | ±4° | - | 12 | 17 | 20 | 23 | 24 | 8.1 | 7.2 | 6.6 | 6.2 |
| Realistic | 8.9 | 11 | 13 | 14 | 15 | ||||||||
Ammunition
| Smoke shell characteristics | ||||||
|---|---|---|---|---|---|---|
| Ammunition | Velocity (m/s) |
Projectile mass (kg) |
Screen radius (m) |
Screen deploy time (s) |
Screen hold time (s) |
Explosive mass (TNT equivalent) (g) |
| 3-inch Smoke | 210 | 3.18 | 9 | 5 | 20 | 8 |
Ammo racks
| Full ammo |
1st rack empty |
2nd rack empty |
3rd rack empty |
4th rack empty |
5th rack empty |
6th rack empty |
Visual discrepancy |
|---|---|---|---|---|---|---|---|
| 45 | __ (+__) | __ (+__) | __ (+__) | __ (+__) | __ (+__) | __ (+__) | __ |
Installation of the smoke launcher adds two more side ammo racks in the very front, which cannot be removed or regulated.
Machine guns
| 7.92 mm BESA | ||||
|---|---|---|---|---|
| Mount | Capacity (Belt) | Fire rate | Vertical | Horizontal |
| Coaxial | 4,950 (225) | 600 | - | - |
Usage in battles
Play style:
In general you should play this tank like any other land ship: slowly make your way to the front line, destroy everything, and make sure you have backup just in case. Despite having a slow speed, you have a good reverse gear box, enabling you to "swiftly" retreat if you must. An important thing to keep in mind is that you should try not to over extend - doing so will likely end your game due to becoming surrounded and unable to retreat. Having some music to relax while driving around is also a good idea - bored mind tends to get unfocused.
If you wish to go all-in and get very close, at least remember about a huge weak spot being the side armor - all someone has to do is to shoot the frontal third to the side with APHE and your entire crew is being blown to smithereens, most of the time. Ensure that enemy is funneled in one direction, and push them.
It is viable to push forward with the back part of the tank, even when there is no real cover in form of hills, because of the size of the engine and transmission. It is extremely beneficial to do against tanks that are mainly using APHE and are too used to firing at the hull (even allowing you to casually take PzGr 43 of Sturer Emil and pretend nothing ever happened), with the only real downside being vastly reduced gun depression. Remember that your turret is still vulnerable and some enemies will spend extra second to aim at it specifically - make sure you will fire first and at least disable them.
It is definitely recommended to uninstall the GWP modification if play agressively, as otherwise enemy can just shoot your defunct machineguns on the sides. Another reason to remove modification is that driving backwards makes you vulnerable and easy to disable for tanks that are using pure AP (like any Shermans M4A*, VC, etc), but they will still struggle to instantly destroy the tank if you remove all excessive ammo racks.
Ammunition:
It is recommended to bring 27 shells, as this will put all your ammunition under your turret crew. This will greatly improve your survivablility. It is highly recommended to uninstall the GWP modification, as it fills your front with ammunition without your consent, at least at the moment of writing.
One important thing to keep in mind is that your tank is given two shells: HE and solid shot. Despite main ammunition being solid shot, you will see one shots quite often due to the sheer size of the shell itself. Simply aim in way that fills the most of the enemy tank with debris and enjoy. HE can be pre-loaded if enemy open-topped SPG is expected or managed to survive initial AP hit.
Defensive Capabilities:
With a fast turret traverse, it will be quite easy to react to incoming threats. Even though your crew are all bunched up, it is surprisingly easy to avoid too many losses due to the sheer size of the tank itself. As a side note, you are defenseless against CAS due to your size and speed so expect to be bombed. There isn't much you can do when that happens due to the poor bottom armour.
Notable Enemies:
- ISU-122 and similar designs: Big gun and notable armor. Can HE you to smithereens from any angle if it doesn't accidentally hit your cannon. It is recommended to try to ambush it or attack when it is distracted or reloading. If ISU is surrounded by other tanks, target it first, even if they seem more dangerous at the moment
- SU-85M: Gun able to pen you at close and medium range, notable armor. Try to shoot first and/or push with the back side to maybe survive initial hit
- Waffentrager: Able to pen you anywhere, with devastating post pen damage, likes to creep around corners or hide in bushes. Avoid sniper duels with it. If it's in the open at 700 m range - HE it by using binoculars, if not in the open, too close or stays in bushes - try to hit its ammo rack below the turret with AP while pushing with your back
- M10/18/36 GMC: Good gun, but extremely visible due to machine gun on the top. Preload HE and obliterate it, or shoot AP at the middle of the hull
- Tiger I: Big gun, good armor when it's angling. if it's not angling, just shoot dead in the middle, if it is - try to hit turret crew through hull plate that seems more flat to you. Avoid hitting machine gun at all costs, as they are impenetrable. Try to shoot first, if you can
- Panther: At close to medium range, a single hit to the middle of the hull can destroy it, but for extra safety you should shoot a bit to the right (their left). Otherwise, disable the weapon at any cost
- M4/T26: Can penetrate you almost anywhere, depening on ammunition choice. If the hull is exposed - nail it dead in the middle. If only turret is exposed - disable the gun or try to shoot the ammo rack by aiming below the gun mask on the very right (their left)
- M4A4(SA50): Extremely lethal AP shell, but it's a sherman, so you can just shoot centre mass
Pros and cons
Pros:
- Good survivability against popular tanks when driving with the rear part forwards
- The tank has a reverse gear box, giving it the same speed in both directions
- The AP shell has quite good penetration and damage for its battle rating
- The turret and track traverse speeds are surprisingly good, especially for the size of the vehicle
- The side of the vehicle has decent armor values, making armor angling and side scraping a viable tactic to improve the vehicles survivability, although it's only really viable in a downtier
- Has 8 crew members in case of a non-APHE penetration
- Fast reload for a gun of this calibre
Cons:
- One of the slowest vehicles in the game
- The TOG II GWP modification (smoke screens) also gives the vehicle side sponsons, which create a big weak spot to its side armor, making side scraping an unusable tactic
- The cannon only has 1 anti armor shell, an AP round, which means you rarely oneshot vehicles when firing at the turret
- The turret armor is not very thick, and isnt angled, which makes it a big weakspot
- The vehicles is absolutely huge and is thus an easy prey for aircraft
- Even though the tank is huge, the crew is all very close together in the front under the turret, which means the tank can be knocked out by one well aimed APHE shell
- Huge engine and transmission, making them easy targets.
History
Describe the history of the creation and combat usage of the vehicle in more detail than in the introduction. If the historical reference turns out to be too long, take it to a separate article, taking a link to the article about the vehicle and adding a block "/History" (example: https://wiki.warthunder.com/(Vehicle-name)/History) and add a link to it here using the main template. Be sure to reference text and sources by using <ref></ref>, as well as adding them at the end of the article with <references />. This section may also include the vehicle's dev blog entry (if applicable) and the in-game encyclopedia description (under === In-game description ===, also if applicable).
Media
- Videos
See also
External links
Paste links to sources and external resources, such as:
- topic on the official game forum;
- other literature.
| Britain heavy tanks | |
|---|---|
| Matilda | Matilda III · Matilda Hedgehog |
| Churchill | Churchill I · Churchill III · Churchill VII · Churchill Crocodile · Churchill NA75 · Black Prince |
| Post-war | Caernarvon · Conqueror |
| Other | Independent · Excelsior · TOG II |
| Britain premium ground vehicles | |
|---|---|
| Light tanks | A13 Mk I (3rd R.T.R.) · A13 Mk II 1939 · AEC Mk II · Crusader "The Saint" · Rooikat 105 |
| Medium tanks | A.C.I · Grant I · Cromwell V (RP-3) · Sherman IC "Trzyniec" · A.C.IV · Comet I "Iron Duke IV" |
| Centurion Mk.2 · ▄Strv 81 (RB 52) · Centurion Mk.5 AVRE · Centurion Mk.5/1 · ▄Sho't Kal Dalet · Centurion Action X | |
| Vijayanta · Khalid · Challenger DS · Challenger 2 OES | |
| Heavy tanks | Independent · Matilda Hedgehog · Excelsior · TOG II · Churchill Crocodile · Black Prince |
| Tank destroyers | Alecto I · Achilles (65 Rg.) · QF 3.7 Ram |
