Difference between revisions of "Matilda Hedgehog"
(→Description) |
|||
| (12 intermediate revisions by 9 users not shown) | |||
| Line 1: | Line 1: | ||
| − | {{Specs-Card|code=uk_matilda_hedgehog}} | + | {{Specs-Card |
| + | |code=uk_matilda_hedgehog | ||
| + | |images={{Specs-Card-Image|GarageImage_{{PAGENAME}}.jpg}} | ||
| + | }} | ||
== Description == | == Description == | ||
<!-- ''In the description, the first part should be about the history of the creation and combat usage of the vehicle, as well as its key features. In the second part, tell the reader about the ground vehicle in the game. Insert a screenshot of the vehicle, so that if the novice player does not remember the vehicle by name, he will immediately understand what kind of vehicle the article is talking about.'' --> | <!-- ''In the description, the first part should be about the history of the creation and combat usage of the vehicle, as well as its key features. In the second part, tell the reader about the ground vehicle in the game. Insert a screenshot of the vehicle, so that if the novice player does not remember the vehicle by name, he will immediately understand what kind of vehicle the article is talking about.'' --> | ||
| − | |||
| − | |||
The '''{{Specs|name}}''' is a premium gift rank {{Specs|rank}} British heavy tank {{Battle-rating}}. It was introduced during [[Update "New Power"]] as a reward for [[Battle Pass: Season I]]. | The '''{{Specs|name}}''' is a premium gift rank {{Specs|rank}} British heavy tank {{Battle-rating}}. It was introduced during [[Update "New Power"]] as a reward for [[Battle Pass: Season I]]. | ||
| + | |||
| + | The Matilda Hedgehog is an Australian late-war experiment of the early but legendary Matilda infantry tank. The most notable difference from other Matildas is the presence of a new type of armament in the rear; a Spigot system fitted with Hedgehog mortars. This mortar was commonly used in naval warfare as an anti-submarine weapon and as such is very lethal weaponry if used correctly against tanks. | ||
| + | |||
| + | Along with other minor differences in armour protection and capabilities, the Matilda Hedgehog provides a somewhat of a unique playstyle for any commander in the shape of indirect fire. Although, her playstyle still resembles the other variant already found in the British tech tree, the [[Matilda III]]. In short, the performance could be summarised with the phrase: slow and steady. | ||
| + | |||
| + | One of the remarkable flaws of the Matilda Hedgehog over other variants is combat readiness and versatility. This is because the Hedgehog is a situational and limited weapon in tank warfare. The vehicle also loses equipment as the smoke grenade launchers and receives a large weak spot in its rear, as the Hedgehog launcher acts as a large unprotected ammo rack. | ||
== General info == | == General info == | ||
=== Survivability and armour === | === Survivability and armour === | ||
| + | {{Specs-Tank-Armour}} | ||
''Describe armour protection. Note the most well protected and key weak areas. Appreciate the layout of modules as well as the number and location of crew members. Is the level of armour protection sufficient, is the placement of modules helpful for survival in combat? If necessary use a visual template to indicate the most secure and weak zones of the armour.'' | ''Describe armour protection. Note the most well protected and key weak areas. Appreciate the layout of modules as well as the number and location of crew members. Is the level of armour protection sufficient, is the placement of modules helpful for survival in combat? If necessary use a visual template to indicate the most secure and weak zones of the armour.'' | ||
| Line 23: | Line 31: | ||
| Turret || ___ - ___ mm ''Turret front'' <br> ___ mm ''Gun mantlet'' || ___ - ___ mm || ___ - ___ mm || ___ - ___ mm | | Turret || ___ - ___ mm ''Turret front'' <br> ___ mm ''Gun mantlet'' || ___ - ___ mm || ___ - ___ mm || ___ - ___ mm | ||
|- | |- | ||
| − | | Cupola || | + | | Cupola || 75 mm ''All-around'' <br>25 mm ''Base'' || 75 mm <br> 25 mm ''Base'' || 75 mm <br> 25 mm ''Base'' || 75 mm |
|- | |- | ||
|} | |} | ||
| Line 31: | Line 39: | ||
=== Mobility === | === Mobility === | ||
| + | {{Specs-Tank-Mobility}} | ||
<!-- ''Write about the mobility of the ground vehicle. Estimate the specific power and manoeuvrability, as well as the maximum speed forwards and backwards.'' --> | <!-- ''Write about the mobility of the ground vehicle. Estimate the specific power and manoeuvrability, as well as the maximum speed forwards and backwards.'' --> | ||
{{tankMobility|abMinHp=294|rbMinHp=168}} | {{tankMobility|abMinHp=294|rbMinHp=168}} | ||
| + | |||
| + | === Modifications and economy === | ||
| + | {{Specs-Economy}} | ||
== Armaments == | == Armaments == | ||
| + | {{Specs-Tank-Armaments}} | ||
=== Main armament === | === Main armament === | ||
| + | {{Specs-Tank-Weapon|2}} | ||
<!-- ''Give the reader information about the characteristics of the main gun. Assess its effectiveness in a battle based on the reloading speed, ballistics and the power of shells. Do not forget about the flexibility of the fire, that is how quickly the cannon can be aimed at the target, open fire on it and aim at another enemy. Add a link to the main article on the gun: <code><nowiki>{{main|Name of the weapon}}</nowiki></code>. Describe in general terms the ammunition available for the main gun. Give advice on how to use them and how to fill the ammunition storage.'' --> | <!-- ''Give the reader information about the characteristics of the main gun. Assess its effectiveness in a battle based on the reloading speed, ballistics and the power of shells. Do not forget about the flexibility of the fire, that is how quickly the cannon can be aimed at the target, open fire on it and aim at another enemy. Add a link to the main article on the gun: <code><nowiki>{{main|Name of the weapon}}</nowiki></code>. Describe in general terms the ammunition available for the main gun. Give advice on how to use them and how to fill the ammunition storage.'' --> | ||
{{main|QF 2-pounder (40 mm)}} | {{main|QF 2-pounder (40 mm)}} | ||
| Line 122: | Line 136: | ||
=== Additional armament === | === Additional armament === | ||
| + | {{Specs-Tank-Weapon|1}} | ||
<!-- ''Some tanks are armed with several guns in one or more turrets. Evaluate the additional weaponry and give advice on its use. Describe the ammunition available for additional weaponry. Give advice on about how to use them and how to fill the ammunition storage. If there is no additional weaponry remove this subsection.'' --> | <!-- ''Some tanks are armed with several guns in one or more turrets. Evaluate the additional weaponry and give advice on its use. Describe the ammunition available for additional weaponry. Give advice on about how to use them and how to fill the ammunition storage. If there is no additional weaponry remove this subsection.'' --> | ||
{{main|Hedgehog}} | {{main|Hedgehog}} | ||
| Line 180: | Line 195: | ||
=== Machine guns === | === Machine guns === | ||
| + | {{Specs-Tank-Weapon|3}} | ||
<!-- ''Offensive and anti-aircraft machine guns not only allow you to fight some aircraft but also are effective against lightly armoured vehicles. Evaluate machine guns and give recommendations on its use.'' --> | <!-- ''Offensive and anti-aircraft machine guns not only allow you to fight some aircraft but also are effective against lightly armoured vehicles. Evaluate machine guns and give recommendations on its use.'' --> | ||
{{main|BESA (7.92 mm)}} | {{main|BESA (7.92 mm)}} | ||
| Line 194: | Line 210: | ||
== Usage in battles == | == Usage in battles == | ||
| − | ''Describe the tactics of playing in the vehicle, the features of using vehicles in the team and advice on tactics. Refrain from creating a "guide" - do not impose a single point of view but instead give the reader food for thought. Describe the most dangerous enemies and give recommendations on fighting them. If necessary, note the specifics of the game in different modes (AB, RB, SB).'' | + | <!-- ''Describe the tactics of playing in the vehicle, the features of using vehicles in the team and advice on tactics. Refrain from creating a "guide" - do not impose a single point of view but instead give the reader food for thought. Describe the most dangerous enemies and give recommendations on fighting them. If necessary, note the specifics of the game in different modes (AB, RB, SB).'' --> |
| + | If attacking, the Matilda should take point in the attacking force (if your team will wait for you) and crawl slowly towards the enemy locations with support from your team members. Stop and fire at any target that reveals itself to attack you. When defending, park some distance away from a choke point to a vital area and blast enemies as they try to enter. Remember to maintain team support so that enemies don't try to out manoeuvre you. Make sure to keep a safe distance away from the enemy to maximise the effectiveness of your armour with the shell damage drop-off. Like this, your armour will be very hard to penetrate. At the same time use the [[Ordnance QF 2-pounder (40 mm)|2-pounder gun]] to attack the enemy. Close-distance fighting is ill-advised as opponents will be able to more easily penetrate the front armour and find weak points. A very important tip to know about the Matilda III is to '''not go into towns!''' You will be easily out manoeuvred, allowing your opponents to get close and flank and destroy you. | ||
| + | |||
| + | Opponents that deserve extra attention are the tank destroyers. The two German Marders carry a gun that can easily knock you out at long range, especially the [[Marder III H|Marder III (H)]], but those have thin armour, so use that to your advantage. The more armoured German TD, the StuG III, is even more dangerous. The [[StuG III A]] carry the [[KwK 37 (75 mm)|short 75 mm]] that can fire high-penetrating HEAT rounds while its front armour can resist the 2-pounder's shots from a longer distance. The [[StuG III F]] is a bigger problem with its [[KwK 40 (75 mm)|longer 75 mm gun]] and thicker armour, but its high battle rating of 3.7 should make this an uncommon sight. The Matilda will have a hard time to fight the StuGs due to the front armour and inability to manoeuvre to hit the side armour, thus it would be better to leave that to more manoeuvrable team members. | ||
| + | |||
| + | Other tanks to worry about are the more common medium tanks each nation carries from the [[M4A1|M4 Shermans]], [[Pz.IV F2|Panzer IVs]], and [[T-34 (1941)|T-34s]]. These medium tanks have frontal armour able to resist the Matilda's 2-pounder rounds and easily out manoeuvre it as well. The most noteworthy tank to worry about is the Panzer IV with the [[KwK 40 (75 mm)|long 75 mm guns]], which can easily destroy your frontal armour. | ||
| − | + | Unlike Matilda III, this tank has a Hedgehog 183 mm launcher on its back. While it can be useful against clusters of unmoving vehicles, it is highly inaccurate and takes time to get used to. It also makes the Matilda Hedgehog much more vulnerable to flanking attacks, as the launcher can be shot easily, and results in an ammo rack explosion. This can get the tank destroyed by even SPAA vehicles. | |
| − | |||
| − | |||
| − | |||
| − | |||
| − | |||
| − | |||
| − | |||
| − | |||
| − | |||
| − | |||
| − | |||
| − | |||
| − | |||
| − | |||
| − | |||
| − | |||
| − | |||
| − | |||
| − | |||
| − | |||
| − | |||
| − | |||
| − | |||
| − | |||
| − | |||
| − | |||
| − | |||
| − | |||
| − | |||
| − | |||
| − | |||
| − | |||
| − | |||
| − | |||
| − | |||
| − | |||
| − | |||
=== Pros and cons === | === Pros and cons === | ||
| − | <!-- ''Summarise and briefly evaluate the vehicle in terms of its characteristics and combat effectiveness. Mark its pros and cons in a bulleted list. Try not to use more than 6 points for each of the characteristics. Avoid using categorical definitions such as "bad", "good" and the like - use substitutions with softer forms such as "inadequate" and "effective".'' --> | + | <!-- ''Summarise and briefly evaluate the vehicle in terms of its characteristics and combat effectiveness. Mark its pros and cons in a bulleted list. Try not to use more than 6 points for each of the characteristics. Avoid using categorical definitions such as "bad", "good" and the like - use substitutions with softer forms such as "inadequate" and "effective".'' --> |
'''Pros:''' | '''Pros:''' | ||
| − | + | * Identical 40 mm gun to [[Matilda III]], meaning same excellent gun depression, rate of fire and armour penetration | |
| − | * Identical gun to | + | * Hedgehogs can be lethal versus clusters of unmoving or light vehicles; such as those in close quarters battles |
| − | * | + | * Frontal armour weak spots as the commander's cupola and the turret ring has been reinforced |
'''Cons:''' | '''Cons:''' | ||
| − | * Poor mobility on | + | * Poor mobility on all terrains, something retained from its predecessor, the [[Matilda III]] |
| − | + | * Hedgehog launcher cannot be aimed or lowered; this means inaccuracies when firing and a permanent weak spot | |
| − | * Hedgehog launcher | + | * Overall configuration is unimproved, however firing range is now limited by the Hedgehog launchers and there is no smoke launchers |
| − | * | ||
== History == | == History == | ||
| Line 256: | Line 239: | ||
== Media == | == Media == | ||
<!-- ''Excellent additions to the article would be video guides, screenshots from the game, and photos.'' --> | <!-- ''Excellent additions to the article would be video guides, screenshots from the game, and photos.'' --> | ||
| − | [ | + | |
| + | ;Skins | ||
| + | |||
| + | * [https://live.warthunder.com/feed/camouflages/?vehicleCountry=britain&vehicleType=tank&vehicleClass=heavy_tank&vehicle=uk_matilda_hedgehog Skins and camouflages for the {{PAGENAME}} from live.warthunder.com.] | ||
| + | |||
| + | ;Images | ||
| + | <gallery mode="packed-hover" heights="150"> | ||
| + | Image:Matilda Hedgehog Devblog Image 001.jpg|<small>Matilda Hedgehog devblog image.</small> | ||
| + | </gallery> | ||
| + | |||
| + | ;Videos | ||
| + | {{Youtube-gallery|yuMkZYEs1H4|'''Matilda Hedgehog - Getting Gaijined Again [War Thunder]''' - ''Napalmratte''|dxCO6tn53jY|'''Matilda Hedgehog Very Quick Mortar Tutorial''' - ''PhantomRiderWT''}} | ||
== See also == | == See also == | ||
| − | ''Links to the articles on the War Thunder Wiki that you think will be useful for the reader, for example:'' | + | <!--''Links to the articles on the War Thunder Wiki that you think will be useful for the reader, for example:'' |
* ''reference to the series of the vehicles;'' | * ''reference to the series of the vehicles;'' | ||
| − | * ''links to approximate analogues of other nations and research trees.'' | + | * ''links to approximate analogues of other nations and research trees.''--> |
| + | |||
| + | * [[Matilda III]] | ||
== External links == | == External links == | ||
| − | ''Paste links to sources and external resources, such as:'' | + | <!--''Paste links to sources and external resources, such as:'' |
* ''topic on the official game forum;'' | * ''topic on the official game forum;'' | ||
| − | * ''other literature.'' | + | * ''other literature.''--> |
| + | |||
| + | * [[wt:en/news/6967-special-battle-pass-in-war-thunder-en|[Special] Battle Pass in War Thunder!]] | ||
{{Britain heavy tanks}} | {{Britain heavy tanks}} | ||
{{Britain premium ground vehicles}} | {{Britain premium ground vehicles}} | ||
Revision as of 08:49, 24 February 2021

Contents
Description
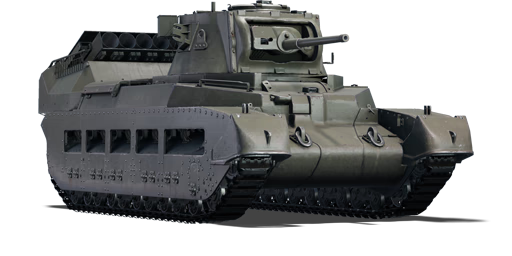
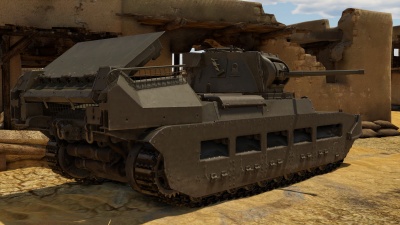
The Matilda Hedgehog is a premium gift rank II British heavy tank with a battle rating of 2.7 (AB/RB/SB). It was introduced during Update "New Power" as a reward for Battle Pass: Season I.
The Matilda Hedgehog is an Australian late-war experiment of the early but legendary Matilda infantry tank. The most notable difference from other Matildas is the presence of a new type of armament in the rear; a Spigot system fitted with Hedgehog mortars. This mortar was commonly used in naval warfare as an anti-submarine weapon and as such is very lethal weaponry if used correctly against tanks.
Along with other minor differences in armour protection and capabilities, the Matilda Hedgehog provides a somewhat of a unique playstyle for any commander in the shape of indirect fire. Although, her playstyle still resembles the other variant already found in the British tech tree, the Matilda III. In short, the performance could be summarised with the phrase: slow and steady.
One of the remarkable flaws of the Matilda Hedgehog over other variants is combat readiness and versatility. This is because the Hedgehog is a situational and limited weapon in tank warfare. The vehicle also loses equipment as the smoke grenade launchers and receives a large weak spot in its rear, as the Hedgehog launcher acts as a large unprotected ammo rack.
General info
Survivability and armour
Describe armour protection. Note the most well protected and key weak areas. Appreciate the layout of modules as well as the number and location of crew members. Is the level of armour protection sufficient, is the placement of modules helpful for survival in combat? If necessary use a visual template to indicate the most secure and weak zones of the armour.
Armour type:
| Armour | Front (Slope angle) | Sides | Rear | Roof |
|---|---|---|---|---|
| Hull | ___ mm | ___ mm Top ___ mm Bottom |
___ mm | ___ - ___ mm |
| Turret | ___ - ___ mm Turret front ___ mm Gun mantlet |
___ - ___ mm | ___ - ___ mm | ___ - ___ mm |
| Cupola | 75 mm All-around 25 mm Base |
75 mm 25 mm Base |
75 mm 25 mm Base |
75 mm |
Notes:
Mobility
| Game Mode | Max Speed (km/h) | Weight (tons) | Engine power (horsepower) | Power-to-weight ratio (hp/ton) | |||
|---|---|---|---|---|---|---|---|
| Forward | Reverse | Stock | Upgraded | Stock | Upgraded | ||
| Arcade | 26 | 5 | 27.3 | 294 | 363 | 10.77 | 13.3 |
| Realistic | 24 | 4 | 168 | 190 | 6.15 | 6.96 | |
Modifications and economy
| Mobility | Protection | Firepower | ||||||||||||||||||||
|---|---|---|---|---|---|---|---|---|---|---|---|---|---|---|---|---|---|---|---|---|---|---|
|
|
|
Armaments
Main armament
| 40 mm QF 2-pounder | Turret rotation speed (°/s) | Reloading rate (seconds) | |||||||||||
|---|---|---|---|---|---|---|---|---|---|---|---|---|---|
| Mode | Capacity | Vertical | Horizontal | Stabilizer | Stock | Upgraded | Full | Expert | Aced | Stock | Full | Expert | Aced |
| Arcade | 93 | ±20° | ±150° | Vertical | 16.2 | 22.4 | 27.2 | 30.1 | 32.0 | 3.64 | 3.22 | 2.97 | 2.80 |
| Realistic | 11.9 | 14.0 | 17.0 | 18.8 | 20.0 | ||||||||
Ammunition
| Penetration statistics | |||||||
|---|---|---|---|---|---|---|---|
| Ammunition | Type of warhead |
Penetration @ 0° Angle of Attack (mm) | |||||
| 10 m | 100 m | 500 m | 1,000 m | 1,500 m | 2,000 m | ||
| Shot Mk.1 AP/T | AP | 72 | 68 | 52 | 37 | 27 | 19 |
| Shell Mk.2 | HE | 4 | 4 | 4 | 4 | 4 | 4 |
| Shot Mk.IXB APCBC/T | APCBC | 89 | 86 | 77 | 66 | 57 | 50 |
| Shot Mk.1 APHV/T | AP | 80 | 75 | 58 | 41 | 30 | 21 |
| Shell Mk.1 AP/T | APHE | 66 | 62 | 49 | 36 | 26 | 20 |
| Shell details | |||||||||
|---|---|---|---|---|---|---|---|---|---|
| Ammunition | Type of warhead |
Velocity (m/s) |
Projectile Mass (kg) |
Fuse delay (m) |
Fuse sensitivity (mm) |
Explosive Mass (TNT equivalent) (g) |
Ricochet | ||
| 0% | 50% | 100% | |||||||
| Shot Mk.1 AP/T | AP | 792 | 1.08 | N/A | N/A | N/A | 47° | 60° | 65° |
| Shell Mk.2 | HE | 687 | 1.34 | 0 | 0.1 | 85 | 79° | 80° | 81° |
| Shot Mk.IXB APCBC/T | APCBC | 792 | 1.24 | N/A | N/A | N/A | 48° | 63° | 71° |
| Shot Mk.1 APHV/T | AP | 853 | 1.08 | N/A | N/A | N/A | 47° | 60° | 65° |
| Shell Mk.1 AP/T | APHE | 792 | 1.08 | 1.2 | 9 | 20.9 | 47° | 60° | 65° |
Ammo racks
| Full ammo |
1st rack empty |
2nd rack empty |
3rd rack empty |
4th rack empty |
5th rack empty |
6th rack empty |
Visual discrepancy |
|---|---|---|---|---|---|---|---|
| 93 | __ (+__) | __ (+__) | __ (+__) | __ (+__) | __ (+__) | __ (+__) | __ |
Additional armament
| Hedgehog | ||||
|---|---|---|---|---|
| Capacity | Vertical | Horizontal | Stabilizer | |
| 7 | +30°/+45° | N/A | N/A | |
Ammunition
| Penetration statistics | |||||||
|---|---|---|---|---|---|---|---|
| Ammunition | Type of warhead |
Penetration @ 0° Angle of Attack (mm) | |||||
| 10 m | 100 m | 500 m | 1,000 m | 1,500 m | 2,000 m | ||
| Hedgehog projectile | HE | 80 | 80 | 80 | 80 | 80 | 80 |
| Shell details | |||||||||
|---|---|---|---|---|---|---|---|---|---|
| Ammunition | Type of warhead |
Velocity (m/s) |
Projectile Mass (kg) |
Fuse delay (m) |
Fuse sensitivity (mm) |
Explosive Mass (TNT equivalent) (g) |
Ricochet | ||
| 0% | 50% | 100% | |||||||
| Hedgehog projectile | HE | 45 | 29.5 | 0 | 0.1 | 25,280 | 79° | 80° | 81° |
Ammo racks
| Full ammo |
1st rack empty |
Visual discrepancy |
|---|---|---|
| 7 | __ (+__) | __ |
Machine guns
| 7.92 mm BESA | ||||
|---|---|---|---|---|
| Mount | Capacity (Belt) | Fire rate | Vertical | Horizontal |
| Coaxial | 4,000 (225) | 600 | N/A | N/A |
Usage in battles
If attacking, the Matilda should take point in the attacking force (if your team will wait for you) and crawl slowly towards the enemy locations with support from your team members. Stop and fire at any target that reveals itself to attack you. When defending, park some distance away from a choke point to a vital area and blast enemies as they try to enter. Remember to maintain team support so that enemies don't try to out manoeuvre you. Make sure to keep a safe distance away from the enemy to maximise the effectiveness of your armour with the shell damage drop-off. Like this, your armour will be very hard to penetrate. At the same time use the 2-pounder gun to attack the enemy. Close-distance fighting is ill-advised as opponents will be able to more easily penetrate the front armour and find weak points. A very important tip to know about the Matilda III is to not go into towns! You will be easily out manoeuvred, allowing your opponents to get close and flank and destroy you.
Opponents that deserve extra attention are the tank destroyers. The two German Marders carry a gun that can easily knock you out at long range, especially the Marder III (H), but those have thin armour, so use that to your advantage. The more armoured German TD, the StuG III, is even more dangerous. The StuG III A carry the short 75 mm that can fire high-penetrating HEAT rounds while its front armour can resist the 2-pounder's shots from a longer distance. The StuG III F is a bigger problem with its longer 75 mm gun and thicker armour, but its high battle rating of 3.7 should make this an uncommon sight. The Matilda will have a hard time to fight the StuGs due to the front armour and inability to manoeuvre to hit the side armour, thus it would be better to leave that to more manoeuvrable team members.
Other tanks to worry about are the more common medium tanks each nation carries from the M4 Shermans, Panzer IVs, and T-34s. These medium tanks have frontal armour able to resist the Matilda's 2-pounder rounds and easily out manoeuvre it as well. The most noteworthy tank to worry about is the Panzer IV with the long 75 mm guns, which can easily destroy your frontal armour.
Unlike Matilda III, this tank has a Hedgehog 183 mm launcher on its back. While it can be useful against clusters of unmoving vehicles, it is highly inaccurate and takes time to get used to. It also makes the Matilda Hedgehog much more vulnerable to flanking attacks, as the launcher can be shot easily, and results in an ammo rack explosion. This can get the tank destroyed by even SPAA vehicles.
Pros and cons
Pros:
- Identical 40 mm gun to Matilda III, meaning same excellent gun depression, rate of fire and armour penetration
- Hedgehogs can be lethal versus clusters of unmoving or light vehicles; such as those in close quarters battles
- Frontal armour weak spots as the commander's cupola and the turret ring has been reinforced
Cons:
- Poor mobility on all terrains, something retained from its predecessor, the Matilda III
- Hedgehog launcher cannot be aimed or lowered; this means inaccuracies when firing and a permanent weak spot
- Overall configuration is unimproved, however firing range is now limited by the Hedgehog launchers and there is no smoke launchers
History
Describe the history of the creation and combat usage of the vehicle in more detail than in the introduction. If the historical reference turns out to be too long, take it to a separate article, taking a link to the article about the vehicle and adding a block "/History" (example: https://wiki.warthunder.com/(Vehicle-name)/History) and add a link to it here using the main template. Be sure to reference text and sources by using <ref></ref>, as well as adding them at the end of the article with <references />. This section may also include the vehicle's dev blog entry (if applicable) and the in-game encyclopedia description (under === In-game description ===, also if applicable).
Media
- Skins
- Images
Matilda Hedgehog devblog image.

- Videos
See also
External links
| Britain heavy tanks | |
|---|---|
| Matilda | Matilda III · Matilda Hedgehog |
| Churchill | Churchill I · Churchill III · Churchill VII · Churchill Crocodile · Churchill NA75 · Black Prince |
| Post-war | Caernarvon · Conqueror |
| Other | Independent · Excelsior · TOG II |
| Britain premium ground vehicles | |
|---|---|
| Light tanks | A13 Mk I (3rd R.T.R.) · A13 Mk II 1939 · AEC Mk II · Crusader "The Saint" · Rooikat 105 |
| Medium tanks | A.C.I · Grant I · Cromwell V (RP-3) · Sherman IC "Trzyniec" · A.C.IV · Comet I "Iron Duke IV" |
| Centurion Mk.2 · ▄Strv 81 (RB 52) · Centurion Mk.5 AVRE · Centurion Mk.5/1 · ▄Sho't Kal Dalet · Centurion Action X | |
| Vijayanta · Khalid · Challenger DS · Challenger 2 OES | |
| Heavy tanks | Independent · Matilda Hedgehog · Excelsior · TOG II · Churchill Crocodile · Black Prince |
| Tank destroyers | Alecto I · Achilles (65 Rg.) · QF 3.7 Ram |
