T-34-85 (Sweden)
| This page is about the medium tank T-34-85 (Sweden). For other versions, see T-34 (Family). |
.jpg)
Contents
Description
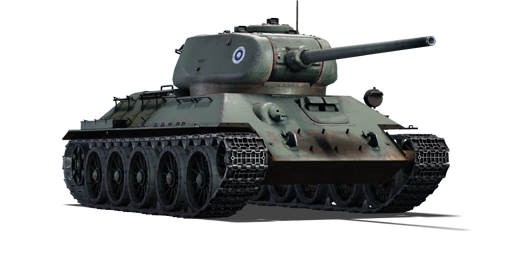
The ▄T-34-85 is a rank IV Swedish medium tank with a battle rating of 5.7 (AB/RB/SB). It was introduced in Update "Fire and Ice".
General info
Survivability and armour
Armour type:
| Armour | Front (Slope angle) | Sides | Rear | Roof |
|---|---|---|---|---|
| Hull | 45 mm (60°) Front glacis 45 mm (60°) Lower glacis 75 mm (60°) Driver's hatch 65 mm (30°) Machine gun port |
45 mm (39-40°) Top 45 mm Bottom |
45 mm (47-49°) Top 45 mm (46°) Bottom |
20 mm |
| Turret | 90 mm (1-69°) Turret front 90 + 40 mm (8-61°) Gun mantlet |
75 mm (19-22°) Front 2/3rd 52 mm (13-19°) Rear 1/3rd |
52 mm (9°) | 20 mm |
| Cupola | 90 mm | 90 mm | 90 mm | 20 mm |
Notes:
Mobility
Write about the mobility of the ground vehicle. Estimate the specific power and manoeuvrability, as well as the maximum speed forwards and backwards.
| Game Mode | Max Speed (km/h) | Weight (tons) | Engine power (horsepower) | Power-to-weight ratio (hp/ton) | |||
|---|---|---|---|---|---|---|---|
| Forward | Reverse | Stock | Upgraded | Stock | Upgraded | ||
| Arcade | 62 | 10 | 32.2 | _,___ | 954 | __.__ | 29.63 |
| Realistic | 55 | 9 | _,___ | 500 | __.__ | 15.53 | |
Modifications and economy
| Mobility | Protection | Firepower | ||||||||||||||||||||
|---|---|---|---|---|---|---|---|---|---|---|---|---|---|---|---|---|---|---|---|---|---|---|
|
|
|
Armaments
Main armament
The T-34-85 is equipped with the fantastic ZiS-S-53 cannon, with penetrates about 145 mm on the close range with the stock BR-365K round. This might not be enough to fight Tiger IIs frontally, but it works perfectly with other tanks, which are less armoured or you can engage them from the side.
The gun depression is like on many other Soviet vehicles quite poor, with only 5° there are no hull-down manoeuvres possible.
| 85 mm ZIS-S-53 | Turret rotation speed (°/s) | Reloading rate (seconds) | |||||||||||
|---|---|---|---|---|---|---|---|---|---|---|---|---|---|
| Mode | Capacity | Vertical | Horizontal | Stabilizer | Stock | Upgraded | Full | Expert | Aced | Stock | Full | Expert | Aced |
| Arcade | 60 | -5°/+22° | ±180° | N/A | 23.8 | 32.9 | 40.0 | 44.2 | 47.1 | 9.62 | 8.51 | 7.84 | 7.40 |
| Realistic | 14.9 | 17.5 | 21.3 | 23.5 | 25.0 | ||||||||
Ammunition
| Penetration statistics | |||||||
|---|---|---|---|---|---|---|---|
| Ammunition | Type of warhead |
Penetration @ 0° Angle of Attack (mm) | |||||
| 10 m | 100 m | 500 m | 1,000 m | 1,500 m | 2,000 m | ||
| BR-365K | APHE | 148 | 143 | 126 | 106 | 90 | 77 |
| BR-365A | APHEBC | 135 | 133 | 124 | 114 | 104 | 95 |
| BR-365P | APCR | 195 | 187 | 154 | 122 | 96 | 76 |
| O-365K | HE | 19 | 18 | 17 | 16 | 15 | 14 |
| Shell details | ||||||||||||
|---|---|---|---|---|---|---|---|---|---|---|---|---|
| Ammunition | Type of warhead |
Velocity (m/s) |
Projectile mass (kg) |
Fuse delay (m) |
Fuse sensitivity (mm) |
Explosive mass (TNT equivalent) (g) |
Ricochet | |||||
| 0% | 50% | 100% | ||||||||||
| BR-365K | APHE | 792 | 9.2 | 1.2 | 14 | 77 | 47° | 60° | 65° | |||
| BR-365A | APHEBC | 792 | 9.2 | 1.2 | 14 | 164 | 48° | 63° | 71° | |||
| BR-365P | APCR | 1,050 | 4.99 | - | - | - | 66° | 70° | 72° | |||
| O-365K | HE | 785 | 9.54 | 0.2 | 0.1 | 741 | 79° | 80° | 81° | |||
Ammo racks

| Full ammo |
1st rack empty |
2nd rack empty |
3rd rack empty |
4th rack empty |
5th rack empty |
6th rack empty |
|---|---|---|---|---|---|---|
| 60 | 57 (+3) | 55 (+5) | 54 (+6) | 48 (+12) | 43 (+17) | 37 (+23) |
| 7th rack empty |
8th rack empty |
9th rack empty |
10th rack empty |
11th rack empty |
Visual discrepancy |
|
| 31 (+29) | 25 (+35) | 19 (+41) | 17 (+43) | 1 (+59) | No |
Notes:
- Shells are modeled individually and disappear after having been shot or loaded.
- Rack 11 is a first stage ammo rack. It totals 16 shells and gets filled first when loading up the tank.
- This rack is also emptied early: the rack depletion order at full capacity is: 11 - 1 - 2 - etc. until 10.
- If you pack 17 (+43) shells, it will keep the hull empty of ammo.
- Simply not firing when the gun is loaded will move ammo from racks 1 to 10 into rack 11. Firing will interrupt the restocking of the ready racks.
Machine guns
| 7.62 mm DT | ||||
|---|---|---|---|---|
| Mount | Capacity (Belt) | Fire rate | Vertical | Horizontal |
| Coaxial | 1,890 (63) | 600 | N/A | N/A |
Usage in battles
The T-34-85's best playstyle is that of a flanker. Due to its high mobility, fast turret traverse, and a capable cannon with excellent post-penetration damage, the T-34-85 fills this role perfectly. Since the turret is so tall, it makes combat behind low obstacles difficult, as the turret segment above the main gun is visible. The T-34-85's other playstyle can be as a support tank, by keeping up with more protected vehicles like the IS-2 and supplement firepower while their heavy armament reloads.
The T-34-85 would not make a very suitable short-range brawler though even with the 85 mm gun as the gun has a rather tedious reload for the specific playstyle and the T-34-57's armour is very poor at its BR. With that, the T-34-85 would tend to be able to fire one shot at a close enemy before it gets taken out by other enemies nearby. However, it is understandable that the situation is unavoidable, so it is recommended to stay steady by firing one shot at an unsuspecting enemy at close range before retreating to reload, evading enemy shots.
If one decides to use the T-34 as a main battle tank, it's advisable to hide the hull as well as possible which has the weakest armour. Unfortunately, most heavy tanks like the Tiger II are nearly invulnerable from the front, but many mediums and even Cold War MBTs can still be destroyed. At this rank bracket, however, its speed, turret location, and poor armour push it towards a flanking role, away from the 1940-43 main battle comfort zone. The gun is still very potent, and the ammunition often knocks out nearly the entire crew, but the increases in armour of enemy vehicles necessitate learning their weak spots. The gun is generally accurate and most shells retain their velocity even into far ranges.
Enemies worth noting:
Panther A/D, Tiger II P - The Panthers are one of the most common tanks around BR 5.7, and they pose a great threat with their deadly long 75 mm cannon, thick frontal armour and adequate speed. You want to avoid engaging them at long range as the T-34 has only x3.5 scope magnification, making long range shooting super hard. Engage the Panthers within 500 m and avoid shooting their frontal hull. Their biggest weak spot is the gun mantlet, which is only 100 mm thick and has a flat part in the middle. That is where you want to aim at, the T-34's APHE has sufficient damage to instantly destroy the Panther even from its turret. The second weak spot is of course the sides, guaranteeing an instant kill. Generally APHE is enough to deal with the Panthers, and no APCR is needed.
For the Tiger II P, aim at the vertical area of the frontal turret which is also 100 mm. The best tactic is still to flank it however.
Tiger H1/E - The Tiger's weak spots are the opposite with the Panthers. Their hull are unsloped and rather thin, while the gun mantlet is weirdly shaped and can absorb quite some shells. The best engaging range remains the same, within 500 m. If the Tiger is angling, aim at the turret ring to disable the gunner and destroy the turret traverse, or aim at the hull side below the side skirt, which is only 60 mm. If it is not angling, aim between the driver's vision port and the MG for an instant kill. Avoid shooting at these two parts as they tend to bounce/absorb shells. For the Tiger E, don't shoot at the lower glacis as there will be add-on tracks installed there, making it harder to penetrate.
Ho-Ri - In a frontal engagement, APCR is required as the APHE shells don't have enough penetration. With APCR loaded, aim at the further sides of the fighting compartment, away from the gun, because the further from the gun, the thinner the armour gets, with the thinnest part being around 160 mm unsloped. Penetrating there will knock out its loader, gunner or commander, or detonate the ammo. Of course, the best way is still side-shooting with APHE.
Panzer IV/70, Jagdpanzer 38(t) - These small tank destroyers with their well angled frontal armour can be quite a problem from a distance. With APHE, you can disable their transmission by shooting at their lower glacis. Now if you can, flank them. The 85 mm APHE does a great job at penetrating sloped, thin armour, so you don't have to get to their absolute sides. For the Pz IV/70, you can also aim at the downward part of the gun mantlet since the shell might ricochet downwards into the hull, knocking out every crew member. The Jagdpanzer 38(t) doesn't have this problem, so side-shooting is required to destroy it effectively.
M4A3E2 Jumbo - This is another common enemy. It is recommended to use the BR-365A, the one with less penetration but more explosive filler. The reason is that it is better at penetrating sloped armour, which the Jumbo has. With that shell you can easily destroy a M4A3E2 who's not angling. If it is, aim at the hull side just above the tracks, or load APCR and shoot straight at its gun mantlet. Against a 75 mm M4A3E2 you can relax a bit as it will struggle to penetrate your armour, but your cupola is a rather large weak spot and a shot through there can knock out the T-34. Be more careful with the M4A3E2 76 W, as they can easily pierce through your armour.
Pros and cons
Pros:
- Great mobility: 56 km/h max speed allows it to relocate itself easily
- Nice cannon with adequate penetration, awesome damage and good reload speed
- Has a wide range of shells to choose from: free BR-365K, destructive BR-365A, and piercing BR-365P
- Fast turret traverse, dealing with multiple targets is less dangerous
- Large fuel tanks next to the engine can protect it by absorbing some shells
- Sloped hull armour and gun mantlet might bounce some shells with luck
Cons:
- Armour was not upgraded from older T-34, severely lowering protection against powerful tanks like Panther D
- Closely packed crew of 5 tend to be taken out by a single shot
- -5° gun depression hinders its capacity in hilly terrains
- -7 km/h reverse speed is slow, can sometimes get the player killed
- Maximum 3.5x gunsight zoom is inferior to some tanks (eg. Tiger E, M36, Nashorn) in ranged engagement
- Enlarged turret makes it easier to get spotted & hit
History
Like all T-34s in Finnish service, these were captured by the Finnish Army during the Continuation War. In the case of the T-34-85, this was from 1943 onwards, when the new model of the tank with the 85mm gun began to enter service. A total of 9 T-34s were captured by the Finns. [1]
Media
- Skins
See also
- Other T-34-85 variants
External links
Paste links to sources and external resources, such as:
- topic on the official game forum;
- other literature.
| Sweden medium tanks | |
|---|---|
| Strv m/42 | Lago I · Strv m/42 EH · Ikv 73 · Strv m/42 DT · Pvkv IV |
| Centurion derivatives | Strv 81 · Strv 81 (RB 52) · Strv 101 · Strv 104 · Strv 105 |
| Strv 103 | Strv 103-0 · Strv 103A · Strv 103С |
| Strv 121/122 | Strv 121 · Christian II · Strv 122A · Strv 122B PLSS · Strv 122B+ |
| Other | Sherman III/IV · T 80 U |
| Finland | |
| WWII | ▄T-28 · ▄T-34 · ▄Pz.IV · ▄T-34-85 |
| Post War | ▄Comet I · ▄Charioteer Mk VII · ▄T-54 · ▄T-55M · ▄T-72M1 · ▄Leopard 2A4 · ▄Leopard 2A6 |
| Norway | Leopard 1A5NO2 |
- ↑ Zaloga, Steven J.; Kinnear, Jim (1996). T-34-85 Medium Tank 1944–94. New Vanguard 20. Oxford: Osprey Publishing. ISBN 1-85532-525-7
