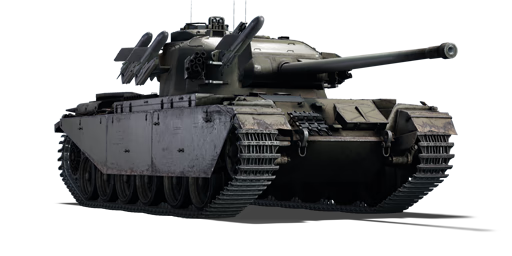
Strv 81 (RB 52)
This page is about the Swedish medium tank Strv 81 (RB 52). For the British version, see Strv 81 (RB 52) (Great Britain). |
Contents
Description
The Stridsvagn 81 (Robot 52) was an Strv 81 that was armed with the Robot 52 anti-tank guided missile (ATGM). This missile is essentially a Swedish copy of Nord Aviation's SS.11 manual command to line of sight (MCLOS) wire-guided ATGM. Shortly after the introduction of the Strv 81 in the 1950s, the Swedish Army tested the possibility to install anti tank missiles in Centurions and other platforms. During this time period, it should be considered that many armies envisioned ATGMs as the future of armored warfare, since they outranged most if not all cannons. Tests were carried out with a Centurion Mk.3 fitted with SS.11 ATGMs produced in Sweden by the name RB 52, but instead the army decided to use this missiles in proper ATGM carriers and scrapped the project.
Introduced during Update "Raining Fire" in the 8th Anniversary Sale as a substitute for the ▄Strv 81 (RB 52) formerly present in the British ground forces tree prior to the introduction of the Swedish ground forces, the Strv 81 (RB 52) represents a Swedish-camouflaged Centurion Mk 3 fitted with RB 52 ATGMs. Its gameplay is very similar to that of modern main battle tanks. Players never have to worry about opponents appearing around corners and stopping to take aim with the two-plane fully automatic stabilization system. The availability of RB 52 ATGMs is one distinctive secondary armament that the vehicle has over the standard Strv 81. The RB 52 missiles mounted on the right side of the turret provide up to 600 mm of armour penetration. Three are immediately available for use and are directed by an MCLOS system. The missile's trajectory is such that it rises for a short distance before levelling down, producing a "dead zone" of up to 200 metres that the missile cannot fully engage in. Players who launch missiles must be constantly conscious of the distance between themselves and the enemy.

General info
Survivability and armour
Armour type:
- Rolled homogeneous armour (Hull, Turret roof)
- Cast homogeneous armour (Turret)
Armour | Front | Sides | Rear | Roof |
---|---|---|---|---|
Hull | 76.2 mm (58°) Front glacis 76.2 mm (47-48°) Lower glacis |
50.8 (12°) + 6 mm | 38 mm (8-12°) | 29 mm 8-14 mm Engine deck |
Turret | 152 mm (6-27°) Turret front 152 mm Gun mantlet |
89 mm (5-12°) | 89 mm (1-18°) | 50.8 mm Border of turret 29 mm Center of turret |
Armour | Front | Rear | Roof | |
Cupola | 152 mm | 90 mm | 29 mm |
Notes:
- Suspension wheels and tracks are both 20 mm thick.
- The steel boxes around the turret and hull give a 4 mm additional protection, though this seems to be a negligible addition.
- ATGM attached outside the turret act as ammo racks and can be detonated
- Spaced armour plates are placed on the side of the Centurion, giving an additional 6 mm of side armour.
Mobility
Game Mode | Max Speed (km/h) | Weight (tons) | Engine power (horsepower) | Power-to-weight ratio (hp/ton) | |||
---|---|---|---|---|---|---|---|
Forward | Reverse | Stock | Upgraded | Stock | Upgraded | ||
Arcade | 39 | 14 | 50.8 | 1,007 | 1,240 | 19.82 | 24.41 |
Realistic | 35 | 13 | 575 | 650 | 11.32 | 12.8 |
Modifications and economy
Armaments
Main armament
84 mm kan Strv 81 | Turret rotation speed (°/s) | Reloading rate (seconds) | |||||||||||
---|---|---|---|---|---|---|---|---|---|---|---|---|---|
Mode | Capacity | Vertical | Horizontal | Stabilizer | Stock | Upgraded | Full | Expert | Aced | Stock | Full | Expert | Aced |
Arcade | 65 | -10°/+20° | ±180° | Two-plane | 19.0 | 26.4 | 32.0 | 35.4 | 37.7 | 8.19 | 7.25 | 6.68 | 6.30 |
Realistic | 11.9 | 14.0 | 17.0 | 18.8 | 20.0 |
Ammunition
Penetration statistics | |||||||
---|---|---|---|---|---|---|---|
Ammunition | Type of warhead |
Penetration @ 0° Angle of Attack (mm) | |||||
10 m | 100 m | 500 m | 1,000 m | 1,500 m | 2,000 m | ||
slpprj | APCBC | 232 | 229 | 216 | 201 | 187 | 173 |
slpprj m/54 | APDS | 384 | 380 | 363 | 343 | 324 | 306 |
slsgr m/53 | HE | 20 | 20 | 20 | 20 | 20 | 20 |
Shell details | ||||||||||||
---|---|---|---|---|---|---|---|---|---|---|---|---|
Ammunition | Type of warhead |
Velocity (m/s) |
Projectile mass (kg) |
Fuse delay (m) |
Fuse sensitivity (mm) |
Explosive mass (TNT equivalent) (kg) |
Ricochet | |||||
0% | 50% | 100% | ||||||||||
slpprj | APCBC | 1,000 | 9.1 | - | - | - | 48° | 63° | 71° | |||
slpprj m/54 | APDS | 1,430 | 3.22 | - | - | - | 75° | 78° | 80° | |||
slsgr m/53 | HE | 600 | 7.88 | 0.2 | 0.1 | 1.59 | 79° | 80° | 81° |
Smoke shell characteristics | ||||||
---|---|---|---|---|---|---|
Ammunition | Velocity (m/s) |
Projectile mass (kg) |
Screen radius (m) |
Screen deploy time (s) |
Screen hold time (s) |
Explosive mass (TNT equivalent) (g) |
rökgr m/53 | 250 | 9.3 | 9 | 5 | 20 | 50 |
Ammo racks
Full ammo |
1st rack empty |
2nd rack empty |
3rd rack empty |
4th rack empty |
Visual discrepancy |
---|---|---|---|---|---|
65 | 62 (+3) | 33 (+32) | 17 (+48) | 1 (+64) | No |
- Turret empty: 62 (+3)
- Front empty: 33 (+32)
Additional armament
Robot 52 (SS.11) missile | |||
---|---|---|---|
Capacity | Vertical | Horizontal | Stabilizer |
3 | N/A | N/A | N/A |
Ammunition
Penetration statistics | |||||||
---|---|---|---|---|---|---|---|
Ammunition | Type of warhead |
Penetration @ 0° Angle of Attack (mm) | |||||
10 m | 100 m | 500 m | 1,000 m | 1,500 m | 2,000 m | ||
RB 52 A | ATGM | 600 | 600 | 600 | 600 | 600 | 600 |
Missile details | ||||||||||||
---|---|---|---|---|---|---|---|---|---|---|---|---|
Ammunition | Type of warhead |
Velocity (m/s) |
Range (m) |
Projectile mass (kg) |
Fuse delay (m) |
Fuse sensitivity (mm) |
Explosive mass (TNT equivalent) (kg) |
Ricochet | ||||
0% | 50% | 100% | ||||||||||
RB 52 A | ATGM | 220 | 3,500 | 29.99 | 0.05 | 0.1 | 2 | 80° | 82° | 90° |
Ammo racks
Full ammo |
1st rack empty |
2nd rack empty |
3rd rack empty |
Visual discrepancy |
---|---|---|---|---|
3 | 2 (+1) | 1 (+2) | 0 (+3) | No |
Machine guns
7.92 mm BESA | ||||
---|---|---|---|---|
Mount | Capacity (Belt) | Fire rate | Vertical | Horizontal |
Coaxial | 3,600 (225) | 600 | N/A | N/A |
Usage in battles
The Stridsvagn 81 is essentially the Centurion Mk 3. It is an effective medium tank if played to its strengths.
If one wants to keep it simple, just use the powerful gun to snipe from distance.
More advanced tankers can utilize the not too impressive max speed (35 km/h or 22 mph) to move with this medium tank into the flanks of enemy tanks (close to the border of a map) and search for positions like hills and ridges where one can make use of the amazing -10° gun depression to hide the vulnerable lower plate of this tank. Once in position, one should use the binoculars to scout for enemies without exposing the turret. If an enemy tank is spotted that could be a potential threat, pop out a little bit and start to take out the enemies gunner/cannon barrel/cannon breech to prevent him from returning fire. Now utilize the quick reload to take out one crew member after the other to finish off the opponent. If an enemy is spotted who is exposing their side or even the rear while not aiming towards the Strv 81, shoot the engine first to immobilize and possibly even ignite the enemy tank, preventing him to take cover. The next shots should again disable the gun of the enemy, now finish the prey by shooting all crew members or, if feeling lucky, shoot an ammo rack.
The best choice to pierce enemy tanks is obviously the Shot Mk.3 (APDS) although it is quite expensive in terms of Silver Lions. The Shot Mk. 1 (APCBC) works in most situation as well but lacks penetration compared to the Mk. 3 APDS shot. The amazing penetration characteristics of this APDS shot enables this gun to pierce front plates of all Panther models (apart from the Panther II) to ranges up to 2,000 m. T-44s and Panther IIs front plates can be penetrated to ranges up to almost 1,000 m. Keep in mind though that the front plate of the T-44 is angled at 60°, so it bounces even this powerful APDS shot quite often. Even the front plate of the mighty Tiger II is not able to stop this APDS shot if not angled and the range is shorter than 100 m. However, aside from the gun, the Strv 81 has access to three potent anti-tank guided missiles.
In a head to head situation with an enemy tank approaching try to angle the Strv 81 not more than 5° degrees to either side since the side armour is quite weak (50.8 mm), try to hide the lower front plate which is a massive weak spot, while reloading turn the turret 10° to the right to maximize chances of bouncing shots (right side of the turret front has some extra armour) and keeping the gunner alive.
How to use an ATGM
The addition of the ATGM means the Strv 81 has the potential to act as a long-range support vehicle from the rear lines or the flanks. Prop up the Centurion in a well fortified and safe location and use it as a base of fire and launch missiles onto the enemies' front or sides. With the high amount of penetration available on the SS.11 missiles, even a glancing hit can do massive damage to the hit enemy tank.
The SS.11 missiles attached to the right side of the Strv 81 turret provide up to 600 mm of penetration upon impact, making all but the most deflected shots potent to any targets. Three are available for immediate usage and are guided by a MCLOS system. The missile have a trajectory of going up for a distance before leveling, creating a "dead zone" of up to 200 m that the missile cannot adequately engage in.
In arcade mode, the missile guidance system is relatively uncomplicated in aiming. Simply aim the crosshair onto the desired target and the missile will adjust to fit into the crosshair. The guidance system is sensitive as such it is not recommended to rapidly swing the crosshair around during the missile trajectory to keep it stable and on track. Once depleted, the missile will gradually reload to refill the launch racks.
In realistic and simulator mode, the missile is guided by the tank movement keys of [W], [A], [S], and [D]. [W] and [S] moves the missile vertically while [A] and [D] moves the missile horizontally. The guidance system will not activate until the missile clears its dead zone. The system is sensitive as such it is not recommended to rapidly tap the keys for movement else the missile moves out of the scope and away from the controls. Once depleted, the missile will not automatically reload and must be driven onto a captured control point for reloads.
Another way to use the ATGMs at long range is by shooting out the enemy's transmission, allowing guidance of the missile while preventing the enemy from getting back behind cover. This is effective against heavily-armoured targets like the T26E1-1 Super Pershing, the T26E5, and the IS-6. Their lower hull weak spot is not easily exploited because of the low post-penetration damage of APDS rounds. This method allows you to have another round ready just in case another enemy pops out while finishing off the other. A prerequisite for this tactic to work is to retreat behind cover once the enemy immobilized because it exposes you to retaliatory fire otherwise.
Pros and cons
Pros:
- Really nice 20-pounder gun with a surprising reload rate. An ace crew can reload the gun in an excellent 6.3 seconds.
- APDS shell provides great ballistics and penetration
- Depression and good optics translate to adequate firing capacities.
- Has 3 keyboard guided ATGMs that have an astounding 600 mm of HEAT penetration. No tank at this BR can absorb that kind of penetration.
- The turret has a lot rounded angles. Will bounce some powerful shells every so often.
- There's a large 17 mm steel plate sitting between the driver and the reserve ammo, reducing the likelihood of ammo explosion.
- Decent engine power. Can climb hills and accelerate to its top speed rather quickly, with workable reverse too.
- Gets the usual bonuses that come with all Premium tanks.
Cons:
- The turret protection is unreliable thanks to the mediocre armour. 3 of the 4 crew members are in the turret.
- The lower plate and side plates are weak, vulnerable to even small calibre APBC or APHE.
- Very little engine deck armour. Susceptible to artillery and strafing aircraft.
- APDS shell might require several shots to destroy tanks.
- The 8-round ready ammo rack is used up rather quickly. If all 8 rounds are expended, the tanks fire rate drops significantly until first-stage ammo refill.
- ATGM's are really slow and landing an impact can be difficult.
- Very slow for a medium tank. Some heavy tanks might be faster.
History
Development
The tank's concept was made in 1943 when the Directorate of Tank Design, under Sir Claude Gibb, was asked to produce a new heavy cruiser tank for the General Staff under the designation A41, which was to become the standard of a British "Universal Tank" to replace the separated "infantry" and "cruiser" tanks currently used. As World War II progressed and the Germans unveiled their heavier tanks with an 88 mm KwK36 cannon like the Tiger, War Office made a revision to their design requirements to counter this threat. The requirements now include an increased durability and reliability, with the ability to protect itself against the 88 mm gun and mines, an agility similar to the Comet tank and with good reverse speed, all while staying under a 40 ton weight.
Responding to these requirements, the department developed a larger hulls by adapting the suspension on the Comet, lengthening with another road wheel and spacing between the wheels. The standard Christie suspension used on the previous cruiser tanks was replaced by the Horstmann suspension, which uses coil springs on two-wheel bogies on each side and is proven to be easier to maintain than the Christie suspension. The hull used a welded and sloped armour with a cast turret mounting the famous 17-pounder cannon. The speed of the tank would be established by using the Rolls Meteor engine previously used on the Comet and Cromwell. Despite these changes, the department concluded that the weight restriction would not allow the tank design to withstand the 88 mm rounds. The weight restriction was done so the tank would be able to be carried around in the Mk.I and Mk.II transport trailers, which had a 40-ton load. This restriction was rescinded to allow more freedom in the tank design, which showed potential to War Ministry. The heavier tank designs developed had armour equivalent to the heaviest infantry tanks like the Churchill tank, yet with superior cross-country mobility due to improved suspension and engines.
The tank was given the name Centurion and the first mock-ups of the design was made by AEC and was presented in May 1944. After that, 20 pilot models were ordered with a various armament combinations. Ten had a 17-pounder and a 20 mm Polsten gun (5 with a machine gun in turret rear, 5 with an escape door instead), five had a 17-pounder and a BESA machine gun and an escape door, five more with the 77 mm HV gun with a driver operated hull machine gun. The prototypes of the 40-ton design, the Mk.1, had a 76 mm armour on the front glacis, which was made very powerful with the heavy sloping design on the tank. Added with a 152 mm thick turret armour, the Centurion became a very protected tank design, yet it was also very agile, outperforming the Comet tank in tests. The next Centurion model, Mk.2, featured a much thicker 118 mm front glacis armour and a thicker side armour. Production began for the Centurion Mk.2 in November 1945 for 800 tanks from Leyland Motors, Royal Ordnance Factories, and Vickers. The Mk.2 was put into service in the 5th Royal Tank Regiment in December 1946.
After the Centurion Mk.2 was put into service, Royal Ordnance developed the successor to the 17-pounder, the 84 mm 20-pounder. With this, the Centurion went through another upgrade to mount the 20-pounder. The 20 mm Polsten gun was removed and replaced by a BESA gun due to its questionable utility. The new upgrade, now the Centurion Mk 3, also featured an automatic stabilization system that improved firing accuracy while on the move. The tank was first produced in 1948 and overtook the previous Mk.1 and Mk.2 in service. However, the 20-pounder also did not stay in service for long and were replaced by the more powerful 105 mm L7 gun from Royal Ordnance Factories. All Centurions versions after Mark 5/2 used the L7 gun, including the Centurion Mk 10, which also featured additional armour with the new gun.
Swedish import
Sweden, a neutral power during World War II, analyzed the progress of technology and concluded they needed a replacement tank for their armoured forces. The Swedish Armed Forces right after World War II in 1945 decided that the most suitable tank for the upcoming years of the Cold War was the Centurion tank. A request was sent for the purchase of the vehicles, but Britain affirmed that their needs must be met before any exports of the Centurion tank could be made. Not eager to wait long for their tanks, Sweden started development in 1951 to create their own tank, designated "Emil", as well as seek out the AMX-13 light tank from France. However the wait ended abruptly when Britain started to export the Centurion in 1952, and Sweden swooped up an order of 80 Centurion Mk 3 in 1952, with the first delivery arriving in April 1953. The Swedish designated the adopted Centurion Mk 3 tank as the Stridsvagn 81. In 1955, Sweden imported another batch of Centurion, 160 Mk 5 variants, and employed them in the same designation as well. In the 1960, Sweden bought another batch of Mk 10 tanks that were accepted as the Stridsvagn 101. During the years in service, the Strv 81 and 101 were upgraded with newer equipments, modules, and armaments, as well as changing the designation to signal the improvements. There were also tests such as the inclusion of SS.11 missile on the turret side to improve the firepower of the Centurions.
The Centurion Stridsvagn series served alongside the domestic Strv 103 design as the primary vehicle of the Swedish armoured forces. In 1990s, the Swedish military started to phase out the two tanks as they modernized their forces. After a series of tests between the Russian T-72, American M1 Abrams, and German Leopard 2, the Swedish military replaced their outdated armoured fleet with the Leopard 2, designated the Stridsvagn 121.
Media
- Skins
- Videos
See also
- Vehicles equipped with the same chassis
- Related Development
- Other vehicles of similar configuration and role
External links
Paste links to sources and external resources, such as:
- topic on the official game forum;
- other literature.
Department of Tank Design | |
---|---|
Medium Tanks | |
Sherman Firefly | Sherman Firefly · Sherman IC "Trzyniec" |
MBTs | |
Centurion | Centurion Mk 1 · Centurion Mk.2 · Centurion Mk 3 · Centurion Action X · Centurion Mk.5 AVRE · Centurion Mk 10 |
Challenger* | Challenger Mk.2 · Challenger Mk.3 · Challenger DS |
Tank Destroyers | |
Achilles | Achilles · Achilles (65 Rg.) |
Centurion-based | Conway · FV4005 |
Export | |
Sherman Firefly | Sherman Ic · ▄Sherman Vc |
Centurion | Centurion Mk.5/1 · Strv 81 · Strv 81 (RB 52) · ▄Strv 81 (RB 52) · Strv 101 · Strv 104** · Strv 105** · Sho't |
See also | US Ordnance Department · Israeli Ordnance Corps · Vickers-Armstrongs Limited |
*By successor, the Military Vehicles and Engineering Establishment | |
**Swedish modernizations incorporating innovations from the Israeli Sho't Kals. |
Sweden medium tanks | |
---|---|
Strv m/42 | Lago I · Strv m/42 EH · Ikv 73 · Strv m/42 DT · Pvkv IV |
Centurion derivatives | Strv 81 · Strv 81 (RB 52) · Strv 101 · Strv 104 · Strv 105 |
Strv 103 | Strv 103-0 · Strv 103A · Strv 103С |
Strv 121/122 | Strv 121 · Christian II · Strv 122A · Strv 122B PLSS · Strv 122B+ |
Other | Sherman III/IV · T 80 U |
Finland | |
WWII | ▄T-28 · ▄T-34 · ▄Pz.IV · ▄T-34-85 |
Post War | ▄Comet I · ▄Charioteer Mk VII · ▄T-54 · ▄T-55M · ▄T-72M1 · ▄Leopard 2A4 · ▄Leopard 2A6 |
Norway | Leopard 1A5NO2 |
Sweden premium ground vehicles | |
---|---|
Light tanks | ▄T-26E · Strv m/39 · Pbil m/40 · Strv m/41 S-I · CV9035DK · CV 90105 |
Medium tanks | Sherman III/IV · Strv 81 (RB 52) · Strv 103-0 · Leopard 1A5NO2 · Christian II |
Heavy tanks | Kungstiger |
Tank destroyers | Ikv 73 · SAV 20.12.48 · VIDAR |