Difference between revisions of "T-10A"
(→Media) |
Colok76286 (talk | contribs) (Edits) |
||
| (27 intermediate revisions by 12 users not shown) | |||
| Line 1: | Line 1: | ||
| − | {{Specs-Card|code=ussr_t_10a}} | + | {{Specs-Card |
| + | |code=ussr_t_10a | ||
| + | |images={{Specs-Card-Image|GarageImage_{{PAGENAME}}.jpg|ArtImage_{{PAGENAME}}.png}} | ||
| + | |market=items_Т-10А (USSR) | ||
| + | }} | ||
== Description == | == Description == | ||
<!-- ''In the description, the first part should be about the history of the creation and combat usage of the vehicle, as well as its key features. In the second part, tell the reader about the ground vehicle in the game. Insert a screenshot of the vehicle, so that if the novice player does not remember the vehicle by name, he will immediately understand what kind of vehicle the article is talking about.'' --> | <!-- ''In the description, the first part should be about the history of the creation and combat usage of the vehicle, as well as its key features. In the second part, tell the reader about the ground vehicle in the game. Insert a screenshot of the vehicle, so that if the novice player does not remember the vehicle by name, he will immediately understand what kind of vehicle the article is talking about.'' --> | ||
| − | |||
| − | |||
The '''{{Specs|name}}''' is a premium gift rank {{Specs|rank}} Soviet heavy tank {{Battle-rating}}. It was introduced during [[Update "New Power"]] as a reward for [[Battle Pass: Season I]]. | The '''{{Specs|name}}''' is a premium gift rank {{Specs|rank}} Soviet heavy tank {{Battle-rating}}. It was introduced during [[Update "New Power"]] as a reward for [[Battle Pass: Season I]]. | ||
== General info == | == General info == | ||
=== Survivability and armour === | === Survivability and armour === | ||
| − | ''Describe armour protection. Note the most well protected and key weak areas. Appreciate the layout of modules as well as the number and location of crew members. Is the level of armour protection sufficient, is the placement of modules helpful for survival in combat? If necessary use a visual template to indicate the most secure and weak zones of the armour.'' | + | {{Specs-Tank-Armour}} |
| − | + | <!-- ''Describe armour protection. Note the most well protected and key weak areas. Appreciate the layout of modules as well as the number and location of crew members. Is the level of armour protection sufficient, is the placement of modules helpful for survival in combat? If necessary use a visual template to indicate the most secure and weak zones of the armour.'' --> | |
| − | + | Overall, the armour protection of the hull, as it is a T-10 hull, has very good protection for only APDS. When not angled, the pike is able to deflect and stop APDS and full calibre kinetic rounds. However, chemical rounds such as HEAT and ATGM will have no issues penetrating the hull as well as APFSDS. Moving to the turret, it is poorly armoured even against APDS, it may stop APCBC shells but should not be relied on to stop HEAT and ATGM nor APFSDS | |
| − | |||
| − | |||
{| class="wikitable" | {| class="wikitable" | ||
| Line 19: | Line 19: | ||
! Armour !! Front (Slope angle) !! Sides !! Rear !! Roof | ! Armour !! Front (Slope angle) !! Sides !! Rear !! Roof | ||
|- | |- | ||
| − | | Hull || | + | | Hull || 120 mm (57°) ''Front glacis'' <br> 120 mm (49°) ''Lower glacis'' <br> 40-60 mm (78-79°) ''Driver's port'' || 120 mm (50°) ''Top'' <br> 80 mm (0-64°) ''Middle'' <br> 30 mm (60°) ''Bottom'' || 50 mm (53°) ''Top'' <br> 60 mm (21°) ''Bottom'' || 30 mm |
|- | |- | ||
| − | | Turret || | + | | Turret || 120-250 mm (26-60°) ''Turret front'' <br> 100 + 250 mm (0-75°) ''Gun mantlet'' || 130-190 mm (3-55°) || 102 mm (21-47°) || 30 mm |
|- | |- | ||
| − | | Cupola || | + | | Cupola || 40 mm || 40 mm || 40 mm || 30 mm |
|- | |- | ||
|} | |} | ||
| − | |||
| − | |||
| − | |||
=== Mobility === | === Mobility === | ||
| + | {{Specs-Tank-Mobility}} | ||
<!-- ''Write about the mobility of the ground vehicle. Estimate the specific power and manoeuvrability, as well as the maximum speed forwards and backwards.'' --> | <!-- ''Write about the mobility of the ground vehicle. Estimate the specific power and manoeuvrability, as well as the maximum speed forwards and backwards.'' --> | ||
{{tankMobility|abMinHp=1,085|rbMinHp=619}} | {{tankMobility|abMinHp=1,085|rbMinHp=619}} | ||
| + | |||
| + | Mobility wise, as it is a T-10, it lacks speed as well as agility. However, the horsepower generated by the engine makes this a beast when moving obstacles and even dead tanks. The mass can be seen as a pro and a con. Due to heavy mass, it has more traction and will not be flipped by explosions or pushed so easily by tanks. However, the mass reduced drastically the top speed as well as the acceleration. | ||
| + | |||
| + | === Modifications and economy === | ||
| + | {{Specs-Economy}} | ||
== Armaments == | == Armaments == | ||
| + | Driver only: NVD. | ||
| + | |||
| + | {{Specs-Tank-Armaments}} | ||
| + | |||
=== Main armament === | === Main armament === | ||
| + | {{Specs-Tank-Weapon|1}} | ||
<!-- ''Give the reader information about the characteristics of the main gun. Assess its effectiveness in a battle based on the reloading speed, ballistics and the power of shells. Do not forget about the flexibility of the fire, that is how quickly the cannon can be aimed at the target, open fire on it and aim at another enemy. Add a link to the main article on the gun: <code><nowiki>{{main|Name of the weapon}}</nowiki></code>. Describe in general terms the ammunition available for the main gun. Give advice on how to use them and how to fill the ammunition storage.'' --> | <!-- ''Give the reader information about the characteristics of the main gun. Assess its effectiveness in a battle based on the reloading speed, ballistics and the power of shells. Do not forget about the flexibility of the fire, that is how quickly the cannon can be aimed at the target, open fire on it and aim at another enemy. Add a link to the main article on the gun: <code><nowiki>{{main|Name of the weapon}}</nowiki></code>. Describe in general terms the ammunition available for the main gun. Give advice on how to use them and how to fill the ammunition storage.'' --> | ||
| − | {{main|D- | + | {{main|D-25TS (122 mm)}} |
{| class="wikitable" style="text-align:center" width="100%" | {| class="wikitable" style="text-align:center" width="100%" | ||
|- | |- | ||
| − | ! colspan="5" | [[D- | + | ! colspan="5" | [[D-25TS (122 mm)|122 mm D-25TS]] || colspan="5" | Turret rotation speed (°/s) || colspan="4" | Reloading rate (seconds) |
|- | |- | ||
! Mode !! Capacity !! Vertical !! Horizontal !! Stabilizer | ! Mode !! Capacity !! Vertical !! Horizontal !! Stabilizer | ||
| Line 49: | Line 57: | ||
|- | |- | ||
! ''Arcade'' | ! ''Arcade'' | ||
| − | | rowspan="2" | 30 || rowspan="2" | - | + | | rowspan="2" | 30 || rowspan="2" | -3°/+17° || rowspan="2" | ±180° || rowspan="2" | {{Annotation|Vertical|up to 24 km/h}} || 13.8 || 19.0 || 23.1 || 25.6 || 27.2 || rowspan="2" | 19.50 || rowspan="2" | 17.25 || rowspan="2" | 15.90 || rowspan="2" | 15.00 |
|- | |- | ||
! ''Realistic'' | ! ''Realistic'' | ||
| − | | | + | | 8.3 || 9.8 || 11.9 || 13.2 || 14.0 |
|- | |- | ||
|} | |} | ||
| Line 62: | Line 70: | ||
! rowspan="2" data-sort-type="text" | Ammunition | ! rowspan="2" data-sort-type="text" | Ammunition | ||
! rowspan="2" | Type of<br>warhead | ! rowspan="2" | Type of<br>warhead | ||
| − | ! colspan="6" | | + | ! colspan="6" | Penetration @ 0° Angle of Attack (mm) |
|- | |- | ||
! 10 m !! 100 m !! 500 m !! 1,000 m !! 1,500 m !! 2,000 m | ! 10 m !! 100 m !! 500 m !! 1,000 m !! 1,500 m !! 2,000 m | ||
| Line 100: | Line 108: | ||
==== [[Ammo racks]] ==== | ==== [[Ammo racks]] ==== | ||
| − | + | [[File:Ammoracks_{{PAGENAME}}.png|right|thumb|x250px|[[Ammo racks]] of the {{PAGENAME}}]] | |
| − | <!-- '''Last updated:''' --> | + | <!-- '''Last updated: 2.3.0.62''' --> |
{| class="wikitable" style="text-align:center" | {| class="wikitable" style="text-align:center" | ||
|- | |- | ||
! Full<br>ammo | ! Full<br>ammo | ||
| + | ! Ammo<br>part | ||
! 1st<br>rack empty | ! 1st<br>rack empty | ||
! 2nd<br>rack empty | ! 2nd<br>rack empty | ||
| Line 111: | Line 120: | ||
! 5th<br>rack empty | ! 5th<br>rack empty | ||
! 6th<br>rack empty | ! 6th<br>rack empty | ||
| + | |- | ||
| + | | '''30''' || ''Projectiles'' <br> ''Propellants'' || 27 ''(+3)'' <br> 27 ''(+3)'' || 24 ''(+6)'' <br> 24 ''(+6)'' || 20 ''(+10)'' <br> 20 ''(+10)'' || 17 ''(+13)'' <br> 17 ''(+13)'' || 14 ''(+16)'' <br> 14 ''(+16)'' || 11 ''(+19)'' <br> 11 ''(+19)'' | ||
| + | |- | ||
| + | ! 7th<br>rack empty | ||
| + | ! 8th<br>rack empty | ||
| + | ! 9th<br>rack empty | ||
| + | ! 10th<br>rack empty | ||
| + | ! 11th<br>rack empty | ||
| + | ! 12th<br>rack empty | ||
! Visual<br>discrepancy | ! Visual<br>discrepancy | ||
|- | |- | ||
| − | | ''' | + | | 10 ''(+20)'' <br> 10 ''(+20)'' || 9 ''(+21)'' <br> 9 ''(+21)'' || 7 ''(+23)'' <br> 7 ''(+23)'' || 5 ''(+25)'' <br> 5 ''(+25)'' || 3 ''(+27)'' <br> 3 ''(+27)'' || 1 ''(+29)'' <br> 1 ''(+29)''|| No |
|- | |- | ||
|} | |} | ||
=== Machine guns === | === Machine guns === | ||
| + | {{Specs-Tank-Weapon|2}} | ||
| + | {{Specs-Tank-Weapon|3}} | ||
<!-- ''Offensive and anti-aircraft machine guns not only allow you to fight some aircraft but also are effective against lightly armoured vehicles. Evaluate machine guns and give recommendations on its use.'' --> | <!-- ''Offensive and anti-aircraft machine guns not only allow you to fight some aircraft but also are effective against lightly armoured vehicles. Evaluate machine guns and give recommendations on its use.'' --> | ||
{{main|DShK (12.7 mm)}} | {{main|DShK (12.7 mm)}} | ||
| Line 129: | Line 149: | ||
| Coaxial || 500 (50) || 600 || N/A || N/A | | Coaxial || 500 (50) || 600 || N/A || N/A | ||
|- | |- | ||
| − | | Pintle || 250 (50) || 600 || -5°/+ | + | | Pintle || 250 (50) || 600 || -5°/+85° || ±180° |
|- | |- | ||
|} | |} | ||
== Usage in battles == | == Usage in battles == | ||
| − | ''Describe the tactics of playing in the vehicle, the features of using vehicles in the team and advice on tactics. Refrain from creating a "guide" - do not impose a single point of view but instead give the reader food for thought. Describe the most dangerous enemies and give recommendations on fighting them. If necessary, note the specifics of the game in different modes (AB, RB, SB).'' | + | <!-- ''Describe the tactics of playing in the vehicle, the features of using vehicles in the team and advice on tactics. Refrain from creating a "guide" - do not impose a single point of view but instead give the reader food for thought. Describe the most dangerous enemies and give recommendations on fighting them. If necessary, note the specifics of the game in different modes (AB, RB, SB).'' --> |
| − | + | Even though you have thick armour HEAT-FS and APDS will go right through it so be careful. T-10A's gun has a 230mm pen at 90° point blank but for targets such as the M-103 you will have a very hard time killing. Your reload rate is also very good for a 122mm gun you can expect a 18 second reload which is way less than a IS-3 or IS-4 which has a average of 25 seconds. When taking a enemy position or cap bring at least 2 ally to help and support you. Since your a Soviet tank you have a low gun depression of 3°, so avoid poisons that need gun depression. One special feature that sets T-10A from other heavy Soviet tanks is a stabilizer which makes a huge difference in getting a kill or sent back to the hanger. You also have a 12.7mm machine gun to take out light armoured targets, planes, or helicopters. | |
| − | |||
| − | |||
| − | |||
| − | |||
| − | |||
| − | |||
| − | |||
| − | |||
| − | |||
| − | |||
| − | |||
| − | |||
| − | |||
| − | |||
| − | |||
| − | |||
| − | |||
| − | |||
| − | |||
| − | |||
| − | |||
| − | |||
| − | |||
| − | |||
| − | |||
| − | |||
| − | |||
| − | |||
| − | |||
| − | |||
| − | |||
| − | |||
| − | |||
| − | |||
| − | |||
| − | |||
| − | |||
| − | |||
| − | |||
| − | |||
| − | |||
=== Pros and cons === | === Pros and cons === | ||
| − | ''Summarise and briefly evaluate the vehicle in terms of its characteristics and combat effectiveness. Mark its pros and cons in a bulleted list. Try not to use more than 6 points for each of the characteristics. Avoid using categorical definitions such as "bad", "good" and the like - use substitutions with softer forms such as "inadequate" and "effective".'' | + | <!-- ''Summarise and briefly evaluate the vehicle in terms of its characteristics and combat effectiveness. Mark its pros and cons in a bulleted list. Try not to use more than 6 points for each of the characteristics. Avoid using categorical definitions such as "bad", "good" and the like - use substitutions with softer forms such as "inadequate" and "effective".'' --> |
'''Pros:''' | '''Pros:''' | ||
| − | * | + | * Good turret armour and effective pike nose hull armour. |
| + | * Good side armour which can occasionally protect you from heavy tank shells. | ||
| + | * Decent mobility for such a heavily armoured vehicle. | ||
| + | * Has night vision device. | ||
| + | * Has a vertical stabilizer. | ||
| + | * 12.7 mm DShK coaxial and commander's weapons make short work of light vehicles, allowing conservation of main gun rounds. | ||
'''Cons:''' | '''Cons:''' | ||
| − | * | + | * HEATFS, HESH, APDS rounds can easily penetrate the armour. |
| + | * 14 hp/t ratio (in RB) which is not enough at its BR. | ||
| + | * -8 km/h reverse speed. | ||
| + | * Limited ammo reserves for secondary weapons. | ||
| + | * No NVD for gunner view | ||
== History == | == History == | ||
| − | ''Describe the history of the creation and combat usage of the vehicle in more detail than in the introduction. If the historical reference turns out to be too long, take it to a separate article, taking a link to the article about the vehicle and adding a block "/History" (example: <nowiki>https://wiki.warthunder.com/(Vehicle-name)/History</nowiki>) and add a link to it here using the <code>main</code> template. Be sure to reference text and sources by using <code><nowiki><ref></ref></nowiki></code>, as well as adding them at the end of the article with <code><nowiki><references /></nowiki></code>. This section may also include the vehicle's dev blog entry (if applicable) and the in-game encyclopedia description (under <code><nowiki>=== In-game description ===</nowiki></code>, also if applicable).'' | + | <!-- ''Describe the history of the creation and combat usage of the vehicle in more detail than in the introduction. If the historical reference turns out to be too long, take it to a separate article, taking a link to the article about the vehicle and adding a block "/History" (example: <nowiki>https://wiki.warthunder.com/(Vehicle-name)/History</nowiki>) and add a link to it here using the <code>main</code> template. Be sure to reference text and sources by using <code><nowiki><ref></ref></nowiki></code>, as well as adding them at the end of the article with <code><nowiki><references /></nowiki></code>. This section may also include the vehicle's dev blog entry (if applicable) and the in-game encyclopedia description (under <code><nowiki>=== In-game description ===</nowiki></code>, also if applicable).'' --> |
| + | {{main|T-10M#History|l1=History of the T-10M}} | ||
| + | The T-10A is an early variant of the T-10 heavy tank. It included a single-plane stabilizer which allowed the gun to be fired accurately while moving. It was developed in 1956, and was later succeeded by the T-10B, and finally the [[T-10M]]. | ||
== Media == | == Media == | ||
<!-- ''Excellent additions to the article would be video guides, screenshots from the game, and photos.'' --> | <!-- ''Excellent additions to the article would be video guides, screenshots from the game, and photos.'' --> | ||
| − | [ | + | |
| + | ;Skins | ||
| + | |||
| + | * [https://live.warthunder.com/feed/camouflages/?vehicle=ussr_t_10a Skins and camouflages for the {{PAGENAME}} from live.warthunder.com.] | ||
| + | |||
| + | ;Images | ||
| + | <gallery mode="packed-hover"> | ||
| + | Image:T-10A Devblog Image 001.jpg|<small>T-10A devblog image</small> | ||
| + | </gallery> | ||
| + | |||
| + | ;Videos | ||
| + | {{Youtube-gallery|OR18NRGT7uw|'''The Shooting Range #254''' - ''Pages of History'' section at 03:03 discusses the T-10.|gENL-q_x5Tc|'''SOVIET SUFFERING: T-10A Review''' - ''Sako Sniper''|MsSxTpwTq-I|'''The Heavy Problem - T-10A''' - ''JustinPlaysYT''}} | ||
== See also == | == See also == | ||
| − | ''Links to the articles on the War Thunder Wiki that you think will be useful for the reader, for example:'' | + | <!-- ''Links to the articles on the War Thunder Wiki that you think will be useful for the reader, for example:'' |
| + | * ''reference to the series of the vehicles;'' | ||
| + | * ''links to approximate analogues of other nations and research trees.'' --> | ||
| − | + | ;Vehicles equipped with the same chassis | |
| − | * | + | * [[T-10M]] |
== External links == | == External links == | ||
| − | ''Paste links to sources and external resources, such as:'' | + | <!-- ''Paste links to sources and external resources, such as:'' |
| + | * ''topic on the official game forum;'' | ||
| + | * ''other literature.'' --> | ||
| − | * | + | * [[wikipedia:T-10_tank|[Wikipedia] T-10 tank]] |
| − | |||
{{USSR heavy tanks}} | {{USSR heavy tanks}} | ||
{{USSR premium ground vehicles}} | {{USSR premium ground vehicles}} | ||
Revision as of 19:27, 12 September 2021


Contents
Description
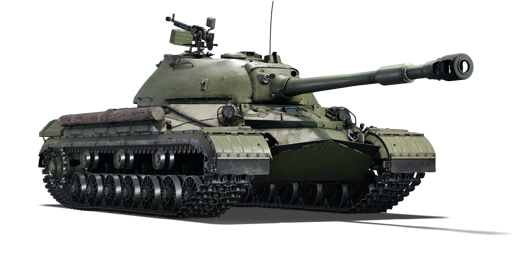
The T-10A is a premium gift rank V Soviet heavy tank with a battle rating of 7.7 (AB/RB/SB). It was introduced during Update "New Power" as a reward for Battle Pass: Season I.
General info
Survivability and armour
Overall, the armour protection of the hull, as it is a T-10 hull, has very good protection for only APDS. When not angled, the pike is able to deflect and stop APDS and full calibre kinetic rounds. However, chemical rounds such as HEAT and ATGM will have no issues penetrating the hull as well as APFSDS. Moving to the turret, it is poorly armoured even against APDS, it may stop APCBC shells but should not be relied on to stop HEAT and ATGM nor APFSDS
| Armour | Front (Slope angle) | Sides | Rear | Roof |
|---|---|---|---|---|
| Hull | 120 mm (57°) Front glacis 120 mm (49°) Lower glacis 40-60 mm (78-79°) Driver's port |
120 mm (50°) Top 80 mm (0-64°) Middle 30 mm (60°) Bottom |
50 mm (53°) Top 60 mm (21°) Bottom |
30 mm |
| Turret | 120-250 mm (26-60°) Turret front 100 + 250 mm (0-75°) Gun mantlet |
130-190 mm (3-55°) | 102 mm (21-47°) | 30 mm |
| Cupola | 40 mm | 40 mm | 40 mm | 30 mm |
Mobility
| Game Mode | Max Speed (km/h) | Weight (tons) | Engine power (horsepower) | Power-to-weight ratio (hp/ton) | |||
|---|---|---|---|---|---|---|---|
| Forward | Reverse | Stock | Upgraded | Stock | Upgraded | ||
| Arcade | 45 | 9 | 50 | 1,085 | 1,336 | 21.7 | 26.72 |
| Realistic | 42 | 8 | 619 | 700 | 12.38 | 14 | |
Mobility wise, as it is a T-10, it lacks speed as well as agility. However, the horsepower generated by the engine makes this a beast when moving obstacles and even dead tanks. The mass can be seen as a pro and a con. Due to heavy mass, it has more traction and will not be flipped by explosions or pushed so easily by tanks. However, the mass reduced drastically the top speed as well as the acceleration.
Modifications and economy
| Mobility | Protection | Firepower | ||||||||||||||||||||||||
|---|---|---|---|---|---|---|---|---|---|---|---|---|---|---|---|---|---|---|---|---|---|---|---|---|---|---|
|
|
|
Armaments
Driver only: NVD.
Main armament
| 122 mm D-25TS | Turret rotation speed (°/s) | Reloading rate (seconds) | |||||||||||
|---|---|---|---|---|---|---|---|---|---|---|---|---|---|
| Mode | Capacity | Vertical | Horizontal | Stabilizer | Stock | Upgraded | Full | Expert | Aced | Stock | Full | Expert | Aced |
| Arcade | 30 | -3°/+17° | ±180° | Vertical | 13.8 | 19.0 | 23.1 | 25.6 | 27.2 | 19.50 | 17.25 | 15.90 | 15.00 |
| Realistic | 8.3 | 9.8 | 11.9 | 13.2 | 14.0 | ||||||||
Ammunition
| Penetration statistics | |||||||
|---|---|---|---|---|---|---|---|
| Ammunition | Type of warhead |
Penetration @ 0° Angle of Attack (mm) | |||||
| 10 m | 100 m | 500 m | 1,000 m | 1,500 m | 2,000 m | ||
| BR-471 | APHE | 205 | 201 | 183 | 162 | 144 | 128 |
| BR-471B | APHEBC | 205 | 203 | 191 | 178 | 166 | 155 |
| BR-471D | APCBC | 230 | 227 | 215 | 200 | 186 | 173 |
| OF-471 | HE | 37 | 37 | 37 | 37 | 37 | 37 |
| Shell details | |||||||||
|---|---|---|---|---|---|---|---|---|---|
| Ammunition | Type of warhead |
Velocity (m/s) |
Projectile Mass (kg) |
Fuse delay (m) |
Fuse sensitivity (mm) |
Explosive Mass (TNT equivalent) (g) |
Ricochet | ||
| 0% | 50% | 100% | |||||||
| BR-471 | APHE | 795 | 25 | 1.2 | 19 | 246.4 | 47° | 60° | 65° |
| BR-471B | APHEBC | 795 | 25 | 1.2 | 19 | 246.4 | 48° | 63° | 71° |
| BR-471D | APCBC | 800 | 25 | 1.2 | 19 | 192.5 | 48° | 63° | 71° |
| OF-471 | HE | 800 | 25 | 0 | 0.1 | 3,600 | 79° | 80° | 81° |
Ammo racks

| Full ammo |
Ammo part |
1st rack empty |
2nd rack empty |
3rd rack empty |
4th rack empty |
5th rack empty |
6th rack empty |
|---|---|---|---|---|---|---|---|
| 30 | Projectiles Propellants |
27 (+3) 27 (+3) |
24 (+6) 24 (+6) |
20 (+10) 20 (+10) |
17 (+13) 17 (+13) |
14 (+16) 14 (+16) |
11 (+19) 11 (+19) |
| 7th rack empty |
8th rack empty |
9th rack empty |
10th rack empty |
11th rack empty |
12th rack empty |
Visual discrepancy | |
| 10 (+20) 10 (+20) |
9 (+21) 9 (+21) |
7 (+23) 7 (+23) |
5 (+25) 5 (+25) |
3 (+27) 3 (+27) |
1 (+29) 1 (+29) |
No |
Machine guns
| 12.7 mm DShK | ||||
|---|---|---|---|---|
| Mount | Capacity (Belt) | Fire rate | Vertical | Horizontal |
| Coaxial | 500 (50) | 600 | N/A | N/A |
| Pintle | 250 (50) | 600 | -5°/+85° | ±180° |
Usage in battles
Even though you have thick armour HEAT-FS and APDS will go right through it so be careful. T-10A's gun has a 230mm pen at 90° point blank but for targets such as the M-103 you will have a very hard time killing. Your reload rate is also very good for a 122mm gun you can expect a 18 second reload which is way less than a IS-3 or IS-4 which has a average of 25 seconds. When taking a enemy position or cap bring at least 2 ally to help and support you. Since your a Soviet tank you have a low gun depression of 3°, so avoid poisons that need gun depression. One special feature that sets T-10A from other heavy Soviet tanks is a stabilizer which makes a huge difference in getting a kill or sent back to the hanger. You also have a 12.7mm machine gun to take out light armoured targets, planes, or helicopters.
Pros and cons
Pros:
- Good turret armour and effective pike nose hull armour.
- Good side armour which can occasionally protect you from heavy tank shells.
- Decent mobility for such a heavily armoured vehicle.
- Has night vision device.
- Has a vertical stabilizer.
- 12.7 mm DShK coaxial and commander's weapons make short work of light vehicles, allowing conservation of main gun rounds.
Cons:
- HEATFS, HESH, APDS rounds can easily penetrate the armour.
- 14 hp/t ratio (in RB) which is not enough at its BR.
- -8 km/h reverse speed.
- Limited ammo reserves for secondary weapons.
- No NVD for gunner view
History
The T-10A is an early variant of the T-10 heavy tank. It included a single-plane stabilizer which allowed the gun to be fired accurately while moving. It was developed in 1956, and was later succeeded by the T-10B, and finally the T-10M.
Media
- Skins
- Images
T-10A devblog image

- Videos
See also
- Vehicles equipped with the same chassis
External links
| USSR heavy tanks | |
|---|---|
| KV-1 | KV-1 (L-11) · KV-1 (ZiS-5) · KV-1E · KV-1S |
| KV-2 | KV-2 (1939) · KV-2 (1940) · KV-2 (ZiS-6) |
| Other KVs | KV-85 · KV-122 · KV-220 |
| IS-1/2 | IS-1 · IS-2 · IS-2 (1944) · IS-2 No.321 · IS-2 "Revenge" · Object 248 |
| Other IS tanks | IS-3 · IS-4M · IS-6 · IS-7 |
| T-10 | T-10A · T-10M |
| Multi-turreted | T-35 · SMK |
| Other | Object 279 |
| Lend-Lease | ▂MK-II "Matilda" |
| USSR premium ground vehicles | |
|---|---|
| Light tanks | BA-11 · RBT-5 · BT-7A (F-32) · T-26 (1st Gv.T.Br.) · T-26E · T-126 · PT-76-57 · 2S38 |
| Medium tanks | T-34 (Prototype) · T-34 (1st Gv.T.Br.) · T-34E · T-34-57 (1943) · T-34-85E · T-34-100 · T-44-122 · TO-55 · T-55AM-1 · T-72AV (TURMS-T) · T-80UD |
| ▂M3 Medium · ▂M4A2 · ▂T-III · ▂T-V · ▂МК-IX "Valentine" | |
| Heavy tanks | SMK · T-35 · ▂MK-II "Matilda" · KV-1E · KV-2 (1940) · KV-2 (ZiS-6) · KV-122 · KV-220 · IS-2 "Revenge" · Object 248 · IS-6 · T-10A |
| Tank destroyers | BM-8-24 · BM-13N · BM-31-12 |
| SU-57 · SU-76D · SU-76M (5th Gv.Kav.Corps) · SU-85A · SU-100Y · SU-122P · Object 120 | |
| SPAA | ▂Phòng không T-34 · ZUT-37 |
