Difference between revisions of "M13/40 (II)"
(→Ammunition: Converted to transclusion) |
(→Ammo racks) (Tag: Visual edit) |
||
| (32 intermediate revisions by 9 users not shown) | |||
| Line 1: | Line 1: | ||
| + | {{Specs-Card|code=it_m13_40_serie_2}} | ||
{{About | {{About | ||
| − | |about= | + | |about=medium tank '''{{PAGENAME}}''' |
| − | |usage= other | + | |usage=other uses |
| − | |link= M13/40 (Family) | + | |link=M13/40 (Family) |
| − | |||
| − | |||
| − | |||
| − | |||
}} | }} | ||
== Description == | == Description == | ||
| − | <!-- | + | <!--In the description, the first part should be about the history of the creation and combat usage of the vehicle, as well as its key features. In the second part, tell the reader about the ground vehicle in the game. Insert a screenshot of the vehicle, so that if the novice player does not remember the vehicle by name, he will immediately understand what kind of vehicle the article is talking about.--> |
| − | The '''{{Specs|name}}''' (shortened as '''{{Specs|pseudonym}}''') is a | + | [[File:GarageImage M13 40 (II).jpg|420px|thumb|left]] |
| + | {{Break}} | ||
| + | The '''{{Specs|name}}''' (shortened as '''{{Specs|pseudonym}}''') is a gift Rank {{Specs|rank}} Italian medium tank {{Battle-rating}}. It was introduced during [[Update 1.85 "Supersonic"]] as a battle reward in the [[wt:en/news/5967-news-festivities-in-war-thunder-en|2018 War Thunder Festivities]]. It has since been available for purchase with Golden Eagles. | ||
| − | The M13/40 (II) is nearly identical to its other in-game variants. Compared to the [[M13/40 (I)]], it has 5 degrees worse gun depression, but its reload rate now matches other rank | + | The M13/40 (II) is nearly identical to its other in-game variants. Compared to the [[M13/40 (I)]], it has 5 degrees worse gun depression, but its reload rate now matches other rank 1 tanks, being 3.5 seconds after experting the crew. Compared to the [[M13/40 (III)]], it just has worse gun depression with everything else being same. |
Visually, it can be distinguished from the [[M13/40 (I)|mark I]] by its default African camouflage and folded antenna on the right side (left if head-on), and by the lack of chassis parts on top of its left track (right if head-on). It can be distinguished from the [[M13/40 (III)|mark III]] only by lack of the block on top of the middle of the turret. | Visually, it can be distinguished from the [[M13/40 (I)|mark I]] by its default African camouflage and folded antenna on the right side (left if head-on), and by the lack of chassis parts on top of its left track (right if head-on). It can be distinguished from the [[M13/40 (III)|mark III]] only by lack of the block on top of the middle of the turret. | ||
| − | An average gun for its BR, it can penetrate the front of some of the tanks it will face and | + | An average gun for its BR, it can penetrate the front of some of the tanks it will face and one-shot them. It has decent armour, strong enough to bounce shots at high angle. The worst aspect of the M13/40 (II), as with the rest of them, is its speed. Poor acceleration makes it hard to achieve its top speed of 32 km/h, and with worse vertical angles it's even less worth it to go up hills. |
== General info == | == General info == | ||
=== Survivability and armour === | === Survivability and armour === | ||
| − | + | <!--''Describe armour protection. Note the most well protected and key weak areas. Appreciate the layout of modules as well as the number and location of crew members. Is the level of armour protection sufficient, is the placement of modules helpful for survival in combat?'' | |
| − | <!-- ''Describe armour protection. Note the most well protected and key weak areas. Appreciate the layout of modules as well as the number and location of crew members. Is the level of armour protection sufficient, is the placement of modules helpful for survival in combat? | ||
| − | |||
| − | |||
| − | |||
| − | |||
| − | |||
| − | |||
| − | '' | + | ''If necessary use a visual template to indicate the most secure and weak zones of the armour.'' --> |
| − | + | Armour is same as all M13/40 - Angle your tank to have 36 to 50 mm effective armour thickness and use it to block enemy shots. Destroy British tanks as soon as possible, as every single one of them can destroy your tank. | |
| − | |||
| − | |||
| − | |||
| − | |||
| − | |||
| − | |||
| − | |||
| − | |||
| − | |||
| − | |||
| − | |||
| − | |||
| − | + | However, the default camouflage is now the desert one, which means you will be at a disadvantage on non-desert maps at first in terms of stealth. | |
| − | |||
| − | |||
| − | |||
=== Mobility === | === Mobility === | ||
| − | |||
<!-- ''Write about the mobility of the ground vehicle. Estimate the specific power and manoeuvrability, as well as the maximum speed forwards and backwards.'' --> | <!-- ''Write about the mobility of the ground vehicle. Estimate the specific power and manoeuvrability, as well as the maximum speed forwards and backwards.'' --> | ||
| − | {{tankMobility|abMinHp=201|rbMinHp=115}} | + | {{tankMobility|abMinHp= 201|rbMinHp= 115}} |
Mobility is the same as M13/40 (I) - It is rather slow and is unable to scale hills well, 32 km/h being its top speed, reachable only on flat land. | Mobility is the same as M13/40 (I) - It is rather slow and is unable to scale hills well, 32 km/h being its top speed, reachable only on flat land. | ||
| − | |||
| − | |||
| − | |||
== Armaments == | == Armaments == | ||
| − | |||
=== Main armament === | === Main armament === | ||
| − | + | <!--Give the reader information about the characteristics of the main gun. Assess its effectiveness in a battle based on the reloading speed, ballistics and the power of shells. Do not forget about the flexibility of the fire, that is how quickly the cannon can be aimed at the target, open fire on it and aim at another enemy. Add a link to the main article on the gun: <code><nowiki>{{main|Name of the weapon}}</nowiki></code>. Describe in general terms the ammunition available for the main gun. Give advice on how to use them and how to fill the ammunition storage.--> | |
| − | <!-- | ||
{{main|47/32 mod.35 (47 mm)}} | {{main|47/32 mod.35 (47 mm)}} | ||
| − | Like the other M13/40s, | + | Like the other M13/40s, it has a 47 mm gun with ammunition capable of destroying most of tanks in one shot, assuming they are within 200 m range. Upgraded ammunition improves performance against angled tanks and damage potential at long range. |
| − | {| class="wikitable" style="text-align:center" width=" | + | {| class="wikitable" style="text-align:center" |
| + | |- | ||
| + | ! colspan="6" | [[47/32 mod.35 (47 mm)|47 mm 47/32 mod.35]] | ||
| + | |- | ||
| + | ! colspan="3" rowspan="1" style="width:5em" |Capacity | ||
| + | ! rowspan="1" | Vertical <br> guidance | ||
| + | ! rowspan="1" | Horizontal <br> guidance | ||
| + | ! rowspan="1" | Stabilizer | ||
| + | |- | ||
| + | | colspan="3" | 87 || -10°/+25° || ±180° || N/A | ||
| + | |- | ||
| + | ! colspan="6" | Turret rotation speed (°/s) | ||
| + | |- | ||
| + | ! style="width:4em" |Mode | ||
| + | ! style="width:4em" |Stock | ||
| + | ! style="width:4em" |Upgraded | ||
| + | ! style="width:4em" |Prior + Full crew | ||
| + | ! style="width:4em" |Prior + Expert qualif. | ||
| + | ! style="width:4em" |Prior + Ace qualif. | ||
| + | |- | ||
| + | | ''Arcade'' || 13.33 || __.__ || __.__ || __.__ || __.__ | ||
|- | |- | ||
| − | + | | ''Realistic'' || 8.33 || __.__ || __.__ || __.__ || __.__ | |
|- | |- | ||
| − | ! | + | ! colspan="4" | Reloading rate (seconds) |
| − | |||
| − | |||
|- | |- | ||
| − | ! | + | ! colspan="1" style="width:4em" |Stock |
| − | + | ! colspan="1" style="width:4em" |Prior + Full crew | |
| + | ! colspan="1" style="width:4em" |Prior + Expert qualif. | ||
| + | ! colspan="1" style="width:4em" |Prior + Ace qualif. | ||
|- | |- | ||
| − | + | | 3.77 || __.__ || __.__ || __.__ | |
| − | | | ||
|- | |- | ||
|} | |} | ||
| − | ==== Ammunition ==== | + | ===== Ammunition ===== |
| − | { | + | {| class="wikitable sortable" style="text-align:center" width="100%" |
| + | ! colspan="8" | Penetration statistics | ||
| + | |- | ||
| + | ! rowspan="2" data-sort-type="text" | Ammunition | ||
| + | ! rowspan="2" class="unsortable" | Type of <br /> warhead | ||
| + | ! colspan="6" | '''Penetration''' '''''in mm''''' '''@ 90°''' | ||
| + | |- | ||
| + | ! 10m | ||
| + | ! 100m | ||
| + | ! 500m | ||
| + | ! 1000m | ||
| + | ! 1500m | ||
| + | ! 2000m | ||
| + | |- | ||
| + | | Granata Perforante mod.35 || APHE || 54 || 52 || 40 || 30 || 22 || 16 | ||
| + | |- | ||
| + | | Granata Perforante mod.39 || APBC || 53 || 52 || 45 || 39 || 33 || 28 | ||
| + | |- | ||
| + | |} | ||
| + | {| class="wikitable sortable" style="text-align:center" width="100%" | ||
| + | ! colspan="11" | Shell details | ||
| + | |- | ||
| + | ! rowspan="2" data-sort-type="text" | Ammunition | ||
| + | ! rowspan="2" class="unsortable" | Type of <br /> warhead | ||
| + | ! rowspan="2" |Velocity <br /> in m/s | ||
| + | ! rowspan="2" |Projectile<br />Mass in kg | ||
| + | ! rowspan="2" | ''Fuse delay'' | ||
| + | ''in m:'' | ||
| + | ! rowspan="2" | ''Fuse sensitivity'' | ||
| + | ''in mm:'' | ||
| + | ! rowspan="2" | ''Explosive Mass in g<br /> (TNT equivalent):'' | ||
| + | ! rowspan="2" | ''Normalization At 30° <br> from horizontal:'' | ||
| + | ! colspan="3" | ''Ricochet:'' | ||
| + | |- | ||
| + | ! 0% | ||
| + | ! 50% | ||
| + | ! 100% | ||
| + | |- | ||
| + | | Granata Perforante mod.35 || APHE || 630 || 1.5 || 1.2 || 15 || 30 || ° || 47° || 60° || 65° | ||
| + | |- | ||
| + | | Granata Perforante mod.39 || APBC || 630 || 1.4 || 1.2 || 15 || 30 || ° || 48° || 63° || 71° | ||
| + | |- | ||
| + | |} | ||
| − | ==== [[Ammo racks]] ==== | + | ===== [[Ammo racks|Ammo racks]] ===== |
| − | + | {| class="wikitable sortable" style="text-align:center" | |
| − | |||
| − | {| class="wikitable" style="text-align:center" | ||
|- | |- | ||
| − | ! Full<br>ammo | + | ! class="wikitable unsortable" |Full<br /> ammo |
| − | ! 1st<br>rack empty | + | !Turret Empty |
| − | ! 2nd<br>rack empty | + | ! class="wikitable unsortable" |1st<br /> rack empty |
| − | ! 3rd<br>rack empty | + | ! class="wikitable unsortable" |2nd<br /> rack empty |
| − | ! Visual<br>discrepancy | + | ! class="wikitable unsortable" |3rd<br /> rack empty |
| + | ! class="wikitable unsortable" |4th<br /> rack empty | ||
| + | ! class="wikitable unsortable" |5th<br /> rack empty | ||
| + | ! class="wikitable unsortable" |6th<br /> rack empty | ||
| + | ! class="wikitable unsortable" |Visual<br /> discrepancy | ||
|- | |- | ||
| − | | '''87''' || | + | || '''87''' |
| + | |54|| XX ''(X+)'' || ''(+)'' || ''(+)'' || ''(+)'' || ''(+)'' || ''(+)'' || style="text-align:left" | Yes | ||
|- | |- | ||
|} | |} | ||
| − | |||
| − | + | === Machine guns === | |
| + | <!--Offensive and anti-aircraft machine guns not only allow you to fight some aircraft but also are effective against lightly armoured vehicles. Evaluate machine guns and give recommendations on its use.--> | ||
| + | |||
| + | The coaxial-mounted machine gun can be used against open topped vehicles and against strafing planes. The pintle-mounted machine gun is hard to use for anything, as it's completely fixed in place. | ||
| − | |||
| − | |||
| − | |||
| − | |||
{{main|Breda Mod. 38 (8 mm)}} | {{main|Breda Mod. 38 (8 mm)}} | ||
| − | + | {| class="wikitable" style="text-align:center" | |
| − | + | |- | |
| − | {| class="wikitable" style="text-align:center" width=" | + | ! colspan="7" | [[Breda Mod. 38 (8 mm)|8 mm Breda Mod. 38]] |
| + | |- | ||
| + | ! colspan="7" | ''Coaxial mount'' | ||
| + | |- | ||
| + | ! colspan="4" rowspan="1" style="width:5em" |Capacity (Belt capacity) | ||
| + | ! rowspan="1" | Fire rate <br> (shots/minute) | ||
| + | ! rowspan="1" | Vertical <br> guidance | ||
| + | ! rowspan="1" | Horizontal <br> guidance | ||
|- | |- | ||
| − | + | | colspan="4" | 1,524 (24) || 600 || N/A || N/A | |
|- | |- | ||
| − | ! | + | ! colspan="7" | ''Pintle mount'' |
|- | |- | ||
| − | | | + | ! colspan="4" rowspan="1" style="width:5em" |Capacity (Belt capacity) |
| + | ! rowspan="1" | Fire rate <br> (shots/minute) | ||
| + | ! rowspan="1" | Vertical <br> guidance | ||
| + | ! rowspan="1" | Horizontal <br> guidance | ||
|- | |- | ||
| − | | | + | | colspan="4" | 1,524 (24) || 600 || __° || __° |
|- | |- | ||
|} | |} | ||
== Usage in battles == | == Usage in battles == | ||
| − | <!-- ''Describe the tactics of playing in the vehicle, the features of using vehicles in the team and advice on tactics. Refrain from creating a "guide" - do not impose a single point of view but instead give the reader food for thought. Describe the most dangerous enemies and give recommendations on fighting them. If necessary, note the specifics of the game in different modes (AB, RB, SB).'' --> | + | <!--''Describe the tactics of playing in the vehicle, the features of using vehicles in the team and advice on tactics. Refrain from creating a "guide" - do not impose a single point of view but instead give the reader food for thought. Describe the most dangerous enemies and give recommendations on fighting them. If necessary, note the specifics of the game in different modes (AB, RB, SB).''--> |
| − | Like the [[M13/40 (I)]], it can be used as a breakthrough tank to push through enemy defences and slowly, but surely destroy them, while driving at them at an angle to maximise armour effectiveness. | + | Like the [[M13/40 (I)]], it can be used as a breakthrough tank to push through enemy defences and slowly, but surely destroy them, while driving at them at an angle to maximise armour effectiveness. This role is reinforced by a fact that this tank has better reload rate and doesn't have to suffer two counter-shots for one, and can destroy all the tanks that pop out of cover with nearly no break. |
Just as with other models, you can also use flank route to go along with your team and to destroy every enemy tank that tries to flank your team. | Just as with other models, you can also use flank route to go along with your team and to destroy every enemy tank that tries to flank your team. | ||
| − | The important difference from other models is that your gun depression is somewhat worse, so scaling hills is even more risky and has less worth than before. Instead, focus on pushing enemy tanks, as your ammunition is good enough to destroy most tanks in one shot. | + | The important difference from other models is that your gun depression is somewhat worse, so scaling hills is even more risky and has less worth than before. Instead, focus on pushing enemy tanks, as your fire rate when trained is 3.5 seconds, and your ammunition is good enough to destroy most tanks in one shot. |
=== Pros and cons === | === Pros and cons === | ||
| − | <!-- ''Summarise and briefly evaluate the vehicle in terms of its characteristics and combat effectiveness. Mark its pros and cons in a bulleted list. Try not to use more than 6 points for each of the characteristics. Avoid using categorical definitions such as "bad", "good" and the like - use substitutions with softer forms such as "inadequate" and "effective".'' --> | + | <!--''Summarise and briefly evaluate the vehicle in terms of its characteristics and combat effectiveness. Mark its pros and cons in a bulleted list. Try not to use more than 6 points for each of the characteristics. Avoid using categorical definitions such as "bad", "good" and the like - use substitutions with softer forms such as "inadequate" and "effective".''--> |
'''Pros:''' | '''Pros:''' | ||
| − | * | + | *Like all M13/40 tanks, has armour decent enough to break through enemy lines when angled |
| − | * | + | *Compared to mark I, reload speed upgrade allows it to dominate over groups of enemy tanks while they try to figure your armour out |
| − | * | + | *Allows player to use full [[M13/40 (Family)|M13/40]] lineup and dismiss all the other Italian rank 1 tanks, which is arguably for the best |
'''Cons:''' | '''Cons:''' | ||
| − | * | + | *Still struggles at fighting other heavily armoured tanks at 500 m range |
| − | + | *Has worse gun depression than either of the reserve Italian tanks | |
| − | * | ||
== History == | == History == | ||
| − | <!-- ''Describe the history of the creation and combat usage of the vehicle in more detail than in the introduction. If the historical reference turns out to be too long, take it to a separate article, taking a link to the article about the vehicle and adding a block "/History" (example: <nowiki>https://wiki.warthunder.com/(Vehicle-name)/History</nowiki>) and add a link to it here using the <code>main</code> template. Be sure to reference text and sources by using <code><nowiki>< | + | <!--''Describe the history of the creation and combat usage of the ground vehicle in more detail than in the introduction. If the historical reference turns out to be too long, take it to a separate article, taking a link to the article about the vehicle and adding a block "/ History" (example: <nowiki>https://wiki.warthunder.com/(Vehicle-name)/History</nowiki>) and add a link to it here using the <code>main</code> template. Be sure to reference text and sources by using <code><nowiki><ref></nowiki></code>, as well as adding them at the end of the article. This section may also include the vehicle's dev blog entry (if applicable) and the in-game encyclopedia description (under <code><nowiki>=== In-game description ===</nowiki></code>, also if applicable).''--> |
| − | Intended to replace the unsatisfactory M11/39, the M13/40 retained its main mechanical features, but with a more powerful gun in a fully rotating turret. The M13 was slow, unreliable, and suffered from the tank commander doubling as the gunner. Similar to early | + | Intended to replace the unsatisfactory M11/39, the M13/40 retained its main mechanical features, but with a more powerful gun in a fully rotating turret. The M13 was slow, unreliable, and suffered from the tank commander doubling as the gunner. Similar to early Russian and French tanks, it did not receive radios as standard equipment until 1942. Nevertheless, it became the standard Italian medium tank from 1941 on, and is the best known Italian tank of the war. In War Thunder, the M13/40 (II) represents those made in the mid part of the production run, with hydraulic traverse gears and fixed radio installations. |
It first saw service with the 3rd Medium Tank Battalion (Battaglione Carri M) in Libya's Sollum-Halfaya region. It later equipped 132nd "Ariete (Ram)" Armoured Division (Divisione Corazzata) in North Africa. From January to April of 1941, it also saw action in Yugoslavia and Greece with the 131st Centauro (Centaur) and 133rd Littorio armoured divisions. For a short time after the first rush of British victories in North Africa in early 1941, there were enough captured M13s to equip a British armoured unit, 6th Royal Tank Regiment, in Libya. These were all lost in turn to Rommel's offensive in March of that year. In late August of 1941, Italian medium tank platoons increased their number from four to five. | It first saw service with the 3rd Medium Tank Battalion (Battaglione Carri M) in Libya's Sollum-Halfaya region. It later equipped 132nd "Ariete (Ram)" Armoured Division (Divisione Corazzata) in North Africa. From January to April of 1941, it also saw action in Yugoslavia and Greece with the 131st Centauro (Centaur) and 133rd Littorio armoured divisions. For a short time after the first rush of British victories in North Africa in early 1941, there were enough captured M13s to equip a British armoured unit, 6th Royal Tank Regiment, in Libya. These were all lost in turn to Rommel's offensive in March of that year. In late August of 1941, Italian medium tank platoons increased their number from four to five. | ||
| Line 162: | Line 204: | ||
== Media == | == Media == | ||
| − | + | ''Excellent additions to the article would be video guides, screenshots from the game, and photos.'' | |
| − | + | == See also == | |
| − | + | ''Links to the articles on the War Thunder Wiki that you think will be useful for the reader, for example:'' | |
| − | |||
| − | |||
| − | |||
| − | |||
| − | |||
| − | |||
* ''reference to the series of the vehicles;'' | * ''reference to the series of the vehicles;'' | ||
| − | * ''links to approximate analogues of other nations and research trees.'' | + | * ''links to approximate analogues of other nations and research trees.'' |
| − | + | == External links == | |
| − | + | ''Paste links to sources and external resources, such as:'' | |
| − | |||
| − | |||
| − | |||
| − | |||
| − | |||
| − | |||
| − | |||
| − | |||
| − | |||
| − | |||
| − | |||
* ''topic on the official game forum;'' | * ''topic on the official game forum;'' | ||
| − | * ''other literature.'' | + | * ''encyclopedia page on the tank;'' |
| − | + | * ''other literature.'' | |
| − | |||
| − | |||
| − | |||
| − | |||
{{Italy medium tanks}} | {{Italy medium tanks}} | ||
{{Italy premium ground vehicles}} | {{Italy premium ground vehicles}} | ||
Revision as of 00:09, 3 May 2020
Contents
| This page is about the medium tank M13/40 (II). For other uses, see M13/40 (Family). |
Description
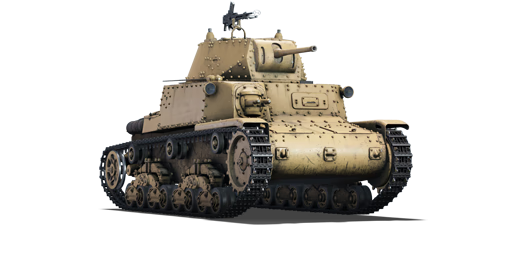
.jpg)
The Fiat-Ansaldo M13/40 II Serie (shortened as M13/40 (II)) is a gift Rank I Italian medium tank
with a battle rating of 2.0 (AB/RB/SB). It was introduced during Update 1.85 "Supersonic" as a battle reward in the 2018 War Thunder Festivities. It has since been available for purchase with Golden Eagles.
The M13/40 (II) is nearly identical to its other in-game variants. Compared to the M13/40 (I), it has 5 degrees worse gun depression, but its reload rate now matches other rank 1 tanks, being 3.5 seconds after experting the crew. Compared to the M13/40 (III), it just has worse gun depression with everything else being same.
Visually, it can be distinguished from the mark I by its default African camouflage and folded antenna on the right side (left if head-on), and by the lack of chassis parts on top of its left track (right if head-on). It can be distinguished from the mark III only by lack of the block on top of the middle of the turret.
An average gun for its BR, it can penetrate the front of some of the tanks it will face and one-shot them. It has decent armour, strong enough to bounce shots at high angle. The worst aspect of the M13/40 (II), as with the rest of them, is its speed. Poor acceleration makes it hard to achieve its top speed of 32 km/h, and with worse vertical angles it's even less worth it to go up hills.
General info
Survivability and armour
Armour is same as all M13/40 - Angle your tank to have 36 to 50 mm effective armour thickness and use it to block enemy shots. Destroy British tanks as soon as possible, as every single one of them can destroy your tank.
However, the default camouflage is now the desert one, which means you will be at a disadvantage on non-desert maps at first in terms of stealth.
Mobility
| Game Mode | Max Speed (km/h) | Weight (tons) | Engine power (horsepower) | Power-to-weight ratio (hp/ton) | |||
|---|---|---|---|---|---|---|---|
| Forward | Reverse | Stock | Upgraded | Stock | Upgraded | ||
| Arcade | 36 | 6 | 13.6 | 201 | 248 | 14.78 | 18.24 |
| Realistic | 32 | 5 | 115 | 130 | 8.46 | 9.56 | |
Mobility is the same as M13/40 (I) - It is rather slow and is unable to scale hills well, 32 km/h being its top speed, reachable only on flat land.
Armaments
Main armament
Like the other M13/40s, it has a 47 mm gun with ammunition capable of destroying most of tanks in one shot, assuming they are within 200 m range. Upgraded ammunition improves performance against angled tanks and damage potential at long range.
| 47 mm 47/32 mod.35 | |||||
|---|---|---|---|---|---|
| Capacity | Vertical guidance |
Horizontal guidance |
Stabilizer | ||
| 87 | -10°/+25° | ±180° | N/A | ||
| Turret rotation speed (°/s) | |||||
| Mode | Stock | Upgraded | Prior + Full crew | Prior + Expert qualif. | Prior + Ace qualif. |
| Arcade | 13.33 | __.__ | __.__ | __.__ | __.__ |
| Realistic | 8.33 | __.__ | __.__ | __.__ | __.__ |
| Reloading rate (seconds) | |||||
| Stock | Prior + Full crew | Prior + Expert qualif. | Prior + Ace qualif. | ||
| 3.77 | __.__ | __.__ | __.__ | ||
Ammunition
| Penetration statistics | |||||||
|---|---|---|---|---|---|---|---|
| Ammunition | Type of warhead |
Penetration in mm @ 90° | |||||
| 10m | 100m | 500m | 1000m | 1500m | 2000m | ||
| Granata Perforante mod.35 | APHE | 54 | 52 | 40 | 30 | 22 | 16 |
| Granata Perforante mod.39 | APBC | 53 | 52 | 45 | 39 | 33 | 28 |
| Shell details | ||||||||||
|---|---|---|---|---|---|---|---|---|---|---|
| Ammunition | Type of warhead |
Velocity in m/s |
Projectile Mass in kg |
Fuse delay
in m: |
Fuse sensitivity
in mm: |
Explosive Mass in g (TNT equivalent): |
Normalization At 30° from horizontal: |
Ricochet: | ||
| 0% | 50% | 100% | ||||||||
| Granata Perforante mod.35 | APHE | 630 | 1.5 | 1.2 | 15 | 30 | ° | 47° | 60° | 65° |
| Granata Perforante mod.39 | APBC | 630 | 1.4 | 1.2 | 15 | 30 | ° | 48° | 63° | 71° |
Ammo racks
| Full ammo |
Turret Empty | 1st rack empty |
2nd rack empty |
3rd rack empty |
4th rack empty |
5th rack empty |
6th rack empty |
Visual discrepancy |
|---|---|---|---|---|---|---|---|---|
| 87 | 54 | XX (X+) | (+) | (+) | (+) | (+) | (+) | Yes |
Machine guns
The coaxial-mounted machine gun can be used against open topped vehicles and against strafing planes. The pintle-mounted machine gun is hard to use for anything, as it's completely fixed in place.
| 8 mm Breda Mod. 38 | ||||||
|---|---|---|---|---|---|---|
| Coaxial mount | ||||||
| Capacity (Belt capacity) | Fire rate (shots/minute) |
Vertical guidance |
Horizontal guidance | |||
| 1,524 (24) | 600 | N/A | N/A | |||
| Pintle mount | ||||||
| Capacity (Belt capacity) | Fire rate (shots/minute) |
Vertical guidance |
Horizontal guidance | |||
| 1,524 (24) | 600 | __° | __° | |||
Usage in battles
Like the M13/40 (I), it can be used as a breakthrough tank to push through enemy defences and slowly, but surely destroy them, while driving at them at an angle to maximise armour effectiveness. This role is reinforced by a fact that this tank has better reload rate and doesn't have to suffer two counter-shots for one, and can destroy all the tanks that pop out of cover with nearly no break.
Just as with other models, you can also use flank route to go along with your team and to destroy every enemy tank that tries to flank your team.
The important difference from other models is that your gun depression is somewhat worse, so scaling hills is even more risky and has less worth than before. Instead, focus on pushing enemy tanks, as your fire rate when trained is 3.5 seconds, and your ammunition is good enough to destroy most tanks in one shot.
Pros and cons
Pros:
- Like all M13/40 tanks, has armour decent enough to break through enemy lines when angled
- Compared to mark I, reload speed upgrade allows it to dominate over groups of enemy tanks while they try to figure your armour out
- Allows player to use full M13/40 lineup and dismiss all the other Italian rank 1 tanks, which is arguably for the best
Cons:
- Still struggles at fighting other heavily armoured tanks at 500 m range
- Has worse gun depression than either of the reserve Italian tanks
History
Intended to replace the unsatisfactory M11/39, the M13/40 retained its main mechanical features, but with a more powerful gun in a fully rotating turret. The M13 was slow, unreliable, and suffered from the tank commander doubling as the gunner. Similar to early Russian and French tanks, it did not receive radios as standard equipment until 1942. Nevertheless, it became the standard Italian medium tank from 1941 on, and is the best known Italian tank of the war. In War Thunder, the M13/40 (II) represents those made in the mid part of the production run, with hydraulic traverse gears and fixed radio installations.
It first saw service with the 3rd Medium Tank Battalion (Battaglione Carri M) in Libya's Sollum-Halfaya region. It later equipped 132nd "Ariete (Ram)" Armoured Division (Divisione Corazzata) in North Africa. From January to April of 1941, it also saw action in Yugoslavia and Greece with the 131st Centauro (Centaur) and 133rd Littorio armoured divisions. For a short time after the first rush of British victories in North Africa in early 1941, there were enough captured M13s to equip a British armoured unit, 6th Royal Tank Regiment, in Libya. These were all lost in turn to Rommel's offensive in March of that year. In late August of 1941, Italian medium tank platoons increased their number from four to five.
When Italy surrendered in September 1943, 22 M13s were captured by Germany, who handed them over to the Italian fascist forces. It is uncertain how many in total were produced, as many were converted to M14/41s: estimates range from 710 to 1,049.
Media
Excellent additions to the article would be video guides, screenshots from the game, and photos.
See also
Links to the articles on the War Thunder Wiki that you think will be useful for the reader, for example:
- reference to the series of the vehicles;
- links to approximate analogues of other nations and research trees.
External links
Paste links to sources and external resources, such as:
- topic on the official game forum;
- encyclopedia page on the tank;
- other literature.
| Italy medium tanks | |
|---|---|
| Italy | |
| M13/40 | M13/40 (I) · M13/40 (II) · M13/40 (III) |
| M14/41 | M14/41 · M14/41 (47/40) |
| M15/42 | M15/42 |
| M16/43 | Celere Sahariano |
| P26/40 | P40 · P40 "G.C. Leoncello" |
| OF-40 | OF-40 · OF-40 Mk.2A · OF-40 (MTCA) |
| Ariete | Ariete (P) · Ariete · Ariete PSO · Ariete AMV |
| Germany | ▄Pz.III N · ▄Pz.IV G · ▄Leopard 1A5 |
| Allied powers | ▄Sherman I Composito · Sherman Ic · ▄Sherman Vc · ▄Sherman V · M26 "D.C.Ariete" · M26A1 · M47 (105/55) · M60A1 "D.C.Ariete" |
| Hungary | |
| Turán | Turan I · Turan II · Turan III |
| Germany | ◔Leopard 2A4 |
| USSR | ◔T-72M1 |
| Italy premium ground vehicles | |
|---|---|
| Light tanks | L6/40 (31 Rgt.) · Toldi IIA · AUBL/74 HVG · VRCC · Centauro RGO |
| Medium tanks | M13/40 (II) · Turan II · M14/41 (47/40) · Celere Sahariano · P40 "G.C. Leoncello" · ▄Sherman I Composito · ▄Pz.IV G |
| M26 "D.C.Ariete" · M60A1 "D.C.Ariete" · OF-40 (MTCA) | |
| Heavy tanks | Tigris |
| Tank destroyers | Breda 90/53 · M43 "G.C.Leoncello" · Zrinyi I |
