Difference between revisions of "A13 Mk I"
(→Main armament) |
(→Ammo racks) (Tag: Visual edit) |
||
| (31 intermediate revisions by 14 users not shown) | |||
| Line 1: | Line 1: | ||
| + | {{Specs-Card|code=uk_a_13_mk1}} | ||
{{About | {{About | ||
| about = British light tank '''{{PAGENAME}}''' | | about = British light tank '''{{PAGENAME}}''' | ||
| − | | usage = other | + | | usage = other uses |
| link = A13 (Family) | | link = A13 (Family) | ||
| − | |||
| − | |||
| − | |||
| − | |||
}} | }} | ||
== Description == | == Description == | ||
| − | <!-- ''In the description, the first part | + | <!--''In the description, the first part needs to be about the history of the creation and combat usage of the vehicle, as well as its key features. In the second part, tell the reader about the ground vehicle in the game. Insert the screenshot of the vehicle. If the novice player does not remember the vehicle by name, they will immediately understand what kind of vehicle it is talking about.''--> |
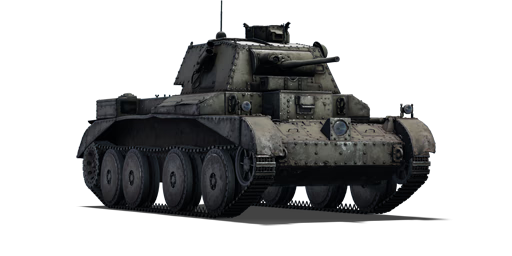
| − | The ''' | + | [[File:GarageImage_A13MkI.jpg|420px|thumb|left]] |
| + | {{break}} | ||
| + | The '''{{Specs|name}}''' is a reserve British light tank {{Battle-rating}}. It was introduced along with the initial British tree line in [[Update 1.55 "Royal Armour"]]. | ||
| + | |||
| + | This tank is a good representative of later rank 2-3 British tanks: good mobility, flat and thin frontal armour, bad reverse speed and minimal post-penetration damage. | ||
| + | |||
| + | =====Driving===== | ||
| + | Even though the A13 has good mobility, it sometimes feels weird: it loses speed on turns, does not accelerates quite as fast as it's overpowered engine (38.19 HP/ton, stock) should provide it and hill-climbing feels hard. All of these flaws come from the gearbox, which has bad and uneven ratios, resulting in a kick when changing speed. Knowing that you should always keep an eye on the "gear" counter top-left of your screen (activate it in the options menu) since it provides you crucial information on how your tank will react to your commands. With a bit of practice, one should swiftly masters these peculiarities. | ||
| − | + | =====Shooting===== | |
| + | Since the [[Ordnance QF 2-pounder (40 mm)|QF 2-pounder]] is used on most tanks of rank 1, it's important to know it well. This cannon has a major disadvantage at a distance since its projectiles lose around 20mm of penetration for every 500 m they travels. As if this was not enough, it has poor accuracy. Even with the ''adjustment of fire'' modification, one should target large components (crew, engine, transmission) or, as distance increases (500 m or more), the general centre of the foe. Firing it, you will easily notice it's last but not least flaw: it does almost no post-penetration damage, which means you will need to snipe, crew members, one by one. Combine this difficulty with a bit of distance and this task can prove difficult, sometimes leaving the enemy enough time to replenish it's crew before you finish it off. | ||
| + | |||
| + | On the other hand, this cannon has 5 major advantages: reload speed, close-quarter penetration, a primitive stabilizing system, lots of ammo and awesome gun depression. Its fast reloading speed allows you to compensate for its poor accuracy. Missed a shot? Why not take another even before you can re-position! Close quarter penetration, one of the best at its tier, is also a plus. Your enemies will only block your shot if you happen to hit a steep-angled plate of armour. The primitive stabilizer allows the tank to fire on the move as well. That being said, it works best at low speeds and on the relatively flat road through but is still much more precise than the comparable [[BT-7]] with its [[20-K (45 mm)|20-K]]. Last but not least, small shells means more shells. The A13 can bring up to 87 shells into the game, much more than you need to knock out 3-4 tanks. This allows you to try and suppress an enemy and keep it into cover by constantly firing near it (at this rank, this tactic can prove effective against new players). Finally, its good gun depression enables it to fire over hills, exposing only it's a small turret, shooting and disappearing swiftly. Proper use of these features allows this tank to compete well at it's BR. | ||
| + | |||
| + | =====Others===== | ||
| + | Since the addition of smoke in War Thunder, light tanks have it easier. Use your forward-launching smoke to create a wall of smoke in a strategic place. It can be used to cover your allies, when capturing a point, flanking in a street (urban environment). | ||
== General info == | == General info == | ||
| − | |||
=== Survivability and armour === | === Survivability and armour === | ||
| − | + | <!--''Describe armour protection. Note the most well protected and key weak areas. Appreciate the layout of modules as well as the number and location of crew members. Is the level of armour protection sufficient, is the placement of modules helpful for survival in combat?'' | |
| − | <!-- ''Describe armour protection. Note the most well protected and key weak areas. Appreciate the layout of modules as well as the number and location of crew members. Is the level of armour protection sufficient, is the placement of modules helpful for survival in combat? If necessary use a visual template to indicate the most secure and weak zones of the armour.'' --> | + | |
| + | ''If necessary use a visual template to indicate the most secure and weak zones of the armour.''--> | ||
'''Armour type:''' | '''Armour type:''' | ||
| Line 33: | Line 43: | ||
| Turret || 14 mm (0-15°) ''Turret front'' <br> 14 mm (1-63°) ''Gun mantlet'' || 14 mm (21°) || 14 mm (2°) || 14 mm | | Turret || 14 mm (0-15°) ''Turret front'' <br> 14 mm (1-63°) ''Gun mantlet'' || 14 mm (21°) || 14 mm (2°) || 14 mm | ||
|- | |- | ||
| − | | Cupola | + | ! Armour !! Sides !! Roof |
| + | |- | ||
| + | | Cupola || 14 mm || 14 mm | ||
|- | |- | ||
|} | |} | ||
'''Notes:''' | '''Notes:''' | ||
| − | |||
* Suspension wheels and tracks are 15 mm thick while the torsion bars in between the side armour are 10 mm thick. | * Suspension wheels and tracks are 15 mm thick while the torsion bars in between the side armour are 10 mm thick. | ||
| − | |||
| − | |||
| − | |||
| − | |||
| − | |||
=== Mobility === | === Mobility === | ||
| − | |||
<!-- ''Write about the mobility of the ground vehicle. Estimate the specific power and manoeuvrability, as well as the maximum speed forwards and backwards.'' --> | <!-- ''Write about the mobility of the ground vehicle. Estimate the specific power and manoeuvrability, as well as the maximum speed forwards and backwards.'' --> | ||
| − | {{tankMobility|abMinHp=527|rbMinHp=301 | + | {{tankMobility|abMinHp= 527|rbMinHp= 301}} |
| − | |||
| − | |||
| − | |||
| − | |||
| − | |||
| − | |||
| − | |||
== Armaments == | == Armaments == | ||
| − | |||
=== Main armament === | === Main armament === | ||
| − | + | <!--''Give the reader information about the characteristics of the main gun. Assess its effectiveness in a battle based on the reloading speed, ballistics and the power of shells. Do not forget about the flexibility of the fire, that is how quickly the cannon can be aimed at the target, open fire on it and aim at another enemy. Add a link to the main article on the gun: <code><nowiki>{{main|Name of the weapon}}</nowiki></code>. Describe in general terms the ammunition available for the main gun. Give advice on how to use them and how to fill the ammunition storage.''--> | |
| − | <!-- ''Give the reader information about the characteristics of the main gun. Assess its effectiveness in a battle based on the reloading speed, ballistics and the power of shells. Do not forget about the flexibility of the fire, that is how quickly the cannon can be aimed at the target, open fire on it and aim at another enemy. Add a link to the main article on the gun: <code><nowiki>{{main|Name of the weapon}}</nowiki></code>. Describe in general terms the ammunition available for the main gun. Give advice on how to use them and how to fill the ammunition storage.'' --> | + | {{main|Ordnance QF 2-pounder (40 mm)}} |
| − | {{main|QF 2-pounder (40 mm)}} | ||
| − | + | {| class="wikitable" style="text-align:center" | |
| + | |- | ||
| + | ! colspan="6" | [[Ordnance QF 2-pounder (40 mm)|40 mm OQF 2-pounder]] | ||
| + | |- | ||
| + | ! colspan="3" rowspan="1" style="width:5em" |Capacity | ||
| + | ! rowspan="1" | Vertical <br> guidance | ||
| + | ! rowspan="1" | Horizontal <br> guidance | ||
| + | ! rowspan="1" | Stabilizer | ||
| + | |- | ||
| + | | colspan="3" | 87 || -15°/+20° || ±180° || Vertical | ||
| + | |- | ||
| + | ! colspan="6" | Turret rotation speed (°/s) | ||
| + | |- | ||
| + | ! style="width:4em" |Mode | ||
| + | ! style="width:4em" |Stock | ||
| + | ! style="width:4em" |Upgraded | ||
| + | ! style="width:4em" |Prior + Full crew | ||
| + | ! style="width:4em" |Prior + Expert qualif. | ||
| + | ! style="width:4em" |Prior + Ace qualif. | ||
| + | |- | ||
| + | | ''Arcade'' || 9.50 || 13.20 || _.__ || _.__ || _.__ | ||
| + | |- | ||
| + | | ''Realistic'' || 9.50 || 11.20 || _.__ || _.__ || _.__ | ||
| + | |- | ||
| + | ! colspan="4" | Reloading rate (seconds) | ||
| + | |- | ||
| + | ! colspan="1" style="width:4em" |Stock | ||
| + | ! colspan="1" style="width:4em" |Prior + Full crew | ||
| + | ! colspan="1" style="width:4em" |Prior + Expert qualif. | ||
| + | ! colspan="1" style="width:4em" |Prior + Ace qualif. | ||
| + | |- | ||
| + | | 3.64 || _.__ || _.__ || _.__ | ||
| + | |- | ||
| + | |} | ||
| − | + | ===== Ammunition ===== | |
| − | + | {| class="wikitable sortable" style="text-align:center" width="100%" | |
| − | + | ! colspan="8" | Penetration statistics | |
| − | + | |- | |
| − | {| class="wikitable" style="text-align:center" width="100%" | + | ! rowspan="2" data-sort-type="text" | Ammunition |
| + | ! rowspan="2" class="unsortable" | Type of <br /> warhead | ||
| + | ! colspan="6" | '''Penetration''' '''''in mm''''' '''@ 90°''' | ||
| + | |- | ||
| + | ! 10m | ||
| + | ! 100m | ||
| + | ! 500m | ||
| + | ! 1000m | ||
| + | ! 1500m | ||
| + | ! 2000m | ||
| + | |- | ||
| + | | Shot Mk.1 AP/T || AP || 71 || 68 || 52 || 37 || 27 || 19 | ||
| + | |- | ||
| + | | Shot Mk.1 APCBC/T || APCBC || 88 || 83 || 64 || 46 || 33 || 24 | ||
| + | |- | ||
| + | | Shot Mk.1 APHV/T || AP || 80 || 78 || 67 || 56 || 47 || 40 | ||
| + | |- | ||
| + | | Shell Mk.1 AP/T || APHE || 65 || 62 || 49 || 36 || 26 || 20 | ||
| + | |- | ||
| + | |} | ||
| + | {| class="wikitable sortable" style="text-align:center" width="100%" | ||
| + | ! colspan="11" | Shell details | ||
| + | |- | ||
| + | ! rowspan="2" data-sort-type="text" | Ammunition | ||
| + | ! rowspan="2" class="unsortable" | Type of <br /> warhead | ||
| + | ! rowspan="2" |Velocity <br /> in m/s | ||
| + | ! rowspan="2" |Projectile<br />Mass in kg | ||
| + | ! rowspan="2" | ''Fuse delay'' | ||
| + | ''in m:'' | ||
| + | ! rowspan="2" | ''Fuse sensitivity'' | ||
| + | ''in mm:'' | ||
| + | ! rowspan="2" | ''Explosive Mass in g<br /> (TNT equivalent):'' | ||
| + | ! rowspan="2" | ''Normalization At 30° <br> from horizontal:'' | ||
| + | ! colspan="3" | ''Ricochet:'' | ||
| + | |- | ||
| + | ! 0% | ||
| + | ! 50% | ||
| + | ! 100% | ||
|- | |- | ||
| − | + | | Shot Mk.1 AP/T || AP || 792 || 1.08 || N/A || N/A || N/A || -1° || 47° || 60° || 65° | |
|- | |- | ||
| − | + | | Shot Mk.1 APCBC/T || APCBC || 792 || 1.24 || N/A || N/A || N/A || +4° || 48° || 63° || 71° | |
| − | |||
| − | |||
|- | |- | ||
| − | + | | Shot Mk.1 APHV/T || AP || 853 || 1.08 || N/A || N/A || N/A || -1° || 47° || 60° || 65° | |
| − | | | ||
|- | |- | ||
| − | + | | Shell Mk.1 AP/T || APHE || 792 || 1.08 || 1.2 || 9 || 19 || +4° || 47° || 60° || 65° | |
| − | | | ||
|- | |- | ||
|} | |} | ||
| − | = | + | ===== [[Ammo racks|Ammo racks]] ===== |
| − | + | [[File:Ammoracks_A13MkI.png|right|thumbnail|x250px|[[Ammo racks|Ammo racks]] of the A13 Mk I.]] | |
| − | + | {| class="wikitable sortable" style="text-align:center" | |
| − | |||
| − | |||
| − | |||
| − | |||
| − | |||
| − | |||
| − | ==== [[Ammo racks]] ==== | ||
| − | [[File: | ||
| − | |||
| − | {| class="wikitable" style="text-align:center" | ||
| − | |||
| − | |||
| − | |||
| − | |||
| − | |||
| − | |||
| − | |||
| − | |||
| − | |||
| − | |||
|- | |- | ||
| − | | | + | ! class="wikitable unsortable" |Full<br /> ammo |
| + | ! class="wikitable unsortable" |1st<br /> rack empty | ||
| + | ! class="wikitable unsortable" |2nd<br /> rack empty | ||
| + | ! class="wikitable unsortable" |3rd<br /> rack empty | ||
| + | ! class="wikitable unsortable" |4th<br /> rack empty | ||
| + | ! class="wikitable unsortable" |5th<br /> rack empty | ||
| + | ! class="wikitable unsortable" |6th<br /> rack empty | ||
| + | ! class="wikitable unsortable" |7th<br /> rack empty | ||
| + | ! class="wikitable unsortable" |8th<br /> rack empty | ||
| + | ! class="wikitable unsortable" |9th<br /> rack empty | ||
| + | ! class="wikitable unsortable" |10th<br /> rack empty | ||
| + | ! class="wikitable unsortable" |11th<br /> rack empty | ||
| + | ! class="wikitable unsortable" |12th<br /> rack empty | ||
| + | ! class="wikitable unsortable" |13th<br /> rack empty | ||
| + | ! class="wikitable unsortable" |14th<br /> rack empty | ||
| + | ! class="wikitable unsortable" |15th<br /> rack empty | ||
| + | ! class="wikitable unsortable" |16th<br /> rack empty | ||
| + | ! class="wikitable unsortable" |Visual<br /> discrepancy | ||
|- | |- | ||
| − | + | || '''87''' || 78 ''(+9)'' || 75 ''(+12)'' || 72 ''(+15)'' || 69 ''(+18)'' || 66 ''(+21)'' || 62 ''(+25)'' || 60 ''(+27)'' || 56 ''(+31)'' || 51 ''(+36)'' || 47 ''(+40)'' || 43 ''(+44)'' || 41 ''(+46)'' || 36 ''(+51)'' || 31 ''(+56)'' || 16 ''(+71)'' || 1 ''(+86)'' || style="text-align:left" | No | |
| − | |||
| − | |||
| − | |||
| − | |||
| − | |||
| − | |||
| − | |||
| − | |||
|- | |- | ||
| − | |||
|} | |} | ||
| − | |||
| − | + | Center hull empty: 41 ''(+46)'' | |
| + | |||
| + | ===== Optics ===== | ||
| + | <!--Explain how the optic's status can affect the tank's gameplay in any unique or meaningful way. A comparison to rival tanks of the rank is welcome.If you are having problems with it, refer to the [[Optics|optics gallery]] page for examples.''--> | ||
| − | |||
{| class="wikitable" style="text-align:center" width="50%" | {| class="wikitable" style="text-align:center" width="50%" | ||
| − | ! colspan="3" | {{PAGENAME}} [[Optics]] | + | ! colspan="3" | {{PAGENAME}} [[Optics]] |
|- | |- | ||
! Which ones | ! Which ones | ||
| Line 139: | Line 190: | ||
|- | |- | ||
! Main Gun optics | ! Main Gun optics | ||
| − | | x1.85 || x3.5 | + | | x1.85 || x3.5 <!--Sometimes the actual value may not be known and here it should be referenced if the optic values are an estimate such as with an "X8.3 (estimated)" notation or something else that way the user will then be able to look to the comparable optics section and see a referenced optic which will have actual in-game data to back up the claim.--> |
|- | |- | ||
! Comparable optics | ! Comparable optics | ||
| − | | colspan="2" | [[AMR.35 ZT3]] | + | | colspan="2;" style="text-align:center;" | [[AMR.35 ZT3]] |
|- | |- | ||
|} | |} | ||
=== Machine guns === | === Machine guns === | ||
| − | + | <!--''Offensive and anti-aircraft machine guns not only allow you to fight some aircraft but also are effective against lightly armoured vehicles. Evaluate machine guns and give recommendations on its use.''--> | |
| − | <!-- ''Offensive and anti-aircraft machine guns not only allow you to fight some aircraft but also are effective against lightly armoured vehicles. Evaluate machine guns and give recommendations on its use.'' --> | ||
{{main|Vickers (7.7 mm)}} | {{main|Vickers (7.7 mm)}} | ||
| − | + | {| class="wikitable" style="text-align:center" | |
| − | + | |- | |
| − | {| class="wikitable" style="text-align:center" | + | ! colspan="7" | [[Vickers (7.7 mm)|7.7 mm Vickers]] |
|- | |- | ||
| − | ! colspan=" | + | ! colspan="7" | ''Coaxial mount'' |
|- | |- | ||
| − | ! | + | ! colspan="4" rowspan="1" style="width:5em" |Capacity (Belt capacity) |
| + | ! rowspan="1" | Fire rate <br> (shots/minute) | ||
| + | ! rowspan="1" | Vertical <br> guidance | ||
| + | ! rowspan="1" | Horizontal <br> guidance | ||
|- | |- | ||
| − | | | + | | colspan="4" | 3,500 (250) || 390 || N/A || N/A |
|- | |- | ||
|} | |} | ||
| − | == Usage in battles == | + | == Usage in the battles == |
| − | <!-- ''Describe the tactics of playing in the vehicle, the features of using vehicles in the team and advice on tactics. Refrain from creating a "guide" - do not impose a single point of view but | + | <!--''Describe the tactics of playing in the vehicle, the features of using vehicles in the team and advice on tactics. Refrain from creating a "guide" - do not impose a single point of view but give the reader food for thought. Describe the most dangerous enemies and give recommendations on fighting them. If necessary, note the specifics of the game in different modes (AB, RB, SB).''--> |
| − | + | This vehicle's role is that of a light tank in the truest sense, sporting an acceptable gun, great mobility and virtually no armour to speak of. | |
| − | This vehicle's role is that of a light tank in the truest sense, sporting | + | |
| + | This tank has a very active play style and should not be used in the front lines. Instead, use your mobility to your advantage: Spot, flank and provide artillery support for your teammates, blind your enemies with well-placed smokes screens in key avenues. Make sure to only target secluded enemies in flanking tactics so you can take full advantage of the element of surprise and outflank your opponent. Never expose yourself for too long because even anti-aircraft guns are a potential threat to your non-angled armour. The [[Ordnance QF 2-pounder (40 mm)|QF 2-pounder]] has an awfully long range accuracy so you must get close to your enemies to actually land a shot where you expect. Load up this agile (but reluctant) cat with ammo and flank your enemies with a constant flow of bullets. | ||
=== Pros and cons === | === Pros and cons === | ||
| − | <!-- '' | + | <!--''Summarize and briefly evaluate the vehicle in terms of its characteristics and combat effectiveness. Mark its pros and cons in a bulleted list. Do not use more than 6 points for each of the characteristics. Avoid using categorical definitions such as "bad", "good" and the like - they have a substitution in the form of softer "inadequate", "effective".''--> |
| − | |||
'''Pros:''' | '''Pros:''' | ||
| − | * | + | * Good gun for its rank |
| − | * Fast | + | * Fast |
| − | * Has a " | + | * Slim target |
| − | * Brings lots of ammo | + | * Has a "lock", which is a primitive form of stabilisation. This makes stopping and firing a useful tactic as the 2-pdr doesn't bounce as much as a non-stabilised gun. |
| + | * Brings lots of ammo. (87 rounds max) | ||
* Has forward-launching smoke launchers | * Has forward-launching smoke launchers | ||
| − | * | + | * Coaxial MG |
| − | * -15° gun depression | + | * Good HP/ton ratio |
| − | * | + | * Decent turret sewing rate |
| − | * | + | * -15° gun depression |
| − | * Very effective in a flanker and scout | + | * 4 crewmen and a 3 man turret. |
| + | * Quite a fast reload, makes finishing off a target both quicker and easier. | ||
| + | * Very effective in its historical role, a flanker and scout. | ||
'''Cons:''' | '''Cons:''' | ||
| − | * | + | * Next to no armour |
| + | * Barely any response from the engine | ||
* Loses speed when turning | * Loses speed when turning | ||
| + | * The ability to carry almost 90 rounds comes at a cost, this cost is that the ammunition is very hard to miss and thus, the A13 series suffers from frequent ammunition detonations. | ||
* Wiggles when trying to turn on 5th gear | * Wiggles when trying to turn on 5th gear | ||
| − | * The Vickers | + | * Regular MGs can penetrate side armour |
| + | * The coaxial machine gun is a Vickers which, compared to other Rank I machine guns, has an incredibly slow fire rate. | ||
| + | * Not effective at anything other than how it was historical used. No brawling or supporting heavier vehicles. | ||
== History == | == History == | ||
| − | <!-- ''Describe the history of the creation and combat usage of the vehicle in more detail than in the introduction. If the historical reference turns out to be too | + | <!--''Describe the history of the creation and combat usage of the ground vehicle in more detail than in the introduction. If the historical reference turns out to be too big, take it to a separate article, taking a link to an article about the vehicle and adding a block "/historical reference" (example: https://wiki.warthunder.com/Name-vehicles/historical reference) and add a link to it here using the <code>main</code> template. Be sure to include links to sources at the end of the article.''--> |
===Development=== | ===Development=== | ||
| − | The British development on their cruiser tanks, tanks that focus on mobility to exploit breakthroughs beyond enemy lines, took a turn in 1936 after General Giffard LeQuesne Martel became the Assistant Director of Mechanization at the British War Office, the head of the army in the government. Martel, an advocate of the tanks, and developer of the concept of "tankettes", witnessed a tank demonstration in 1936 that had Soviet designs. The one that attracted his attention was the [[BT-5|BT light tank]]. The BT's use of the Christie suspension had Martel argue for the usage of the same suspension in their tank designs, to which the British government complied with the purchase and licensing of the system from the Nuffield Organization. | + | The British development on their cruiser tanks, tanks that focus on mobility to exploit breakthroughs beyond enemy lines, took a turn in 1936 after General Giffard LeQuesne Martel became the Assistant Director of Mechanization at the British War Office, the head of the army in the government. Martel, an advocate of the tanks, and developer of the concept of "tankettes", witnessed a tank demonstration in 1936 that had Soviet designs. The one that attracted his attention was the [[BT-5|BT light tank]]. The BT's use of the Christie suspension had Martel argue for the usage of the same suspension in their tank designs, to which the British government complied with the purchase and licensing of the system from the Nuffield Organization. |
| − | The acquired vehicle from the purchase of the Christie suspension was labelled as the ''A13E1'' and became part of the design development under the designation ''Cruiser Mk III (A13)''. The General Staff requested for the vehicle to have 30 mm of armour, a 2-pounder gun, and a road speed of 48 km/h. The original vehicle was extensively reworked due to many interior and mechanical issues. Until the tank design was finished, the British Army adopted the ''Cruiser Mk I (A9)'' tank for use, but these tanks were delayed due to the A13's near completion. The first prototype was delivered in 1937 under the name ''A13E2'', this featured the turret from the A9 cruiser tank, with a 2-pounder and a Vickers machine gun. The armour on the prototype was 15 mm and the design could reach a top speed under a governor of 48 km/h (64 km/h ungoverned). The last and revised design was the ''A13E3'' that became adopted by the British Army and ordered into production in 1939. The General Staff specification number for the tank was the '''A13 Mk. I, Cruiser Tank Mark III'''. 65 of these tanks were ordered from the Nuffield Mechanization & Aero Limited, to which 30 were built before the War Office decided to upgrade the A13 Mk.I with more armour than the [[A13 Mk II|A13 Mk.II, Cruiser Tank Mk IV]]. Some of the A13 Mk.I Cruiser Mk III was also converted into Mk IV to stay modernized. | + | The acquired vehicle from the purchase of the Christie suspension was labelled as the ''A13E1'' and became part of the design development under the designation ''Cruiser Mk III (A13)''. The General Staff requested for the vehicle to have 30 mm of armour, a 2-pounder gun, and a road speed of 48 km/h. The original vehicle was extensively reworked due to many interior and mechanical issues. Until the tank design was finished, the British Army adopted the ''Cruiser Mk I (A9)'' tank for use, but these tanks were delayed due to the A13's near completion. The first prototype was delivered in 1937 under the name ''A13E2'', this featured the turret from the A9 cruiser tank, with a 2-pounder and a Vickers machine gun. The armour on the prototype was 15 mm and the design could reach a top speed under a governor of 48 km/h (64 km/h ungoverned). The last and revised design was the ''A13E3'' that became adopted by the British Army and ordered into production in 1939. The General Staff specification number for the tank was the '''A13 Mk. I, Cruiser Tank Mark III'''. 65 of these tanks were ordered from the Nuffield Mechanization & Aero Limited, to which 30 were built before the War Office decided to upgrade the A13 Mk.I with more armour than the '' [[A13 Mk II|A13 Mk.II, Cruiser Tank Mk IV]]''. Some of the A13 Mk.I Cruiser Mk III was also converted into Mk IV to stay modernized. |
===Combat usage=== | ===Combat usage=== | ||
| − | The A13 first saw combat in the Battle of France under the British Expeditionary Force in 1940. The A13 encountered many troubles during its employment, the crew having little to no training with the new tanks due to their rushed adoption into service. The tanks were in poor condition and some were even missing parts. The A13s were used in the 1st Armoured Division, but many were either destroyed by the superior German armoured forces or abandoned at Calais during the evacuation of Allied troops at Dunkirk, which forced the units to leave behind their heavier equipment. | + | The A13 first saw combat in the Battle of France under the British Expeditionary Force in 1940. The A13 encountered many troubles during its employment, the crew having little to no training with the new tanks due to their rushed adoption into service. The tanks were in poor condition and some were even missing parts. The A13s were used in the 1st Armoured Division, but many were either destroyed by the superior German armoured forces or abandoned at Calais during the evacuation of Allied troops at Dunkirk, which forced the units to leave behind their heavier equipment. |
After the disaster at France, the A13 were still used to support the war. Some were sent to Greece to support their defence against Germany in the Battle of Greece, but a majority were sent to North Africa as part of the Western Desert Campaign near Libya under the 7th Armoured Division. Compared to the time in France, the A13s in North Africa fared much better, ironing out most of its initial defects, and was even more suited to the environment than other tank designs. The A13 was popular with the crew for its high speed, reliability, and a powerful 2-pounder cannon that could engage a majority of Axis tanks in 1941. However, there was an insufficient number of A13s available for use, so tank units were mixed with the faster cruiser tanks and slower infantry tanks, which caused tactical and logistical difficulties trying to accommodate all of the tanks. Another deficiency with the tank and every other British tank with the 2-pounder was the lack of high-explosive shell issued to the tankers, which made them vulnerable to anti-tank guns, which caused a majority of British tank losses in the North African Campaign. Still, the A13 fared very well with its armour and armament until late 1941 where better armoured [[Pz.III L|Panzer IIIs]] and [[Pz.IV G|Panzer IVs]] began to appear on the battlefield. | After the disaster at France, the A13 were still used to support the war. Some were sent to Greece to support their defence against Germany in the Battle of Greece, but a majority were sent to North Africa as part of the Western Desert Campaign near Libya under the 7th Armoured Division. Compared to the time in France, the A13s in North Africa fared much better, ironing out most of its initial defects, and was even more suited to the environment than other tank designs. The A13 was popular with the crew for its high speed, reliability, and a powerful 2-pounder cannon that could engage a majority of Axis tanks in 1941. However, there was an insufficient number of A13s available for use, so tank units were mixed with the faster cruiser tanks and slower infantry tanks, which caused tactical and logistical difficulties trying to accommodate all of the tanks. Another deficiency with the tank and every other British tank with the 2-pounder was the lack of high-explosive shell issued to the tankers, which made them vulnerable to anti-tank guns, which caused a majority of British tank losses in the North African Campaign. Still, the A13 fared very well with its armour and armament until late 1941 where better armoured [[Pz.III L|Panzer IIIs]] and [[Pz.IV G|Panzer IVs]] began to appear on the battlefield. | ||
| Line 206: | Line 266: | ||
== Media == | == Media == | ||
| − | + | {{Youtube-gallery|mjacUnmi2iY|Bovington Tank Museum Tank Chats: A13 Cruiser}} | |
| − | |||
| − | |||
| − | |||
| − | |||
| − | + | == Read also == | |
| − | + | ''Links to the articles on the War Thunder Wiki that you think will be useful for the reader, for example,'' | |
| − | |||
| − | == | ||
| − | ''Links to the articles on the War Thunder Wiki that you think will be useful for the reader, for example | ||
* ''reference to the series of the vehicles;'' | * ''reference to the series of the vehicles;'' | ||
* ''links to approximate analogues of other nations and research trees.'' | * ''links to approximate analogues of other nations and research trees.'' | ||
| − | == | + | ''ETC.'' |
| + | |||
| + | == Sources == | ||
''Paste links to sources and external resources, such as:'' | ''Paste links to sources and external resources, such as:'' | ||
| Line 227: | Line 282: | ||
* ''other literature.'' | * ''other literature.'' | ||
| − | |||
{{Britain light tanks}} | {{Britain light tanks}} | ||
Revision as of 01:07, 4 April 2020
Contents
| This page is about the British light tank A13 Mk I. For other uses, see A13 (Family). |
Description

The Tank, Cruiser, Mk III (A13) is a reserve British light tank
with a battle rating of 1.0 (AB/RB/SB). It was introduced along with the initial British tree line in Update 1.55 "Royal Armour".
This tank is a good representative of later rank 2-3 British tanks: good mobility, flat and thin frontal armour, bad reverse speed and minimal post-penetration damage.
Driving
Even though the A13 has good mobility, it sometimes feels weird: it loses speed on turns, does not accelerates quite as fast as it's overpowered engine (38.19 HP/ton, stock) should provide it and hill-climbing feels hard. All of these flaws come from the gearbox, which has bad and uneven ratios, resulting in a kick when changing speed. Knowing that you should always keep an eye on the "gear" counter top-left of your screen (activate it in the options menu) since it provides you crucial information on how your tank will react to your commands. With a bit of practice, one should swiftly masters these peculiarities.
Shooting
Since the QF 2-pounder is used on most tanks of rank 1, it's important to know it well. This cannon has a major disadvantage at a distance since its projectiles lose around 20mm of penetration for every 500 m they travels. As if this was not enough, it has poor accuracy. Even with the adjustment of fire modification, one should target large components (crew, engine, transmission) or, as distance increases (500 m or more), the general centre of the foe. Firing it, you will easily notice it's last but not least flaw: it does almost no post-penetration damage, which means you will need to snipe, crew members, one by one. Combine this difficulty with a bit of distance and this task can prove difficult, sometimes leaving the enemy enough time to replenish it's crew before you finish it off.
On the other hand, this cannon has 5 major advantages: reload speed, close-quarter penetration, a primitive stabilizing system, lots of ammo and awesome gun depression. Its fast reloading speed allows you to compensate for its poor accuracy. Missed a shot? Why not take another even before you can re-position! Close quarter penetration, one of the best at its tier, is also a plus. Your enemies will only block your shot if you happen to hit a steep-angled plate of armour. The primitive stabilizer allows the tank to fire on the move as well. That being said, it works best at low speeds and on the relatively flat road through but is still much more precise than the comparable BT-7 with its 20-K. Last but not least, small shells means more shells. The A13 can bring up to 87 shells into the game, much more than you need to knock out 3-4 tanks. This allows you to try and suppress an enemy and keep it into cover by constantly firing near it (at this rank, this tactic can prove effective against new players). Finally, its good gun depression enables it to fire over hills, exposing only it's a small turret, shooting and disappearing swiftly. Proper use of these features allows this tank to compete well at it's BR.
Others
Since the addition of smoke in War Thunder, light tanks have it easier. Use your forward-launching smoke to create a wall of smoke in a strategic place. It can be used to cover your allies, when capturing a point, flanking in a street (urban environment).
General info
Survivability and armour
Armour type:
- Rolled homogeneous armour
- Cast homogeneous armour (Gun mantlet)
| Armour | Front | Sides | Rear | Roof |
|---|---|---|---|---|
| Hull | 14 mm Front plate 14 mm (0-62°) Front glacis 14 mm (64°) Lower glacis |
7 + 7 mm | 14 mm (0-62°) | 14 mm |
| Turret | 14 mm (0-15°) Turret front 14 mm (1-63°) Gun mantlet |
14 mm (21°) | 14 mm (2°) | 14 mm |
| Armour | Sides | Roof | ||
| Cupola | 14 mm | 14 mm |
Notes:
- Suspension wheels and tracks are 15 mm thick while the torsion bars in between the side armour are 10 mm thick.
Mobility
| Game Mode | Max Speed (km/h) | Weight (tons) | Engine power (horsepower) | Power-to-weight ratio (hp/ton) | |||
|---|---|---|---|---|---|---|---|
| Forward | Reverse | Stock | Upgraded | Stock | Upgraded | ||
| Arcade | 54 | 7 | 13.8 | 527 | 649 | 38.19 | 47.03 |
| Realistic | 48 | 6 | 301 | 340 | 21.81 | 24.64 | |
Armaments
Main armament
| 40 mm OQF 2-pounder | |||||
|---|---|---|---|---|---|
| Capacity | Vertical guidance |
Horizontal guidance |
Stabilizer | ||
| 87 | -15°/+20° | ±180° | Vertical | ||
| Turret rotation speed (°/s) | |||||
| Mode | Stock | Upgraded | Prior + Full crew | Prior + Expert qualif. | Prior + Ace qualif. |
| Arcade | 9.50 | 13.20 | _.__ | _.__ | _.__ |
| Realistic | 9.50 | 11.20 | _.__ | _.__ | _.__ |
| Reloading rate (seconds) | |||||
| Stock | Prior + Full crew | Prior + Expert qualif. | Prior + Ace qualif. | ||
| 3.64 | _.__ | _.__ | _.__ | ||
Ammunition
| Penetration statistics | |||||||
|---|---|---|---|---|---|---|---|
| Ammunition | Type of warhead |
Penetration in mm @ 90° | |||||
| 10m | 100m | 500m | 1000m | 1500m | 2000m | ||
| Shot Mk.1 AP/T | AP | 71 | 68 | 52 | 37 | 27 | 19 |
| Shot Mk.1 APCBC/T | APCBC | 88 | 83 | 64 | 46 | 33 | 24 |
| Shot Mk.1 APHV/T | AP | 80 | 78 | 67 | 56 | 47 | 40 |
| Shell Mk.1 AP/T | APHE | 65 | 62 | 49 | 36 | 26 | 20 |
| Shell details | ||||||||||
|---|---|---|---|---|---|---|---|---|---|---|
| Ammunition | Type of warhead |
Velocity in m/s |
Projectile Mass in kg |
Fuse delay
in m: |
Fuse sensitivity
in mm: |
Explosive Mass in g (TNT equivalent): |
Normalization At 30° from horizontal: |
Ricochet: | ||
| 0% | 50% | 100% | ||||||||
| Shot Mk.1 AP/T | AP | 792 | 1.08 | N/A | N/A | N/A | -1° | 47° | 60° | 65° |
| Shot Mk.1 APCBC/T | APCBC | 792 | 1.24 | N/A | N/A | N/A | +4° | 48° | 63° | 71° |
| Shot Mk.1 APHV/T | AP | 853 | 1.08 | N/A | N/A | N/A | -1° | 47° | 60° | 65° |
| Shell Mk.1 AP/T | APHE | 792 | 1.08 | 1.2 | 9 | 19 | +4° | 47° | 60° | 65° |
Ammo racks
| Full ammo |
1st rack empty |
2nd rack empty |
3rd rack empty |
4th rack empty |
5th rack empty |
6th rack empty |
7th rack empty |
8th rack empty |
9th rack empty |
10th rack empty |
11th rack empty |
12th rack empty |
13th rack empty |
14th rack empty |
15th rack empty |
16th rack empty |
Visual discrepancy |
|---|---|---|---|---|---|---|---|---|---|---|---|---|---|---|---|---|---|
| 87 | 78 (+9) | 75 (+12) | 72 (+15) | 69 (+18) | 66 (+21) | 62 (+25) | 60 (+27) | 56 (+31) | 51 (+36) | 47 (+40) | 43 (+44) | 41 (+46) | 36 (+51) | 31 (+56) | 16 (+71) | 1 (+86) | No |
Center hull empty: 41 (+46)
Optics
| A13 Mk I Optics | ||
|---|---|---|
| Which ones | Default magnification | Maximum magnification |
| Main Gun optics | x1.85 | x3.5 |
| Comparable optics | AMR.35 ZT3 | |
Machine guns
| 7.7 mm Vickers | ||||||
|---|---|---|---|---|---|---|
| Coaxial mount | ||||||
| Capacity (Belt capacity) | Fire rate (shots/minute) |
Vertical guidance |
Horizontal guidance | |||
| 3,500 (250) | 390 | N/A | N/A | |||
Usage in the battles
This vehicle's role is that of a light tank in the truest sense, sporting an acceptable gun, great mobility and virtually no armour to speak of.
This tank has a very active play style and should not be used in the front lines. Instead, use your mobility to your advantage: Spot, flank and provide artillery support for your teammates, blind your enemies with well-placed smokes screens in key avenues. Make sure to only target secluded enemies in flanking tactics so you can take full advantage of the element of surprise and outflank your opponent. Never expose yourself for too long because even anti-aircraft guns are a potential threat to your non-angled armour. The QF 2-pounder has an awfully long range accuracy so you must get close to your enemies to actually land a shot where you expect. Load up this agile (but reluctant) cat with ammo and flank your enemies with a constant flow of bullets.
Pros and cons
Pros:
- Good gun for its rank
- Fast
- Slim target
- Has a "lock", which is a primitive form of stabilisation. This makes stopping and firing a useful tactic as the 2-pdr doesn't bounce as much as a non-stabilised gun.
- Brings lots of ammo. (87 rounds max)
- Has forward-launching smoke launchers
- Coaxial MG
- Good HP/ton ratio
- Decent turret sewing rate
- -15° gun depression
- 4 crewmen and a 3 man turret.
- Quite a fast reload, makes finishing off a target both quicker and easier.
- Very effective in its historical role, a flanker and scout.
Cons:
- Next to no armour
- Barely any response from the engine
- Loses speed when turning
- The ability to carry almost 90 rounds comes at a cost, this cost is that the ammunition is very hard to miss and thus, the A13 series suffers from frequent ammunition detonations.
- Wiggles when trying to turn on 5th gear
- Regular MGs can penetrate side armour
- The coaxial machine gun is a Vickers which, compared to other Rank I machine guns, has an incredibly slow fire rate.
- Not effective at anything other than how it was historical used. No brawling or supporting heavier vehicles.
History
Development
The British development on their cruiser tanks, tanks that focus on mobility to exploit breakthroughs beyond enemy lines, took a turn in 1936 after General Giffard LeQuesne Martel became the Assistant Director of Mechanization at the British War Office, the head of the army in the government. Martel, an advocate of the tanks, and developer of the concept of "tankettes", witnessed a tank demonstration in 1936 that had Soviet designs. The one that attracted his attention was the BT light tank. The BT's use of the Christie suspension had Martel argue for the usage of the same suspension in their tank designs, to which the British government complied with the purchase and licensing of the system from the Nuffield Organization.
The acquired vehicle from the purchase of the Christie suspension was labelled as the A13E1 and became part of the design development under the designation Cruiser Mk III (A13). The General Staff requested for the vehicle to have 30 mm of armour, a 2-pounder gun, and a road speed of 48 km/h. The original vehicle was extensively reworked due to many interior and mechanical issues. Until the tank design was finished, the British Army adopted the Cruiser Mk I (A9) tank for use, but these tanks were delayed due to the A13's near completion. The first prototype was delivered in 1937 under the name A13E2, this featured the turret from the A9 cruiser tank, with a 2-pounder and a Vickers machine gun. The armour on the prototype was 15 mm and the design could reach a top speed under a governor of 48 km/h (64 km/h ungoverned). The last and revised design was the A13E3 that became adopted by the British Army and ordered into production in 1939. The General Staff specification number for the tank was the A13 Mk. I, Cruiser Tank Mark III. 65 of these tanks were ordered from the Nuffield Mechanization & Aero Limited, to which 30 were built before the War Office decided to upgrade the A13 Mk.I with more armour than the A13 Mk.II, Cruiser Tank Mk IV. Some of the A13 Mk.I Cruiser Mk III was also converted into Mk IV to stay modernized.
Combat usage
The A13 first saw combat in the Battle of France under the British Expeditionary Force in 1940. The A13 encountered many troubles during its employment, the crew having little to no training with the new tanks due to their rushed adoption into service. The tanks were in poor condition and some were even missing parts. The A13s were used in the 1st Armoured Division, but many were either destroyed by the superior German armoured forces or abandoned at Calais during the evacuation of Allied troops at Dunkirk, which forced the units to leave behind their heavier equipment.
After the disaster at France, the A13 were still used to support the war. Some were sent to Greece to support their defence against Germany in the Battle of Greece, but a majority were sent to North Africa as part of the Western Desert Campaign near Libya under the 7th Armoured Division. Compared to the time in France, the A13s in North Africa fared much better, ironing out most of its initial defects, and was even more suited to the environment than other tank designs. The A13 was popular with the crew for its high speed, reliability, and a powerful 2-pounder cannon that could engage a majority of Axis tanks in 1941. However, there was an insufficient number of A13s available for use, so tank units were mixed with the faster cruiser tanks and slower infantry tanks, which caused tactical and logistical difficulties trying to accommodate all of the tanks. Another deficiency with the tank and every other British tank with the 2-pounder was the lack of high-explosive shell issued to the tankers, which made them vulnerable to anti-tank guns, which caused a majority of British tank losses in the North African Campaign. Still, the A13 fared very well with its armour and armament until late 1941 where better armoured Panzer IIIs and Panzer IVs began to appear on the battlefield.
Due to its growing obsolescence on the battlefield, the A13 was replaced in 1941 by the better armoured A15 Crusader tank.
Media
Read also
Links to the articles on the War Thunder Wiki that you think will be useful for the reader, for example,
- reference to the series of the vehicles;
- links to approximate analogues of other nations and research trees.
ETC.
Sources
Paste links to sources and external resources, such as:
- topic on the official game forum;
- other literature.
| Britain light tanks | |
|---|---|
| A13 | A13 Mk I · A13 Mk I (3rd R.T.R.) · A13 Mk II · A13 Mk II 1939 |
| A15 | Crusader II · Crusader "The Saint" · Crusader III |
| A17 | Tetrarch I |
| IFV | Warrior |
| Wheeled | Daimler Mk II · AEC Mk II · Fox · Vickers Mk.11 |
| Other | VFM5 |
| South Africa | |
| SARC | SARC MkIVa · SARC MkVI (2pdr) · SARC MkVI (6pdr) |
| Ratel | Ratel 90 · Ratel 20 |
| Rooikat | Rooikat Mk.1D · Rooikat 105 · Rooikat MTTD |
| Other | Concept 3 · Eland 90 Mk.7 |
| USA | Stuart I · Stuart III |
