Difference between revisions of "Ratel 20"
Colok76286 (talk | contribs) (Edits) |
m (Edited See Also section for relevancy) (Tag: Visual edit) |
||
| (26 intermediate revisions by 10 users not shown) | |||
| Line 1: | Line 1: | ||
| + | {{About | ||
| + | | about = British light tank '''{{PAGENAME}}''' | ||
| + | | usage = other versions | ||
| + | | link = Ratel (Family) | ||
| + | }} | ||
{{Specs-Card | {{Specs-Card | ||
|code=uk_ratel_20 | |code=uk_ratel_20 | ||
| − | |images={{Specs-Card-Image|GarageImage_{{PAGENAME}}.jpg}} | + | |images={{Specs-Card-Image|GarageImage_{{PAGENAME}}.jpg|ArtImage_{{PAGENAME}}.jpg}} |
}} | }} | ||
| Line 7: | Line 12: | ||
<!-- ''In the description, the first part should be about the history of the creation and combat usage of the vehicle, as well as its key features. In the second part, tell the reader about the ground vehicle in the game. Insert a screenshot of the vehicle, so that if the novice player does not remember the vehicle by name, he will immediately understand what kind of vehicle the article is talking about.'' --> | <!-- ''In the description, the first part should be about the history of the creation and combat usage of the vehicle, as well as its key features. In the second part, tell the reader about the ground vehicle in the game. Insert a screenshot of the vehicle, so that if the novice player does not remember the vehicle by name, he will immediately understand what kind of vehicle the article is talking about.'' --> | ||
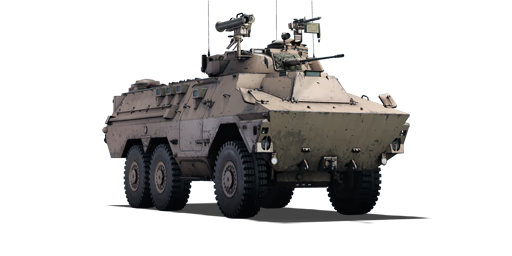
The '''{{Specs|name}}''' is a rank {{Specs|rank}} British light tank {{Battle-rating}}. It was introduced in [[Update "Ixwa Strike"]]. | The '''{{Specs|name}}''' is a rank {{Specs|rank}} British light tank {{Battle-rating}}. It was introduced in [[Update "Ixwa Strike"]]. | ||
| + | |||
| + | The Ratel 20 is the original variant of the versatile Ratel IFV built by South Africa in 1976, to meet their tactics on mobile warfare. It is granted the title of the first wheeled IFV to enter service worldwide. | ||
| + | |||
| + | While the mobile and indirect playstyle of the previous [[Ratel 90]] continues, the variation in weaponry sets ups for a somewhat more defensive and supporting approach during armoured engagements. The fast-firing 20 mm GI-2 automatic cannon and the powerful Milan ATGM are alternative armaments that will require some practice due to their situational unreliability when compared to a classical high-calibre cannon layout. | ||
| + | |||
| + | Aside from the alternative weaponry, the pros and cons of the Ratel chassis remain essentially unchanged, therefore the Ratel 20 still relies on his firepower and mobility; both are effective tools when in the hands of skilled players. | ||
== General info == | == General info == | ||
| Line 12: | Line 23: | ||
{{Specs-Tank-Armour}} | {{Specs-Tank-Armour}} | ||
<!-- ''Describe armour protection. Note the most well protected and key weak areas. Appreciate the layout of modules as well as the number and location of crew members. Is the level of armour protection sufficient, is the placement of modules helpful for survival in combat? If necessary use a visual template to indicate the most secure and weak zones of the armour.'' --> | <!-- ''Describe armour protection. Note the most well protected and key weak areas. Appreciate the layout of modules as well as the number and location of crew members. Is the level of armour protection sufficient, is the placement of modules helpful for survival in combat? If necessary use a visual template to indicate the most secure and weak zones of the armour.'' --> | ||
| − | '' | + | '''Armour type:''' |
| − | + | * Rolled homogeneous armour (hull, turret, cupola) | |
| − | + | * Cast homogeneous armour (gun mantlet) | |
| − | * Cast homogeneous armour ( | + | * Wheel (tires, suspension rods) |
| + | * Bulletproof glass (driver windows) | ||
{| class="wikitable" | {| class="wikitable" | ||
| Line 22: | Line 34: | ||
! Armour !! Front (Slope angle) !! Sides !! Rear !! Roof | ! Armour !! Front (Slope angle) !! Sides !! Rear !! Roof | ||
|- | |- | ||
| − | | Hull || | + | | Hull || 15 mm (30°) ''Front plate'' <br> 10 mm (75°) ''Upper Glacis'' <br> 20 mm (30°) ''Lower plate'' || 8 mm (26°) ''Top'' <br> 10 mm (2-27°) ''Bottom'' || 10 mm (0-43°) || 6 mm |
|- | |- | ||
| − | | Turret || | + | | Turret || 12 mm (30°) ''Turret front'' <br> 12 mm (8°) ''Gun mantlet'' || 10 mm (17-21°) || 10 mm (16°) || 10 mm (16°) ''Front part'' <br> 10 mm ''Rear part'' <br> 8 mm ''Gunner hatch'' |
|- | |- | ||
| − | | Cupola || | + | | Cupola || colspan="3" | 8-10 mm (spherical) || 8 mm (46-85°) ''Hatch'' |
|- | |- | ||
|} | |} | ||
| − | '''Notes:''' | + | '''Notes:''' |
| − | + | ||
| + | * Wheels and suspension are 10 mm thick. | ||
| + | |||
| + | * Belly is 8 mm thick. | ||
| + | * Unlike Ratel 90, the radiator's armour is 10 mm instead of 5 mm thick. | ||
=== Mobility === | === Mobility === | ||
{{Specs-Tank-Mobility}} | {{Specs-Tank-Mobility}} | ||
<!-- ''Write about the mobility of the ground vehicle. Estimate the specific power and manoeuvrability, as well as the maximum speed forwards and backwards.'' --> | <!-- ''Write about the mobility of the ground vehicle. Estimate the specific power and manoeuvrability, as well as the maximum speed forwards and backwards.'' --> | ||
| − | |||
| − | {{tankMobility}} | + | {{tankMobility|abMinHp=437|rbMinHp=249}} |
=== Modifications and economy === | === Modifications and economy === | ||
| Line 49: | Line 64: | ||
<!-- ''Give the reader information about the characteristics of the main gun. Assess its effectiveness in a battle based on the reloading speed, ballistics and the power of shells. Do not forget about the flexibility of the fire, that is how quickly the cannon can be aimed at the target, open fire on it and aim at another enemy. Add a link to the main article on the gun: <code><nowiki>{{main|Name of the weapon}}</nowiki></code>. Describe in general terms the ammunition available for the main gun. Give advice on how to use them and how to fill the ammunition storage.'' --> | <!-- ''Give the reader information about the characteristics of the main gun. Assess its effectiveness in a battle based on the reloading speed, ballistics and the power of shells. Do not forget about the flexibility of the fire, that is how quickly the cannon can be aimed at the target, open fire on it and aim at another enemy. Add a link to the main article on the gun: <code><nowiki>{{main|Name of the weapon}}</nowiki></code>. Describe in general terms the ammunition available for the main gun. Give advice on how to use them and how to fill the ammunition storage.'' --> | ||
{{main|GI-2 (20 mm)}} | {{main|GI-2 (20 mm)}} | ||
| − | |||
{| class="wikitable" style="text-align:center" width="100%" | {| class="wikitable" style="text-align:center" width="100%" | ||
| Line 60: | Line 74: | ||
|- | |- | ||
! ''Arcade'' | ! ''Arcade'' | ||
| − | | rowspan="2" | 1,200 ( | + | | rowspan="2" | 1,200 (150) || rowspan="2" | 750 || rowspan="2" | -8°/+38° || rowspan="2" | ±180° || rowspan="2" | N/A || 22.7 || 31.4 || 38.1 || 42.1 || 44.8 || rowspan="2" | 10.40 || rowspan="2" | 9.20 || rowspan="2" | 8.48 || rowspan="2" | 8.00 |
|- | |- | ||
! ''Realistic'' | ! ''Realistic'' | ||
| − | | | + | | 14.2 || 16.7 || 20.2 || 22.4 || 23.8 |
|- | |- | ||
|} | |} | ||
| Line 69: | Line 83: | ||
==== Ammunition ==== | ==== Ammunition ==== | ||
| − | * '''Default:''' {{Annotation|HVAP-T|High-velocity armour-piercing tracer}}{{-}}{{Annotation| | + | * '''Default:''' {{Annotation|HVAP-T|High-velocity armour-piercing tracer}}{{-}}{{Annotation|HEFI-T|High-explosive fragmentation incendiary tracer}} |
| − | * '''M594:''' {{Annotation| | + | * '''M594:''' {{Annotation|HEFI-T|High-explosive fragmentation incendiary tracer}}{{-}}{{Annotation|HEFI-T|High-explosive fragmentation incendiary tracer}}{{-}}{{Annotation|HVAP-T|High-velocity armour-piercing tracer}} |
| − | * '''M601:''' {{Annotation|HVAP-T|High-velocity armour-piercing tracer}}{{-}}{{Annotation|HVAP-T|High-velocity armour-piercing tracer}}{{-}}{{Annotation| | + | * '''M601:''' {{Annotation|HVAP-T|High-velocity armour-piercing tracer}}{{-}}{{Annotation|HVAP-T|High-velocity armour-piercing tracer}}{{-}}{{Annotation|HEFI-T|High-explosive fragmentation incendiary tracer}} |
| − | { | + | {{:GI-2 (20 mm)/Ammunition|HVAP-T, HEFI-T}} |
| − | |||
| − | |||
| − | |||
| − | |||
| − | |- | ||
| − | |||
| − | |||
| − | |||
| − | |||
| − | |||
| − | |||
| − | |||
| − | |||
| − | |||
==== [[Ammo racks]] ==== | ==== [[Ammo racks]] ==== | ||
| − | + | [[File:Ammoracks_{{PAGENAME}}.png|right|thumb|x250px|[[Ammo racks]] of the {{PAGENAME}}]] | |
| − | <!-- '''Last updated:''' --> | + | <!-- '''Last updated: 2.7.0.173''' --> |
{| class="wikitable" style="text-align:center" | {| class="wikitable" style="text-align:center" | ||
|- | |- | ||
! Full<br>ammo | ! Full<br>ammo | ||
| + | ! Ammo<br>type | ||
! 1st<br>rack empty | ! 1st<br>rack empty | ||
! 2nd<br>rack empty | ! 2nd<br>rack empty | ||
| Line 101: | Line 102: | ||
! 5th<br>rack empty | ! 5th<br>rack empty | ||
! 6th<br>rack empty | ! 6th<br>rack empty | ||
| + | ! 7th<br>rack empty | ||
| + | ! 8th<br>rack empty | ||
! Visual<br>discrepancy | ! Visual<br>discrepancy | ||
|- | |- | ||
| − | | '''10''' || | + | | '''10''' <br> '''1,200''' || ''Clips'' <br> ''Rounds'' || 9 ''(+1)'' <br> 1,080 || 8 ''(+2)'' <br> 960 || 7 ''(+3)'' <br> 840 || 6 ''(+4)'' <br> 620 || 4 ''(+6)'' <br> 480 || 3 ''(+7)'' <br> 360 || 2 ''(+8)'' <br> 240 || 1 ''(+9)'' <br> 120 || Yes |
|- | |- | ||
|} | |} | ||
| + | '''Notes''': | ||
| + | |||
| + | * Ammunition is modelled as 10 clips of 120 rounds. | ||
| + | * The visual discrepancy concerns the number of clips: 10 clips can be fired but only 8 are modeled. | ||
=== Additional armament === | === Additional armament === | ||
| Line 111: | Line 118: | ||
<!-- ''Some tanks are armed with several guns in one or more turrets. Evaluate the additional weaponry and give advice on its use. Describe the ammunition available for additional weaponry. Give advice on about how to use them and how to fill the ammunition storage. If there is no additional weaponry remove this subsection.'' --> | <!-- ''Some tanks are armed with several guns in one or more turrets. Evaluate the additional weaponry and give advice on its use. Describe the ammunition available for additional weaponry. Give advice on about how to use them and how to fill the ammunition storage. If there is no additional weaponry remove this subsection.'' --> | ||
{{main|MILAN}} | {{main|MILAN}} | ||
| − | |||
| − | {| class="wikitable" style="text-align:center" | + | {| class="wikitable" style="text-align:center" |
| − | |||
| − | |||
|- | |- | ||
| − | ! | + | ! colspan="4" | [[MILAN]] missile |
| − | |||
| − | |||
|- | |- | ||
| − | ! | + | ! Capacity !! Vertical !! Horizontal !! Stabilizer |
| − | |||
|- | |- | ||
| − | + | | 7 || ±5° || N/A || N/A | |
| − | | | ||
|- | |- | ||
|} | |} | ||
==== Ammunition ==== | ==== Ammunition ==== | ||
| − | { | + | {{:MILAN/Ammunition|MILAN}} |
| − | |||
| − | |||
| − | |||
| − | |||
| − | |||
| − | |||
| − | |||
| − | |||
| − | | MILAN | ||
| − | |||
| − | |||
| − | |||
| − | |||
| − | |||
| − | |||
| − | |||
| − | |||
| − | |||
| − | |||
| − | |||
| − | |||
| − | |||
| − | |||
| − | |||
| − | |||
| − | |||
| − | |||
| − | |||
| − | |||
==== [[Ammo racks]] ==== | ==== [[Ammo racks]] ==== | ||
| − | + | [[File:Ammoracks_{{PAGENAME}}_secondary.png|right|thumb|x250px|[[Ammo racks]] of the {{PAGENAME}}]] | |
| − | <!-- '''Last updated:''' --> | + | <!-- '''Last updated: 2.7.0.173''' --> |
{| class="wikitable" style="text-align:center" | {| class="wikitable" style="text-align:center" | ||
|- | |- | ||
! Full<br>ammo | ! Full<br>ammo | ||
| − | |||
| − | |||
| − | |||
| − | |||
| − | |||
| − | |||
! Visual<br>discrepancy | ! Visual<br>discrepancy | ||
|- | |- | ||
| − | | '''7''' || | + | | '''7''' || No |
|- | |- | ||
|} | |} | ||
| + | '''Notes''': | ||
| + | |||
| + | * Missiles are modeled individually and disappear after having been launched. | ||
| + | * It is not possible to select how many missiles to bring into battle. | ||
| + | * The missiles deplete from 1 to 7. | ||
=== Machine guns === | === Machine guns === | ||
| Line 184: | Line 154: | ||
<!-- ''Offensive and anti-aircraft machine guns not only allow you to fight some aircraft but also are effective against lightly armoured vehicles. Evaluate machine guns and give recommendations on its use.'' --> | <!-- ''Offensive and anti-aircraft machine guns not only allow you to fight some aircraft but also are effective against lightly armoured vehicles. Evaluate machine guns and give recommendations on its use.'' --> | ||
{{main|Browning MG4 (7.62 mm)}} | {{main|Browning MG4 (7.62 mm)}} | ||
| − | |||
{| class="wikitable" style="text-align:center" width="50%" | {| class="wikitable" style="text-align:center" width="50%" | ||
| Line 192: | Line 161: | ||
! Mount !! Capacity (Belt) !! Fire rate !! Vertical !! Horizontal | ! Mount !! Capacity (Belt) !! Fire rate !! Vertical !! Horizontal | ||
|- | |- | ||
| − | | || | + | | Coaxial || 3,000 (250) || 500 || N/A || N/A |
|- | |- | ||
| − | | || | + | | Pintle || 3,000 (250) || 500 || -10°/+3° || ±120° |
|- | |- | ||
|} | |} | ||
| Line 200: | Line 169: | ||
== Usage in battles == | == Usage in battles == | ||
<!-- ''Describe the tactics of playing in the vehicle, the features of using vehicles in the team and advice on tactics. Refrain from creating a "guide" - do not impose a single point of view but instead give the reader food for thought. Describe the most dangerous enemies and give recommendations on fighting them. If necessary, note the specifics of the game in different modes (AB, RB, SB).'' --> | <!-- ''Describe the tactics of playing in the vehicle, the features of using vehicles in the team and advice on tactics. Refrain from creating a "guide" - do not impose a single point of view but instead give the reader food for thought. Describe the most dangerous enemies and give recommendations on fighting them. If necessary, note the specifics of the game in different modes (AB, RB, SB).'' --> | ||
| − | + | Use your excellent mobility on roads to flank the enemy and use your autocannon to hit side and rear armour. If you ever come face to face with a heavily armoured vehicle, use your ATGM. On rough terrain, support your teammates and use your ATGMs to pick off targets passing by. You can also help repair teammates and destroy lightly-armoured targets with your autocannon. Since your 20 mm isn't very useful against most tanks from the front, use it to take out tracks and gun barrels. The ratel is very long and hard to hide so always be careful that you are not exposing sections of your vehicle that the enemy can see. | |
=== Pros and cons === | === Pros and cons === | ||
<!-- ''Summarise and briefly evaluate the vehicle in terms of its characteristics and combat effectiveness. Mark its pros and cons in a bulleted list. Try not to use more than 6 points for each of the characteristics. Avoid using categorical definitions such as "bad", "good" and the like - use substitutions with softer forms such as "inadequate" and "effective".'' --> | <!-- ''Summarise and briefly evaluate the vehicle in terms of its characteristics and combat effectiveness. Mark its pros and cons in a bulleted list. Try not to use more than 6 points for each of the characteristics. Avoid using categorical definitions such as "bad", "good" and the like - use substitutions with softer forms such as "inadequate" and "effective".'' --> | ||
| − | |||
'''Pros:''' | '''Pros:''' | ||
| − | * | + | * [[MILAN]] ATGM has good penetration values and overpressure capabilities |
| + | * Ratel chassis is decently mobile once fully upgraded; also great reverse speed of 17 km/h | ||
| + | * 20 mm GI-2 gun has a high rate of fire and a useful elevation of +38°; perfect against low flying aircraft | ||
'''Cons:''' | '''Cons:''' | ||
| − | * | + | * Large size; difficult to conceal and manoeuvre on urban maps |
| + | * No stabilizer; the vehicle must stop to use the GI-2 cannon effectively | ||
| + | * Low engine power; the wheels also struggles on snow, sand or mud | ||
| + | * GI-2 cannon has poor performance against sloped thin armour as those on [[BMP-1 (Family)]], [[R3 T106 FA]] or [[AUBL/74]] | ||
| + | * Armour is unreliable and poor; only 3 crew members and a large ATGMs rack | ||
== History == | == History == | ||
<!-- ''Describe the history of the creation and combat usage of the vehicle in more detail than in the introduction. If the historical reference turns out to be too long, take it to a separate article, taking a link to the article about the vehicle and adding a block "/History" (example: <nowiki>https://wiki.warthunder.com/(Vehicle-name)/History</nowiki>) and add a link to it here using the <code>main</code> template. Be sure to reference text and sources by using <code><nowiki><ref></ref></nowiki></code>, as well as adding them at the end of the article with <code><nowiki><references /></nowiki></code>. This section may also include the vehicle's dev blog entry (if applicable) and the in-game encyclopedia description (under <code><nowiki>=== In-game description ===</nowiki></code>, also if applicable).'' --> | <!-- ''Describe the history of the creation and combat usage of the vehicle in more detail than in the introduction. If the historical reference turns out to be too long, take it to a separate article, taking a link to the article about the vehicle and adding a block "/History" (example: <nowiki>https://wiki.warthunder.com/(Vehicle-name)/History</nowiki>) and add a link to it here using the <code>main</code> template. Be sure to reference text and sources by using <code><nowiki><ref></ref></nowiki></code>, as well as adding them at the end of the article with <code><nowiki><references /></nowiki></code>. This section may also include the vehicle's dev blog entry (if applicable) and the in-game encyclopedia description (under <code><nowiki>=== In-game description ===</nowiki></code>, also if applicable).'' --> | ||
| − | '' | + | '''Development''' |
| + | [[File:Ratel-20.jpg|alt=A UN Ratel-20 IFV in the Royal Tank Museum, Jordan.|left|thumb|A UN Ratel-20 IFV in the Royal Tank Museum, Jordan.]] | ||
| + | Named after the tenacious honey badger<ref>Scheepers, M., Pretorius, F. (2021) 'Loss of military equipment by the SADF at the Battle at Indungo during the Border War, 31 October 1987', ''Scientia Militaria, South African Journal of Military Studies'', Vol 49, Nr 2, pp. 58-9.</ref>, the Ratel Infantry Fighting Vehicle's development began in 1970 when the South African Defence Force required armoured vehicles which could cover the vast distances of the African plains. These requirements prioritised strong firepower and good protection to enable mechanised infantry to play their role within a highly mobile warfare doctrine. The SADF were already using British APCs, but these aligned with the British doctrine of mobilised infantry dismounting for engagements which was counter-intuitive to the direction of the diverging South African structure<ref name=":0">Harmse, K., Dunstan, S. (2017) ''South African Armour of the Border War 1975–89''. Oxford: Osprey Publishing, pp. 18-47.</ref>. | ||
| + | The SADF also used South African-designed armoured vehicles, yet these were liable to breakdowns and weapon failures which peaked during the South African Border War, exposing the weaknesses of older and cheaper IFV models and exposing the necessity for complete replacement to the more durable and reliable Ratel models. The South African derivative of the [[AML-90 (Family)|AML]], the [[Eland 90 Mk.7|Eland]] was successful as a reconnaissance vehicle with remarkable self-defence, and this would inspire the design of the Ratel which shares visual similarity<ref name=":0" />. | ||
| + | |||
| + | '''Combat usage''' | ||
| + | |||
| + | The Ratel would enter production in 1975 and see immediate success in the Angolan War from 1978. Despite a design based around flat terrain and infantry combat, the Ratel found itself excelling in challenging mountainous terrain and rainforests, fulfilling additional combat and support roles. In later produced modular variants, the Ratel utilised the cannon turret of the [[Eland 90 Mk.7|Eland]], ATGMs, and also support platforms such as observation and logistics<ref>O'Malley, T.J. (1996) ''Fighting Vehicles: Armoured Personnel Carriers and Infantry Fighting Vehicles''. London: Merlin Publications, pp. 98-9.</ref>. | ||
| + | |||
| + | The Ratel-20 would see combat in Operation Reindeer, 1978, Operation Sceptic, 1980, Operation Askari, 1983, and Operation Excite, 1988 for the SADF in Angola<ref name=":0" />. It still serves several African nations in the present day, including South Africa which maintains over one thousand Ratel IFVs in total comprising a significant percentage of the SADF's land fighting capability, and Ratel-20s have been used extensively by countries participating in United Nations peacekeeping missions<ref>Wezeman, P. (2011). 'South African Arms Supplies to Sub-Saharan Africa', Stockholm International Peace Research Institute.</ref>. | ||
== Media == | == Media == | ||
<!-- ''Excellent additions to the article would be video guides, screenshots from the game, and photos.'' --> | <!-- ''Excellent additions to the article would be video guides, screenshots from the game, and photos.'' --> | ||
| − | + | ||
| + | ;Skins | ||
| + | |||
| + | * [https://live.warthunder.com/feed/camouflages/?vehicle=uk_ratel_20 Skins and camouflages for the {{PAGENAME}} from live.warthunder.com.] | ||
| + | |||
| + | ;Videos | ||
| + | {{Youtube-gallery|8O6saI_fQ2Y|'''The Shooting Range #244''' - ''Pages of History'' section at 03:36 discusses the {{PAGENAME}}.}} | ||
== See also == | == See also == | ||
| Line 226: | Line 215: | ||
* ''reference to the series of the vehicles;'' | * ''reference to the series of the vehicles;'' | ||
* ''links to approximate analogues of other nations and research trees.'' --> | * ''links to approximate analogues of other nations and research trees.'' --> | ||
| − | |||
| − | + | ;<nowiki>Other vehicles based on the Ratel chassis:</nowiki> | |
| − | * | + | ;* [[Ratel 90]] |
| + | ;* [[ZT3A2]] | ||
| + | |||
| + | Vehicles of similar design and role: | ||
| + | |||
| + | * [[Warrior]] | ||
| + | * [[Marder A1-]] | ||
| + | * [[Pbv 302 (BILL)]] | ||
== External links == | == External links == | ||
| Line 235: | Line 230: | ||
* ''topic on the official game forum;'' | * ''topic on the official game forum;'' | ||
* ''other literature.'' --> | * ''other literature.'' --> | ||
| − | |||
| − | + | ;Bibliography: | |
| − | + | <references /> | |
| + | {{TankManufacturer Sandock-Austral}} | ||
{{Britain light tanks}} | {{Britain light tanks}} | ||
| + | |||
| + | [[Category:ATGM vehicles]] | ||
| + | [[Category:Wheeled ground vehicles]] | ||
Revision as of 01:08, 9 November 2023
| This page is about the British light tank Ratel 20. For other versions, see Ratel (Family). |


Contents
Description
The Ratel 20 is a rank IV British light tank with a battle rating of 6.7 (AB/RB/SB). It was introduced in Update "Ixwa Strike".
The Ratel 20 is the original variant of the versatile Ratel IFV built by South Africa in 1976, to meet their tactics on mobile warfare. It is granted the title of the first wheeled IFV to enter service worldwide.
While the mobile and indirect playstyle of the previous Ratel 90 continues, the variation in weaponry sets ups for a somewhat more defensive and supporting approach during armoured engagements. The fast-firing 20 mm GI-2 automatic cannon and the powerful Milan ATGM are alternative armaments that will require some practice due to their situational unreliability when compared to a classical high-calibre cannon layout.
Aside from the alternative weaponry, the pros and cons of the Ratel chassis remain essentially unchanged, therefore the Ratel 20 still relies on his firepower and mobility; both are effective tools when in the hands of skilled players.
General info
Survivability and armour
Armour type:
- Rolled homogeneous armour (hull, turret, cupola)
- Cast homogeneous armour (gun mantlet)
- Wheel (tires, suspension rods)
- Bulletproof glass (driver windows)
| Armour | Front (Slope angle) | Sides | Rear | Roof |
|---|---|---|---|---|
| Hull | 15 mm (30°) Front plate 10 mm (75°) Upper Glacis 20 mm (30°) Lower plate |
8 mm (26°) Top 10 mm (2-27°) Bottom |
10 mm (0-43°) | 6 mm |
| Turret | 12 mm (30°) Turret front 12 mm (8°) Gun mantlet |
10 mm (17-21°) | 10 mm (16°) | 10 mm (16°) Front part 10 mm Rear part 8 mm Gunner hatch |
| Cupola | 8-10 mm (spherical) | 8 mm (46-85°) Hatch | ||
Notes:
- Wheels and suspension are 10 mm thick.
- Belly is 8 mm thick.
- Unlike Ratel 90, the radiator's armour is 10 mm instead of 5 mm thick.
Mobility
| Game Mode | Max Speed (km/h) | Weight (tons) | Engine power (horsepower) | Power-to-weight ratio (hp/ton) | |||
|---|---|---|---|---|---|---|---|
| Forward | Reverse | Stock | Upgraded | Stock | Upgraded | ||
| Arcade | 117 | 20 | 18.9 | 437 | 538 | 23.12 | 28.47 |
| Realistic | 106 | 18 | 249 | 282 | 13.17 | 14.92 | |
Modifications and economy
| Mobility | Protection | Firepower | ||||||||||||||||||||||||
|---|---|---|---|---|---|---|---|---|---|---|---|---|---|---|---|---|---|---|---|---|---|---|---|---|---|---|
|
|
|
Armaments
Main armament
| 20 mm GI-2 | Turret rotation speed (°/s) | Reloading rate (seconds) | ||||||||||||
|---|---|---|---|---|---|---|---|---|---|---|---|---|---|---|
| Mode | Capacity (Belt) | Fire rate | Vertical | Horizontal | Stabilizer | Stock | Upgraded | Full | Expert | Aced | Stock | Full | Expert | Aced |
| Arcade | 1,200 (150) | 750 | -8°/+38° | ±180° | N/A | 22.7 | 31.4 | 38.1 | 42.1 | 44.8 | 10.40 | 9.20 | 8.48 | 8.00 |
| Realistic | 14.2 | 16.7 | 20.2 | 22.4 | 23.8 | |||||||||
Ammunition
- Default: HVAP-T · HEFI-T
- M594: HEFI-T · HEFI-T · HVAP-T
- M601: HVAP-T · HVAP-T · HEFI-T
| Penetration statistics | |||||||
|---|---|---|---|---|---|---|---|
| Ammunition | Penetration @ 0° Angle of Attack (mm) | ||||||
| 10 m | 100 m | 500 m | 1,000 m | 1,500 m | 2,000 m | ||
| HVAP-T | 57 | 52 | 37 | 24 | 15 | 10 | |
| HEFI-T | 6 | 6 | 4 | 3 | 2 | 2 | |
| Shell details | ||||||||||||
|---|---|---|---|---|---|---|---|---|---|---|---|---|
| Ammunition | Velocity (m/s) |
Projectile mass (kg) |
Fuse delay (m) |
Fuse sensitivity (mm) |
Explosive mass (TNT equivalent) (g) |
Ricochet | ||||||
| 0% | 50% | 100% | ||||||||||
| HVAP-T | 1,100 | 0.11 | - | - | - | 66° | 70° | 72° | ||||
| HEFI-T | 1,054 | 0.12 | 0.1 | 0.1 | 27.2 | - | - | - | ||||
Ammo racks

| Full ammo |
Ammo type |
1st rack empty |
2nd rack empty |
3rd rack empty |
4th rack empty |
5th rack empty |
6th rack empty |
7th rack empty |
8th rack empty |
Visual discrepancy |
|---|---|---|---|---|---|---|---|---|---|---|
| 10 1,200 |
Clips Rounds |
9 (+1) 1,080 |
8 (+2) 960 |
7 (+3) 840 |
6 (+4) 620 |
4 (+6) 480 |
3 (+7) 360 |
2 (+8) 240 |
1 (+9) 120 |
Yes |
Notes:
- Ammunition is modelled as 10 clips of 120 rounds.
- The visual discrepancy concerns the number of clips: 10 clips can be fired but only 8 are modeled.
Additional armament
| MILAN missile | |||
|---|---|---|---|
| Capacity | Vertical | Horizontal | Stabilizer |
| 7 | ±5° | N/A | N/A |
Ammunition
| Penetration statistics | |||||||
|---|---|---|---|---|---|---|---|
| Ammunition | Type of warhead |
Penetration @ 0° Angle of Attack (mm) | |||||
| 10 m | 100 m | 500 m | 1,000 m | 1,500 m | 2,000 m | ||
| MILAN | ATGM | 530 | 530 | 530 | 530 | 530 | 530 |
| Missile details | ||||||||||||
|---|---|---|---|---|---|---|---|---|---|---|---|---|
| Ammunition | Type of warhead |
Velocity (m/s) |
Range (m) |
Projectile mass (kg) |
Fuse delay (m) |
Fuse sensitivity (mm) |
Explosive mass (TNT equivalent) (kg) |
Ricochet | ||||
| 0% | 50% | 100% | ||||||||||
| MILAN | ATGM | 200 | 2,000 | 6.7 | 0.05 | 0.1 | 1.83 | 80° | 82° | 90° | ||
Ammo racks

| Full ammo |
Visual discrepancy |
|---|---|
| 7 | No |
Notes:
- Missiles are modeled individually and disappear after having been launched.
- It is not possible to select how many missiles to bring into battle.
- The missiles deplete from 1 to 7.
Machine guns
| 7.62 mm Browning MG4 | ||||
|---|---|---|---|---|
| Mount | Capacity (Belt) | Fire rate | Vertical | Horizontal |
| Coaxial | 3,000 (250) | 500 | N/A | N/A |
| Pintle | 3,000 (250) | 500 | -10°/+3° | ±120° |
Usage in battles
Use your excellent mobility on roads to flank the enemy and use your autocannon to hit side and rear armour. If you ever come face to face with a heavily armoured vehicle, use your ATGM. On rough terrain, support your teammates and use your ATGMs to pick off targets passing by. You can also help repair teammates and destroy lightly-armoured targets with your autocannon. Since your 20 mm isn't very useful against most tanks from the front, use it to take out tracks and gun barrels. The ratel is very long and hard to hide so always be careful that you are not exposing sections of your vehicle that the enemy can see.
Pros and cons
Pros:
- MILAN ATGM has good penetration values and overpressure capabilities
- Ratel chassis is decently mobile once fully upgraded; also great reverse speed of 17 km/h
- 20 mm GI-2 gun has a high rate of fire and a useful elevation of +38°; perfect against low flying aircraft
Cons:
- Large size; difficult to conceal and manoeuvre on urban maps
- No stabilizer; the vehicle must stop to use the GI-2 cannon effectively
- Low engine power; the wheels also struggles on snow, sand or mud
- GI-2 cannon has poor performance against sloped thin armour as those on BMP-1 (Family), R3 T106 FA or AUBL/74
- Armour is unreliable and poor; only 3 crew members and a large ATGMs rack
History
Development

Named after the tenacious honey badger[1], the Ratel Infantry Fighting Vehicle's development began in 1970 when the South African Defence Force required armoured vehicles which could cover the vast distances of the African plains. These requirements prioritised strong firepower and good protection to enable mechanised infantry to play their role within a highly mobile warfare doctrine. The SADF were already using British APCs, but these aligned with the British doctrine of mobilised infantry dismounting for engagements which was counter-intuitive to the direction of the diverging South African structure[2]. The SADF also used South African-designed armoured vehicles, yet these were liable to breakdowns and weapon failures which peaked during the South African Border War, exposing the weaknesses of older and cheaper IFV models and exposing the necessity for complete replacement to the more durable and reliable Ratel models. The South African derivative of the AML, the Eland was successful as a reconnaissance vehicle with remarkable self-defence, and this would inspire the design of the Ratel which shares visual similarity[2].
Combat usage
The Ratel would enter production in 1975 and see immediate success in the Angolan War from 1978. Despite a design based around flat terrain and infantry combat, the Ratel found itself excelling in challenging mountainous terrain and rainforests, fulfilling additional combat and support roles. In later produced modular variants, the Ratel utilised the cannon turret of the Eland, ATGMs, and also support platforms such as observation and logistics[3].
The Ratel-20 would see combat in Operation Reindeer, 1978, Operation Sceptic, 1980, Operation Askari, 1983, and Operation Excite, 1988 for the SADF in Angola[2]. It still serves several African nations in the present day, including South Africa which maintains over one thousand Ratel IFVs in total comprising a significant percentage of the SADF's land fighting capability, and Ratel-20s have been used extensively by countries participating in United Nations peacekeeping missions[4].
Media
- Skins
- Videos
See also
- Other vehicles based on the Ratel chassis:
Vehicles of similar design and role:
External links
- Bibliography
- ↑ Scheepers, M., Pretorius, F. (2021) 'Loss of military equipment by the SADF at the Battle at Indungo during the Border War, 31 October 1987', Scientia Militaria, South African Journal of Military Studies, Vol 49, Nr 2, pp. 58-9.
- ↑ 2.0 2.1 2.2 Harmse, K., Dunstan, S. (2017) South African Armour of the Border War 1975–89. Oxford: Osprey Publishing, pp. 18-47.
- ↑ O'Malley, T.J. (1996) Fighting Vehicles: Armoured Personnel Carriers and Infantry Fighting Vehicles. London: Merlin Publications, pp. 98-9.
- ↑ Wezeman, P. (2011). 'South African Arms Supplies to Sub-Saharan Africa', Stockholm International Peace Research Institute.
| Sandock-Austral | |
|---|---|
| Ratel | Ratel 90 · Ratel 20 · ZT3A2 |
| Eland | Eland 90 Mk.7 |
| Britain light tanks | |
|---|---|
| A13 | A13 Mk I · A13 Mk I (3rd R.T.R.) · A13 Mk II · A13 Mk II 1939 |
| A15 | Crusader II · Crusader "The Saint" · Crusader III |
| A17 | Tetrarch I |
| IFV | Warrior |
| Wheeled | Daimler Mk II · AEC Mk II · Fox · Vickers Mk.11 |
| Other | VFM5 |
| South Africa | |
| SARC | SARC MkIVa · SARC MkVI (2pdr) · SARC MkVI (6pdr) |
| Ratel | Ratel 90 · Ratel 20 |
| Rooikat | Rooikat Mk.1D · Rooikat 105 · Rooikat MTTD |
| Other | Concept 3 · Eland 90 Mk.7 |
| USA | Stuart I · Stuart III |
