Difference between revisions of "STB-2"
Colok76286 (talk | contribs) (→Mobility: Updated to new, sleek profile table) |
m (changed the name of tank in the descriptions from STB-1 to STB-2 as per game changes) (Tag: Visual edit) |
||
| (40 intermediate revisions by 9 users not shown) | |||
| Line 1: | Line 1: | ||
| − | {{Specs-Card|code=jp_st_b1}} | + | {{Specs-Card |
| + | |code=jp_st_b1 | ||
| + | |images={{Specs-Card-Image|GarageImage_{{PAGENAME}}.jpg|ArtImage_{{PAGENAME}}.jpg}} | ||
| + | }} | ||
== Description == | == Description == | ||
| − | <!--''In the description, the first part | + | <!-- ''In the description, the first part should be about the history of the creation and combat usage of the vehicle, as well as its key features. In the second part, tell the reader about the ground vehicle in the game. Insert a screenshot of the vehicle, so that if the novice player does not remember the vehicle by name, he will immediately understand what kind of vehicle the article is talking about.'' --> |
| − | + | The '''{{Specs|name}}''' is the prototype of the [[Type 74]], which was developed shortly after the introduction of the [[Type 61]]. Due to Japan's late entry into post-war tank development, they were behind by one tank generation and had to compare their Type 61s to more advanced tanks such as the [[T-62]]s, [[M60]]s and [[Leopard 1]]s. To keep up with these advancements, Japan sought to upgrade their tanks with the primary goal of incorporating the new standard [[L7 (105 mm) (Family)|L7 rifled cannon]]. | |
| − | |||
| − | The '''{{ | ||
| − | + | It was introduced in [[Update 1.65 "Way of the Samurai"]] along with the initial Japanese Ground Forces tree. Although the STB-2 has considerably more armour than its counterparts, such as the [[Leopard 1]] and [[AMX-30 (Family)|early AMX-30s]], and has comparable mobility, it is not recommended for use as a front-line tank. Instead, it is best to employ a cautious hit-and-run tactic similar to that used with Leopards. Proper use of the tank's [[hydropneumatic suspension]] can improve its depression and, in some cases, aid in survivability. Additionally, the STB-2 is equipped with a laser rangefinder, giving it superior long-range capabilities over other tanks of its rank. This allows it to be highly accurate with low-velocity HESH or quickly acquire target range with APDS. | |
| − | |||
| − | |||
== General info == | == General info == | ||
=== Survivability and armour === | === Survivability and armour === | ||
| − | <!--''Describe armour protection. Note the most well protected and key weak areas. Appreciate the layout of modules as well as the number and location of crew members. Is the level of armour protection sufficient, is the placement of modules | + | {{Specs-Tank-Armour}} |
| − | + | <!-- ''Describe armour protection. Note the most well protected and key weak areas. Appreciate the layout of modules as well as the number and location of crew members. Is the level of armour protection sufficient, is the placement of modules helpful for survival in combat? If necessary use a visual template to indicate the most secure and weak zones of the armour.'' --> | |
| − | |||
{| class="wikitable" | {| class="wikitable" | ||
|- | |- | ||
| Line 24: | Line 22: | ||
| Turret || 132 mm (12-66°) ''Turret front'' <br> 100-200 mm (1-66°) ''Gun mantlet'' || 132 mm (1-54°) <br> 75 mm (26-61°) ''Rear'' || 40 mm (1-64°) <br> 40 mm (36-82°) ''Turret underside''|| 67 mm ''Front'' <br> 20 mm ''Rear'' | | Turret || 132 mm (12-66°) ''Turret front'' <br> 100-200 mm (1-66°) ''Gun mantlet'' || 132 mm (1-54°) <br> 75 mm (26-61°) ''Rear'' || 40 mm (1-64°) <br> 40 mm (36-82°) ''Turret underside''|| 67 mm ''Front'' <br> 20 mm ''Rear'' | ||
|- | |- | ||
| − | + | | Cupola || 30 mm || 30 mm || 30 mm || 30 mm | |
| − | | | ||
| − | | | ||
|- | |- | ||
|} | |} | ||
| Line 36: | Line 32: | ||
=== Mobility === | === Mobility === | ||
| + | {{Specs-Tank-Mobility}} | ||
<!-- ''Write about the mobility of the ground vehicle. Estimate the specific power and manoeuvrability, as well as the maximum speed forwards and backwards.'' --> | <!-- ''Write about the mobility of the ground vehicle. Estimate the specific power and manoeuvrability, as well as the maximum speed forwards and backwards.'' --> | ||
| − | {{tankMobility|abMinHp= | + | {{tankMobility|abMinHp=1,348|rbMinHp=769}} |
| + | |||
| + | === Modifications and economy === | ||
| + | {{Specs-Economy}} | ||
== Armaments == | == Armaments == | ||
| + | {{Specs-Tank-Armaments}} | ||
=== Main armament === | === Main armament === | ||
| − | <!--''Give the reader information about the characteristics of the main gun. Assess its effectiveness in a battle based on the reloading speed, ballistics and the power of shells. Do not forget about the | + | {{Specs-Tank-Weapon|1}} |
| + | <!-- ''Give the reader information about the characteristics of the main gun. Assess its effectiveness in a battle based on the reloading speed, ballistics and the power of shells. Do not forget about the flexibility of the fire, that is how quickly the cannon can be aimed at the target, open fire on it and aim at another enemy. Add a link to the main article on the gun: <code><nowiki>{{main|Name of the weapon}}</nowiki></code>. Describe in general terms the ammunition available for the main gun. Give advice on how to use them and how to fill the ammunition storage.'' --> | ||
{{main|L7A3 (105 mm)}} | {{main|L7A3 (105 mm)}} | ||
| − | {| class="wikitable" style="text-align:center" | + | {| class="wikitable" style="text-align:center" width="100%" |
| − | |||
| − | |||
|- | |- | ||
| − | ! colspan=" | + | ! colspan="5" | [[L7A3 (105 mm)|105 mm L7A3]] || colspan="5" | Turret rotation speed (°/s) || colspan="4" | Reloading rate (seconds) |
| − | |||
| − | |||
| − | |||
|- | |- | ||
| − | + | ! Mode !! Capacity !! Vertical !! Horizontal !! Stabilizer | |
| + | ! Stock !! Upgraded !! Full !! Expert !! Aced | ||
| + | ! Stock !! Full !! Expert !! Aced | ||
|- | |- | ||
| − | ! | + | ! ''Arcade'' |
| + | | rowspan="2" | 50 || rowspan="2" | -6°/+9° || rowspan="2" | ±180° || rowspan="2" | Two-plane || 22.8 || 31.6 || 38.4 || 42.5 || 45.2 || rowspan="2" | 8.71 || rowspan="2" | 7.70 || rowspan="2" | 7.10 || rowspan="2" | 6.70 | ||
|- | |- | ||
| − | ! | + | ! ''Realistic'' |
| − | + | | 14.3 || 16.8 || 20.4 || 22.6 || 24.0 | |
| − | |||
| − | |||
| − | |||
| − | |||
| − | |||
| − | |||
| − | |||
| − | |||
| − | |||
| − | |||
| − | |||
| − | |||
| − | |||
| − | |||
| − | |||
| − | |||
| − | |||
|- | |- | ||
|} | |} | ||
| − | + | ==== Ammunition ==== | |
| − | { | + | {{:L7A3 (105 mm)/Ammunition|M392A2, Type 75, M416}} |
| − | |||
| − | |||
| − | |||
| − | |||
| − | |||
| − | |||
| − | |||
| − | |||
| − | |||
| − | |||
| − | |||
| − | |||
| − | |||
| − | |||
| − | |||
| − | |||
| − | |||
| − | |||
| − | |||
| − | |||
| − | { | ||
| − | |||
| − | |||
| − | |||
| − | |||
| − | |||
| − | |||
| − | |||
| − | |||
| − | |||
| − | |||
| − | |||
| − | |||
| − | |||
| − | |||
| − | |||
| − | |||
| − | |||
| − | |||
| − | | M392A2 | ||
| − | |||
| − | |||
| − | |||
| − | |||
| − | |||
| − | |||
| − | + | ==== [[Ammo racks]] ==== | |
| − | {| class="wikitable | + | [[File:Ammoracks_{{PAGENAME}}.png|right|thumb|x250px|[[Ammo racks]] of the {{PAGENAME}}]] |
| + | <!-- '''Last updated: 1.101.1.16''' --> | ||
| + | {| class="wikitable" style="text-align:center" | ||
|- | |- | ||
| − | ! | + | ! Full<br>ammo |
| − | ! | + | ! 1st<br>rack empty |
| − | ! | + | ! 2nd<br>rack empty |
| − | ! | + | ! 3rd<br>rack empty |
| − | ! | + | ! 4th<br>rack empty |
| − | ! | + | ! Visual<br>discrepancy |
|- | |- | ||
| − | + | | '''50''' || 44 ''(+6)'' || 16 ''(+34)'' || 10 ''(+40)'' || 1 ''(+49)'' || No | |
|- | |- | ||
|} | |} | ||
| + | '''Notes''': | ||
| − | Hull floor empty: | + | * Hull floor empty: 16 ''(+34)'' shells |
| + | * Shells are modeled individually and disappear after having been shot or loaded. | ||
| + | * Racks 3 and 4 are first stage ammo racks. They total 15 shells and get filled first when loading up the tank. | ||
| + | * These racks are also emptied early: the rack depletion order at full capacity is: 3 - 4 - 1 - 2. | ||
| + | * Simply not firing when the gun is loaded will move ammunition from rack 1 then 2 into ready rack 4 then 3. Firing will interrupt the restocking of the ready racks. | ||
=== Machine guns === | === Machine guns === | ||
| − | <!--''Offensive and anti-aircraft machine guns not only allow you to fight some aircraft | + | {{Specs-Tank-Weapon|2}} |
| + | {{Specs-Tank-Weapon|3}} | ||
| + | <!-- ''Offensive and anti-aircraft machine guns not only allow you to fight some aircraft but also are effective against lightly armoured vehicles. Evaluate machine guns and give recommendations on its use.'' --> | ||
{{main|M2HB (12.7 mm)|M1919A4 (7.62 mm)}} | {{main|M2HB (12.7 mm)|M1919A4 (7.62 mm)}} | ||
| − | {| class="wikitable" style="text-align:center" | + | {| class="wikitable" style="text-align:center" width="50%" |
| − | |||
| − | |||
|- | |- | ||
| − | ! colspan="7 | + | ! colspan="5" | [[M2HB (12.7 mm)|12.7 mm M2HB]] |
|- | |- | ||
| − | ! | + | ! Mount !! Capacity (Belt) !! Fire rate !! Vertical !! Horizontal |
| − | ! | ||
| − | ! | ||
| − | ! | ||
|- | |- | ||
| − | | | + | | Pintle || 800 (200) || 577 || -10°/+40° || ±180° |
|- | |- | ||
|} | |} | ||
| − | {| class="wikitable" style="text-align:center" | + | {| class="wikitable" style="text-align:center" width="50%" |
| − | |||
| − | |||
|- | |- | ||
| − | ! colspan="7 | + | ! colspan="5" | [[M1919A4 (7.62 mm)|7.62 mm M1919A4]] |
|- | |- | ||
| − | ! | + | ! Mount !! Capacity (Belt) !! Fire rate !! Vertical !! Horizontal |
| − | ! | ||
| − | ! | ||
| − | ! | ||
|- | |- | ||
| − | | | + | | Coaxial || 4,500 (250) || 500 || - || - |
|- | |- | ||
|} | |} | ||
| − | == Usage in | + | == Usage in battles == |
| − | <!--''Describe the tactics of playing in the vehicle, the features of using vehicles in the team and advice on tactics. Refrain from creating a "guide" - do not impose a single point of view but give the reader food for thought. Describe the most dangerous enemies and give recommendations on fighting them. If necessary, note the specifics of the game in different modes (AB, RB, SB).''--> | + | <!-- ''Describe the tactics of playing in the vehicle, the features of using vehicles in the team and advice on tactics. Refrain from creating a "guide" - do not impose a single point of view but instead give the reader food for thought. Describe the most dangerous enemies and give recommendations on fighting them. If necessary, note the specifics of the game in different modes (AB, RB, SB).'' --> |
| − | The STB- | + | The STB-2 can be compared to the [[Leopard I]] or even a stock [[Leopard A1A1]], but has its own capabilities in its own right. The STB-2 allows for both a more held down playstyle or aggressive playstyle versus the Leopard I due to its [[Hydropneumatic suspension|hydropneumatic suspension]] and two-plane stabilizer. Together with the power of the engine outfitted on the STB-2, allows it to speedily move to a nice sniper spot or hull-down position and fire at targets before they realize a tank could be there. |
| + | |||
| + | The STB-2 possesses a pretty nice angled upper front plate, but do keep in mind that the STB-2 wasn't designed to take a punch, only to deal a punch, so even with the good angle you shouldn't rely too heavily on it, as shells can penetrate it and won't always bounce off. Do keep this fully in mind especially when taking more shells with the vehicle, as the fuel tank next to the driver will be filled with extra shells, which can blow up the whole tank if a shell does eventually penetrate. | ||
| − | + | With the addition of a 12.7 mm machine gun, the STB-2 can make short work of ZSU's or light tanks alike if the heat of the battle doesn't allow for the main gun or in-case of more important targets requiring the main gun's firepower. | |
| + | |||
| + | With only 2 shells to choose from being APDS & HESH, APDS can be used for long-distance engagements and HESH can deal with light to medium armoured vehicles with overpressure damage, this can be done at a long range once the laser rangefinder has been unlocked as well. But due to the low velocity of the HESH round it has to be fired at a stationary target at long range to effectively hit. | ||
=== Pros and cons === | === Pros and cons === | ||
| − | <!--'' | + | <!-- ''Summarise and briefly evaluate the vehicle in terms of its characteristics and combat effectiveness. Mark its pros and cons in a bulleted list. Try not to use more than 6 points for each of the characteristics. Avoid using categorical definitions such as "bad", "good" and the like - use substitutions with softer forms such as "inadequate" and "effective".'' --> |
| + | |||
'''Pros:''' | '''Pros:''' | ||
| − | + | * 105 mm L7 cannon found on other NATO tanks | |
| − | + | * 12.7 mm Browning M2HB machine gun | |
| − | * 105 mm L7 cannon found on other NATO tanks. | + | * Two-plane stabilizer that allows it to fire on the move |
| − | * | + | * Highly mobile |
| − | * Low profile | + | * Armour may bounce APHE shells |
| − | * Utilization of [[ | + | * Low profile |
| − | * | + | * Utilization of [[hydropneumatic suspension]] allows for various offensive and defensive options |
| + | * Laser rangefinder | ||
'''Cons:''' | '''Cons:''' | ||
| − | * | + | * Some areas are lightly armoured, vulnerable to high penetrating SPAAs |
| − | * | + | * Poor gun elevation angle |
| − | |||
| − | |||
== History == | == History == | ||
| − | <!--''Describe the history of the creation and combat usage of the | + | <!-- ''Describe the history of the creation and combat usage of the vehicle in more detail than in the introduction. If the historical reference turns out to be too long, take it to a separate article, taking a link to the article about the vehicle and adding a block "/History" (example: <nowiki>https://wiki.warthunder.com/(Vehicle-name)/History</nowiki>) and add a link to it here using the <code>main</code> template. Be sure to reference text and sources by using <code><nowiki><ref></ref></nowiki></code>, as well as adding them at the end of the article with <code><nowiki><references /></nowiki></code>. This section may also include the vehicle's dev blog entry (if applicable) and the in-game encyclopedia description (under <code><nowiki>=== In-game description ===</nowiki></code>, also if applicable).'' --> |
The prototype for the Type 74. Known in Japanese as 74式戦車の試作車STB-1 (ななよんしきせんしゃのしさくしゃSTB-1). Created in September 1969 along with STB-2 in the STT program. Due to issues with cost effectiveness these two prototypes were not considered for the replacement of the Type 61. In a bid to reduce costs STB-3, STB-4, STB-5 and STB-6 were produced between April 1970 to December 1971. The final judgement for the STT program was held in November 1973 which lead the line to be completed in 1974. And, production started the following year in 1975 for the [[Type 74]]. | The prototype for the Type 74. Known in Japanese as 74式戦車の試作車STB-1 (ななよんしきせんしゃのしさくしゃSTB-1). Created in September 1969 along with STB-2 in the STT program. Due to issues with cost effectiveness these two prototypes were not considered for the replacement of the Type 61. In a bid to reduce costs STB-3, STB-4, STB-5 and STB-6 were produced between April 1970 to December 1971. The final judgement for the STT program was held in November 1973 which lead the line to be completed in 1974. And, production started the following year in 1975 for the [[Type 74]]. | ||
== Media == | == Media == | ||
| − | '' | + | <!-- ''Excellent additions to the article would be video guides, screenshots from the game, and photos.'' --> |
| − | + | ;Skins | |
| − | * [ | + | * [https://live.warthunder.com/feed/camouflages/?vehicle=jp_st_b1 Skins and camouflages for the {{PAGENAME}} from live.warthunder.com.] |
| − | + | ;Videos | |
| − | '' | + | {{Youtube-gallery|GgC8UNa8dok|'''Leopard I vs STB-1''' - ''War Thunder Official Channel''|p6cWlyUnJQA|'''Top 7 off-road beasts''' discusses the {{PAGENAME}} at 2:46 - ''War Thunder Official Channel''|PosWOnOGkSo|'''Best experimental vehicles''' discusses the {{PAGENAME}} at 6:11 - ''War Thunder Official Channel''}} |
| + | == See also == | ||
| + | <!-- ''Links to the articles on the War Thunder Wiki that you think will be useful for the reader, for example:'' | ||
| + | * ''reference to the series of the vehicles;'' | ||
| + | * ''links to approximate analogues of other nations and research trees.'' --> | ||
| + | |||
| + | ;[[Type 74 (Family)|Related Development]] | ||
| + | |||
| + | * [[Type 74 (C)]] - <small>(Early Production version)</small> | ||
| + | * [[Type 74 (E)]] - <small>(Variant with improved FCS & thermal sleeve)</small> | ||
| + | * [[Type 74 (F)]] - <small>(Variant with mounting plates for a Type 92 mine-roller)</small> | ||
| + | * [[Type 74 (G)]] - <small>(Improved ({{Annotation|改|Kai}}) variant with thermal and armour skirts)</small> | ||
| + | |||
| + | ;Other vehicles of similar configuration and role | ||
| + | |||
| + | * [[Leopard I]] | ||
| + | * [[AMX-30]] | ||
| + | * [[AMX-30 (1972)]] | ||
| + | |||
| + | == External links == | ||
| + | <!-- ''Paste links to sources and external resources, such as:'' | ||
* ''topic on the official game forum;'' | * ''topic on the official game forum;'' | ||
| − | * ''other literature.'' | + | * ''other literature.'' --> |
| + | |||
| + | * [[wt:en/news/4459-profile-stb-1-steel-ninja-en/|[Profile] STB-1: Steel Ninja]] | ||
{{Japan medium tanks}} | {{Japan medium tanks}} | ||
Latest revision as of 05:54, 16 December 2023


Contents
Description
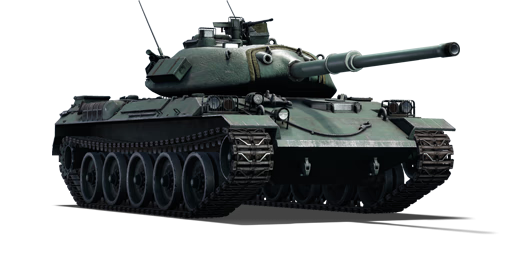
The STB-2 is the prototype of the Type 74, which was developed shortly after the introduction of the Type 61. Due to Japan's late entry into post-war tank development, they were behind by one tank generation and had to compare their Type 61s to more advanced tanks such as the T-62s, M60s and Leopard 1s. To keep up with these advancements, Japan sought to upgrade their tanks with the primary goal of incorporating the new standard L7 rifled cannon.
It was introduced in Update 1.65 "Way of the Samurai" along with the initial Japanese Ground Forces tree. Although the STB-2 has considerably more armour than its counterparts, such as the Leopard 1 and early AMX-30s, and has comparable mobility, it is not recommended for use as a front-line tank. Instead, it is best to employ a cautious hit-and-run tactic similar to that used with Leopards. Proper use of the tank's hydropneumatic suspension can improve its depression and, in some cases, aid in survivability. Additionally, the STB-2 is equipped with a laser rangefinder, giving it superior long-range capabilities over other tanks of its rank. This allows it to be highly accurate with low-velocity HESH or quickly acquire target range with APDS.
General info
Survivability and armour
| Armour | Front | Sides | Rear | Roof |
|---|---|---|---|---|
| Hull | 40-80 mm (64-73°) Front glacis 100 (26°), 80 mm (58-66°)Lower glacis |
35-40 mm (44°) Top 40 mm (0-55°) Bottom |
25 mm (1-46°) | 20 mm |
| Turret | 132 mm (12-66°) Turret front 100-200 mm (1-66°) Gun mantlet |
132 mm (1-54°) 75 mm (26-61°) Rear |
40 mm (1-64°) 40 mm (36-82°) Turret underside |
67 mm Front 20 mm Rear |
| Cupola | 30 mm | 30 mm | 30 mm | 30 mm |
Notes:
- Suspension wheels and tracks are 20 mm thick.
- Driver's vision port on the front glacis are only 50 mm thick.
- Hull roof is rated to be 54 mm effective against HE.
Mobility
| Game Mode | Max Speed (km/h) | Weight (tons) | Engine power (horsepower) | Power-to-weight ratio (hp/ton) | |||
|---|---|---|---|---|---|---|---|
| Forward | Reverse | Stock | Upgraded | Stock | Upgraded | ||
| Arcade | 59 | 9 | 37.8 | 1,348 | 1,660 | 35.66 | 43.92 |
| Realistic | 54 | 8 | 769 | 870 | 20.34 | 23.02 | |
Modifications and economy
| Mobility | Protection | Firepower | ||||||||||||||||||||
|---|---|---|---|---|---|---|---|---|---|---|---|---|---|---|---|---|---|---|---|---|---|---|
|
|
|
Armaments
Main armament
| 105 mm L7A3 | Turret rotation speed (°/s) | Reloading rate (seconds) | |||||||||||
|---|---|---|---|---|---|---|---|---|---|---|---|---|---|
| Mode | Capacity | Vertical | Horizontal | Stabilizer | Stock | Upgraded | Full | Expert | Aced | Stock | Full | Expert | Aced |
| Arcade | 50 | -6°/+9° | ±180° | Two-plane | 22.8 | 31.6 | 38.4 | 42.5 | 45.2 | 8.71 | 7.70 | 7.10 | 6.70 |
| Realistic | 14.3 | 16.8 | 20.4 | 22.6 | 24.0 | ||||||||
Ammunition
| Penetration statistics | |||||||
|---|---|---|---|---|---|---|---|
| Ammunition | Type of warhead |
Penetration @ 0° Angle of Attack (mm) | |||||
| 10 m | 100 m | 500 m | 1,000 m | 1,500 m | 2,000 m | ||
| M392A2 | APDS | 350 | 347 | 333 | 317 | 302 | 287 |
| Type 75 | HESH | 127 | 127 | 127 | 127 | 127 | 127 |
| Shell details | ||||||||||||
|---|---|---|---|---|---|---|---|---|---|---|---|---|
| Ammunition | Type of warhead |
Velocity (m/s) |
Projectile mass (kg) |
Fuse delay (m) |
Fuse sensitivity (mm) |
Explosive mass (TNT equivalent) (kg) |
Ricochet | |||||
| 0% | 50% | 100% | ||||||||||
| M392A2 | APDS | 1,478 | 4 | - | - | - | 75° | 78° | 80° | |||
| Type 75 | HESH | 760 | 10.8 | 0.1 | 4 | 3.89 | 73° | 77° | 80° | |||
| Smoke shell characteristics | ||||||
|---|---|---|---|---|---|---|
| Ammunition | Velocity (m/s) |
Projectile mass (kg) |
Screen radius (m) |
Screen deploy time (s) |
Screen hold time (s) |
Explosive mass (TNT equivalent) (g) |
| M416 | 732 | 11.6 | 16 | 5 | 25 | 50 |
Ammo racks

| Full ammo |
1st rack empty |
2nd rack empty |
3rd rack empty |
4th rack empty |
Visual discrepancy |
|---|---|---|---|---|---|
| 50 | 44 (+6) | 16 (+34) | 10 (+40) | 1 (+49) | No |
Notes:
- Hull floor empty: 16 (+34) shells
- Shells are modeled individually and disappear after having been shot or loaded.
- Racks 3 and 4 are first stage ammo racks. They total 15 shells and get filled first when loading up the tank.
- These racks are also emptied early: the rack depletion order at full capacity is: 3 - 4 - 1 - 2.
- Simply not firing when the gun is loaded will move ammunition from rack 1 then 2 into ready rack 4 then 3. Firing will interrupt the restocking of the ready racks.
Machine guns
| 12.7 mm M2HB | ||||
|---|---|---|---|---|
| Mount | Capacity (Belt) | Fire rate | Vertical | Horizontal |
| Pintle | 800 (200) | 577 | -10°/+40° | ±180° |
| 7.62 mm M1919A4 | ||||
|---|---|---|---|---|
| Mount | Capacity (Belt) | Fire rate | Vertical | Horizontal |
| Coaxial | 4,500 (250) | 500 | - | - |
Usage in battles
The STB-2 can be compared to the Leopard I or even a stock Leopard A1A1, but has its own capabilities in its own right. The STB-2 allows for both a more held down playstyle or aggressive playstyle versus the Leopard I due to its hydropneumatic suspension and two-plane stabilizer. Together with the power of the engine outfitted on the STB-2, allows it to speedily move to a nice sniper spot or hull-down position and fire at targets before they realize a tank could be there.
The STB-2 possesses a pretty nice angled upper front plate, but do keep in mind that the STB-2 wasn't designed to take a punch, only to deal a punch, so even with the good angle you shouldn't rely too heavily on it, as shells can penetrate it and won't always bounce off. Do keep this fully in mind especially when taking more shells with the vehicle, as the fuel tank next to the driver will be filled with extra shells, which can blow up the whole tank if a shell does eventually penetrate.
With the addition of a 12.7 mm machine gun, the STB-2 can make short work of ZSU's or light tanks alike if the heat of the battle doesn't allow for the main gun or in-case of more important targets requiring the main gun's firepower.
With only 2 shells to choose from being APDS & HESH, APDS can be used for long-distance engagements and HESH can deal with light to medium armoured vehicles with overpressure damage, this can be done at a long range once the laser rangefinder has been unlocked as well. But due to the low velocity of the HESH round it has to be fired at a stationary target at long range to effectively hit.
Pros and cons
Pros:
- 105 mm L7 cannon found on other NATO tanks
- 12.7 mm Browning M2HB machine gun
- Two-plane stabilizer that allows it to fire on the move
- Highly mobile
- Armour may bounce APHE shells
- Low profile
- Utilization of hydropneumatic suspension allows for various offensive and defensive options
- Laser rangefinder
Cons:
- Some areas are lightly armoured, vulnerable to high penetrating SPAAs
- Poor gun elevation angle
History
The prototype for the Type 74. Known in Japanese as 74式戦車の試作車STB-1 (ななよんしきせんしゃのしさくしゃSTB-1). Created in September 1969 along with STB-2 in the STT program. Due to issues with cost effectiveness these two prototypes were not considered for the replacement of the Type 61. In a bid to reduce costs STB-3, STB-4, STB-5 and STB-6 were produced between April 1970 to December 1971. The final judgement for the STT program was held in November 1973 which lead the line to be completed in 1974. And, production started the following year in 1975 for the Type 74.
Media
- Skins
- Videos
See also
- Type 74 (C) - (Early Production version)
- Type 74 (E) - (Variant with improved FCS & thermal sleeve)
- Type 74 (F) - (Variant with mounting plates for a Type 92 mine-roller)
- Type 74 (G) - (Improved (改) variant with thermal and armour skirts)
- Other vehicles of similar configuration and role
External links
| Japan medium tanks | |
|---|---|
| Type 97 | Chi-Ha · Chi-Ha Kai · Chi-Ha Kai TD · Chi-Ha Short Gun |
| Type 1 | Chi-He · Chi-He (5th Regiment) · Ho-I |
| Type 3 | Chi-Nu · Chi-Nu II |
| Type 4 | Chi-To · Chi-To Late |
| Type 5 | Chi-Ri II |
| Type 61 MBT | ST-A1* · ST-A2* · ST-A3* · Type 61 |
| Type 74 MBT | ST-B2* · Type 74 (C) · Type 74 (E) · Type 74 (F) · Type 74 (G) |
| Type 90 MBT | Type 90 · Type 90 (B) · Type 90B "Fuji" |
| Type 10 MBT | TKX (P)* · TKX* · Type 10 |
| Other | Ka-Chi |
| USA | ▅M4A3 (76) W · ▅M47 |
| *Prototype | |
