Difference between pages "A6M2 (China)" and "P40"
(→Description) (Tag: Visual edit) |
(→Main armament) |
||
| Line 1: | Line 1: | ||
| − | {{Specs-Card|code= | + | {{Specs-Card|code=it_p_40}} |
| − | + | {{About | |
| + | |about=Italian medium tank '''{{PAGENAME}}''' | ||
| + | |other | ||
| + | |usage-1 = other uses | ||
| + | |link-1 = P40 (Disambiguation) | ||
| + | |usage-2 = the premium version | ||
| + | |link-2 = P40 "G.C. Leoncello" | ||
| + | }} | ||
== Description == | == Description == | ||
| − | <!-- ''In the description, the first part | + | <!--''In the description, the first part needs to be about the history of the creation and combat usage of the vehicle, as well as its key features. In the second part, tell the reader about the ground vehicle in the game. Insert the screenshot of the vehicle. If the novice player does not remember the vehicle by name, they will immediately understand what kind of vehicle it is talking about.''--> |
[[File:GarageImage_{{PAGENAME}}.jpg|420px|thumb|left]] | [[File:GarageImage_{{PAGENAME}}.jpg|420px|thumb|left]] | ||
{{break}} | {{break}} | ||
| − | The '''{{Specs|name}}''' is a | + | The '''{{Specs|name}}''' is a rank {{Specs|rank}} Italian medium tank {{Battle-rating}}. It was introduced in [[Update 1.85 "Supersonic"]]. |
| − | + | == General info == | |
| + | === Survivability and armour === | ||
| + | <!--''Describe armour protection. Note the most well protected and key weak areas. Appreciate the layout of modules as well as the number and location of crew members. Is the level of armour protection sufficient, is the placement of modules helpful for survival in combat?'' | ||
| + | ''If necessary use a visual template to indicate the most secure and weak zones of the armour.''--> | ||
| + | '''Adequate'''. This is the word that comes to mind when thinking of the P40's armour. Its protection is enough for most medium-ranged engagements but is able to be easily penetrated by most guns at close range. The front plate is a 50 mm plate sloped at 45° allowing for 65-67 mm of total protection, and the drivers hatch on the left side is 76 mm also sloped at 45° allowing for nearly 100 mm of protection. Most shots to the upper glacis won't penetrate thanks to the radical sloping angle of the plate offering 95 mm of armour, but it is possible for it to deflect a shot into the UFP. The gun mantlet is very well protected, with two rounded plates, which each offer roughly 50 mm of protection, stacked on top of each other allowing for a total of 100 mm. Be wary that the turret is a very vulnerable spot due to the nearly flat plate that only has 50 mm of armour. | ||
| − | + | === Mobility === | |
| + | <!-- ''Write about the mobility of the ground vehicle. Estimate the specific power and manoeuvrability, as well as the maximum speed forwards and backwards.'' --> | ||
| − | + | {{tankMobility|abMinHp= 511|rbMinHp= 292}} | |
| − | + | Mobility is below average for the rank but is faster than some common tanks like the early Sherman's and Chi-Nu. However, almost every other tank in the rank will easily outrun the {{PAGENAME}} (Such as the early T-34's, [[Cromwell (Family)|Cromwell's]], [[Pz.III M|Pz.III]] and the [[Pz.IV F2]]). The tank's offroad speed is quite good, able to reach 43 kmh / 27 mph on dirt and get to that speed quite quickly. The hull traverse is also very good and the tank is very responsive while in motion, allowing for a very mobile playstyle. | |
| − | |||
| − | |||
| − | + | == Armaments == | |
| + | === Main armament === | ||
| + | <!--''Give the reader information about the characteristics of the main gun. Assess its effectiveness in a battle based on the reloading speed, ballistics and the power of shells. Do not forget about the flexibilty of the fire, that is how quickly the cannon can be aimed at the target, open fire on it and aim at another enemy. Add a link to the main article on the gun: <code><nowiki>{{main|Name of the weapon}}</nowiki></code>. Describe in general terms the ammunition available for the main gun. Give advice on how to use them and how to fill the ammunition storage.''--> | ||
| + | {{main|Ansaldo 75 L/34 (75 mm)}} | ||
{| class="wikitable" style="text-align:center" | {| class="wikitable" style="text-align:center" | ||
|- | |- | ||
| − | ! colspan=" | + | ! colspan="6" | [[Ansaldo 75 L/34 (75 mm)|75 mm Ansaldo 75 L/34]] |
| + | |- | ||
| + | ! colspan="4" rowspan="1" style="width:5em" |Capacity | ||
| + | ! rowspan="1" | Vertical <br> guidance | ||
| + | ! rowspan="1" | Horizontal <br> guidance | ||
|- | |- | ||
| − | + | | colspan="4" | 63 || -10°/+23° || ±180° | |
|- | |- | ||
| − | ! colspan=" | + | ! colspan="6" | Turret rotation speed (°/s) |
| − | |||
| − | |||
| − | |||
| − | |||
|- | |- | ||
| − | ! | + | ! style="width:4em" |Mode |
| + | ! style="width:4em" |Stock | ||
| + | ! style="width:4em" |Upgraded | ||
| + | ! style="width:4em" |Prior + Full crew | ||
| + | ! style="width:4em" |Prior + Expert qualif. | ||
| + | ! style="width:4em" |Prior + Ace qualif. | ||
|- | |- | ||
| − | | | + | | ''Arcade'' || 8.3 || 11.5 ||22.4||24.8||56.4 |
|- | |- | ||
| − | + | | ''Realistic'' || 8.3 || 9.8 ||11.9||13.2||14.0 | |
|- | |- | ||
| − | ! colspan=" | + | ! colspan="4" | Reloading rate (seconds) |
| − | |||
| − | |||
| − | |||
| − | |||
|- | |- | ||
| − | ! | + | ! colspan="1" style="width:4em" |Stock |
| + | ! colspan="1" style="width:4em" |Prior + Full crew | ||
| + | ! colspan="1" style="width:4em" |Prior + Expert qualif. | ||
| + | ! colspan="1" style="width:4em" |Prior + Ace qualif. | ||
|- | |- | ||
| − | | | + | | 6.5 ||5.8||5.3||5.0 |
|- | |- | ||
|} | |} | ||
| − | ==== | + | The P40 is armed with a [[Ansaldo 75 L/34 (75 mm)]], able to hold a total of 63 shells. combining a decent reload with flexible munitions. The P40 has access to a 75 mm APHE round with 79 mm of penetration and a HEAT round with 100 mm of penetration. It is worth noting, either ammunition is usable, but a mix is preferable. Most enemies will easily fall prey to the APHE round, but T-34's, M4 Sherman's, KV1's, are all enemies that require heavier hitting rounds, like the HEAT round. Note turret rotation is mediocre, and traversing the hull is necessary during close range engagements. The average round velocity will make longer-range combat difficult and the penetration drop off of the APHE round becomes quite noticeable. |
| − | {| class="wikitable" style="text-align:center" | + | |
| + | ===== Ammunition ===== | ||
| + | {| class="wikitable sortable" style="text-align:center" width="100%" | ||
| + | ! colspan="8" | Penetration statistics | ||
|- | |- | ||
| − | ! colspan=" | + | ! rowspan="2" data-sort-type="text" | Ammunition |
| + | ! rowspan="2" class="unsortable" | Type of <br /> warhead | ||
| + | ! colspan="6" | '''Penetration''' '''''in mm''''' '''@ 90°''' | ||
|- | |- | ||
| − | ! | + | ! 10m |
| + | ! 100m | ||
| + | ! 500m | ||
| + | ! 1000m | ||
| + | ! 1500m | ||
| + | ! 2000m | ||
|- | |- | ||
| − | | | + | | Granata Perforante 75/32 || APCBC || 75 || 72 || 66 || 59 || 53 || 48 |
|- | |- | ||
| − | | | + | | EPS M42 || HEAT || 100 || 100 || 100 || 100 || 100 || 100 |
| − | |||
| − | |||
|- | |- | ||
| − | + | | Granata 75/32|| HE || 9 || 9 || 9 || 9 || 9 || 9 | |
|- | |- | ||
| − | + | |} | |
| − | + | {| class="wikitable sortable" style="text-align:center" width="100%" | |
| − | + | ! colspan="10" | Shell details | |
| − | ! colspan=" | ||
| − | |||
| − | |||
|- | |- | ||
| − | | | + | ! rowspan="2" data-sort-type="text" | Ammunition |
| + | ! rowspan="2" |Velocity <br /> in m/s | ||
| + | ! rowspan="2" |Projectile<br />Mass in kg | ||
| + | ! rowspan="2" | ''Fuse delay'' | ||
| + | ''in m:'' | ||
| + | ! rowspan="2" | ''Fuse sensitivity'' | ||
| + | ''in mm:'' | ||
| + | ! rowspan="2" | ''Explosive Mass in g<br /> (TNT equivalent):'' | ||
| + | ! rowspan="2" | ''Normalization At 30° <br> from horizontal:'' | ||
| + | ! colspan="3" | ''Ricochet:'' | ||
|- | |- | ||
| − | + | ! 0% | |
| − | + | ! 50% | |
| − | + | ! 100% | |
|- | |- | ||
| − | + | | Granata Perforante 75/32 || 624 || 6.2 || 1.3 || 15 || 270 || ° || 48° || 63° || 71° | |
|- | |- | ||
| − | + | | EPS M42 || 552 || 5.3 || 0.0 || 0.1 || 656.64 || +0° || 62° || 69° || 73° | |
| − | |||
| − | |||
| − | |||
|- | |- | ||
| − | | | + | | Granata 75/32|| 552 || 6.4 || 0.4 || 0.1 || 600 || +0° || 79° || 80° || 81° |
|- | |- | ||
|} | |} | ||
| − | {| class="wikitable" style="text-align:center" | + | ===== [[Ammo racks|Ammo racks]] ===== |
| − | + | {| class="wikitable sortable" style="text-align:center" | |
| − | |||
| − | |||
| − | |||
|- | |- | ||
| − | ! | + | ! class="wikitable unsortable" |Full<br /> ammo |
| − | ! | + | ! class="wikitable unsortable" |1st<br /> rack empty |
| − | ! | + | ! class="wikitable unsortable" |2nd<br /> rack empty |
| + | ! class="wikitable unsortable" |3rd<br /> rack empty | ||
| + | ! class="wikitable unsortable" |4th<br /> rack empty | ||
| + | ! class="wikitable unsortable" |5th<br /> rack empty | ||
| + | ! class="wikitable unsortable" |6th<br /> rack empty | ||
| + | ! class="wikitable unsortable" |Visual<br /> discrepancy | ||
|- | |- | ||
| − | | | + | || '''63''' || 58 ''(+5)'' || 53 ''(+10)'' || 48 ''(+15)'' || 43 ''(+20)'' || 22 ''(+41)'' || 1 ''(+62)'' || style="text-align:center" | No |
|- | |- | ||
|} | |} | ||
| − | === | + | Recommendations: Sponsons empty: 43 ''(+20)'' |
| − | <!-- | + | |
| + | === Machine guns === | ||
| + | <!--Offensive and anti-aircraft machine guns not only allow you to fight some aircraft but also are effective against lightly armoured vehicles. Evaluate machine guns and give recommendations on its use.--> | ||
| + | {{main|Breda Mod. 38 (8 mm)}} | ||
| + | |||
| + | === Machine guns === | ||
| + | |||
| + | * [[Breda Mod. 38 (8 mm)]] x 2 (One pintle-mounted and one mounted co-axially, 576 rounds total) | ||
| − | + | == Usage in the battles == | |
| + | The P40 is a tank that excels in medium-ranged engagements thanks to its decent armour and adequate gun. Due to the relatively small size and good mobility, it can, however, be played as an ambush tank that can sneak around and plant a shot in the enemy's sides, allowing for an easy elimination because of the large explosive filler in the APCBC shell. Be wary that while the tank's armour may protect against many lower-rank cannons, cannons at equivalent BR (Namely the Pz.IV's long-barrelled cannon) are easily capable of destroying the tank. | ||
| − | + | Players in the P40 should always be with teammates, as the P40 is easy prey when separated from its team. Stick with the heavier tanks such as the KV-1's, Churchill's and Matilda's, as they can soak up shots and draw attention away from the weak little P40, allowing the player to sneak around and hit a few tanks. If there are no heavy tanks, the P40's best bet is to support a Sherman or Pz.IV, as both of them can deal with enemies that the P40 can't. | |
| − | + | === Pros and cons === | |
| − | + | '''Pros:''' | |
| − | |||
| − | The | + | * Decent frontal armour |
| + | * The gun possesses satisfactory performance at its rank | ||
| + | * Has access to HEAT shells with 100 mm of penetration | ||
| + | * Stock shell has a lot of explosive filler, making one-shot very common | ||
| + | * Relatively small for a medium tank | ||
| + | * Very good in medium-ranged performance | ||
| − | + | '''Cons:''' | |
| − | |||
| − | + | * Overall penetration is not that great | |
| − | + | * Pitifully low ammo count for each machine gun belt | |
| − | + | * Armour can still be penetrated by a few enemies of rank II, most notably by the long-barreled Panzer IVs | |
| + | * Breda Mod. 38's have a very low magazine count | ||
| + | * Lower than the average speed | ||
| + | * Mediocre turret traverse | ||
| − | The ''''' | + | == History == |
| + | The Carro Pesante P26/40 was Italy's best tank that saw service in the war. Despite only weighing 29 tonnes, which is significantly less than almost every other country's heavy tanks, it was classed as a heavy tank due to Italy's tank design doctrine. In early 1940, the Italians started working on a 25 tonne "heavy" infantry support tank that was intended to fight alongside the "M" class medium tanks. The recent Africa campaign showed the massive problems the Italian tanks in production had, namely a lack of armour and insufficient firepower, prompting the army to make some changes. Initially designated as "P75" due to the 75 mm short-barrelled 75/32 mm cannon that was changed to a longer barrelled 75/34 with higher potency. The initial prototype was powered by a 330 hp diesel engine but was changed to a traditional petrol-fueled engine due to the unimpressive performance of the diesel engine, which forced the Ansaldo engineers to delay the program until the necessary modifications to the chassis and body could be made to fit the petrol engine. This eventually produced a petrol engine titled "V-12 SPA 342" delivering 420 hp. The vehicle was adopted and was named "P26/40", 26 for the weight and 40 for the year it was designed. | ||
| + | == Media == | ||
| + | ''An excellent addition to the article will be video guides, as well as screenshots from the game and photos.'' | ||
| + | == Read also == | ||
| + | ''Links to the articles on the War Thunder Wiki that you think will be useful for the reader, for example,'' | ||
| − | * | + | * ''reference to the series of the vehicles;'' |
| − | * | + | * ''links to approximate analogues of other nations and research trees.'' |
| − | == | + | ''ETC.'' |
| − | + | == Sources == | |
| + | ''Paste links to sources and external resources, such as:'' | ||
| − | + | * ''topic on the official game forum;'' | |
| + | * ''other literature.'' | ||
| − | |||
{| class="wikitable" style="text-align:center" | {| class="wikitable" style="text-align:center" | ||
|- | |- | ||
| − | ! colspan="7" | | + | ! colspan="7" | [[Breda Mod. 38 (8 mm)|8 mm Breda Mod. 38]] |
|- | |- | ||
| − | + | ! colspan="7" | ''Pintle mount'' | |
| − | |||
| − | ! colspan=" | ||
| − | |||
| − | |||
|- | |- | ||
| − | ! | + | ! colspan="4" rowspan="1" style="width:5em" |Capacity (Belt capacity) |
| + | ! rowspan="1" | Fire rate <br> (shots/minute) | ||
| + | ! rowspan="1" | Vertical <br> guidance | ||
| + | ! rowspan="1" | Horizontal <br> guidance | ||
|- | |- | ||
| − | | | + | | colspan="4" | 288 (24) || 600 || -10°/+20° || ±180° |
|- | |- | ||
| − | + | ! colspan="7" | ''Coaxial mount'' | |
| − | |||
| − | |||
| − | |||
| − | |||
| − | |||
| − | |||
| − | ! colspan=" | ||
|- | |- | ||
| − | | | + | ! colspan="4" rowspan="1" style="width:5em" |Capacity (Belt capacity) |
| − | | | + | ! rowspan="1" | Fire rate <br> (shots/minute) |
| − | | | + | ! rowspan="1" | Vertical <br> guidance |
| − | + | ! rowspan="1" | Horizontal <br> guidance | |
| − | |||
| − | | | ||
|- | |- | ||
| − | | | + | | colspan="4" | 288 (24) || 600 || N/A || N/A |
| − | | | ||
| − | | | ||
| − | | | ||
| − | | | ||
| − | | | ||
|- | |- | ||
| − | + | ||
| − | + | === Machine guns === | |
| − | + | <!-- Offensive and anti-aircraft machine guns not only allow you to fight some aircraft but also are effective against lightly armoured vehicles. Evaluate machine guns and give recommendations on its use. --> | |
| − | | | + | {{main|Breda Mod. 38 (8 mm)}} |
| − | + | ||
| − | + | * [[Breda Mod. 38 (8 mm)]] x 2 (One pintle-mounted and one mounted co-axially, 576 rounds total) | |
| − | + | ||
| − | + | == Usage in the battles == | |
| − | + | <!-- Describe the tactics of playing in the vehicle, the features of using vehicles in the team and advice on tactics. Refrain from creating a "guide" - do not impose a single point of view but give the reader food for thought. Describe the most dangerous enemies and give recommendations on fighting them. If necessary, note the specifics of the game in different modes (AB, RB, SB). --> | |
| − | + | The P40 is a tank that excels in medium-ranged engagements thanks to its decent armour and adequate gun. Due to the relatively small size and good mobility, it can, however, be played as an ambush tank that can sneak around and plant a shot in the enemy's sides, allowing for an easy elimination because of the large explosive filler in the APCBC shell. Be wary that while the tank's armour may protect against many lower-rank cannons, cannons at equivalent BR (Namely the Pz.IV's long-barrelled cannon) are easily capable of destroying the tank. | |
| − | + | ||
| − | + | Players in the P40 should always be with teammates, as the P40 is easy prey when separated from its team. Stick with the heavier tanks such as the KV-1's, Churchill's and Matilda's, as they can soak up shots and draw attention away from the weak little P40, allowing the player to sneak around and hit a few tanks. If there are no heavy tanks, the P40's best bet is to support a Sherman or Pz.IV, as both of them can deal with enemies that the P40 can't. | |
| − | |||
| − | |||
| − | |||
=== Pros and cons === | === Pros and cons === | ||
| − | <!-- | + | <!--''Summarize and briefly evaluate the vehicle in terms of its characteristics and combat effectiveness. Mark its pros and cons in a bulleted list. Do not use more than 6 points for each of the characteristics. Avoid using categorical definitions such as "bad", "good" and the like - they have a substitution in the form of softer "inadequate", "effective".''--> |
| − | |||
'''Pros:''' | '''Pros:''' | ||
| − | * | + | * Decent frontal armour |
| − | * | + | * The gun possesses satisfactory performance at its rank |
| − | * | + | * Has access to HEAT shells with 100 mm of penetration |
| − | * | + | * Stock shell has a lot of explosive filler, making one-shot very common |
| − | * | + | * Relatively small for a medium tank |
| − | + | * Very good in medium-ranged performance | |
| − | * Very good | ||
| − | |||
| − | |||
| − | |||
'''Cons:''' | '''Cons:''' | ||
| − | * | + | * Overall penetration is not that great |
| − | + | * Pitifully low ammo count for each machine gun belt | |
| − | * | + | * Armour can still be penetrated by a few enemies of rank II, most notably by the long-barreled Panzer IVs |
| − | + | * Breda Mod. 38's have a very low magazine count | |
| − | * | + | * Lower than the average speed |
| − | + | * Mediocre turret traverse | |
| − | * | ||
| − | |||
| − | |||
| − | * | ||
| − | |||
| − | |||
| − | * | ||
| − | |||
== History == | == History == | ||
| − | <!--Describe the history of the creation and combat usage of the | + | <!-- Describe the history of the creation and combat usage of the ground vehicle in more detail than in the introduction. If the historical reference turns out to be too big, take it to a separate article, taking a link to an article about the vehicle and adding a block "/historical reference" (example: https://wiki.warthunder.com/Name-vehicles/historical reference) and add a link to it here using the main template. Be sure to include links to sources at the end of the article. --> |
| − | + | The Carro Pesante P26/40 was Italy's best tank that saw service in the war. Despite only weighing 29 tonnes, which is significantly less than almost every other country's heavy tanks, it was classed as a heavy tank due to Italy's tank design doctrine. In early 1940, the Italians started working on a 25 tonne "heavy" infantry support tank that was intended to fight alongside the "M" class medium tanks. The recent Africa campaign showed the massive problems the Italian tanks in production had, namely a lack of armour and insufficient firepower, prompting the army to make some changes. Initially designated as "P75" due to the 75 mm short-barrelled 75/32 mm cannon that was changed to a longer barrelled 75/34 with higher potency. The initial prototype was powered by a 330 hp diesel engine but was changed to a traditional petrol-fueled engine due to the unimpressive performance of the diesel engine, which forced the Ansaldo engineers to delay the program until the necessary modifications to the chassis and body could be made to fit the petrol engine. This eventually produced a petrol engine titled "V-12 SPA 342" delivering 420 hp. The vehicle was adopted and was named "P26/40", 26 for the weight and 40 for the year it was designed. | |
| − | + | == Media == | |
| + | ''An excellent addition to the article will be video guides, as well as screenshots from the game and photos.'' | ||
| − | + | == Read also == | |
| + | ''Links to the articles on the War Thunder Wiki that you think will be useful for the reader, for example,'' | ||
| − | + | * ''reference to the series of the vehicles;'' | |
| + | * ''links to approximate analogues of other nations and research trees.'' | ||
| − | + | ''ETC.'' | |
| − | '' | ||
| − | == | + | == Sources == |
| − | |||
| − | |||
| − | |||
| − | |||
| − | |||
| − | |||
| − | |||
''Paste links to sources and external resources, such as:'' | ''Paste links to sources and external resources, such as:'' | ||
* ''topic on the official game forum;'' | * ''topic on the official game forum;'' | ||
| − | |||
* ''other literature.'' | * ''other literature.'' | ||
| − | {{ | + | {{Italy medium tanks}} |
| − | + | |} | |
| − | |||
Revision as of 16:01, 27 May 2020
Contents
| This page is about the Italian medium tank P40. For other uses, see P40 (Disambiguation). For the premium version, see P40 "G.C. Leoncello". |
Description

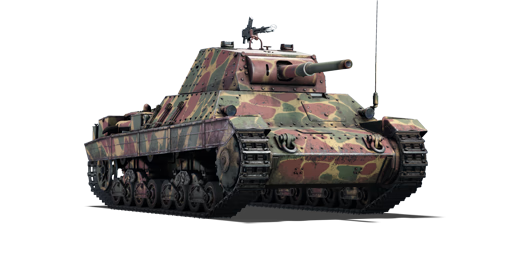
The Fiat-Ansaldo P40 is a rank II Italian medium tank
with a battle rating of 3.3 (AB/RB/SB). It was introduced in Update 1.85 "Supersonic".
General info
Survivability and armour
Adequate. This is the word that comes to mind when thinking of the P40's armour. Its protection is enough for most medium-ranged engagements but is able to be easily penetrated by most guns at close range. The front plate is a 50 mm plate sloped at 45° allowing for 65-67 mm of total protection, and the drivers hatch on the left side is 76 mm also sloped at 45° allowing for nearly 100 mm of protection. Most shots to the upper glacis won't penetrate thanks to the radical sloping angle of the plate offering 95 mm of armour, but it is possible for it to deflect a shot into the UFP. The gun mantlet is very well protected, with two rounded plates, which each offer roughly 50 mm of protection, stacked on top of each other allowing for a total of 100 mm. Be wary that the turret is a very vulnerable spot due to the nearly flat plate that only has 50 mm of armour.
Mobility
| Game Mode | Max Speed (km/h) | Weight (tons) | Engine power (horsepower) | Power-to-weight ratio (hp/ton) | |||
|---|---|---|---|---|---|---|---|
| Forward | Reverse | Stock | Upgraded | Stock | Upgraded | ||
| Arcade | 45 | 5 | 26 | 511 | 630 | 19.65 | 24.23 |
| Realistic | 41 | 5 | 292 | 330 | 11.23 | 12.69 | |
Mobility is below average for the rank but is faster than some common tanks like the early Sherman's and Chi-Nu. However, almost every other tank in the rank will easily outrun the P40 (Such as the early T-34's, Cromwell's, Pz.III and the Pz.IV F2). The tank's offroad speed is quite good, able to reach 43 kmh / 27 mph on dirt and get to that speed quite quickly. The hull traverse is also very good and the tank is very responsive while in motion, allowing for a very mobile playstyle.
Armaments
Main armament
| 75 mm Ansaldo 75 L/34 | |||||
|---|---|---|---|---|---|
| Capacity | Vertical guidance |
Horizontal guidance | |||
| 63 | -10°/+23° | ±180° | |||
| Turret rotation speed (°/s) | |||||
| Mode | Stock | Upgraded | Prior + Full crew | Prior + Expert qualif. | Prior + Ace qualif. |
| Arcade | 8.3 | 11.5 | 22.4 | 24.8 | 56.4 |
| Realistic | 8.3 | 9.8 | 11.9 | 13.2 | 14.0 |
| Reloading rate (seconds) | |||||
| Stock | Prior + Full crew | Prior + Expert qualif. | Prior + Ace qualif. | ||
| 6.5 | 5.8 | 5.3 | 5.0 | ||
The P40 is armed with a Ansaldo 75 L/34 (75 mm), able to hold a total of 63 shells. combining a decent reload with flexible munitions. The P40 has access to a 75 mm APHE round with 79 mm of penetration and a HEAT round with 100 mm of penetration. It is worth noting, either ammunition is usable, but a mix is preferable. Most enemies will easily fall prey to the APHE round, but T-34's, M4 Sherman's, KV1's, are all enemies that require heavier hitting rounds, like the HEAT round. Note turret rotation is mediocre, and traversing the hull is necessary during close range engagements. The average round velocity will make longer-range combat difficult and the penetration drop off of the APHE round becomes quite noticeable.
Ammunition
| Penetration statistics | |||||||
|---|---|---|---|---|---|---|---|
| Ammunition | Type of warhead |
Penetration in mm @ 90° | |||||
| 10m | 100m | 500m | 1000m | 1500m | 2000m | ||
| Granata Perforante 75/32 | APCBC | 75 | 72 | 66 | 59 | 53 | 48 |
| EPS M42 | HEAT | 100 | 100 | 100 | 100 | 100 | 100 |
| Granata 75/32 | HE | 9 | 9 | 9 | 9 | 9 | 9 |
| Shell details | |||||||||
|---|---|---|---|---|---|---|---|---|---|
| Ammunition | Velocity in m/s |
Projectile Mass in kg |
Fuse delay
in m: |
Fuse sensitivity
in mm: |
Explosive Mass in g (TNT equivalent): |
Normalization At 30° from horizontal: |
Ricochet: | ||
| 0% | 50% | 100% | |||||||
| Granata Perforante 75/32 | 624 | 6.2 | 1.3 | 15 | 270 | ° | 48° | 63° | 71° |
| EPS M42 | 552 | 5.3 | 0.0 | 0.1 | 656.64 | +0° | 62° | 69° | 73° |
| Granata 75/32 | 552 | 6.4 | 0.4 | 0.1 | 600 | +0° | 79° | 80° | 81° |
Ammo racks
| Full ammo |
1st rack empty |
2nd rack empty |
3rd rack empty |
4th rack empty |
5th rack empty |
6th rack empty |
Visual discrepancy |
|---|---|---|---|---|---|---|---|
| 63 | 58 (+5) | 53 (+10) | 48 (+15) | 43 (+20) | 22 (+41) | 1 (+62) | No |
Recommendations: Sponsons empty: 43 (+20)
Machine guns
Machine guns
- Breda Mod. 38 (8 mm) x 2 (One pintle-mounted and one mounted co-axially, 576 rounds total)
Usage in the battles
The P40 is a tank that excels in medium-ranged engagements thanks to its decent armour and adequate gun. Due to the relatively small size and good mobility, it can, however, be played as an ambush tank that can sneak around and plant a shot in the enemy's sides, allowing for an easy elimination because of the large explosive filler in the APCBC shell. Be wary that while the tank's armour may protect against many lower-rank cannons, cannons at equivalent BR (Namely the Pz.IV's long-barrelled cannon) are easily capable of destroying the tank.
Players in the P40 should always be with teammates, as the P40 is easy prey when separated from its team. Stick with the heavier tanks such as the KV-1's, Churchill's and Matilda's, as they can soak up shots and draw attention away from the weak little P40, allowing the player to sneak around and hit a few tanks. If there are no heavy tanks, the P40's best bet is to support a Sherman or Pz.IV, as both of them can deal with enemies that the P40 can't.
Pros and cons
Pros:
- Decent frontal armour
- The gun possesses satisfactory performance at its rank
- Has access to HEAT shells with 100 mm of penetration
- Stock shell has a lot of explosive filler, making one-shot very common
- Relatively small for a medium tank
- Very good in medium-ranged performance
Cons:
- Overall penetration is not that great
- Pitifully low ammo count for each machine gun belt
- Armour can still be penetrated by a few enemies of rank II, most notably by the long-barreled Panzer IVs
- Breda Mod. 38's have a very low magazine count
- Lower than the average speed
- Mediocre turret traverse
History
The Carro Pesante P26/40 was Italy's best tank that saw service in the war. Despite only weighing 29 tonnes, which is significantly less than almost every other country's heavy tanks, it was classed as a heavy tank due to Italy's tank design doctrine. In early 1940, the Italians started working on a 25 tonne "heavy" infantry support tank that was intended to fight alongside the "M" class medium tanks. The recent Africa campaign showed the massive problems the Italian tanks in production had, namely a lack of armour and insufficient firepower, prompting the army to make some changes. Initially designated as "P75" due to the 75 mm short-barrelled 75/32 mm cannon that was changed to a longer barrelled 75/34 with higher potency. The initial prototype was powered by a 330 hp diesel engine but was changed to a traditional petrol-fueled engine due to the unimpressive performance of the diesel engine, which forced the Ansaldo engineers to delay the program until the necessary modifications to the chassis and body could be made to fit the petrol engine. This eventually produced a petrol engine titled "V-12 SPA 342" delivering 420 hp. The vehicle was adopted and was named "P26/40", 26 for the weight and 40 for the year it was designed.
Media
An excellent addition to the article will be video guides, as well as screenshots from the game and photos.
Read also
Links to the articles on the War Thunder Wiki that you think will be useful for the reader, for example,
- reference to the series of the vehicles;
- links to approximate analogues of other nations and research trees.
ETC.
Sources
Paste links to sources and external resources, such as:
- topic on the official game forum;
- other literature.
| 8 mm Breda Mod. 38 | ||||||
|---|---|---|---|---|---|---|
| Pintle mount | ||||||
| Capacity (Belt capacity) | Fire rate (shots/minute) |
Vertical guidance |
Horizontal guidance | |||
| 288 (24) | 600 | -10°/+20° | ±180° | |||
| Coaxial mount | ||||||
| Capacity (Belt capacity) | Fire rate (shots/minute) |
Vertical guidance |
Horizontal guidance | |||
| 288 (24) | 600 | N/A | N/A | |||
| Italy medium tanks | |
|---|---|
| Italy | |
| M13/40 | M13/40 (I) · M13/40 (II) · M13/40 (III) |
| M14/41 | M14/41 · M14/41 (47/40) |
| M15/42 | M15/42 |
| M16/43 | Celere Sahariano |
| P26/40 | P40 · P40 "G.C. Leoncello" |
| OF-40 | OF-40 · OF-40 Mk.2A · OF-40 (MTCA) |
| Ariete | Ariete (P) · Ariete · Ariete PSO · Ariete AMV |
| Germany | ▄Pz.III N · ▄Pz.IV G · ▄Leopard 1A5 |
| Allied powers | ▄Sherman I Composito · Sherman Ic · ▄Sherman Vc · ▄Sherman V · M26 "D.C.Ariete" · M26A1 · M47 (105/55) · M60A1 "D.C.Ariete" |
| Hungary | |
| Turán | Turan I · Turan II · Turan III |
| Germany | ◔Leopard 2A4 |
| USSR | ◔T-72M1 |
