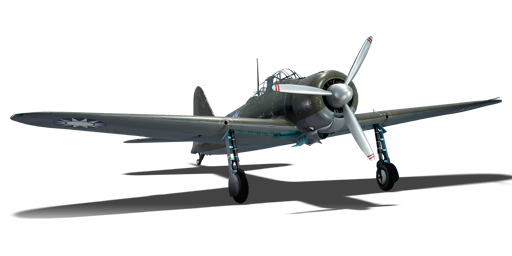
A6M2 (China)

From War Thunder Wiki
Jump to: navigation, search
Rank VI USA | Premium | Golden Eagles
A-10A Thunderbolt (Early)
␗A6M2
a6m2_zero_china.png
GarageImage A6M2 (China).jpg
␗A6M2
Purchase:1 300 Specs-Card-Eagle.png
Show in game

Description

The A6M2 Mod. 21 (Commonly known in Chinese as 零战21型) was captured on multiple occasions by both the Nationalist and Communist forces during and after WWII respectively. This model likely represents the 2 aircraft, numbered V-172 and V-174, that were captured after force-landing on the Leizhou Peninsula in 1941 - the very first Zekes captured by Allied forces - and served as examples to evaluate this fighter just before the outbreak of the Pacific War.

Introduced in Update 1.93 "Shark Attack", the fighter performs identically to its Japanese counterpart with excellent manoeuvrability and devastating firepower; however, players also have to be aware of its low cannon ammo capacity as well as rather fragile airframe that will burst into flames when the fuel tanks are hit. Always leave some energy to climb back to altitude for maximum efficiency - even the most manoeuvrable fighter needs energy to survive long enough from waves of enemies.

General info

Flight performance

Arrestor gear
Accelerates braking by grabbing the brake cable on the deck of the aircraft carrier
Max speed
at 4 400 m510 km/h
Turn time17 s
Max altitude10 300 m
EngineNakajima Sakae 12
TypeRadial
Cooling systemAir
Take-off weight2 t

This aircraft is a copy of the A6M2 in the Japanese tech tree: it has really good turning and manoeuvrability, is able to accelerate fast, has a good climb rate and is known for being the best turn-fighter at its battle rating with the cost of being very weak in terms of armour protection against enemy fire. This aircraft also has a slow top speed, but is still very competitive with other fighters at its BR.

One thing many players note when fighting the Zero is its immense manoeuvrability and turn rate. It is incredibly nimble and has an amazing climb rate, which allows you to run literal rings around many opponents. Even fighters renowned for manoeuvrability, like the mighty Spitfire, will think twice before engaging in a turn fight with the Zero. The Zero's lightly loaded, high-lift wing and low weight make it a dream to fly at speeds below 400 km/h, with an ability to execute wild gyrations and zoom climbs at the whim of the pilot. However, the Zero is hard to handle as it approaches speeds of 480 km/h.

Characteristics Max Speed
(km/h at 4,400 m)
Max altitude
(metres)
Turn time
(seconds)
Rate of climb
(metres/second)
Take-off run
(metres)
AB RB AB RB AB RB
Stock 491 477 10300 17.7 18.1 10.2 10.2 175
Upgraded 531 510 16.8 17.0 17.4 13.3

Details

Features
Combat flaps Take-off flaps Landing flaps Air brakes Arrestor gear
X
Limits
Wings (km/h) Gear (km/h) Flaps (km/h) Max Static G
Combat Take-off Landing + -
660 310 484 451 280 ~13 ~7
Optimal velocities (km/h)
Ailerons Rudder Elevators Radiator
< 270 < 420 < 410 > 324

Survivability and armour

Crew1 person
Speed of destruction
Structural660 km/h
Gear310 km/h
  • No armour plates
  • No armoured glass
  • No self-sealing fuel tanks (1 in each wing root & 1 between the cockpit and the engine)

Your biggest asset to survive is your extreme manoeuvrability: use it to stay out of the enemy's crosshair. The absence of armoured protection means incoming shots from any angle will penetrate and inflict damage to your critical components. A fuel tank on fire will in almost every case burn entirely through, leading to the airframe's destruction.

Modifications and economy

Repair cost
AB792 Sl icon.png
RB3 576 Sl icon.png
SB1 741 Sl icon.png
Crew training10 000 Sl icon.png
Experts67 000 Sl icon.png
Aces400 Ge icon.png
Research Aces570 000 Rp icon.png
Reward for battleAB / RB / SB
Talisman.png 2 × 60 / 180 / 280 % Sl icon.png
Talisman.png 2 × 136 / 136 / 136 % Rp icon.png
Modifications
Flight performance Survivability Weaponry
Mods aerodinamic fuse.png
Fuselage repair
Mods radiator.png
Radiator
Mods compressor.png
Compressor
Mods aerodinamic wing.png
Wings repair
Mods new engine.png
Engine
Mods metanol.png
Engine injection
Mods armor frame.png
Airframe
Mods armor cover.png
Cover
Mods ammo.png
type89_belt_pack
Mod arrow 0.png
Mods weapon.png
type97_new_gun
Mods pilon bomb.png
9 in (mod30)
Mods ammo.png
type99mk1_belt_pack
Mod arrow 0.png
Mods weapon.png
type99mk1_new_gun

Armaments

Offensive armament

Ammunition120 rounds
Fire rate516 shots/min
Ammunition1 360 rounds
Fire rate900 shots/min

The A6M2 (China) is armed with:

  • 2 x 20 mm Type 99 Model 1 cannons, wing-mounted (60 rpg = 120 total)
  • 2 x 7.7 mm Type 97 navy machine guns, nose-mounted (680 rpg = 1,360 total)

Suspended armament

List of setups (1)
Setup 12 x 60 kg Navy Type 97 Number 6 ground bomb

The A6M2 (China) can be outfitted with the following ordnance:

  • Without load
  • 2 x 60 kg Navy Type 97 Number 6 bombs (120 kg total)

Usage in battles

Realistic Battles

The best tactic to use in this aircraft is to sneak up behind your enemies and use your excellent turn rate to your advantage, something that most other fighters don't have at the BR. The most dangerous enemies in this aircraft come from above, Boom-and-Zoomers will rain fire from above if you are not careful.

Force an enemy pilot into a dogfight at 370-400 km/h and below 6,000 m. At this speed and altitude, no enemy fighter can out-manoeuvre or out-climb you. Jump on cruising enemy aircraft from above. Fasten onto the tail of the bandit, use your superior manoeuvrability to match his evasive moves, and put enough rounds into him to bring him down. Use your machine guns first to "bore-sight" the enemy - once you get hits on him, finish him off with your cannons. Below 480 km/h you can fling the Zero all over the sky to get on an enemy's tail or to shake off all but the most determined attacker. Climb away from most enemy aircraft, hanging on your prop in a near-vertical climb. Manoeuvres like the Immelmann are easy, and heavier fighters can't stay with you. The Zero rolls faster to the left than to the right. Roll left to tighten your turn and get onto the enemy's six. Don't dive away from attackers - your plane doesn't have the power or weight to out-run most fighters. To exploit your plane's best performance, force the enemy lower and slow down the pace of the engagement.

Mastering trigger control is crucial for the A6M2, as each of its Type 99 Model 1 cannons only has a 60-round drum that runs out very fast with a long burst which is commonly done by inexperienced pilots. A good way to practice trigger discipline is to fire short bursts for no more than 3 seconds each time. This can be very effective as a short burst of the 20 mm is generally enough to cripple if not destroy a target.

The A6M Zero is known for its tendency to catch fire when hit, and they usually do so in-game. Weapons such as the M2HB can easily set the Zero's fuel tanks aflame. However if you are on fire, do not panic: immediately press "I" to turn off the engine and wait for a few seconds. The fire might go out quickly. As soon as the fire is put out, press "I" again to turn the engine back on. Depending on the damage and the situation, the Zero may still remain competitive for a fight after a fire.

Simulator Battles

The Chinese A6M2 will be very easy to handle for those with experiences on Japanese A6Ms. In Simulator mode, the A6M2 is quite a decent plane thanks to its great flight characteristics, but the lacklustre armament limits its beginner-friendliness.

Just like in Realistic Battle, the A6M2 in Simulator is a great turn-fighter, being able to pull off tight manoeuvres at any speeds that would otherwise stall other aircraft. Low-speed control is forgiving: it retains a great turn rate and handling at <300 km/h, making it easy to land. It also has decent acceleration and climb rate. The roll rate is mediocre but still usable. The dive speed, as one would expect, is not fast at all, so do not try to out-dive any monoplane fighter except I-16s. Something absent in Realistic mode is the responsiveness/sensibility of the aircraft, and the Zero shines at it since the plane feels highly stable and smooth in level flight as well as manoeuvres, allowing the player to pull a lead accurately which is an aspect that quite some turnfighters lack (they are usually too sensitive on the stick).

The A6M2's armament, however, is perhaps its biggest setback especially for beginners. The main disadvantage is the extremely limited ammo count for the 20 mm cannons, at only 60 rounds per gun. With a fire rate of 516 rounds per minute, the cannons will run out of ammo after around 4 bursts which puts a heavy restrain on its battle. But if the shells hit, they destroy. Monoplanes will get critically damaged by 1-3 hits from the cannons, while larger planes require more hits. The cannons' low muzzle velocity is also a disadvantage as it leads to a curvy trajectory which makes distant shots much harder. Another critical disadvantage is the low-mounted gunsight. Being very close to the nose it leaves very little room for the pilot to see below the engine cowling which makes leading very awkward. The numerous canopy frames are also an obstruction preventing the player from quickly locating enemies. The rear view however is quite clear, with all the stabilisers visible.

The Zero's survivability is just as bad in Simulator. The absence of any armour and self-sealing fuel tank means that it cannot take any hits at all, even rifle-calibre bullets can damage its fragile body. Another thing to notice is to hear for an unusual, wind-like noise when you get hit. That is the sound of the plane catching fire. Since you only have the pilot's first person view as opposed to Realistic's third person view which allows you to see a fire straightaway, you must be aware of a fire by hearing or constantly looking around. Common places to catch fire are the wingroots and the back half of the fuselage. If the A6M2 is on fire, immediately turn the engine off and pray. The fire can actually go out but it will leave some fatal damage to the plane.

Consider bringing the least amount of fuel as your cannons will run out quickly anyways meaning you will need to frequently head back to rearm which also refuels you, rendering more fuel pointless. Also consider setting separate keybinds for firing the MG and cannons to save cannon ammo, and vertical head movement to get a bit more view below the nose. As the plane glides down the runway, slightly tilt the control stick to the right to counter the torque to the right. The Chinese A6M2 is painted in a dark brown paint job which works great in evening battles and maps with brown/dark green ground. The plane can usually blend into such dark backgrounds when flying lower than the foes, making it harder for them to spot you. But if the map is bright or if you are above the opponents you will be quite visible. Once you see a target, it is recommended to chase using lead pursuit to take a shortcut because most planes will be faster than the Zero (e.g. Bf 109 E/F, Yak-1, He-100). If they are unaware of a tailer, try sneaking up behind them, get close until their wingtips fill up your windscreen, and open fire. Trigger control is crucial, so do not burst for more than 1.5 seconds each time you fire the cannons.

For the sake of a sneaky surprise attack from behind you can fire all weapons at once, but generally it is a good practice to shoot the MG first to get an accurate lead, then as the bullet start hitting fire the cannons. A common scenario you might encounter is a turnfight. The opponent tries to turn, and you cut inside their turn. Now due to the awful over-the-nose visibility, the target will disappear below the nose when you lead which is not a good thing. A tactic to avoid this is to set up a deflection shot. Pull a hard turn using a combination of ailerons, elevators and rudder to place the target at your side window (opposite side as to where you two are turning), then bank slightly towards the target. Now it should be approaching your line of flight from the side, and a perfectly lined-up deflection shot will result in the target passing right in front of your gunsight without being obstructed and all you have to do is to fire a short burst. Note that all these will happen within ~10 seconds thus extensive practising, quick reaction and precise controls must be in place to create a good deflection shot.

Unfortunately, missions like "destroy enemy bombers/attackers" and ground pounding is not very suitable for the A6M2 mainly due to its severely limited cannon ammunition and nonexistent protection. Although typical bombers/attackers like Ju-88, Ju-87, B-34, etc are vulnerable in Realistic battles, they are way more formidable in Simulator as the control makes it harder for the offensive side to lead accurately, giving their gunners chances to deal critical damage. Their fuselage can also eat up quite a few cannon hits. The Zero can perform CAS to a limited extend by using its bombs and MG against tanks, trucks, AAA, etc. Check your surroundings constantly.

Enemies worth noting:

  • P-61C-1: this plane is one tough nut to crack. It is quite fast, packs a fatal punch, has a searching radar, and a deadly turret on top. The turret consists of 4 x 12.7 mm M2 Browning machine guns that cover the upper half of the plane, and most P-61 players tend to fly low or get you into their upper half to target you with the turret. Avoid being above them at all costs, utilise the Zero's manoeuvrability and sneak under their belly. Its appearance resembles a P-38: a center fuselage with two engine nacelles extending backwards and forming the twin tail like a frame, you will know it is a Black Widow and not a Lightning when red tracer bullets start shooting out from it.
  • I-16s: the late I-16s are equipped with ShVAK cannons that can be pretty dangerous to your fragile airframe. They can turn equally well as the Zero, have superior roll rate but the stability is so terrible that as soon as they pull a little more on the stick, they will enter spins. Therefore it is quite easy to counter them: engage a turnfight with them and turn tighter and tighter, or do a few barrel rolls. They will quickly lose control and start spinning and it is quite hard to recover. Then simply get some separation, turn around and put some solid shots into them. They have an I-15's short and fat fuselage, a flat radial engine and triangular stabilisers located right after the low-mounted mono wings, all covered in olive green paint.
  • A6M2/A6M3: the original Japanese A6Ms can cause some serious trouble for the Chinese captured A6M2. Against those equally manoeuvrable enemies, the best choice is to get an altitude advantage or wait until they are distracted by teammates before engaging. Approach at a high speed (~520 km/h) or from above. For a better chance to score hits, hold your trigger until the target is less than ~300 m away. Around 10 solid hits from the cannons are enough to shred another Zero to pieces, but do watch out for their evasive manoeuvres. If they slip around your gunsight, keep closing in to fire as close as possible (<300 m) to save ammo and increase accuracy. If you are at a disadvantaged altitude, perform the conventional manoeuvres to dodge their BnZ dives. You can utilise manoeuvres such as low yo-yos and descending scissors to drag them down to the deck so they pose less threat to your team, though this means sacrificing yourself if you lose the fight. When performing vertical manoeuvres, remember to release takeoff/landing flaps while you approach the maximum turning point so your nose drops down quicker. For horizontal manoeuvres, using combat flaps throughout the fight as well as takeoff/landing flaps in some aggressive manoeuvres can effectively tighten your turns, although they can decrease your airspeed quite a bit.
  • XP-50: this plane is able to climb higher than everyone else in most cases. A common tactic of these high-altitude fighters is to pick on high-altitude enemies one by one. So against the XP-50 a good choice is to stay low, at the Zero's fastest altitude 4,000 m, so it is less likely to target you. Wait until the XP-50 fights its way lower, then when it is lower than you, BnZ it. Watch out if it tries to outrun you to gain some separation, do not pursue it.

Manual Engine Control

MEC elements
Mixer Pitch Radiator Supercharger Turbocharger
Oil Water Type
Controllable Controllable
Not auto controlled
Controllable
Not auto controlled
Controllable
Not auto controlled
Separate Not controllable
1 gear
Not controllable

Pros and cons

Pros:

  • Incredibly manoeverable at low-to-medium speed, can out-turn most enemies it will face
  • Excellent climb rate up to 4,500 m
  • Hard-hitting 20 mm cannons
  • Low stall speed and easy to take off and landing due to being a carrier-based fighter
  • Excellent smooth handling in simulator and great rear visibility

Cons:

  • Frail airframe with no protection, can be easily crippled by any incoming hits
  • Poor high-speed characteristics; control can easily lock at higher speeds, and high-speed manoevers may results into wing overloading
  • Generally slow top speed and poor energy retention, vulnerable to boom-and-zoom attacks
  • 20 mm cannons have very poor muzzle velocity, making it difficult to hit enemies at all but point blank ranges (~300 m)
  • Low ammo count for 20 mm cannons, while 7 mm machine guns offers little damage output
  • Has lots of bars inside the cockpit, limiting visibility in simulator

History

Main article: History of the A6M2

After the first encounters with the Zeke in September 1940, Japanese forces proved their superiority over the poorly equipped ROCAF with only biplanes and very few monoplanes imported from US, making the Zero invincible over the Chinese skies up until 1942.

Zekes in KMT forces

In spite of the supremacy of Japanese aviation over the Chinese forces, KMT forces still got their hands on two A6M2b Zekes on the Leizhou Peninsula, Guangdong on 26 November 1941. V-172, sn. Mitsubishi 3372, manufactured on 21 October 1941, belonged to the Tainan Air Group (Tainan Kaigun Kokutai 台南海軍航空隊) and was piloted by staff sergeant Inoue Shichigosanzo (井上七五三造) and V-174 by sergent Takaaki Shimoto (下東孝明) (the pilot duo were likely executed for confidential purposes by the NRA)[1]; they were then dismantled and transported to Liuzhou (now in Guangxi) for further studies and ROCAF decals were painted onto V-172. It was then evaluated by the AVG - the Flying Tigers - where Claire Lee Chennault was in command, that was in fact the very first complete Zeke captured by Allied forces. Later in October, just 3 months after the Akutan Zero was discovered in Alaska, KMT forces captured another A6M at Hainan and transported it back to Guilin (now also in Guangxi) for studies as well. These 2 Zekes served as the few examples for the Allies to exploit the flaws of the "invincible Zeke".

Media

Skins
Videos

See also

  • A6M2 (USA) - USA-captured A6M2
  • A6M2 - Original version in the Japanese tree

External links

References


Mitsubishi Company (三菱商会)
Fighters  A5M4 · Hagiri's A5M4
  A6M2 mod. 11 · A6M2 · A6M3 · A6M3 mod. 22 · A6M3 mod. 22Ko · A6M5 · A6M5 Ko · A6M5 otsu · A6M5 Hei · A6M6c
  A7M1 (NK9H) · A7M2
  J2M2 · J2M3 · J2M4 Kai · J2M5 · J2M5 (30 mm)
Hydroplanes  F1M2
Interceptors  Ki-83 · Ki-109
Bombers  G4M1
  Ki-21-Ia · Ki-21-I hei · Ki-67-I Ko · Ki-67-I otsu
Jet Fighters  Ki-200
Captured  ▃A6M2 · ␗A6M2
See also  Mitsubishi Heavy Industries, Ltd. (Post-War)

China fighters
British  ␗Gladiator Mk I
French  D.510C
Japanese  ␗A6M2 · ␗Ki-27 otsu · ␗Ki-43-III ko · ␗Ki-44-II hei · ␗Ki-61-I otsu · ␗Ki-84 ko
American  CW-21 · Hawk III · P-66 · ␗P-40E-1 · H-81A-2 · ␗P-43A-1 · ␗P-47D-23-RA · ␗P-47D-30 · ␗P-51D-20 · ␗P-51K
Soviet  ␗I-15bis · ␗I-153 M-62 · ␗I-16 Chung 28 · ␗I-16 type 5 · ␗I-16 type 10 · ␗I-16 type 17 · ␗La-11 · ␗La-9

China premium aircraft
Fighters  ␗A6M2 · D.510C · H-81A-2 · Hawk III · ␗Ki-45 hei/tei · ␗Ki-84 ko
Jet fighters  Shenyang F-5 · J-7D
Strike aircraft  A-5C · ␗F-84G-31-RE