Difference between pages "F-86A-5" and "ST-A2"
(Added basic information and tables.) |
(→Main armament) |
||
| Line 1: | Line 1: | ||
| − | {{Specs-Card|code= | + | {{Specs-Card|code=jp_st_a2}} |
| − | + | {{About | |
| + | | about = Japanese medium tank '''{{PAGENAME}}''' | ||
| + | | usage = other variants | ||
| + | | link = Type 61 (Family) | ||
| + | }} | ||
== Description == | == Description == | ||
| − | <!--''In the description, the first part | + | <!-- ''In the description, the first part should be about the history of the creation and combat usage of the vehicle, as well as its key features. In the second part, tell the reader about the ground vehicle in the game. Insert a screenshot of the vehicle, so that if the novice player does not remember the vehicle by name, he will immediately understand what kind of vehicle the article is talking about.'' --> |
| − | |||
[[File:GarageImage_{{PAGENAME}}.jpg|420px|thumb|left]] | [[File:GarageImage_{{PAGENAME}}.jpg|420px|thumb|left]] | ||
{{break}} | {{break}} | ||
| − | The ''' | + | The '''{{Specs|name}}''' is a Rank {{Specs|rank}} Japanese medium tank {{Battle-rating}}. It was introduced along with the initial Japanese Ground Forces tree in [[Update 1.65 "Way of the Samurai"]]. |
| + | |||
| + | It is a sidegrade to [[ST-A1]], which takes sniping duty as its main work while neglecting most of the other roles. One can literally treat them as the same tank, but they have some minor quality of life differences, which will be mentioned here. | ||
| − | |||
== General info == | == General info == | ||
| − | === | + | === Survivability and armour === |
| − | <!--'' | + | <!--Describe armour protection. Note the most well protected and key weak areas. Appreciate the layout of modules as well as the number and location of crew members. Is the level of armour protection sufficient, is the placement of modules helpful for survival in combat? |
| + | |||
| + | If necessary use a visual template to indicate the most secure and weak zones of the armour.--> | ||
| + | |||
| + | Armour on ST-A2 is about the same as ST-A1, but there are some differences to its weaknesses. | ||
| + | |||
| + | For instance, the hull is now raised to engine deck level and slope goes all the way up the turret, resulting in turret being well above engine deck. The frontal armour is even more angled now, with effective thickness of about 90-100 mm, but it now also connected to engine deck, and in connection spot it's about 80 mm effective thickness like before. Most of tanks can still penetrate entire armour with no issues, so overall on tank's own BR it changes only rear gun depression and ability of certain tanks to just explode the tank with HE when it's hulldown. | ||
| + | |||
| + | Since hull is raised higher, there is less chances that enemy APHE will hit driver optics on accident or will be stopped by transmission and won't destroy the tank. Also, '''gunner's head''' is now above gun breech, so random shrapnel has a chance of hitting him, if enemy shell explodes above it, resulting in complete crew knockout, unlike with ST-A1. | ||
| + | |||
| + | For the turret, the commander cupolas was raised a bit and the pintle-mounted machine gun was removed. Overall it makes it harder to destroy tank with HE, but nothing more. However, the turret neck is no longer a weak spot for SPAA to exploit, but tank can still be destroyed by SPAA firing at MG port because their shells still cause spalling or explode and hit ammo rack despite it being rotated away from the weakspot. Still, it will definitely take them longer to deal with the tank that way. | ||
| + | |||
| + | Ammo rack in back of the turret is now facing turret and is much narrower a target, so the gun breech shields it entirely. Because of that, as long as the ST-A2 fires off first two rounds in first-stage rack, the chances of tank exploding due to ammo rack being hit through the turret is reduced. It came at a price, though, as it is now even easier to shoot the tank from the side or back. The block outside of turret's back isn't even modeled, so if HESH hits back of the turret, it's going to explode the entire tank. | ||
| + | |||
| + | === Mobility === | ||
| + | <!-- ''Write about the mobility of the ground vehicle. Estimate the specific power and manoeuvrability, as well as the maximum speed forwards and backwards.'' --> | ||
| + | |||
| + | {{tankMobility|abMinHp= 775|rbMinHp= 442}} | ||
| + | |||
| + | The mobility of the {{PAGENAME}} is the same as predecessor, as well as their effective off-road and top speed - about (AB/RB) 40/33 km/h forward and -18/-15 km/h backwards off-road, with top speed being 50/45 forward and -20/-17 backwards . | ||
| + | |||
| + | == Armaments == | ||
| + | === Main armament === | ||
| + | <!--Give the reader information about the characteristics of the main gun. Assess its effectiveness in a battle based on the reloading speed, ballistics and the power of shells. Do not forget about the flexibility of the fire, that is how quickly the cannon can be aimed at the target, open fire on it and aim at another enemy. Add a link to the main article on the gun: <code><nowiki>{{main|Name of the weapon}}</nowiki></code>. Describe in general terms the ammunition available for the main gun. Give advice on how to use them and how to fill the ammunition storage.--> | ||
| + | {{main|M3A1 (90 mm)}} | ||
| + | |||
| + | The gun and the ammunition themselves are the same as the ones on ST-A1. | ||
| + | |||
| + | As with ST-A1, one must unlock APHE as the very first module and then try to get aim adjustment as soon as possible, leveling it same way as the predecessor, as otherwise it is very hard to defeat opposing tanks and earn research points on this tank. | ||
| + | |||
| + | Due to turret being elevated above engine deck, the gun can now depress enough to fire at tanks behind it, no matter how low their profile is, as long as they stay on even ground. | ||
| + | |||
{| class="wikitable" style="text-align:center" | {| class="wikitable" style="text-align:center" | ||
|- | |- | ||
| − | ! colspan=" | + | ! colspan="6" | [[M3A1 (90 mm)|90 mm M3A1]] |
| + | |- | ||
| + | ! colspan="3" rowspan="1" style="width:5em" |Capacity | ||
| + | ! rowspan="1" | Vertical <br> guidance | ||
| + | ! rowspan="1" | Horizontal <br> guidance | ||
| + | ! rowspan="1" | Stabilizer | ||
| + | |- | ||
| + | | colspan="3" | 40 || -10°/+13° || ±180° || N/A | ||
|- | |- | ||
| − | ! colspan=" | + | ! colspan="6" | Turret rotation speed (°/s) |
|- | |- | ||
| − | ! | + | ! style="width:4em" |Mode |
| − | ! | + | ! style="width:4em" |Stock |
| − | ! | + | ! style="width:4em" |Upgraded |
| − | ! | + | ! style="width:4em" |Prior + Full crew |
| − | ! | + | ! style="width:4em" |Prior + Expert qualif. |
| + | ! style="width:4em" |Prior + Ace qualif. | ||
|- | |- | ||
| − | + | | ''Arcade'' || 22.85 || 31.62 || 38.40 || 42.47 || 45.18 | |
| − | |||
| − | |||
| − | |||
| − | |||
| − | |||
|- | |- | ||
| − | | | + | | ''Realistic'' || 14.28 || 16.8 || 20.40 || 22.56 || 24.0 |
|- | |- | ||
| − | ! colspan=" | + | ! colspan="4" | Reloading rate (seconds) |
|- | |- | ||
| − | ! colspan=" | + | ! colspan="1" style="width:4em" |Stock |
| − | ! | + | ! colspan="1" style="width:4em" |Prior + Full crew |
| − | ! colspan=" | + | ! colspan="1" style="width:4em" |Prior + Expert qualif. |
| − | ! colspan=" | + | ! colspan="1" style="width:4em" |Prior + Ace qualif. |
| − | |||
|- | |- | ||
| − | + | | 9.75 || 8.63 || 7.95 || 7.5 | |
| − | |||
| − | |||
| − | |||
| − | |||
| − | |||
|- | |- | ||
| − | |||
|} | |} | ||
| − | ==== | + | |
| − | {| class="wikitable" style="text-align:center" | + | ===== Ammunition ===== |
| + | {| class="wikitable sortable" style="text-align:center" width="100%" | ||
| + | ! colspan="8" | Penetration statistics | ||
|- | |- | ||
| − | ! colspan=" | + | ! rowspan="2" data-sort-type="text" | Ammunition |
| + | ! rowspan="2" class="unsortable" | Type of <br /> warhead | ||
| + | ! colspan="6" | '''Penetration''' '''''in mm''''' '''@ 0°''' | ||
|- | |- | ||
| − | ! | + | ! 10m |
| − | ! | + | ! 100m |
| − | ! | + | ! 500m |
| − | ! | + | ! 1000m |
| − | ! | + | ! 1500m |
| + | ! 2000m | ||
|- | |- | ||
| − | | | + | | M318 shot || AP ||174||171||159||149||133||122 |
|- | |- | ||
| − | | | + | | M71 shell || HE || 13 || 13 || 13 || 13 || 13 || 13 |
| − | + | |- | |
| − | + | | M82 shot || APCBC ||182||180|| 168 || 153 || 140 || 128 | |
|- | |- | ||
| − | + | | M304 shot || APCR || 264 || 260 || 245 || 226 || 210 || 191 | |
|- | |- | ||
| − | + | | M332 shot || APCR || 271 || 270 || 245 || 217 || 192 || 170 | |
| − | |||
| − | |||
| − | |||
|- | |- | ||
| − | + | | M348 shell || HEATFS || 305 || 305 || 305 || 305 || 305 || 305 | |
| − | |||
|- | |- | ||
| − | | | + | |} |
| + | {| class="wikitable sortable" style="text-align:center" width="100%" | ||
| + | ! colspan="11" | Shell details | ||
|- | |- | ||
| − | | | + | ! rowspan="2" data-sort-type="text" | Ammunition |
| − | + | ! rowspan="2" class="unsortable" | Type of <br /> warhead | |
| − | + | ! rowspan="2" |Velocity <br /> in m/s | |
| + | ! rowspan="2" |Projectile<br />Mass in kg | ||
| + | ! rowspan="2" | ''Fuse delay'' | ||
| + | ''in m:'' | ||
| + | ! rowspan="2" | ''Fuse sensitivity'' | ||
| + | ''in mm:'' | ||
| + | ! rowspan="2" | ''Explosive Mass in g<br /> (TNT equivalent):'' | ||
| + | ! rowspan="2" | ''Normalization At 30° <br> from horizontal:'' | ||
| + | ! colspan="3" | ''Ricochet:'' | ||
|- | |- | ||
| − | ! | + | ! 0% |
| + | ! 50% | ||
| + | ! 100% | ||
|- | |- | ||
| − | + | | M318 shot || AP || 853 || 11 || N/A || N/A || N/A || +4° ||47°|| 60° || 65° | |
| − | |||
| − | |||
| − | |||
|- | |- | ||
| − | | | + | | M71 shell || HE || 823 || 11 || 0.1 || 0.5 || 925 || +0° || 79° || 80° || 81° |
| + | |- | ||
| + | | M82 shot || APCBC || 853 || 11 || 1.2 || 14 || 137.2 || +4° || 48° || 63° || 71° | ||
|- | |- | ||
| − | | | + | | M304 shot || APCR || 1021 || 7.6 || N/A || N/A || N/A || +1.5° || 66° || 70° || 72° |
| − | |||
| − | |||
|- | |- | ||
| − | + | | M332 shot || APCR || 1178 || 5.6 || N/A || N/A || N/A || +1.5° || 66° || 70° || 72° | |
|- | |- | ||
| − | + | | M348 shell || HEATFS || 853 || 6.5 || 0.0 || 0.1 || 926.17 || +0° || 65° || 72° || 75° | |
|- | |- | ||
| − | + | |} | |
| − | + | {| class="wikitable sortable" style="text-align:center" | |
| − | ! | + | ! colspan="7" | Smoke characteristic |
|- | |- | ||
| − | + | ! Ammunition | |
| + | ! Velocity <br /> in m/s | ||
| + | ! Projectile<br />Mass in kg | ||
| + | ! ''Screen radius <br /> in m'' | ||
| + | ! ''Screen time <br /> in s'' | ||
| + | ! ''Screen hold time <br /> in s:'' | ||
| + | ! ''Explosive Mass in g<br /> (TNT equivalent):'' | ||
|- | |- | ||
| − | + | | M313 || 821 || 11 || 13 || 5 || 20 || 50 | |
|- | |- | ||
| − | ! | + | |} |
| − | + | ||
| − | ! | + | =====Optics===== |
| + | <!-- | ||
| + | ''Explain how the optic's status can affect the tank's gameplay in any unique or meaningful way. A comparison to rival tanks of the rank is welcome.'' | ||
| + | |||
| + | ''If you are having problems with it, refer to the [[Optics|optics gallery]] page for examples.''--> | ||
| + | |||
| + | {| class="wikitable" style="text-align:center" width="50%" | ||
| + | ! colspan="3" | {{PAGENAME}} [[Optics]] | ||
|- | |- | ||
| − | + | ! Which ones | |
| + | ! Default magnification | ||
| + | ! Maximum magnification | ||
|- | |- | ||
| − | ! | + | ! Main Gun optics |
| + | | x8 || x16 <!--Sometimes the actual value may not be known and here it should be referenced if the optic values are an estimate such as with an "X8.3 (estimated)" notation or something else that way the user will then be able to look to the comparable optics section and see a referenced optic which will have actual in-game data to back up the claim.--> | ||
|- | |- | ||
| − | ! | + | ! Comparable optics |
| − | + | | colspan="2;" style="text-align:center;" | [[JPz 4-5]] | |
| − | |||
|- | |- | ||
| − | |||
| − | |||
|} | |} | ||
| − | === | + | ST-A2 optics are identical to ST-A1. As usual, the user should exploit the superior magnification to target out enemy weaknesses or to snipe unsuspecting opponents from afar. |
| − | <!-- | + | |
| − | + | === Machine guns === | |
| − | + | <!--Offensive and anti-aircraft machine guns not only allow you to fight some aircraft, but also are effective against lightly armoured vehicles. Evaluate machine guns and give recommendations on its use.--> | |
| − | + | {{main|M1919A4 (7.62 mm)}} | |
| − | + | ||
| + | The 12.7 mm M2HB machine gun was removed, so ST-A2 only has [[M1919A4 (7.62 mm)|7.62 mm M1919A4]] in its turret. It still can be used to damage open-top SPG, but fighting light tanks with it is not possible. Planes are also harder to engage with it. | ||
| + | |||
| + | On other hand, its trajectory is similiar to APHE shell up to 760 m, so you can use it to check your aim in RB, if necessary, which further confirms sniper specialization of ST-A2. | ||
| + | |||
| + | {| class="wikitable" | ||
| + | ! colspan="7" |[[M1919A4 (7.62 mm)|7.62 mm M1919A4]] | ||
| + | |- | ||
| + | ! colspan="7" |''Coaxial mount'' | ||
| + | |- | ||
| + | ! colspan="4" rowspan="1" |Capacity (Belt capacity) | ||
| + | ! rowspan="1" |Fire rate | ||
| + | |||
| + | (shots/minute) | ||
| + | ! rowspan="1" |Vertical | ||
| + | |||
| + | guidance | ||
| + | ! rowspan="1" |Horizontal | ||
| − | + | guidance | |
| − | + | |- | |
| − | + | | colspan="4" |4,500 (250) | |
| − | + | |500 | |
| + | |N/A | ||
| + | |N/A | ||
| + | |} | ||
| − | + | == Usage in battles == | |
| + | <!--Describe the tactics of playing in the vehicle, the features of using vehicles in the team and advice on tactics. Refrain from creating a "guide" - do not impose a single point of view but instead give the reader food for thought. Describe the most dangerous enemies and give recommendations on fighting them. If necessary, note the specifics of the game in different modes (AB, RB, SB).--> | ||
| − | + | As the ST-A is Japan's first tank project for a new era of tank development, it shows the same gameplay issues as the [[Chi-Ha]]. The weak armor, the slow to mediocre turret rotation speed, quite a long hull and high drop-rate of shells. | |
| − | + | But its not just all negatives, the mobility is good for what it is, has adequate gun depression and the ST-A even comes with HEAT like the [[Chi-Ha]], this time in the form of M348 HEAT-FS researchable as tier IV modification. | |
| − | |||
| − | |||
| − | + | Other than the similarities to the [[Chi-Ha]], the ST-A2 has its own factors good and bad which should be kept in mind when playing. From the very good reverse speed, great zoom factor and many shell options, the ST-A2 also has an angled front plate unlike the [[ST-A1]], which does place the turret higher, allowing it to shoot over the engine, at the cost of having a higher profile. Also unlike the [[ST-A1]], the .50 has been removed from the ST-A2 which will make it harder to deal with lighter vehicles and planes. | |
| + | ===Gameplay=== | ||
| − | + | The plan is simple and similar to the [[Chi-Ha]] & other early Japanese medium tanks, you want to stay either near or behind your allies and not rush forward, you can't take much damage, but you can deliver a punch. Pre-aim the turret and guide the enemy tanks into the sights as the rotation speed isn't of the fastest. | |
| − | |||
| − | |||
| − | |||
| − | |||
| − | |||
| − | |||
| − | |||
| − | |||
| − | |||
| − | |||
| − | The | + | The further you are from your enemy the better for the inadequate armor, The ST-A comes with an amazing zoom factor and allows for clear sniping, but do keep in mind the shell drop-off are rather high. |
| − | + | Before you have your hands on the HEAT-FS, the safest bet is to exploit the flanks of the enemy, especially when starting with only AP, frontal penetrations won't happen reliable with the tanks the ST-A faces, try aiming for ammo racks, put a solid round into cramped crew members while trying to get the M82 shot and back up into cover or behind corners as the crew reloads the shell. | |
| − | + | After unlocking the M82 APHE, placing shots is less important, once it penetrates, it's most likely to blow up good. It will come at the cost of the extra penetration, but when aiming for the sides, extra penetration isn't required. It's still a good idea to bring some AP shells with the tank just in-case you have to fight in a frontal engagement and the APHE fails to penetrate. | |
| + | With the HEAT-FS finally unlocked, you can fully make use of the punches you can deal and the zoom you have, help your allies out with the toughest of enemies and simply frontally penetrate them. | ||
===Modules=== | ===Modules=== | ||
{| class="wikitable" | {| class="wikitable" | ||
| − | ! | + | !Tier |
| − | !colspan = "2"| | + | ! colspan="2" |Mobility |
| − | ! | + | !Protection |
| − | !colspan = " | + | ! colspan="3" |Firepower |
|- | |- | ||
| − | | I | + | |I |
| − | | | + | |Tracks|| |
| − | | | + | |Parts |
| − | | | + | |M82 shot |
| − | | | + | |Horizontal Drive |
| − | | | + | | |
|- | |- | ||
| − | | II | + | |II |
| − | | | + | |Suspension||Brake System |
| − | | | + | |FPE |
| − | | | + | |M304 shot |
| − | | | + | |Adjustment of Fire |
| − | | | + | | |
|- | |- | ||
| − | | III | + | |III |
| − | | | + | |Filters|| |
| − | | | + | |Crew Replenishment |
| − | | | + | |M332 shot |
| − | | | + | |Elevation Mechanism |
| − | | | + | | |
|- | |- | ||
| − | | IV | + | |IV |
| − | | | + | |Transmission||Engine |
| − | | | + | | |
| − | | | + | |M348 shell |
| − | | | + | |Artillery Support |
| − | | | + | |M313 |
|- | |- | ||
|} | |} | ||
| − | |||
=== Pros and cons === | === Pros and cons === | ||
| − | <!-- | + | <!--Summarize and briefly evaluate the vehicle in terms of its characteristics and combat effectiveness. Mark its pros and cons in a bulleted list. Try not to use more than 6 points for each of the characteristics. Avoid using categorical definitions such as "bad", "good" and the like - they can be substituted with softer forms such as "inadequate" and "effective".--> |
'''Pros:''' | '''Pros:''' | ||
| − | + | ||
| − | + | *Overall better sniper qualities than ST-A1 (but they only really matter in RB) | |
| − | * | + | *Can defend itself against other tanks in case of a rear flank, unlike ST-A1 |
| − | * | + | *Harder to hit ammo rack in turret from the front, and overall better protection against autocannons, HEAT and pure AP in turret |
| − | * | + | *Harder to be destroyed by HE shot to the turret, can technically tank some attacker's plane assault with its front |
| − | * | + | *Harder to destroy by poorly aimed shot in down-tier |
| − | * | ||
'''Cons:''' | '''Cons:''' | ||
| − | + | ||
| − | * | + | *Worse against light tanks than predecessor due to lack of 12.7 mm MG |
| − | * | + | *Still can be destroyed in one shot by nearly anything on battlefield via crew knockout, as long as they have APHE or HESH |
| − | * | + | *Raised turret still cannot use certain hull down spots, but raises tank's profile |
| − | * | + | *Hull weak spot is even more relevant now |
== History == | == History == | ||
| − | + | ''Describe the history of the creation and combat usage of the ground vehicle in more detail than in the introduction. If the historical reference turns out to be too big, take it to a separate article, taking a link to the article about the vehicle and adding a block "/ History" (example: <nowiki>https://wiki.warthunder.com/(Vehicle-name)/History</nowiki>) and add a link to it here using the <code>main</code> template. Be sure to reference text and sources by using <code><nowiki><ref></nowiki></code>, as well as adding them at the end of the article. This section may also include the vehicle's devblog entry (if applicable) and the ingame encyclopedia description (under <code><nowiki>=== Encyclopedia Info ===</nowiki></code>, also if applicable).'' | |
| − | |||
| − | + | == Media == | |
| + | ''Excellent additions to the article would be video guides, screenshots from the game, and photos.'' | ||
| − | + | == See also == | |
| + | ''Links to the articles on the War Thunder Wiki that you think will be useful for the reader, for example:'' | ||
| − | + | * ''reference to the series of the vehicles;'' | |
| − | |||
| − | |||
| − | |||
| − | |||
| − | * ''reference to the series of the | ||
* ''links to approximate analogues of other nations and research trees.'' | * ''links to approximate analogues of other nations and research trees.'' | ||
| − | |||
| − | == | + | == External links == |
''Paste links to sources and external resources, such as:'' | ''Paste links to sources and external resources, such as:'' | ||
| + | |||
* ''topic on the official game forum;'' | * ''topic on the official game forum;'' | ||
| − | * ''page on | + | * ''encyclopedia page on the tank;'' |
* ''other literature.'' | * ''other literature.'' | ||
| − | {{ | + | {{Japan medium tanks}} |
Revision as of 00:15, 4 June 2020
Contents
| This page is about the Japanese medium tank ST-A2. For other variants, see Type 61 (Family). |
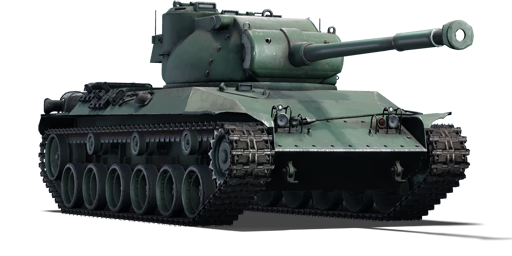
Description

The ST-A2 is a Rank IV Japanese medium tank
with a battle rating of 6.3 (AB/RB/SB). It was introduced along with the initial Japanese Ground Forces tree in Update 1.65 "Way of the Samurai".
It is a sidegrade to ST-A1, which takes sniping duty as its main work while neglecting most of the other roles. One can literally treat them as the same tank, but they have some minor quality of life differences, which will be mentioned here.
General info
Survivability and armour
Armour on ST-A2 is about the same as ST-A1, but there are some differences to its weaknesses.
For instance, the hull is now raised to engine deck level and slope goes all the way up the turret, resulting in turret being well above engine deck. The frontal armour is even more angled now, with effective thickness of about 90-100 mm, but it now also connected to engine deck, and in connection spot it's about 80 mm effective thickness like before. Most of tanks can still penetrate entire armour with no issues, so overall on tank's own BR it changes only rear gun depression and ability of certain tanks to just explode the tank with HE when it's hulldown.
Since hull is raised higher, there is less chances that enemy APHE will hit driver optics on accident or will be stopped by transmission and won't destroy the tank. Also, gunner's head is now above gun breech, so random shrapnel has a chance of hitting him, if enemy shell explodes above it, resulting in complete crew knockout, unlike with ST-A1.
For the turret, the commander cupolas was raised a bit and the pintle-mounted machine gun was removed. Overall it makes it harder to destroy tank with HE, but nothing more. However, the turret neck is no longer a weak spot for SPAA to exploit, but tank can still be destroyed by SPAA firing at MG port because their shells still cause spalling or explode and hit ammo rack despite it being rotated away from the weakspot. Still, it will definitely take them longer to deal with the tank that way.
Ammo rack in back of the turret is now facing turret and is much narrower a target, so the gun breech shields it entirely. Because of that, as long as the ST-A2 fires off first two rounds in first-stage rack, the chances of tank exploding due to ammo rack being hit through the turret is reduced. It came at a price, though, as it is now even easier to shoot the tank from the side or back. The block outside of turret's back isn't even modeled, so if HESH hits back of the turret, it's going to explode the entire tank.
Mobility
| Game Mode | Max Speed (km/h) | Weight (tons) | Engine power (horsepower) | Power-to-weight ratio (hp/ton) | |||
|---|---|---|---|---|---|---|---|
| Forward | Reverse | Stock | Upgraded | Stock | Upgraded | ||
| Arcade | 50 | 20 | 34.2 | 775 | 954 | 22.66 | 27.89 |
| Realistic | 45 | 18 | 442 | 500 | 12.92 | 14.62 | |
The mobility of the ST-A2 is the same as predecessor, as well as their effective off-road and top speed - about (AB/RB) 40/33 km/h forward and -18/-15 km/h backwards off-road, with top speed being 50/45 forward and -20/-17 backwards .
Armaments
Main armament
The gun and the ammunition themselves are the same as the ones on ST-A1.
As with ST-A1, one must unlock APHE as the very first module and then try to get aim adjustment as soon as possible, leveling it same way as the predecessor, as otherwise it is very hard to defeat opposing tanks and earn research points on this tank.
Due to turret being elevated above engine deck, the gun can now depress enough to fire at tanks behind it, no matter how low their profile is, as long as they stay on even ground.
| 90 mm M3A1 | |||||
|---|---|---|---|---|---|
| Capacity | Vertical guidance |
Horizontal guidance |
Stabilizer | ||
| 40 | -10°/+13° | ±180° | N/A | ||
| Turret rotation speed (°/s) | |||||
| Mode | Stock | Upgraded | Prior + Full crew | Prior + Expert qualif. | Prior + Ace qualif. |
| Arcade | 22.85 | 31.62 | 38.40 | 42.47 | 45.18 |
| Realistic | 14.28 | 16.8 | 20.40 | 22.56 | 24.0 |
| Reloading rate (seconds) | |||||
| Stock | Prior + Full crew | Prior + Expert qualif. | Prior + Ace qualif. | ||
| 9.75 | 8.63 | 7.95 | 7.5 | ||
Ammunition
| Penetration statistics | |||||||
|---|---|---|---|---|---|---|---|
| Ammunition | Type of warhead |
Penetration in mm @ 0° | |||||
| 10m | 100m | 500m | 1000m | 1500m | 2000m | ||
| M318 shot | AP | 174 | 171 | 159 | 149 | 133 | 122 |
| M71 shell | HE | 13 | 13 | 13 | 13 | 13 | 13 |
| M82 shot | APCBC | 182 | 180 | 168 | 153 | 140 | 128 |
| M304 shot | APCR | 264 | 260 | 245 | 226 | 210 | 191 |
| M332 shot | APCR | 271 | 270 | 245 | 217 | 192 | 170 |
| M348 shell | HEATFS | 305 | 305 | 305 | 305 | 305 | 305 |
| Shell details | ||||||||||
|---|---|---|---|---|---|---|---|---|---|---|
| Ammunition | Type of warhead |
Velocity in m/s |
Projectile Mass in kg |
Fuse delay
in m: |
Fuse sensitivity
in mm: |
Explosive Mass in g (TNT equivalent): |
Normalization At 30° from horizontal: |
Ricochet: | ||
| 0% | 50% | 100% | ||||||||
| M318 shot | AP | 853 | 11 | N/A | N/A | N/A | +4° | 47° | 60° | 65° |
| M71 shell | HE | 823 | 11 | 0.1 | 0.5 | 925 | +0° | 79° | 80° | 81° |
| M82 shot | APCBC | 853 | 11 | 1.2 | 14 | 137.2 | +4° | 48° | 63° | 71° |
| M304 shot | APCR | 1021 | 7.6 | N/A | N/A | N/A | +1.5° | 66° | 70° | 72° |
| M332 shot | APCR | 1178 | 5.6 | N/A | N/A | N/A | +1.5° | 66° | 70° | 72° |
| M348 shell | HEATFS | 853 | 6.5 | 0.0 | 0.1 | 926.17 | +0° | 65° | 72° | 75° |
| Smoke characteristic | ||||||
|---|---|---|---|---|---|---|
| Ammunition | Velocity in m/s |
Projectile Mass in kg |
Screen radius in m |
Screen time in s |
Screen hold time in s: |
Explosive Mass in g (TNT equivalent): |
| M313 | 821 | 11 | 13 | 5 | 20 | 50 |
Optics
| ST-A2 Optics | ||
|---|---|---|
| Which ones | Default magnification | Maximum magnification |
| Main Gun optics | x8 | x16 |
| Comparable optics | JPz 4-5 | |
ST-A2 optics are identical to ST-A1. As usual, the user should exploit the superior magnification to target out enemy weaknesses or to snipe unsuspecting opponents from afar.
Machine guns
The 12.7 mm M2HB machine gun was removed, so ST-A2 only has 7.62 mm M1919A4 in its turret. It still can be used to damage open-top SPG, but fighting light tanks with it is not possible. Planes are also harder to engage with it.
On other hand, its trajectory is similiar to APHE shell up to 760 m, so you can use it to check your aim in RB, if necessary, which further confirms sniper specialization of ST-A2.
| 7.62 mm M1919A4 | ||||||
|---|---|---|---|---|---|---|
| Coaxial mount | ||||||
| Capacity (Belt capacity) | Fire rate
(shots/minute) |
Vertical
guidance |
Horizontal
guidance | |||
| 4,500 (250) | 500 | N/A | N/A | |||
Usage in battles
As the ST-A is Japan's first tank project for a new era of tank development, it shows the same gameplay issues as the Chi-Ha. The weak armor, the slow to mediocre turret rotation speed, quite a long hull and high drop-rate of shells.
But its not just all negatives, the mobility is good for what it is, has adequate gun depression and the ST-A even comes with HEAT like the Chi-Ha, this time in the form of M348 HEAT-FS researchable as tier IV modification.
Other than the similarities to the Chi-Ha, the ST-A2 has its own factors good and bad which should be kept in mind when playing. From the very good reverse speed, great zoom factor and many shell options, the ST-A2 also has an angled front plate unlike the ST-A1, which does place the turret higher, allowing it to shoot over the engine, at the cost of having a higher profile. Also unlike the ST-A1, the .50 has been removed from the ST-A2 which will make it harder to deal with lighter vehicles and planes.
Gameplay
The plan is simple and similar to the Chi-Ha & other early Japanese medium tanks, you want to stay either near or behind your allies and not rush forward, you can't take much damage, but you can deliver a punch. Pre-aim the turret and guide the enemy tanks into the sights as the rotation speed isn't of the fastest.
The further you are from your enemy the better for the inadequate armor, The ST-A comes with an amazing zoom factor and allows for clear sniping, but do keep in mind the shell drop-off are rather high.
Before you have your hands on the HEAT-FS, the safest bet is to exploit the flanks of the enemy, especially when starting with only AP, frontal penetrations won't happen reliable with the tanks the ST-A faces, try aiming for ammo racks, put a solid round into cramped crew members while trying to get the M82 shot and back up into cover or behind corners as the crew reloads the shell.
After unlocking the M82 APHE, placing shots is less important, once it penetrates, it's most likely to blow up good. It will come at the cost of the extra penetration, but when aiming for the sides, extra penetration isn't required. It's still a good idea to bring some AP shells with the tank just in-case you have to fight in a frontal engagement and the APHE fails to penetrate.
With the HEAT-FS finally unlocked, you can fully make use of the punches you can deal and the zoom you have, help your allies out with the toughest of enemies and simply frontally penetrate them.
Modules
| Tier | Mobility | Protection | Firepower | |||
|---|---|---|---|---|---|---|
| I | Tracks | Parts | M82 shot | Horizontal Drive | ||
| II | Suspension | Brake System | FPE | M304 shot | Adjustment of Fire | |
| III | Filters | Crew Replenishment | M332 shot | Elevation Mechanism | ||
| IV | Transmission | Engine | M348 shell | Artillery Support | M313 | |
Pros and cons
Pros:
- Overall better sniper qualities than ST-A1 (but they only really matter in RB)
- Can defend itself against other tanks in case of a rear flank, unlike ST-A1
- Harder to hit ammo rack in turret from the front, and overall better protection against autocannons, HEAT and pure AP in turret
- Harder to be destroyed by HE shot to the turret, can technically tank some attacker's plane assault with its front
- Harder to destroy by poorly aimed shot in down-tier
Cons:
- Worse against light tanks than predecessor due to lack of 12.7 mm MG
- Still can be destroyed in one shot by nearly anything on battlefield via crew knockout, as long as they have APHE or HESH
- Raised turret still cannot use certain hull down spots, but raises tank's profile
- Hull weak spot is even more relevant now
History
Describe the history of the creation and combat usage of the ground vehicle in more detail than in the introduction. If the historical reference turns out to be too big, take it to a separate article, taking a link to the article about the vehicle and adding a block "/ History" (example: https://wiki.warthunder.com/(Vehicle-name)/History) and add a link to it here using the main template. Be sure to reference text and sources by using <ref>, as well as adding them at the end of the article. This section may also include the vehicle's devblog entry (if applicable) and the ingame encyclopedia description (under === Encyclopedia Info ===, also if applicable).
Media
Excellent additions to the article would be video guides, screenshots from the game, and photos.
See also
Links to the articles on the War Thunder Wiki that you think will be useful for the reader, for example:
- reference to the series of the vehicles;
- links to approximate analogues of other nations and research trees.
External links
Paste links to sources and external resources, such as:
- topic on the official game forum;
- encyclopedia page on the tank;
- other literature.
| Japan medium tanks | |
|---|---|
| Type 97 | Chi-Ha · Chi-Ha Kai · Chi-Ha Kai TD · Chi-Ha Short Gun |
| Type 1 | Chi-He · Chi-He (5th Regiment) · Ho-I |
| Type 3 | Chi-Nu · Chi-Nu II |
| Type 4 | Chi-To · Chi-To Late |
| Type 5 | Chi-Ri II |
| Type 61 MBT | ST-A1* · ST-A2* · ST-A3* · Type 61 |
| Type 74 MBT | ST-B2* · Type 74 (C) · Type 74 (E) · Type 74 (F) · Type 74 (G) |
| Type 90 MBT | Type 90 · Type 90 (B) · Type 90B "Fuji" |
| Type 10 MBT | TKX (P)* · TKX* · Type 10 |
| Other | Ka-Chi |
| USA | ▅M4A3 (76) W · ▅M47 |
| *Prototype | |
