Difference between revisions of "Class 3 (P)"
(→Description) |
m (→Ammo racks) (Tag: Visual edit) |
||
| (32 intermediate revisions by 11 users not shown) | |||
| Line 1: | Line 1: | ||
{{Specs-Card | {{Specs-Card | ||
|code=germ_th_800_bismark | |code=germ_th_800_bismark | ||
| − | |images={{Specs-Card-Image|GarageImage_{{PAGENAME}}.jpg | + | |images={{Specs-Card-Image|GarageImage_{{PAGENAME}}.jpg}} |
| − | |||
}} | }} | ||
== Description == | == Description == | ||
<!-- ''In the description, the first part should be about the history of the creation and combat usage of the vehicle, as well as its key features. In the second part, tell the reader about the ground vehicle in the game. Insert a screenshot of the vehicle, so that if the novice player does not remember the vehicle by name, he will immediately understand what kind of vehicle the article is talking about.'' --> | <!-- ''In the description, the first part should be about the history of the creation and combat usage of the vehicle, as well as its key features. In the second part, tell the reader about the ground vehicle in the game. Insert a screenshot of the vehicle, so that if the novice player does not remember the vehicle by name, he will immediately understand what kind of vehicle the article is talking about.'' --> | ||
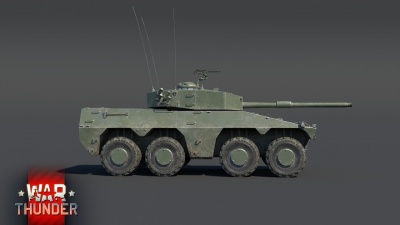
| − | The '''{{Specs| | + | The '''{{Specs|name}}''' is a gift rank {{Specs|rank}} German tank destroyer {{Battle-rating}}. It was introduced during [[Update "Hot Tracks"]] as a reward for the [[wt:en/news/6981-special-operation-w-i-n-t-e-r-en|2020 Operation W.I.N.T.E.R.]] event. |
| − | |||
| − | |||
== General info == | == General info == | ||
| Line 16: | Line 13: | ||
<!-- ''Describe armour protection. Note the most well protected and key weak areas. Appreciate the layout of modules as well as the number and location of crew members. Is the level of armour protection sufficient, is the placement of modules helpful for survival in combat? If necessary use a visual template to indicate the most secure and weak zones of the armour.'' --> | <!-- ''Describe armour protection. Note the most well protected and key weak areas. Appreciate the layout of modules as well as the number and location of crew members. Is the level of armour protection sufficient, is the placement of modules helpful for survival in combat? If necessary use a visual template to indicate the most secure and weak zones of the armour.'' --> | ||
[[File:Class 3 inner spall shields.png|thumb|350x350px|As seen here, the frontal plate has double spall shields divided by a 200 mm air spacing.]] | [[File:Class 3 inner spall shields.png|thumb|350x350px|As seen here, the frontal plate has double spall shields divided by a 200 mm air spacing.]] | ||
| − | [[File:Class 3 inner | + | [[File:Class 3 inner turrer spall shields.png|thumb|As seen here, the turret mantlet, front and sides all have double spall shields separated by an 80 mm air spacing]] |
| − | Due to the massive size of the Class 3, it is able to withstand high calibre | + | Due to the massive size of the Class 3, it is able to withstand high calibre ammunitions due to the poor armour as it will not create enough spalling when penetrated. The crew spacing as well as the interior spacing makes it one of the hardest wheeled vehicles to destroy in the game with only kinetic energy (KE) penetrators (APDS, APFSDS, etc etc). Centre of mass shots from the front with KE shells will often take the driver and set the engine on fire, but due to the turret crew being elevated, they are most likely to survive, meaning the turret is operational ready to engage any enemy threats. Chemical energy (CE) penetrators are a tricky topic when it comes to the frontal armour. Depending on the ammunition used an the impact angle, the Class 3 will be able to withstand the impact or not. CE rounds are most likely to penetrate and be partially or fully stopped thanks to the inner spall shields at a perpendicular angle but will knock out the driver and disable or damage engine as well as igniting the ammo rack. This changes when ATGMs take a play in engagements, they will often create much more spalling than tank-fired HEAT rounds as the calibre is higher (meaning a greater explosive mass) and will cause hullbreak if hit from the sides or if the ATGM spall goes all the way from the front to the back while penetrating the sides. For this same reason it is recommended to only carry ~24-26 rounds in the vehicle as it will empty most of the hull ammo racks but still keep the ready racks full in the turret. The armour is not to be relied on unless there are specific enemies (T-54's for example) as most of them will always penetrate your hull. The Class 3 is immune to autocannon fire from the front and hull upper half sides and turret sides due to the spaced armour. This is an advantage compared to the rest of wheeled light armoured vehicles in which 20 mm and 30 mm autocannons often penetrate and knock out crew and inner components. |
Having spall shields bring multiple benefits against both CE and KE. | Having spall shields bring multiple benefits against both CE and KE. | ||
| Line 27: | Line 24: | ||
''Against CE:'' | ''Against CE:'' | ||
| − | When a round is fired at the centre of mass frontally, the double plate armour will not only reduce the shrapnel but it is able to fully stop it, specially if said threat has a relative low explosive mass despite the armour penetration (PG-9 for example found on the [[BMP-1 (Family)|BMP-1]]). When fired at the turret it may vary as it totally depends on the firing angle. A perpendicular hit to the turret will be lethal but an angled hit will often deviate the shrapnel which may damage or destroy modules but will keep the vehicle operational. Due to its huge height, the enemies that fire at turret will have a more angled hit, meaning that most of the shrapnel will be launched towards the roof and not to the crew compartment, this can take one or two crew members depending on the hit. | + | Any part of the vehicle is susceptible to hull break if hit in the correct way, but often players will fire at centre of mass in which hull break is almost nullified. When a round is fired at the centre of mass frontally, the double plate armour will not only reduce the shrapnel but it is able to fully stop it, specially if said threat has a relative low explosive mass despite the armour penetration (PG-9 for example found on the [[BMP-1 (Family)|BMP-1]]). When fired at the turret it may vary as it totally depends on the firing angle. A perpendicular hit to the turret will be lethal but an angled hit will often deviate the shrapnel which may damage or destroy modules but will keep the vehicle operational. Due to its huge height, the enemies that fire at turret will have a more angled hit, meaning that most of the shrapnel will be launched towards the roof and not to the crew compartment, this can take one or two crew members depending on the hit. |
'''Armour type:''' | '''Armour type:''' | ||
| Line 34: | Line 31: | ||
* High hardness rolled armour | * High hardness rolled armour | ||
| + | '''''Super structure armour''''' | ||
{| class="wikitable" | {| class="wikitable" | ||
|- | |- | ||
! Armour !! Front (Slope angle) !! Sides !! Rear !! Roof | ! Armour !! Front (Slope angle) !! Sides !! Rear !! Roof | ||
|- | |- | ||
| − | | Hull || 30 mm (76°) | + | | Hull || 30 mm glacis (76°) |
| + | 29 mm lower frontal plate (20°) | ||
| + | | 20 mm ''Top'' <br> 20 mm ''Bottom'' || 20 mm || 10 mm | ||
|- | |- | ||
| − | | Turret || 38 mm ''Turret front'' <br> 80 mm ''Gun mantlet'' || 16 mm || 20 mm || 10 mm | + | | Turret || 38 mm ''Turret front'' <br>80 mm ''Gun mantlet'' || 16 mm || 20 mm || 10 mm |
|- | |- | ||
| Cupola || 10 mm || 10 mm || 10 mm || 10 mm | | Cupola || 10 mm || 10 mm || 10 mm || 10 mm | ||
| Line 46: | Line 46: | ||
|} | |} | ||
| − | ''' | + | '''''Inner spall shields''''' |
| − | |||
| − | |||
| − | |||
| − | |||
| − | |||
{| class="wikitable" | {| class="wikitable" | ||
|- | |- | ||
| − | ! | + | ! Armour !! Front (Slope angle) !! Sides !! Rear |
|- | |- | ||
| − | | Hull || 200 mm | + | | Hull || 200 mm air |
| − | + | 38 mm second lower frontal plate (20°) | |
| − | + | | 10 mm air | |
| − | + | 30 mm upper half plate | |
| + | | 5 mm | ||
|- | |- | ||
| + | | Turret || 84 mm turret front first plate | ||
| + | 80 mm air 38 mm turret front second plate<br>80 mm ''Gun mantlet'' | ||
| + | | 30 mm turret side first plate | ||
| + | 120 mm air 16 mm turret side second plate | ||
| + | | N/A | ||
|} | |} | ||
| + | |||
| + | '''Notes:''' | ||
| + | |||
| + | * Suspension is 10 mm thick | ||
| + | * Wheels are 10 mm thick | ||
=== Mobility === | === Mobility === | ||
| Line 68: | Line 74: | ||
Despite the tremendous size and mass, the Class 3 is almost as fast as the [[Radkampfwagen 90|Radkampfwagen]]. The 8 wheels give it an almost perfect cross-country capability with exception of mud, snow and deep sand. Acceleration wise, it takes time to make the Class 3 move if on a non urban environment or at an angle due to the mass. It has traction on the 8 wheels, meaning it is able to move even if only a pairs of wheels are touching the ground. As expected, due to the length, the turn radius is huge and it requires a big surface to be abe to make a 180° turn. Besides the length and height, the Class 3 is tremendously fast for a vehicle its size, specially if it is on urban environment. It is able to reach speeds of 80 km/h even on dirt. This not only makes the Class 3 a fearful tough to crack behemoth but also a flanking and "Hit N' Run" behemoth. Thanks to the stabilizer, the Class 3 is able to fire at enemy targets while on top speed, this requires practice but a handled commander will be able to achieve so. | Despite the tremendous size and mass, the Class 3 is almost as fast as the [[Radkampfwagen 90|Radkampfwagen]]. The 8 wheels give it an almost perfect cross-country capability with exception of mud, snow and deep sand. Acceleration wise, it takes time to make the Class 3 move if on a non urban environment or at an angle due to the mass. It has traction on the 8 wheels, meaning it is able to move even if only a pairs of wheels are touching the ground. As expected, due to the length, the turn radius is huge and it requires a big surface to be abe to make a 180° turn. Besides the length and height, the Class 3 is tremendously fast for a vehicle its size, specially if it is on urban environment. It is able to reach speeds of 80 km/h even on dirt. This not only makes the Class 3 a fearful tough to crack behemoth but also a flanking and "Hit N' Run" behemoth. Thanks to the stabilizer, the Class 3 is able to fire at enemy targets while on top speed, this requires practice but a handled commander will be able to achieve so. | ||
| − | {{tankMobility|abMinHp=1, | + | {{tankMobility|abMinHp=1,116|rbMinHp=695}} |
=== Modifications and economy === | === Modifications and economy === | ||
| Line 75: | Line 81: | ||
== Armaments == | == Armaments == | ||
{{Specs-Tank-Armaments}} | {{Specs-Tank-Armaments}} | ||
| + | The Class 3 has a GT-3 105mm rifled bore main gun, it shares the same ballistics as the L7A3 the [[Leopard 1 (Family)|Leopard]] family share with the exact same ammunition. Thus, there should be no hard enough threat to kill, specially if DM33 is being used with its potent 408mm of penetration. | ||
| + | |||
=== Main armament === | === Main armament === | ||
{{Specs-Tank-Weapon|1}} | {{Specs-Tank-Weapon|1}} | ||
<!-- ''Give the reader information about the characteristics of the main gun. Assess its effectiveness in a battle based on the reloading speed, ballistics and the power of shells. Do not forget about the flexibility of the fire, that is how quickly the cannon can be aimed at the target, open fire on it and aim at another enemy. Add a link to the main article on the gun: <code><nowiki>{{main|Name of the weapon}}</nowiki></code>. Describe in general terms the ammunition available for the main gun. Give advice on how to use them and how to fill the ammunition storage.'' --> | <!-- ''Give the reader information about the characteristics of the main gun. Assess its effectiveness in a battle based on the reloading speed, ballistics and the power of shells. Do not forget about the flexibility of the fire, that is how quickly the cannon can be aimed at the target, open fire on it and aim at another enemy. Add a link to the main article on the gun: <code><nowiki>{{main|Name of the weapon}}</nowiki></code>. Describe in general terms the ammunition available for the main gun. Give advice on how to use them and how to fill the ammunition storage.'' --> | ||
{{main|GT-3 (105 mm)}} | {{main|GT-3 (105 mm)}} | ||
| − | |||
| − | |||
{| class="wikitable" style="text-align:center" width="100%" | {| class="wikitable" style="text-align:center" width="100%" | ||
| Line 91: | Line 97: | ||
|- | |- | ||
! ''Arcade'' | ! ''Arcade'' | ||
| − | | rowspan="2" | 54 || rowspan="2" | -8°/+15° || rowspan="2" | ±180° || rowspan="2" | Two-plane || | + | | rowspan="2" | 54 || rowspan="2" | -8°/+15° || rowspan="2" | ±180° || rowspan="2" | Two-plane || __._ || __._ || __._ || __._ || __._ || rowspan="2" | _.__ || rowspan="2" | _.__ || rowspan="2" | _.__ || rowspan="2" | _.__ |
|- | |- | ||
! ''Realistic'' | ! ''Realistic'' | ||
| − | | | + | | __._ || __._ || __._ || __._ || __._ |
|- | |- | ||
|} | |} | ||
==== Ammunition ==== | ==== Ammunition ==== | ||
| − | {{: | + | {| class="wikitable sortable" style="text-align:center" width="100%" |
| + | ! colspan="8" | Penetration statistics | ||
| + | |- | ||
| + | ! rowspan="2" data-sort-type="text" | Ammunition | ||
| + | ! rowspan="2" | Type of<br>warhead | ||
| + | ! colspan="6" | '''Penetration @ 0° Angle of Attack (mm)''' | ||
| + | |- | ||
| + | ! 10 m !! 100 m !! 500 m !! 1,000 m !! 1,500 m !! 2,000 m | ||
| + | |- | ||
| + | | DM12 || HEATFS || 400 || 400 || 400 || 400 || 400 || 400 | ||
| + | |- | ||
| + | | DM502 || HESH || 127 || 127 || 127 || 127 || 127 || 127 | ||
| + | |- | ||
| + | | DM23 || APFSDS || 337 || 335 || 330 || 322 || 314 || 306 | ||
| + | |- | ||
| + | | DM33 || APFSDS || 408 || 405 || 398 || 389 || 379 || 370 | ||
| + | |- | ||
| + | |} | ||
| + | {| class="wikitable sortable" style="text-align:center" width="100%" | ||
| + | ! colspan="10" | Shell details | ||
| + | |- | ||
| + | ! rowspan="2" data-sort-type="text" | Ammunition | ||
| + | ! rowspan="2" | Type of<br>warhead | ||
| + | ! rowspan="2" | Velocity<br>(m/s) | ||
| + | ! rowspan="2" | Projectile<br>Mass (kg) | ||
| + | ! rowspan="2" | Fuse delay<br>(m) | ||
| + | ! rowspan="2" | Fuse sensitivity<br>(mm) | ||
| + | ! rowspan="2" | Explosive Mass<br>(TNT equivalent) (g) | ||
| + | ! colspan="3" | Ricochet | ||
| + | |- | ||
| + | ! 0% !! 50% !! 100% | ||
| + | |- | ||
| + | | DM12 || HEATFS || 1,173 || 10.5 || 0.05 || 0.1 || 1,270 || 65° || 72° || 77° | ||
| + | |- | ||
| + | | DM502 || HESH || 732 || 14.85 || 0.05 || 0.1 || 4,310 || 73° || 77° || 80° | ||
| + | |- | ||
| + | | DM23 || APFSDS || 1,455 || 3.79 || N/A || N/A || N/A || 78° || 80° || 81° | ||
| + | |- | ||
| + | | DM33 || APFSDS || 1,455 || 3.79 || N/A || N/A || N/A || 78° || 80° || 81° | ||
| + | |- | ||
| + | |} | ||
==== [[Ammo racks]] ==== | ==== [[Ammo racks]] ==== | ||
| − | [[File:Ammoracks_{{PAGENAME}}.png|right|thumb|x250px|[[Ammo racks]] of the {{PAGENAME}}]] | + | <!-- [[File:Ammoracks_{{PAGENAME}}.png|right|thumb|x250px|[[Ammo racks]] of the {{PAGENAME}}]] --> |
| − | <!-- '''Last updated: | + | <!-- '''Last updated:''' --> |
{| class="wikitable" style="text-align:center" | {| class="wikitable" style="text-align:center" | ||
|- | |- | ||
| Line 111: | Line 157: | ||
! 3rd<br>rack empty | ! 3rd<br>rack empty | ||
! 4th<br>rack empty | ! 4th<br>rack empty | ||
| − | |||
! Visual<br>discrepancy | ! Visual<br>discrepancy | ||
|- | |- | ||
| − | | '''54''' || 48 | + | | '''54''' || 48 ''(+6)'' || 32 ''(+22)'' || 16 ''(+38)'' || 1 ''(+53)'' || __ |
|- | |- | ||
|} | |} | ||
| − | |||
| − | |||
| − | |||
| − | |||
| − | |||
| − | |||
=== Machine guns === | === Machine guns === | ||
| Line 144: | Line 183: | ||
== Usage in battles == | == Usage in battles == | ||
<!-- ''Describe the tactics of playing in the vehicle, the features of using vehicles in the team and advice on tactics. Refrain from creating a "guide" - do not impose a single point of view but instead give the reader food for thought. Describe the most dangerous enemies and give recommendations on fighting them. If necessary, note the specifics of the game in different modes (AB, RB, SB).'' --> | <!-- ''Describe the tactics of playing in the vehicle, the features of using vehicles in the team and advice on tactics. Refrain from creating a "guide" - do not impose a single point of view but instead give the reader food for thought. Describe the most dangerous enemies and give recommendations on fighting them. If necessary, note the specifics of the game in different modes (AB, RB, SB).'' --> | ||
| − | + | ''Describe the tactics of playing in the vehicle, the features of using vehicles in the team and advice on tactics. Refrain from creating a "guide" - do not impose a single point of view but instead give the reader food for thought. Describe the most dangerous enemies and give recommendations on fighting them. If necessary, note the specifics of the game in different modes (AB, RB, SB).'' | |
| − | |||
| − | |||
=== Pros and cons === | === Pros and cons === | ||
| Line 156: | Line 193: | ||
* Lots of empty space, difficult to one shot without ammo racking | * Lots of empty space, difficult to one shot without ammo racking | ||
* Good gun, can deal with most enemies easily | * Good gun, can deal with most enemies easily | ||
| − | + | * Turret is frontally immune to auto cannons | |
| − | * Turret is immune to | ||
| − | |||
'''Cons:''' | '''Cons:''' | ||
* Absolutely gigantic, size is on par with the Maus | * Absolutely gigantic, size is on par with the Maus | ||
| + | * Prone to hull-breaking | ||
* Because of its size it may have difficult traversing certain areas of maps, especially urban maps with lots of tight corners | * Because of its size it may have difficult traversing certain areas of maps, especially urban maps with lots of tight corners | ||
| − | * | + | * Very weak armour for its battle rating, won't stop anything other than heavy machine guns and autocannons |
== History == | == History == | ||
<!-- ''Describe the history of the creation and combat usage of the vehicle in more detail than in the introduction. If the historical reference turns out to be too long, take it to a separate article, taking a link to the article about the vehicle and adding a block "/History" (example: <nowiki>https://wiki.warthunder.com/(Vehicle-name)/History</nowiki>) and add a link to it here using the <code>main</code> template. Be sure to reference text and sources by using <code><nowiki><ref></ref></nowiki></code>, as well as adding them at the end of the article with <code><nowiki><references /></nowiki></code>. This section may also include the vehicle's dev blog entry (if applicable) and the in-game encyclopedia description (under <code><nowiki>=== In-game description ===</nowiki></code>, also if applicable).'' --> | <!-- ''Describe the history of the creation and combat usage of the vehicle in more detail than in the introduction. If the historical reference turns out to be too long, take it to a separate article, taking a link to the article about the vehicle and adding a block "/History" (example: <nowiki>https://wiki.warthunder.com/(Vehicle-name)/History</nowiki>) and add a link to it here using the <code>main</code> template. Be sure to reference text and sources by using <code><nowiki><ref></ref></nowiki></code>, as well as adding them at the end of the article with <code><nowiki><references /></nowiki></code>. This section may also include the vehicle's dev blog entry (if applicable) and the in-game encyclopedia description (under <code><nowiki>=== In-game description ===</nowiki></code>, also if applicable).'' --> | ||
| − | + | ''Describe the history of the creation and combat usage of the vehicle in more detail than in the introduction. If the historical reference turns out to be too long, take it to a separate article, taking a link to the article about the vehicle and adding a block "/History" (example: <nowiki>https://wiki.warthunder.com/(Vehicle-name)/History</nowiki>) and add a link to it here using the <code>main</code> template. Be sure to reference text and sources by using <code><nowiki><ref></ref></nowiki></code>, as well as adding them at the end of the article with <code><nowiki><references /></nowiki></code>. This section may also include the vehicle's dev blog entry (if applicable) and the in-game encyclopedia description (under <code><nowiki>=== In-game description ===</nowiki></code>, also if applicable).'' | |
| − | |||
| − | |||
| − | |||
| − | |||
| − | |||
| − | |||
| − | |||
| − | |||
| − | |||
| − | ' | ||
| − | |||
| − | |||
=== [[wt:en/news/7001-development-class-3-en|Devblog]] === | === [[wt:en/news/7001-development-class-3-en|Devblog]] === | ||
| Line 186: | Line 210: | ||
== Media == | == Media == | ||
| − | <!-- ''Excellent additions to the article would be video guides, screenshots from the game, and photos.'' --> | + | <!-- ''Excellent additions to the article would be video guides, screenshots from the game, and photos.'' --><gallery mode="packed" caption="Class 3 (P) Devblog Images" heights="150"> |
| − | + | File:Class 3 WTWallpaper 001.jpg| | |
| − | + | File:Class 3 WTWallpaper 002.jpg| | |
| − | + | File:Class 3 WTWallpaper 003.jpg| | |
| − | + | File:Class 3 WTWallpaper 004.jpg| | |
| − | |||
| − | |||
| − | |||
| − | |||
| − | |||
| − | <gallery mode="packed" caption="Class 3 (P) Devblog Images" heights="150"> | ||
| − | File:Class 3 WTWallpaper 001.jpg | ||
| − | File:Class 3 WTWallpaper 002.jpg | ||
| − | File:Class 3 WTWallpaper 003.jpg | ||
| − | File:Class 3 WTWallpaper 004.jpg | ||
</gallery> | </gallery> | ||
| − | |||
| − | |||
| − | |||
== See also == | == See also == | ||
| Line 220: | Line 231: | ||
* [[wt:en/news/7001-development-class-3-en|[Devblog] Class 3]] | * [[wt:en/news/7001-development-class-3-en|[Devblog] Class 3]] | ||
| − | + | {{Germany tank destroyers}} | |
| − | {{Germany | ||
| − | |||
| − | |||
| − | |||
Revision as of 15:41, 13 January 2021
.jpg)
Contents
Description
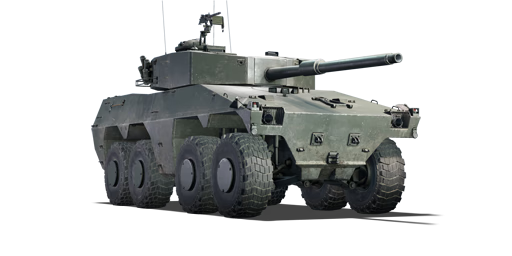
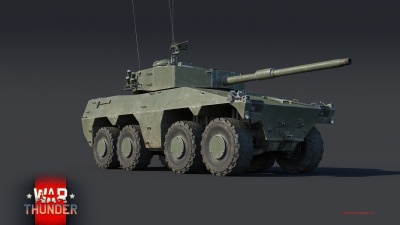
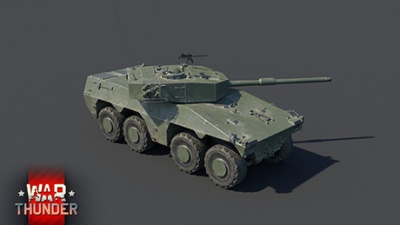
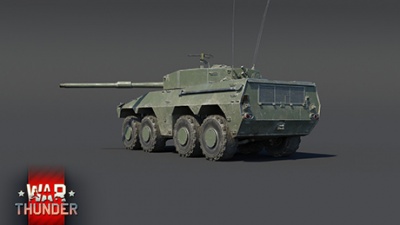
The TH800 is a gift rank VI German tank destroyer with a battle rating of 9.0 (AB/RB/SB). It was introduced during Update "Hot Tracks" as a reward for the 2020 Operation W.I.N.T.E.R. event.
General info
Survivability and armour

Due to the massive size of the Class 3, it is able to withstand high calibre ammunitions due to the poor armour as it will not create enough spalling when penetrated. The crew spacing as well as the interior spacing makes it one of the hardest wheeled vehicles to destroy in the game with only kinetic energy (KE) penetrators (APDS, APFSDS, etc etc). Centre of mass shots from the front with KE shells will often take the driver and set the engine on fire, but due to the turret crew being elevated, they are most likely to survive, meaning the turret is operational ready to engage any enemy threats. Chemical energy (CE) penetrators are a tricky topic when it comes to the frontal armour. Depending on the ammunition used an the impact angle, the Class 3 will be able to withstand the impact or not. CE rounds are most likely to penetrate and be partially or fully stopped thanks to the inner spall shields at a perpendicular angle but will knock out the driver and disable or damage engine as well as igniting the ammo rack. This changes when ATGMs take a play in engagements, they will often create much more spalling than tank-fired HEAT rounds as the calibre is higher (meaning a greater explosive mass) and will cause hullbreak if hit from the sides or if the ATGM spall goes all the way from the front to the back while penetrating the sides. For this same reason it is recommended to only carry ~24-26 rounds in the vehicle as it will empty most of the hull ammo racks but still keep the ready racks full in the turret. The armour is not to be relied on unless there are specific enemies (T-54's for example) as most of them will always penetrate your hull. The Class 3 is immune to autocannon fire from the front and hull upper half sides and turret sides due to the spaced armour. This is an advantage compared to the rest of wheeled light armoured vehicles in which 20 mm and 30 mm autocannons often penetrate and knock out crew and inner components.
Having spall shields bring multiple benefits against both CE and KE.
Against KE:
The air gap between plates not only reduces and scatters the shrapnel in a flatter surface so that the penetrating remains are less but they also reduce the speed and penetration of small calibre fire (below 40 mm), meaning they will not penetrate the second plate (below 30 mm) or will reduce the amount of shrapnel generated (above 30 mm). They also prematurely detonate APCBC shells and reduce the shrapnel generated. Due to this, all APCBC and APHE fuses will be activated which can be lethal in calibres higher than 76 mm even with the spall shields depending on where the round hits at.
Against CE:
Any part of the vehicle is susceptible to hull break if hit in the correct way, but often players will fire at centre of mass in which hull break is almost nullified. When a round is fired at the centre of mass frontally, the double plate armour will not only reduce the shrapnel but it is able to fully stop it, specially if said threat has a relative low explosive mass despite the armour penetration (PG-9 for example found on the BMP-1). When fired at the turret it may vary as it totally depends on the firing angle. A perpendicular hit to the turret will be lethal but an angled hit will often deviate the shrapnel which may damage or destroy modules but will keep the vehicle operational. Due to its huge height, the enemies that fire at turret will have a more angled hit, meaning that most of the shrapnel will be launched towards the roof and not to the crew compartment, this can take one or two crew members depending on the hit.
Armour type:
- Rolled homogeneous armour
- High hardness rolled armour
Super structure armour
| Armour | Front (Slope angle) | Sides | Rear | Roof |
|---|---|---|---|---|
| Hull | 30 mm glacis (76°)
29 mm lower frontal plate (20°) |
20 mm Top 20 mm Bottom |
20 mm | 10 mm |
| Turret | 38 mm Turret front 80 mm Gun mantlet |
16 mm | 20 mm | 10 mm |
| Cupola | 10 mm | 10 mm | 10 mm | 10 mm |
Inner spall shields
| Armour | Front (Slope angle) | Sides | Rear |
|---|---|---|---|
| Hull | 200 mm air
38 mm second lower frontal plate (20°) |
10 mm air
30 mm upper half plate |
5 mm |
| Turret | 84 mm turret front first plate
80 mm air 38 mm turret front second plate |
30 mm turret side first plate
120 mm air 16 mm turret side second plate |
N/A |
Notes:
- Suspension is 10 mm thick
- Wheels are 10 mm thick
Mobility
Despite the tremendous size and mass, the Class 3 is almost as fast as the Radkampfwagen. The 8 wheels give it an almost perfect cross-country capability with exception of mud, snow and deep sand. Acceleration wise, it takes time to make the Class 3 move if on a non urban environment or at an angle due to the mass. It has traction on the 8 wheels, meaning it is able to move even if only a pairs of wheels are touching the ground. As expected, due to the length, the turn radius is huge and it requires a big surface to be abe to make a 180° turn. Besides the length and height, the Class 3 is tremendously fast for a vehicle its size, specially if it is on urban environment. It is able to reach speeds of 80 km/h even on dirt. This not only makes the Class 3 a fearful tough to crack behemoth but also a flanking and "Hit N' Run" behemoth. Thanks to the stabilizer, the Class 3 is able to fire at enemy targets while on top speed, this requires practice but a handled commander will be able to achieve so.
| Game Mode | Max Speed (km/h) | Weight (tons) | Engine power (horsepower) | Power-to-weight ratio (hp/ton) | |||
|---|---|---|---|---|---|---|---|
| Forward | Reverse | Stock | Upgraded | Stock | Upgraded | ||
| Arcade | 96 | 39 | 41 | 1,116 | 1,500 | 27.22 | 36.59 |
| Realistic | 86 | 35 | 695 | 786 | 16.95 | 19.17 | |
Modifications and economy
| Mobility | Protection | Firepower | ||||||||||||||||||||||||
|---|---|---|---|---|---|---|---|---|---|---|---|---|---|---|---|---|---|---|---|---|---|---|---|---|---|---|
|
|
|
Armaments
The Class 3 has a GT-3 105mm rifled bore main gun, it shares the same ballistics as the L7A3 the Leopard family share with the exact same ammunition. Thus, there should be no hard enough threat to kill, specially if DM33 is being used with its potent 408mm of penetration.
Main armament
| 105 mm GT-3 | Turret rotation speed (°/s) | Reloading rate (seconds) | |||||||||||
|---|---|---|---|---|---|---|---|---|---|---|---|---|---|
| Mode | Capacity | Vertical | Horizontal | Stabilizer | Stock | Upgraded | Full | Expert | Aced | Stock | Full | Expert | Aced |
| Arcade | 54 | -8°/+15° | ±180° | Two-plane | __._ | __._ | __._ | __._ | __._ | _.__ | _.__ | _.__ | _.__ |
| Realistic | __._ | __._ | __._ | __._ | __._ | ||||||||
Ammunition
| Penetration statistics | |||||||
|---|---|---|---|---|---|---|---|
| Ammunition | Type of warhead |
Penetration @ 0° Angle of Attack (mm) | |||||
| 10 m | 100 m | 500 m | 1,000 m | 1,500 m | 2,000 m | ||
| DM12 | HEATFS | 400 | 400 | 400 | 400 | 400 | 400 |
| DM502 | HESH | 127 | 127 | 127 | 127 | 127 | 127 |
| DM23 | APFSDS | 337 | 335 | 330 | 322 | 314 | 306 |
| DM33 | APFSDS | 408 | 405 | 398 | 389 | 379 | 370 |
| Shell details | |||||||||
|---|---|---|---|---|---|---|---|---|---|
| Ammunition | Type of warhead |
Velocity (m/s) |
Projectile Mass (kg) |
Fuse delay (m) |
Fuse sensitivity (mm) |
Explosive Mass (TNT equivalent) (g) |
Ricochet | ||
| 0% | 50% | 100% | |||||||
| DM12 | HEATFS | 1,173 | 10.5 | 0.05 | 0.1 | 1,270 | 65° | 72° | 77° |
| DM502 | HESH | 732 | 14.85 | 0.05 | 0.1 | 4,310 | 73° | 77° | 80° |
| DM23 | APFSDS | 1,455 | 3.79 | N/A | N/A | N/A | 78° | 80° | 81° |
| DM33 | APFSDS | 1,455 | 3.79 | N/A | N/A | N/A | 78° | 80° | 81° |
Ammo racks
| Full ammo |
1st rack empty |
2nd rack empty |
3rd rack empty |
4th rack empty |
Visual discrepancy |
|---|---|---|---|---|---|
| 54 | 48 (+6) | 32 (+22) | 16 (+38) | 1 (+53) | __ |
Machine guns
| 7.62 mm Browning MG4 | ||||
|---|---|---|---|---|
| Mount | Capacity (Belt) | Fire rate | Vertical | Horizontal |
| Coaxial | 3,000 (250) | 500 | N/A | N/A |
| Pintle | 2,000 (250) | 500 | -8°/+20° | ±120° |
Usage in battles
Describe the tactics of playing in the vehicle, the features of using vehicles in the team and advice on tactics. Refrain from creating a "guide" - do not impose a single point of view but instead give the reader food for thought. Describe the most dangerous enemies and give recommendations on fighting them. If necessary, note the specifics of the game in different modes (AB, RB, SB).
Pros and cons
Pros:
- Great top speed and good acceleration
- Lots of empty space, difficult to one shot without ammo racking
- Good gun, can deal with most enemies easily
- Turret is frontally immune to auto cannons
Cons:
- Absolutely gigantic, size is on par with the Maus
- Prone to hull-breaking
- Because of its size it may have difficult traversing certain areas of maps, especially urban maps with lots of tight corners
- Very weak armour for its battle rating, won't stop anything other than heavy machine guns and autocannons
History
Describe the history of the creation and combat usage of the vehicle in more detail than in the introduction. If the historical reference turns out to be too long, take it to a separate article, taking a link to the article about the vehicle and adding a block "/History" (example: https://wiki.warthunder.com/(Vehicle-name)/History) and add a link to it here using the main template. Be sure to reference text and sources by using <ref></ref>, as well as adding them at the end of the article with <references />. This section may also include the vehicle's dev blog entry (if applicable) and the in-game encyclopedia description (under === In-game description ===, also if applicable).
Devblog
Class 3 was the third and heaviest wheeled combat vehicle prototype to compete for the South African Army. When developing a heavy version of a wheeled tank, the designers were not limited by limits of weight or dimensions, therefore, in terms of weight, firepower and level of security, the Class 3 is a true wheeled tank. The competition commission opted for a lighter prototype, which later became the Rooikat 76 tank destroyer. The Class 3 prototype was exhibited at the Bloemfontein War Museum with a different turret.
Media
- Class 3 (P) Devblog Images


See also
External links
| Germany tank destroyers | |
|---|---|
| Pz. I Derivatives | Panzerjäger I |
| Pz. II Derivatives | 15cm sIG 33 B Sfl |
| Pz. 38(t) Derivatives | Marder III · Marder III H · Jagdpanzer 38(t) |
| Pz. III Derivatives | StuG III A · StuG III F · StuG III G · StuH 42 G |
| Pz. IV Derivatives | Jagdpanzer IV · Panzer IV/70(A) · Panzer IV/70(V) · Dicker Max · Nashorn · Brummbär · VFW |
| Pz. V Derivatives | Jagdpanther G1 · Bfw. Jagdpanther G1 |
| Pz. VI Derivatives | Sturer Emil · Elefant · Ferdinand · 38 cm Sturmmörser · Jagdtiger |
| Wheeled/Half-track | 8,8 cm Flak 37 Sfl. · Sd.Kfz.251/9 · Sd.Kfz.251/10 · Sd.Kfz.251/22 · Sd.Kfz.234/3 · Sd.Kfz.234/4 · 15 cm Pz.W.42 |
| ATGM Carrier | RakJPz 2 · RakJPz 2 (HOT) · Wiesel 1A2 |
| Other | Waffenträger · M109G · JPz 4-5 · Raketenautomat · VT1-2 |
